REL Acoustics S/2 User manual

1
Operating Instructions for the
Serie S
Sub-Bass Systems
REL Acoustics Limited
North Road, Bridgend Industrial Estate
Bridgend, CF31 3TP
United Kingdom
Telephone: +44 (0)1 656 768 777
Fax: +44 (0) 1 656 766 093
Web: www.rel.net
PAGE BREAK
Caution Marking Explanation
The lightning flash with arrowhead symbol within an equilateral triangle is
intended to alert the user to the presence of un-insulated dangerous voltage
within the product’s enclosure that may be of sufficient magnitude to
constitute a risk of electric shock to persons.
The exclamation point within an equilateral triangle is intended to alert the
user to the presence of important operating and maintenance (servicing)
instructions in the literature accompanying the appliance.

2
IMPORTANT SAFETY INSTRUCTIONS [major heading]
1 Read all of these instruc
ti
ons.
2 Save these instructions for future use.
3 Heed all warnings.
4 Follow all instructions.
5 Do not use this apparatus near water.
6 Clean only with automotive polish and micro fiber cloth.
7Install in accordance with the manufacturer’s instructions.
8 Do not install near any heat sources such as radiators, heat registers, stoves or
other apparatus (including amplifiers) that produce heat.
9 Do not defeat the safety purpose of the grounding-type plug. A grounding type plug has
two blades and a third grounding prong. The third prong is provided for your safety. If the
provided plug does not fit into your outlet, consult and electrician for replacement of the
obsolete outlet.
10 Protect the power cord from being walked on or pinched particularly at plugs,
convenience receptacles, and the point where they exit from the apparatus.
11 Only use attachments/accessories specified by the manufacturer.
12 Use only with a cart, stand, tripod, bracket, or table specified by the manufacturer, or
sold with the apparatus. When a cart is used, use caution when moving the cart/apparatus
combination to avoid injury from tip-over.
13 Unplug this apparatus during lightning storsm or when unused for long periods of
time.
14 Refer all servicing to qualified service personnel. Servicing is required when the
apparatus has been damaged in any way, such as power-supply cord or plug is
damaged, liquid has been spilled or objects have fallen into the apparatus, the
apparatus has been exposed to rail or moisture, does not operate normally, or has
been dropped.
Warning
Avertissement
To reduce the risk of fire or electric shock, do not expose this apparatus to rain or moisture.
Cet article est lourd . Pour éviter tout risque de blessure , prendre soin lors de la
manipulation.
The apparatus shall not be exposed to dripping or splashing and no objects filled with liquids,
such as vases, shall be placed on apparatus.
L' appareil ne doit pas être exposé à des éclaboussures et aucun objet rempli de liquide,
comme des vases, ne doit être placé sur l'appareil .

3
The mains plus is used as disconnect device. The mains plug of the apparatus should not be
obstructed OR should be easily accessed during intended use. To be completely disconnected
from the power input, the mains plug of the apparatus shall me disconnected from the mains.
An appliance with a protective earth terminal should be connected to a mains outlet with a
protective earth connection.
Les conduites Plus est utilisé comme dispositif de déconnexion . La fiche de l'appareil ne
doit pas être obstruée OU doit être facilement accessible pendant l'utilisation . Pour être
complètement déconnecté de l'alimentation électrique , le cordon d'alimentation de
l'appareil doit me débranché .
Un appareil avec une borne de terre doit être branché sur une prise de courant en étant
relié à la terre.
Design Safety
This apparatus is supplied with a detachable mains cord. For 240V operation a 3.15/S/2,
5A/S/3, 5A/S/5 fuse is fitted in the socket, for 120V operation a 6.3A/S/2, T10AL/S/3,
T10AL/S/5 fuse is fitted. Should the fuse need to be replaced use a similar rated fuse
approved to ASTA or BSI 362 standards. Do not use without the fuse cover in place.
Replacement fuse covers are available from your distributor.
Attention Explication Marquage
L'éclair avec le symbole de pointe de flèche dans un triangle équilatéral est
destiné à alerter l' utilisateur de la présence de non isolée tension
dangereuse à l'intérieur de l'enceinte du produit qui peut être d'une ampleur
suffisante pour constituer un risque d'électrocution pour les personnes .
Le point d'exclamation dans un triangle équilatéral est destiné à alerter
l'utilisateur de la présence d'instructions dans la documentation
accompagnant l'appareil exploitation et de maintenance ( entretien ) .
Informations importantes relatives a la securite [major heading]
1 Lisez attentivement ces instructions.
2 Conservez ces instructions.
3 Respectez tous les avertissements.
4 Suivez toutes les instructions.
5 Ne pas utiliser cet appareil près de l'eau .
6 Nettoyez seulement avec du vernis automobile et tissu microfibre .
7 Installer conformément aux instructions du fabricant .
8 Ne pas installer près de sources de chaleur telles que des radiateurs , registres de
chaleur , poêles ou autres appareils (y compris les amplificateurs) qui produisent de la
chaleur .

4
9 Ne pas contourner le dispositif de sécurité de la prise de terre . Une fiche de terre a
deux lames et une troisième broche de mise à la terre . La troisième broche est fournie
pour votre sécurité . Si la fiche fournie ne rentre pas dans votre prise , consultez un
électricien pour le remplacement de la prise obsolète .
10 Protégez le cordon d'alimentation ne soit piétiné ou pincé, en particulier au niveau des
fiches , des prises de courant , et le point de sortie de l'appareil.
11 Utilisez uniquement des fixations / accessoires spécifiés par le fabricant .
12 Utilisez seulement avec un chariot, stand, trépied, support ou table spécifié par le
fabricant , ou vendu avec l'appareil . Lorsque vous utilisez un chariot , soyez prudent
lorsque vous déplacez l'ensemble chariot / appareil pour éviter les blessures en cas de
chute .
13 Débranchez cet appareil pendant un orage ou lorsqu'il est inutilisé storsm pour de
longues périodes de temps .
14 Confiez toute réparation à un personnel qualifié . Une réparation est nécessaire
lorsque l'appareil a été endommagé de quelque façon que ce cordon d'alimentation ou la
fiche est endommagé, du liquide a été renversé ou des objets sont tombés dans l'appareil,
l'appareil a été exposé à rail ou à l'humidité , ne fonctionne pas normalement , ou a été
échappé .
Sécurité Design
Cet appareil est livré avec un cordon amovible cordon . Pour le fonctionnement d'un
fusible de 220V 3.15/S/2, 5A/S/3, 5A/S/5 est montée dans la douille , pour le
fonctionnement de 120V un fusible de 6.3A/S/2, T10AL/S/3, T10AL/S/5 est monté. Si le
fusible doit être remplacé utilisation un fusible similaire approuvé pour ASTA ou BSI
normes 362 . Ne pas utiliser sans le couvercle de fusible en place . Les couvercles de
rechange sont disponibles auprès de votre distributeur

5
FCC STATEMENT
This device complies with Part 15 of the FCC Rules. Operation is subject to the
following two conditions:
(1) This device may not cause harmful interference, and
(2) This device must accept any interference received, including interference that
may cause undesired operation.
NOTE: This equipment has been tested and found to comply with the limits for a Class
B digital Device, pursuant to Part 15 of the FCC Rules. These limits are designed to
provide reasonable protection against harmful interference in a residential installation.
This equipment generates, uses and can radiate radio frequency energy and, if not
installed and used in accordance with the instructions, may cause harmful interference to
radio communications. However, there is no guarantee that the interference will not
occur in a particular installation. If this equipment does cause harmful interference to
radio or television reception, which can be determined by turning the equipment off and
on, the user is encouraged to try and correct the interference by one or more of the
following measures:
Reorient or relocate the receiving antenna.
Increase the separation between the equipment and receiver.
Connect the equipment into an outlet on a circuit different from that to which the
receiver is connected.
Consult the dealer or an experienced radio/TV technician for help.
Caution: Any changes or modifications not expressly approved by the party responsible
for compliance could void the user's authority to operate this equipment.
PAGE BREAK
Welcome to the REL Family[major heading]
Thank you for buying a REL SERIE S Sub-Bass System. The Serie S is carefully hand-built
using innovative techniques and the finest materials available. Serie S is designed for
exceptionally high performance. This manual contains important safety information as well as
helpful setup advice and should be carefully studied before connecting your unit.
Serie S, Forging Ahead Where its Predecessors Leave Off:
Serie S is both evolutionary and revolutionary. Evolutionary in the sense that REL’s
relentless move toward faster, more natural bass production continues to evolve—
specifically with enormously faster, better-controlled bass engines and quieter, better-
braced cabinets. Revolutionary in its inclusion of our zero compression wireless receiver,
an option that frees up the too-frequent challenge of where to locate the sub. Finally, the
consumer is in complete control of their environment.
Super Alloy™ continuous cast inverted cones reduce the moving mass of Serie S over its
predecessors by over 60%. Utilizing T-355 aerospace-grade alloy, the REL design team
have created a driver that produces superior speed, slam and results in both greater
dynamics as well as better internal quieting. In simple English, it plays louder AND
quieter, with far greater extremes. Greater intimacy coupled with greater explosiveness.

6
Wireless Freedom with Zero Compression: Longbow™
Once our team achieved the high standards for performance our customers expect of all
REL subwoofers, we turned our attention to connectivity methods. In addition to our
comprehensive array of hard-wired inputs, Serie S benefits from the finest sounding,
most natural wireless system available at this time.
In order to achieve high quality wireless, the REL team found a new chipset remarkable
for its speed and lack of delay. Building on this foundation our engineering team took to
the task of creating Longbow™, REL’s latest delivery method. Longbow™’s wireless
system uses a proprietary security codec that ensures exceptional protection of the signal,
while using zero digital compression—the bane of conventional wireless systems. This
results in a dynamic, ultra wide-bandwidth sound with almost zero delay. Practically
speaking, Serie S equipped with Longbow™ can be connected to very high end hard-
wired systems with none of the delay issues that plague garden variety wireless systems.
Additionally, the REL team was able to maintain both HIGH LEVEL and .1/LFE
simultaneous connectivity of REL Reference Theatre .Theatre Reference produces a FAR
richer, fuller and better integrated theater sound than conventional .1-only based systems.
And now, customers can have all this wirelessly if they so choose. Yet another
breakthrough for REL!
All Serie S models include REL Longbow™ receiver technology built into the amplifier.
Wireless transmission requires the purchase of a separate Longbow™ transmitter. For
details on how to activate this wireless connectivity, please see the REL Longbow™
transmitter manual.
Serie S, A More Complete Approach:
Many or most loudspeakers emphasize the mid-bass. This is the range from 50 to 90 Hz. We at
REL believe this is an incomplete approach and that loudspeakers need to be augmented in the
lowest frequencies in order to reestablish the natural balance of sound we experience effortlessly
in real life.
All of our designs are true Sub-Bass Systems, meaning they are designed to reproduce very low
frequencies (useful output in the 20Hz-50 Hz region) that are felt as well as heard. This is because
we believe that music is full-range, as are sound effects on movies, and we intend for our
products to reproduce all of these sounds, not just a narrow band.
Beyond 2-Channel Lies Theatre Reference: SERIE S is equipped to allow you to take full
advantage of Dolby Digital AC3, DTS, MPEG 2 and any other digital sound format that includes
a dedicated Low Frequency Effects (LFE) channel.
The dedicated LFE input meets the tough specification laid down for digital 3/2.1 channels,
usually known as 5.1. The output is nominally flat from 35 Hz – 90 Hz. It has a dedicated input
level control which enables users to set the LFE level independently of the processor. This is
important because not all processors offer control over this significant parameter. The LFE
channel is frequently output at 10 dB higher levels than the other channels.
The Serie S models also have High Level (speaker level) inputs with dedicated input level control.
Uniquely, both the High Level and LFE input can be used simultaneously. This means you may
achieve the best possible 2-channel performance with your CDs or other music signals and

7
instantly transform to a powerhouse with LFE when watching movies. This feature requires no
switching, but instead is a seamless benefit to doing things the REL way.
This feature provides real benefit if you wish to play music in stereo mode in the purist
audiophile way and also in REL Theatre Reference mode with no switching necessary. By
connecting BOTH High Level and .1 concurrently and setting your processor to “Large” or “Full
Range”, the best possible performance will be obtained. Consult the owner’s manual of your
loudspeakers or consult with your dealer before setting to Large as a few speakers cannot handle
the bass that is then directed through to the main speakers.
PAGE BREAK
REL Serie S Rear Panel Connection Legend [major heading]
1
2
3
4
5
6
7
8
9
10 11
14
15
16
12
13

8
PAGE BREAK
1 Volume Control for HI/LOW Level input: Use to adjust output when using either HI Level or
LOW Level input. Do not use both simultaneously.
2 Volume Control for .1/LFE Input: Use to adjust output level when using .1/LFE input from a
5.1 amplifier or processor.
3 Crossover: Used to select crossover frequency. Variable between 30Hz and 120Hz.
4 Low-Level Left channel Phono Input: Used to connect low-level to the output of a
preamplifier, integrated amplifier or receiver. (For home cinema, use .1/LFE input).
5 Low-Level Right channel Phono Input: Used to connect low-level to the output of a
preamplifier, integrated amplifier or receiver. (For home cinema, use .1/LFE input).
6 .1/LFE Phono Input: Used to connect to the .1/LFE output from a 5.1 amplifier of processor.
7 Phase: Used to set phase 0-180 degrees.
8 High-Level Neutrik® Speakon® Socket: Use to connect high-level to the main front amplifier
speaker terminals.
9 Wireless enable switch: Used to turn on wireless receiver when connected to REL
Longbow™ wireless transmitter.
10 Standby/ Always On Switch: Used to enable standby mode
11 Power Pilot Light: Power On/Off indicator.
12 Power ON/OFF Switch: Use to turn unit on or off.
13 IEC Mains Socket: Fused mains (AC) input socket that accepts a detachable power cord.
14 Antenna connector: Used with REL Longbow™ wireless transmitter.
15 Pair Pilot Light: Indicates if unit has been paired with REL Longbow™ transmitter.
16 Pair Switch: Used to initiate Pair sequence with REL Longbow™ Transmitter.
17 The audio signals of the product can be provided via personal computer, IPad, MP3 etc
PAGE BREAK
Connecting Up [major heading]
Always switch off your system before disconnecting any wires.
To increase the versatility of connecting up, the Serie S models have four separate inputs. A
Neutrik® Speakon® socket and three phono sockets. This is to facilitate use with both two-
channel stereo systems and AV surround sound systems.
The high-level, unbalanced, dual-channel (stereo) input is via a Neutrik® Speakon® connector
which is connected to the power amplifier’s left and right channel speaker terminals. This has the
advantage of ensuring that the REL receives exactly the same signal as the main speakers. This
means that the character of the bass from the main system is carried forward into the sub-bass.
This is a very important point and together with the REL’s Active Bass Controller (ABC) ensures
far superior system integration of the sub-bass with the main system.
The low-level input is via three separate phono jacks that connect to either the .1/LFE output of a
home cinema amplifier/processor or to the left and right output of a stereo preamplifier.
HI LEVEL and .1/LFE inputs can be used simultaneously. The benefits are two-fold when used
with a home cinema system. The low level input reproduces the .1/LFE channel and the high
level connection underpins the main front speakers. The main front speakers should be set to the
‘large’ option on the processor. See “Home Cinema Applications” for more information.
Connecting to the Power Amplifier Using the Speakon® High Level Input
To engage the Neutrik® Speakon® plug, insert fully into socket and rotate clockwise until locked.

9
To remove the Neutrik® Speakon® plug, grip body of plug, place thumb on chrome lever, move
lever backwards, rotate plug anticlockwise quarter turn and withdraw.
The high-level input is designed to accept the stereo (two-channel) signals from the speaker
terminals of your receiver, integrated amplifier or basic amplifier. This has the advantage of
ensuring that your subwoofer receives exactly the same signal as the main speakers, which means
that the character of the bass from the main system is carried forward into the Sub-Bass System.
This is a very important point and together with REL’s Natural RollOff™ circuitry, ensures far
superior system integration of the Sub-Bass System with the main system.
High-Level Input: Connections should be made to the same binding post on main amplifier as
the main speakers. Connect as shown above. Red to amplifier main right speaker red terminal,
yellow to amplifier main left speaker red terminal and black to amplifier main speaker black
terminal, right or left but not both. Plug the Neutrik® Speakon® plug into the HI LEVEL
Speakon® socket.
.1 Input: This requires a phono-to-phono cable and is a dedicated true .1 channel. This circuit
therefore eliminates the normal Natural RollOff™ Crossover and passes the .1 low-level signal
through with only the required 120Hz fourth-order filter.
Low-Level Input: These left and right phono inputs allow for conventional connection from a
preamplifier and should be used in the rare event that a high-level connection proves
incompatible. Connect as shown below. Plug one end of the phono-phono cables into the LOW
LEVEL INPUT left and right jacks of the REL and the other end into the left or right channel
output of your preamplifier.
PHASE SWITCH – Used to set phase
Position 0 / High-Level, Low-Level or LFE: 0 degrees phase
Position 180 / High-Level, Low-Level or LFE: 180 degrees phase
PHASE SELECTION AFFECTS BOTH HIGH- AND LOW-LEVEL INPUTS
Crossover is always engaged for Hi level input. The .1/LFE signal does not pass through the
crossover circuit.
PAGE BREAK
REL Set-Up Made Simple [major heading]
REL products are not traditional subwoofers, but true Sub-Bass Systems. A REL is designed to
augment the performance of “full range” speaker systems in order to provide, in certain cases,
linear response below 15 Hz. Therefore, for the moment, please set aside everything you’ve been
taught about subwoofers and how they are integrated into a stereo or home cinema system. REL
Sub-Bass Systems set-up and positioning differs from conventional subwoofers. A REL will take
advantage of physics and room acoustics to provide deep pressurization as no traditional
subwoofer can. It is important that you bring to the set-up process a willingness to do things a
little differently in order to obtain these superior results. The end result of your labours will be an
utterly seamless integration of true deep bass to a sound system, regardless of the main speakers’
low bass capability.
Basic set-up should take no more than ten to fifteen minutes to accomplish once connected.
Two Things Before You Begin
1 It is helpful to know that you will almost always connect the REL to the input on the rear
panel labeled “HIGH LEVEL INPUT.” This connection is made using the supplied 32’ 10” (10
meters) cable, the bare leads of which connect to the speaker output terminals of the power

10
amplifier. The easy and foolproof connection at the REL is done with a Neutrik® Speakon®
connector. The purpose of connecting to the speaker output terminals is one of the unique secrets
of REL’s success. By connecting to the High Level input on the REL from the amplifier, you
build forward the sonic signature of your main system, including the tonal balance and timing
cues of the entire electronics chain. In this way, the REL is fed the exact signal that is fed to the
main speakers.
2 When possible, the REL should be placed in one of the corners behind the speakers.
Remember, we are dealing with true LOW bass pressurization with RELs. Low bass
pressurization below 40Hz is best derived from corner placement, where the most linear and
efficient low bass can be produced because the subwoofer is able to take advantage of the
tangential (corner-to-corner) axis which is typically the longest axis in a room.
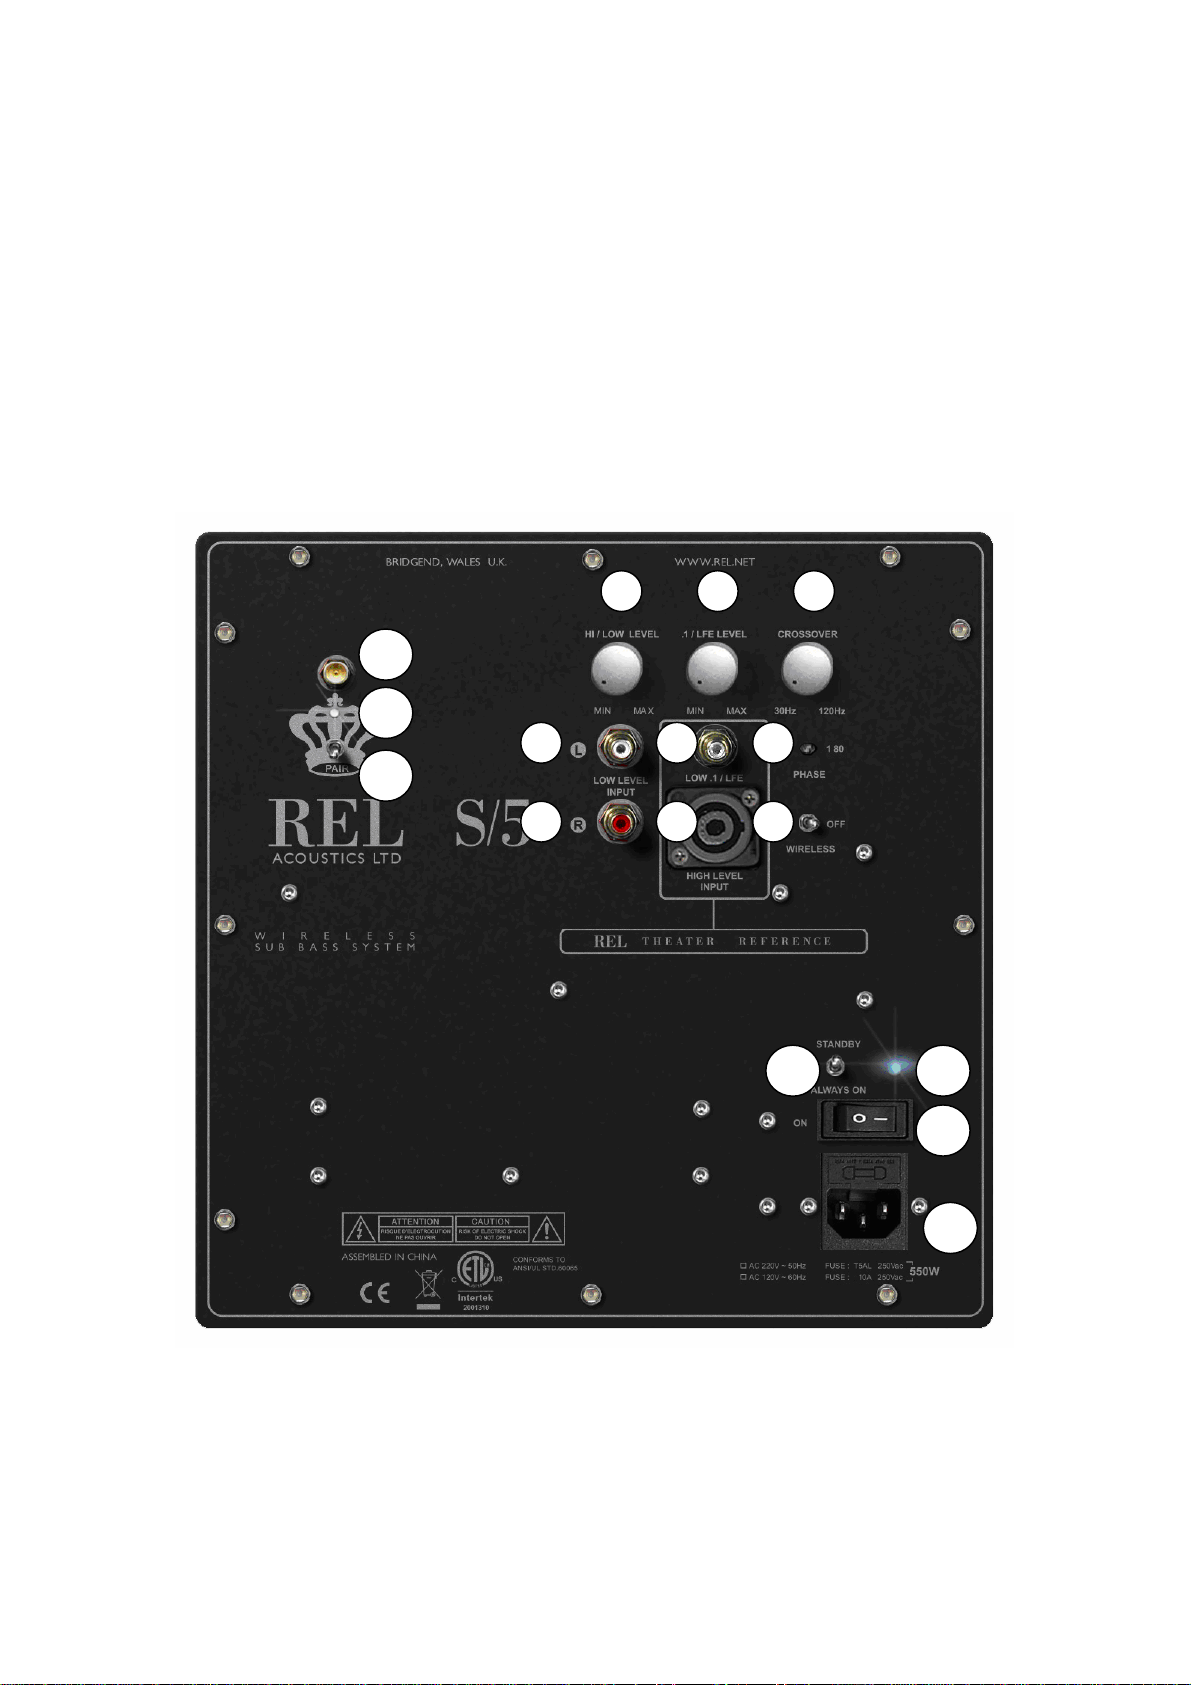
Connecting and Setting Up
High-level connection, using the enclosed cable with the Neutrik® Speakon® connector, is
always the first choice. This connection can be made without affecting the performance of the
amplifier because the REL’s amplifier input impedance is 150,000 ohms, in effect producing NO
additional load on the rest of your system.
• The standard high-level hook up procedure is: attach the red wire to the amplifier’s right
positive speaker output terminal; attach the yellow wire to the amplifier’s left positive speaker
output terminal; attach the black wire to whichever of the amplifier’s ground output terminals is
convenient; plug the Speakon® connector into the Sub-Bass System’s high-level input.
PLACE NORMAL CONNECTION GRAPHIC HERE
• For differential (i.e. fully balanced) amplifiers using one REL, simply use the standard
connecting scheme with the exception of NOT connecting the black wire to a negative speaker
terminal. Instead, it should first be allowed to “float” or hang down without connection to ANY
terminal. Should hum occur using this method, please try connecting to an unused RCA
connector on the rear of a preamp or amplifier. Please contact your dealer should there be any
questions concerning this or any other hookup procedure.
PLACE BALANCED DIFFERENTIAL CONNECTION GRAPHIC HERE
NOTE: The Serie S models are equipped with internal circuitry to allow seamless connection to
Class-D (digital) amplifiers. If connecting to a Class-D amplifier, follow the above connection
procedure for differential amplifiers.
• If connecting RELs to Mono Bloc amplifers we strongly advocate using (2) RELs, one for each
amplifier. Connect the black wire of each REL to the negative speaker terminal of the
corresponding amplifier channel; twist together the red and yellow wires of each REL separately
and connect each pair to the positive speaker terminal of the corresponding amplifier channel. In
some instances, this will result in exceptionally high gain (output) from the RELs. If it seems
simply too high in gain, please remove either the red or yellow wire from the twisted pair. This
will reduce output by half and restore a natural dynamic. If the amplifier is of balanced
differential design, please follow the instructions in the section above labeled Differential
Connection. PLACE MONO BLOC CONNECTION GRAPHIC HERE
• If connecting a single REL as a dedicated center channel sub, please consider connecting to the
rear of the speaker, rather than routing the REL High Level cable all the way back to the
amplifier. Connect the black wire of the REL to the negative center channel speaker terminal;
twist together the red and yellow wires and connect this pair to the positive center channel
speaker terminal.
PLACE CENTER CONNECTION GRAPHIC HERE

11
• If connecting a REL as a dedicated rear channel sub, connect the black wire of the REL to either
the left rear or right rear negative speaker terminal; connect the yellow wire to the left rear
positive speaker terminal; connect the red wire to the right rear positive speaker terminal. If the
amplifier is of balanced differential design, please follow the instructions in the section above
labeled Differential Connection.
PLACE REAR CONNECTION GRFAPHIC HERE
Low-level connection (via phono connectors) is always an option if high-level connection is not
possible. When connecting to the low-level inputs in a system in which high-level connection is
not possible, such as if using internally-amplified speakers, connect left and right phono cables
between the LOW LEVEL INPUT jacks of the REL and the left and right channel outputs of your
preamplifier.
When connecting to a home cinema system where there is a .1/LFE channel output, connect a
single phono cable between the sub output of the processor/receiver and the .1/LFE input jack on
the REL.
1 Positioning: The optimal position for a REL is in one of the corners behind the main speakers.
This position provides 9 dB of mechanical amplification and allows for the most linear true low
bass wave launch, owing to the ability to tune the REL to the longest distance in the room in
order to produce the longest, therefore lowest, bass waves.
2 The Process: To begin the set-up process, choose a piece of music that has a repetitive bass
line that is very low in frequency. We suggest track 4 from the soundtrack to Sneakers (Columbia
CK 53146). This has a repetitive bass drum throughout that gives you plenty of time to move the
woofer around, but more importantly, the venue was quite large for this recording, and therefore
it has a very deep and large-scale bass signature. This type of track is perfect for the set-up
process and should be played at the highest reasonable level expected for system playback.
Working with a partner, one in the listening position and one at the REL manipulating the
controls, is the most effective and efficient way to set up the REL. If working alone, the initial
steps in the set-up can be very effectively carried out from the location of the REL. Trying to
ignore all other music in the track, listen for the bass drum and its effect on the listening room.
3 Phase Orientation: Once in the corner we need to adjust for phase. This may be the single
most critical step, and because it really is quite simple, it is often over-thought. Keep in mind; the
right phase is whichever position is the loudest or fullest. While playing music with true low bass,
adjust the crossover to a point where the REL and the speaker are sure to share frequencies (about
halfway up, or at 12 o’clock on the crossover control, or slightly higher for smaller speakers). At
this point turn the HI/LOW LEVEL control up so that both the REL and speaker are roughly
equal in volume and then switch, using the phase switch, from “0” to “180” phase positions.
Again, whichever position is loudest or fullest is the correct position. That is, when the position is
working in harmony with your main speakers, reinforcing bass, not cancelling it.
4 Placement: The next step is to determine precisely how far from the corner the sub should be
placed to achieve the most efficient output, as well as the lowest frequency extension. With the
REL fully into the corner, and pointing straight out along the diagonal coming out of the corner,
continuing to play the music, slowly pull the REL from the corner on the diagonal, equidistant
from both side and rear wall. At a certain point (sometimes a matter of only a few inches, in rare
cases a foot or more) the REL will audibly go lower, play louder, and, if it truly locks on to the
room and is fully pressurizing it, the air around the REL will seem to be energized, stop right
there! This is the correct position from the corner for the REL.

12
5 Orientation: Once the position from the corner has been established, the orientation of the
woofer must be determined by rotating the REL from an imagined centre point at the rear of the
REL. As the REL is moved from one side to the other listen for the greatest level of output and
bass linearity. In effect, the REL should be left in the position where it is playing the loudest and
lowest.
6 Crossover and Level Settings: To determine the crossover point, take the volume of the REL
(using the HI/LO Level control) all the way down, and put the crossover to 30 Hz. At this point,
bring the REL’s volume back up slowly to the point where you have achieved a subtle balance,
i.e. the point at which you can hear the REL even with the main speakers playing. Now, bring the
crossover point up until it is obviously too high; at this point bring it down to the appropriate
lower setting. For all intents and purposes, this is the correct crossover point. Once this stage has
been reached, subtle changes to volume and crossover can be accomplished to provide the last bit
of complete and seamless integration. With that, set-up is complete.
Hint: There may be a tendency to set the crossover point too high and the volume of the Sub-Bass
System too low when first learning how to integrate a REL with the system, the fear being one of
overwhelming the main speakers with bass. But in doing so, the resulting set-up will be lacking in
bass depth and dynamics. The proper crossover point and volume setting will increase overall
dynamics, allow for extended bass frequencies, and improve soundstage properties. Note, volume
must be adjusted in conjunction with crossover changes. In general, when selecting a lower
crossover point, more volume may need to be applied.
Theatre Applications
For Dolby Digital AC3 or other 5.1 theatre systems, once the standard set-up for two-channel
outlined above is complete, the LFE output from the processor or receiver should be connected to
the .1/LFE INPUT and appropriate volume adjustments made using the .1/LFE level control. For
this configuration, you must set the processor to the “large” or “full range” setting for the left and
right speakers in order for the REL to receive the bass signal via the high-level cable. In this
configuration, the REL provides support for both the left and right speakers for two-channel
listening, and support for the LFE when movies are playing. Most processors will allow you to
defeat the subwoofer output when listening in the two-channel mode. The effect of this set-up is
one of greatly increased dynamics in the mid-bass range, no bass bloat, and a greater degree of
space and timing from the special audio effects. For an even greater sense of space and impact, a
second REL connected in parallel to the centre channel will prove to be a dramatic improvement
as well. And if that is not enough fun, a rear REL, both to support the rear channel speakers as
well as to evenly distribute LFE through the room, truly completes the full-range sonic picture for
state-of-the-art film reproduction.
Running In
Care taken during run in will be rewarded by many years of pleasurable use. Both the electronics
and the drive unit will benefit from an initial period of carefully controlled use. Possible damage
may be sustained by running in the unit at too high a volume setting over an extended period. On
the other hand, by taking a little care over this initial period, about 24 hours of actual use, a longer
life with a higher potential eventual performance is assured.
Care and Polishing
The cabinets are best maintained by using an automobile polish made by reputable manufacturers.
Our favorites are those made by Meguiars and Mother’s. If objects are to be placed upon the top,
it is advisable to use a small mat to protect the surface and to avoid the risk of rattles.

13
PAGE BREAK
Technical
The Serie S models use an unusual method of bass loading. They are designed to operate below
normal system resonance. This has been achieved without the normal form of bass boost or
electronic equalization. Instead of a constantly increasing bass equalization response, we simply
ensure there is sufficient amplifier gain to drive the speaker unit to its maximum excursion level
at whatever the designated lowest operating frequency is, and then cut the bass at a controlled rate
of 12dB per octave above this frequency. Although this may at first seem identical to boosting the
bass, it is actually quite different and ensures that the timing of transients is far improved
compared to the usual bass equalization used. Bass will sound cleaner and faster.
The amplifier is fully DC coupled to avoid phase shifts and compromises in its low end
performance. It is inherently stable and will retain its characteristics over very long periods of
time – important in a unit designed for an exceptionally long working life. These amplifiers are
designed to withstand reasonable abuse and overloads. If in doubt, please contact your dealer.
We believe that the importance of the electronics, cabinet and drivers being designed to work in
harmony is paramount. This approach allows the Serie S Sub-Bass Systems to achieve the highest
possible level of fidelity.
Overload Protection
All REL Sub-Bass Systems are designed as true sub bass speakers. They are designed to
reproduce those exceptionally deep notes that are felt as well as heard. This it will attempt to do
at whatever volume level you set. If set too high no damage should result because the built-in
electronics will limit the cone movement. This electronic control is called Set-Safe™. It
constantly and instantaneously monitors the output from the power amplifier and is totally
transparent in operation until required. This means it has absolutely no effect on the sound quality
of your REL until an overload is detected.
Ordinarily an overload would cause the power amplifier to go into clipping with resultant loss of
control over the drive unit. This can cause drive unit damage, and always sounds nasty. Set-
Safe™ detects the point of incipient clipping and gently soft-clips the waveform of the signal to
ensure actual clipping does not occur.
This is a necessarily simplified description of what actually happens, but in effect, Set-Safe™
controls the amplifier and ensures there is minimum risk of amplifier and driver damage caused
by over-driving.
A thermal overload device is fitted to all Serie S Sub-Bass Systems. If the unit is deliberately
overdriven this device will sense the temperature rise and cut the output; recovery time is
approximately five minutes. If this happens, it is a warning that the unit is being overdriven and
the volume level control should be reduced to a safe level.
Although everything possible has been done to minimize risk of thermal overload failure, there
can be no defense against those individuals who deliberately abuse the device. Such damage is
NOT covered by warranty. Please remember your REL is there to supplement your main system,
not overwhelm it!

14
Power Saving Efficiency:
All REL sub bass system designs utilize a true On-Off switch that affords the owner the
ability to turn off their unit completely, without having to unplug the A/C mains cord.
When a REL sub bass system is switched off using the On-Off switch on the rear panel it
draws ZERO power.
In addition to the efficient power-at-idle exhibited by all REL models, the SerieS also
features an automatic standby mode that is enabled when the power mode switch on the
rear of the unit is set to the “STANDBY” position. In this mode, the input signal is
constantly monitored for audio activity. If not audio information is detected over a
period of 30 minutes, the unit will enter a low power standby mode in which less power
is consumed. When input signal activity is detected, the unit resumes normal operation.
By using the standby mode, you can ensure that there is no unnecessary power draw
when the unit is not in use.
Note: Due to variations in program material, it is impossible to produce a perfectly
reliable standby circuit. Bass rich music or effects will consistently trigger our standby
circuit whilst content that is low in volume and possesses little or no bass cannot be relied
upon to trip the standby function.
Alternatively, the user has the option to leave the unit in the normal operation mode at all
times by selecting the “ALWAYS ON” position of the power mode switch. Leaving a
REL on, produces the best sonic performance and the most reliable operation. In this
mode, the unit will not enter standby regardless of whether or not there is activity at the
input. Using this setting ensures that the SerieS is ready to react instantaneously to bass
transients, whether in music of movies.
The REL SerieS is shipped in the “ALWAYS ON” mode with the wireless receiver
disabled.

15
During initial setup, use the REL this way. If you are using a REL Longbow™
transmitter for initial setup, the wireless switch must be enabled, please follow
instructions for pairing included in the REL Longbow™ transmitter manual.

16
After initial setup, if you wish to employ the standby mode, simply move the power
mode switch into the up position to “STANDBY”.
Model Power Draw at
Standby Power Draw at
Standby w/
wireless
Power Draw at Idle
S/2 > 0.5 Watts > 1 Watt 11 Watts
S/3 > 0.5 Watts > 1 Watt 22 Watts
S/5 > 0.5 Watts > 1 Watt 22 Watts

17
PAGE BREAK
S/5 Specifications [major heading]
Type: Front-firing active woofer,
down-firing passive radiator
Active Drive Unit: 12 in., 300mm long-throw, die cast Aluminium chassis
Passive Radiator: 12 in., 300mm
Lower Frequency Response in Room: 21Hz at -6 dB
Input Connectors: Hi Level Neutrik Speakon, Left and Right Lo Level phono, LFE
phono, SMA connector for wireless Antenna
Gain Control Range: 80 dB
Power Output:550 watts (RMS)
Phase Switch: Yes, 0 or 180 degrees
Amplifier Type: Next Gen II Class D
REL Longbow Wireless capability: Yes- REL Longbow™ transmitter [required]. Sold
separately.
Protection System
Fully Electronic with SET-SAFE: Yes
D.C. Fault: Yes
Output Short: Yes
Mains Input Voltage: 220-240 volts, 110-120 volts for certain markets
Fuses: 5 Amp semi delay 220 volts operation
9 Amp semi delay 120 volts operation
Dimensions
W x H x D, Including Feet and Rear Panel Controls:17.5 x 18 x 20 in., (444.5 x 455.5 x
507 mm) Add 1.75in (44.5mm) in depth when using Hi Level connector
Net Weight: 69.7 lbs. (31.6 kg)
Shipping Weight: 79.5 lbs. (36.0 kg)
Finish Gloss Piano Black or Gloss White Lacquer
Supplied Accessories
Mains Lead: Yes
Neutrik Speakon Interconnect 10 Metres Nominal: Yes
Users Manual:Yes
S/3 Specifications [major heading]
Type: Front-firing active woofer,
down-firing passive radiator
Active Drive Unit: 10 in., 250mm long-throw, die cast Aluminium chassis
Passive Radiator: 12 in., 300mm
Lower Frequency Response in Room: 22Hz at -6 dB
Input Connectors: Hi Level Neutrik Speakon, Left and Right Lo Level phono, LFE
phono,
SMA connector for wireless antenna
Gain Control Range: 80 dB
Power Output:350 watts (RMS)
Phase Switch: Yes, 0 or 180 degrees
Amplifier Type: Next Gen II Class D

18
REL Longbow Wireless capability: Yes- REL Longbow™ transmitter [required]. Sold
separately.
Protection System
Fully Electronic with SET-SAFE: Yes
D.C. Fault: Yes
Output Short: Yes
Mains Input Voltage: 220-240 volts, 110-120 volts for certain markets
Fuses: 5 Amp semi delay 220 volts operation
9 Amp semi delay 120 volts operation
Dimensions
W x H x D, Including Feet and Rear Panel Controls: 16 x 16.7 x 18.25 in., (406 x 424 x
463.5 mm) Add 1.75in (44.5mm) in depth when using Hi Level connector
Net Weight: 61.4 lbs. (27.85 kg)
Shipping Weight: 71 lbs. (32.2 kg)
Finish Gloss Piano Black or Gloss White Lacquer
Supplied Accessories
Mains Lead: Yes
Neutrik Speakon Interconnect 10 Metres Nominal: Yes
Users Manual:Yes
S/2 Specifications [major heading]
Type: Front-firing active woofer,
down-firing passive radiator
Active Drive Unit: 10 in., 250mm long-throw, die cast Aluminium chassis
Passive Radiator: 10 in., 250mm
Lower Frequency Response in Room: 25Hz at -6 dB
Input Connectors: Hi Level Neutrik Speakon, Left and Right Lo Level phono, LFE
phono,
SMA for wireless antenna
Gain Control Range: 80 dB
Power Output:250 watts (RMS)
Phase Switch: Yes, 0 or 180 degrees
Amplifier Type: Class D
REL Longbow Wireless capability: Yes- REL Longbow™ transmitter [required]. Sold
separately.
Protection System
Fully Electronic with SET-SAFE: Yes
D.C. Fault: Yes
Output Short: Yes
Mains Input Voltage: 220-240 volts, 110-120 volts for certain markets
Fuses: 3.15 Amp semi delay 220 volts operation
6.3 Amp semi delay 120 volts operation
Dimensions
W x H x D, Including Feet and Rear Panel Controls: 13.75 x 14.5 x 16.75 in., (349 x
368 x 425.5 mm) Add 1.75in (44.5mm) in depth when using Hi Level connector
Net Weight: 40 lbs. (18.1 kg)
Shipping Weight: 47.5 lbs. (21.5 kg)
Finish Gloss Piano Black or Gloss White Lacquer

19
Supplied Accessories
Mains Lead: Yes
Neutrik Speakon Interconnect 10 Metres Nominal: Yes
Users Manual:Yes
In the interest of product development, REL Acoustics Limited reserve the right to vary
these specifications without notice
This manual suits for next models
3
Table of contents
Other REL Acoustics Subwoofer manuals

REL Acoustics
REL Acoustics T-9 User manual

REL Acoustics
REL Acoustics Q Series User manual

REL Acoustics
REL Acoustics R-205 User manual

REL Acoustics
REL Acoustics 212/SE User manual

REL Acoustics
REL Acoustics G1 Mk II User manual

REL Acoustics
REL Acoustics Serie R User manual

REL Acoustics
REL Acoustics T/i Series User manual

REL Acoustics
REL Acoustics Habitat1 User manual

REL Acoustics
REL Acoustics G1 User manual

REL Acoustics
REL Acoustics Gibraltar Series User manual