Relay AnDi1 User manual

A/D Converter for M-Bus
AnDi1, AnDi2, AnDi3, AnDi4
With 1,2,3 or 4 input channels
User Manual

User Manual AnDi1 / AnDi2 / AnDi3 / AnDi4 ·10/2017 · VERSION 1.3
2
AnDi1/2/3/4
Table of Content
1 Functional description...............................................................................................................3
2 Installation and Startup .............................................................................................................4
2.1 Mounting..........................................................................................................................4
2.2 Connecting ......................................................................................................................4
2.3 Opening the case.............................................................................................................6
3 Parameterization using MBCONF.............................................................................................7
3.1 Installation .......................................................................................................................7
3.2 Operation.........................................................................................................................7
3.3 Sheet Info........................................................................................................................8
3.3 Sheets AnDi4 Port1..4...................................................................................................11
4 M-Bus Telegrams....................................................................................................................14
5 Technical Data........................................................................................................................17
6 CE Declaration........................................................................................................................18
(Valid from M-Bus generation: $31)
© Relay GmbH 2017
www.relay.de

User Manual AnDi1 / AnDi2 / AnDi3 / AnDi4 ·10/2017 · VERSION 1.3
3
AnDi1/2/3/4
1 Functional description
The one to four channel converter from analogue to M-Bus allows capturing of measured data
from sensors in the range of 0/4 to 20mA or 0 to 10V by the M-Bus.
Art. no. MB AnDi 1 1 channel A/D converter for M-Bus
Art. no. MB AnDi 2 2 channel A/D converter for M-Bus
Art. no. MB AnDi 3 3 channel A/D converter for M-Bus
Art. no. MB AnDi 4 4 channel A/D converter for M-Bus
The AnDi is able to supply the sensors with power.
Each of the four measuring inputs and therefore each sensor builds up a separate
M-Bus slave. The user can program special primary and secondary addresses for the input
channels. This configured data is saved permanently into an EEPROM.
The AnDi4 can be mounted either on a wall or a DIN rail according to DIN-EN 50022. The
device needs a regulated power supply of 24VDC.
Picture1: Front of AnDi 1..4
The AnDi 1 to 4 don´t differ in the front cover, but the devices are marked with an additional
label on the housing showing the article no.
The terminals of the unavailable inputs are also not present.
AnDi 4
Power
Status
Port 3
IU +
Port 1
IU
+Port 2
IU
+
Port 4
IU +M
Bus
+-
24 V=
I: 0/4 - 20mA
U: 0 - 10V
+: 15-17V, 35mA

User Manual AnDi1 / AnDi2 / AnDi3 / AnDi4 ·10/2017 · VERSION 1.3
4
AnDi1/2/3/4
2 Installation and Startup
2.1 Mounting
On the back of the housing there is a special mechanism for mounting the device on a DIN rail
according to DIN EN 50022. This mechanism can be removed, turned over and fixed on the wall
with two screws. Afterwards you can mount the device without using a rail. The following figures
show the two options:
Picture 2: Rail mounting Picture 3: Wall mounting
2.2 Connecting
2.2.1 Power supply
The AnDi4 needs an external DC supply voltage of 24V (DC) 5% for operation. It is connected
to the terminals + and –labelled with 24VDC (see picture 1). Please take care of the correct
polarity. After connecting supply the green LED is on and the yellow LED marked with “Status”
lights up for 1 second. The device is initialized and ready for operation when the yellow LED is
off again. In normal operation this LED is on during measuring after a read from M-Bus.
2.2.2 M-Bus
The M-Bus is linked polarity independent to the terminals labelled with “M-Bus”.

User Manual AnDi1 / AnDi2 / AnDi3 / AnDi4 ·10/2017 · VERSION 1.3
5
AnDi1/2/3/4
2.2.3 Sensors
The sensor inputs of the AnDi4 are made universal. Each sensor can be powered either from
the AnDi4 or from an external power supply (see picture 4). The AnDi4 supplies an unregulated
DC voltage in the range from 15 to 17 V. This power supply can source a current of minimum
35mA and is protected against short circuit. The type of measured signal has to be considered
when the sensors are connected. The AnDi4 can adapt two basic types of measured signals:
•A current which is proportional to the measured quantity:
a) In the range from 0 –20mA or 4 –20mA with the sensor working as a current sink.
b) In the range from 0 –20mA or 4 –20mA with the sensor working as a current source.
These sensors have separate connectors for power supply (UB, 0V) and for the output
signal (current).
•A voltage in the range 0 –10V which is proportional to the measured quantity.
Picture 4: Connecting different type of sensors
Port X
IU +Port X
IU +
Connecting sensors
powered from AnDi4
Sensor 4 - 20mA
(current sink) Sensor 0 - 10V
Isignal Usignal
Port X
IU +Port X
IU +
external power supply
Connecting sensors
with external power supply
Sensor 0 - 20mA
(current source) Sensor 0 - 10V
Isignal Usignal
I
U
+Powersupplyforsensor
15-17VDC,35mAmax
Inputforvoltagemeasurement
Inputforcurrentmeasurement
Groundpotential

User Manual AnDi1 / AnDi2 / AnDi3 / AnDi4 ·10/2017 · VERSION 1.3
6
AnDi1/2/3/4
Each input channel of the AnDi4 has to be configured either to current or voltage measurement
by setting up two jumpers on the measuring module. The factory setup is current mode for all
channels. The housing of the AnDi4 must be opened to change the jumper settings (see picture
6).
Picture 5 shows the different jumper positions for
current and voltage mode: Please take care that the
jumpers are placed exactly according to the
drawing. The galvanic insulation between M- Bus
and A/D converter requires the use of two
jumpers to select the measuring mode. The
jumper down on the right gives information
about the mode to the microcontroller and the
jumper in the center left configures the input of the
channel.
Picture 5: Jumper settings
2.3 Opening the case
The case cover can be removed from the lower housing half with the help of a small screwdriver.
The screwdriver is placed, as in the drawing, into the small opening at the cover side. After
moving of the screwdriver in the displayed direction the cover can be taken off.
Picture 6: Opening the case
Jumper settings on measuring module
Voltage signal Current signal

User Manual AnDi1 / AnDi2 / AnDi3 / AnDi4 ·10/2017 · VERSION 1.3
7
AnDi1/2/3/4
3 Parameterization using MBCONF
The configuration of the device must be adapted by the customer to the respective installation.
We include the software MBCONF with delivery. You can get the old software PADCON for MS
DOS or MS Windows 3.1 systems from our web page www.relay.de.
3.1 Installation
The software MBCONF for configuration of the analogue adapter is a 32-bit application, which
can be executed on IBM-PC compatible computers under the operating systems Windows 95 /
98 / NT 4.0. The desktop PC or laptop must have a free serial RS232C interface to connect the
M-Bus level converter. The AnDi4 to be parameterized must be connected directly (i.e. as only
M-Bus device) to the M-Bus output of the level converter.
Please start the file “MBCONF_SETUP.EXE” from Windows Explorer or via “Start – Execute” to
install the software from version 1.40 up. Subsequently you can select the language of the
installation procedure. The setup software can create a program group and a link on the
desktop on demand. You can then execute both versions for German and English language
either from start menu or desktop.
3.2 Operation
After program start the user operates the software according to the Windows conventions with
the mouse or the keyboard. If you stay with the mouse on a button or an input field, then a hint
to its function appears. Light-grey fields and boxes are not capable for editing.
All input fields and buttons have an underlined letter. The function can be activated by
simultaneous pressing of the keys [ALT] and the respective letter. Within dialogs the cursor can
be moved with the keys [TAB] or [SHIFT][TAB ] forwards and back.
[SPACE] activates or deactivates selection boxes. Multiple selection boxes (arrow at the right
edge) can be activated with []. The user then selects an entry with [] and []. By pressing
[RETURN] the selected entry is taken over. With [ESC] the selection box is left without transfer.
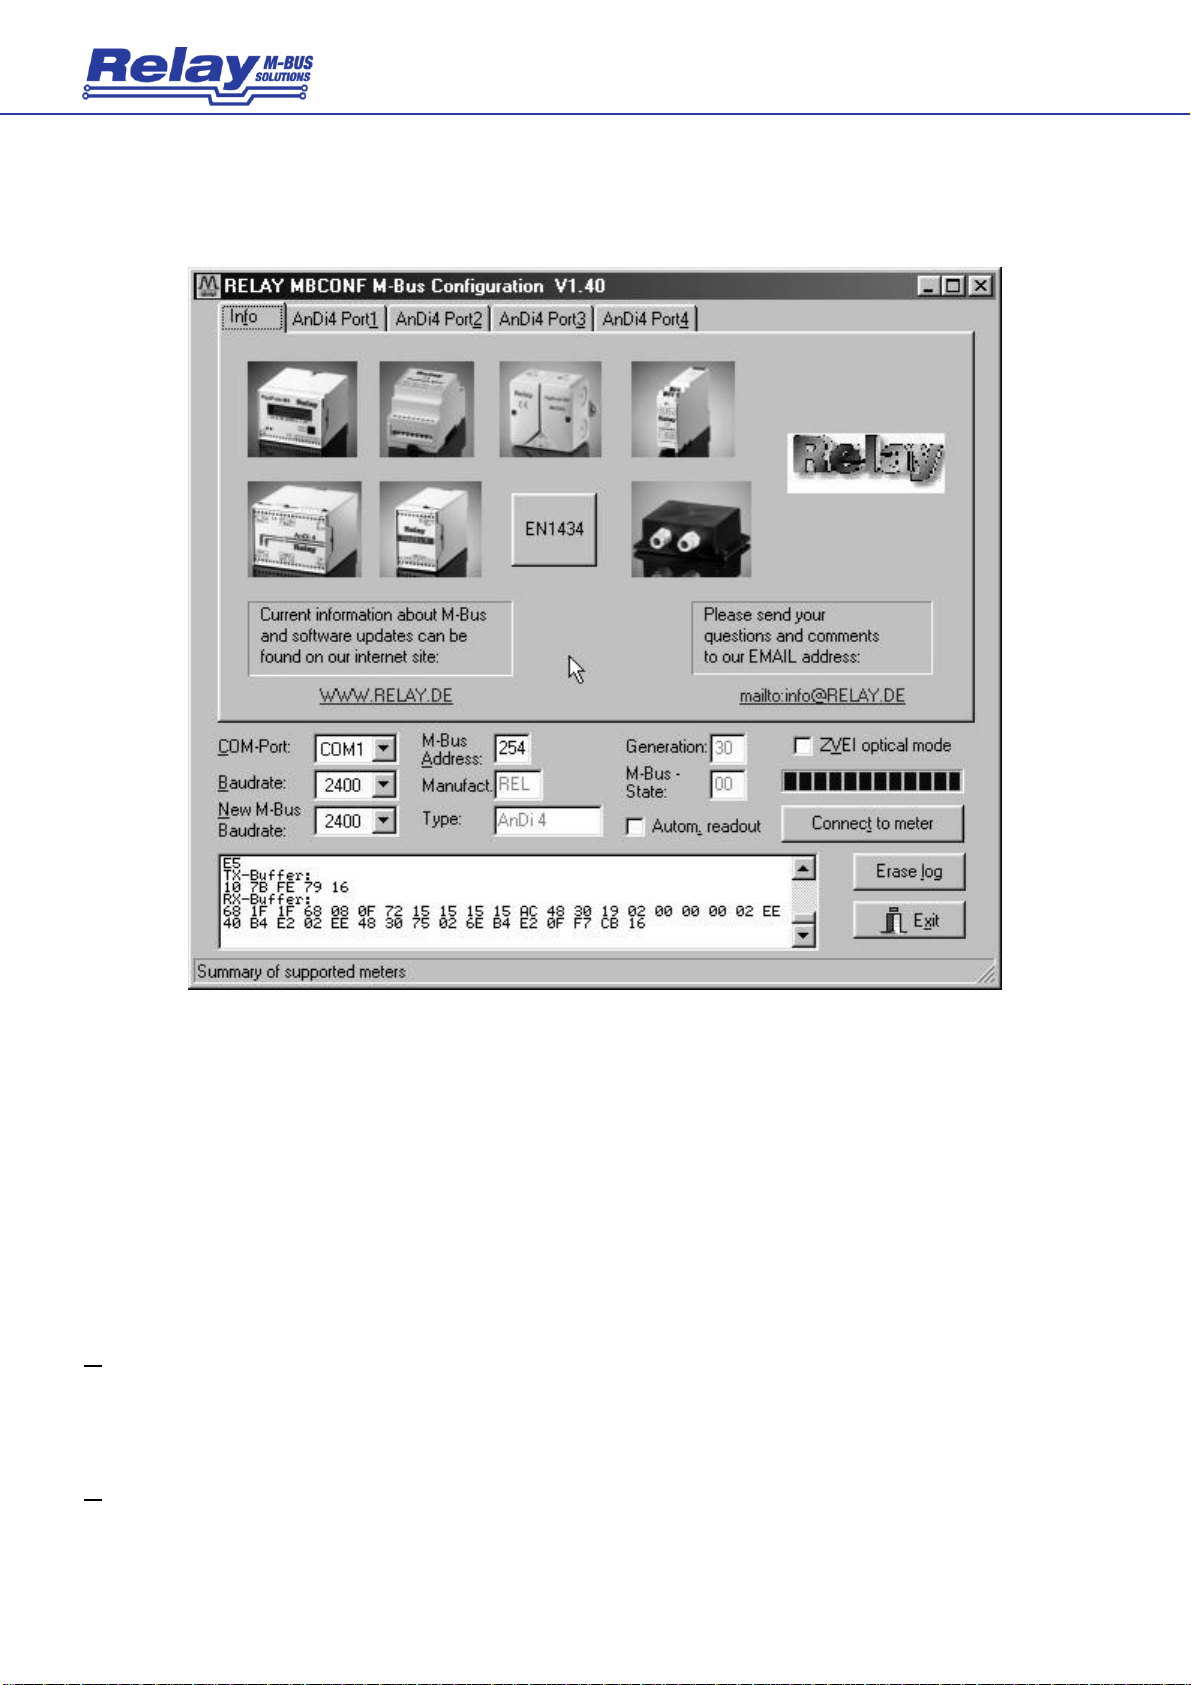
The program is arranged as a sheet system. The sheet “Info” contains general options of the
communication with the M-Bus device to be configured. In this sheet the user can select the
serial port of the PC, the baudrate of the PC, the baudrate of the M-Bus device and the M-Bus
primary address which is used for communication. After a successful connection with the M-Bus
device, further manufacturer information is shown in the sheet “Info” and additional device-
specific sheets are displayed.

User Manual AnDi1 / AnDi2 / AnDi3 / AnDi4 ·10/2017 · VERSION 1.3
8
AnDi1/2/3/4
3.3 Sheet Info
This sheet shows some photos of supported M-Bus devices from the product range of the Relay
GmbH, the PadMess GmbH and further manufacturer. Here are also links to the Internet page,
from which the current version of the program can be downloaded, and to the email address for
criticism and suggestions to the program.
The lower third of this card is likewise visible in every other card. Here the following input fields
and buttons are always attainable:
COM-Port
is the serial port of the PC to which the M-Bus level converter is
connected. The selected port will be saved in an INI file and will be
restored on startup. Therefore the COM-Port has to be configured
only once.
Baudrate
is the transmission speed of the serial port of the PC used for
parameterization. Possible selections for this used M-Bus baudrate
are 300, 2400 or 9600 baud. Attention: Baud rates of more than

User Manual AnDi1 / AnDi2 / AnDi3 / AnDi4 ·10/2017 · VERSION 1.3
9
AnDi1/2/3/4
2400 baud are not supported by all M-Bus level converters which
are available on the market! The selected baudrate must be
identical to the baudrate of the M-Bus device. (see: “New M-Bus
Baudrate”). The AnDi4 supports the baud rates 300 and 2400 Bd.
New M-Bus
Baudrate
allows reprogramming the baudrate of the M-Bus device. The new
baudrate is sent to the M-Bus device after a change in the
appropriate selection box. If the M-Bus slave accepts this
command, it acknowledges the telegram with the single character
„$E5“ ($ for hexadecimal notation) using the old baudrate.
Afterwards the device switches to the new Baud rate.
M-Bus Address
is the primary address of the connected M-Bus slave. In a direct
connection with only one slave you can use the broadcast address
254. Using this address every M-Bus devices must answer
regardless of its own address.
Connect to meter
is used to request data from the slave. The type of device is then
automatically recognized. The items “Manufact.”, “Generation”,
“Type” and “M-Bus State” will then be refreshed. New sheets are
generated depending on manufacturer and type of the M-Bus
device. A single sheet for each channel appears in case of AnDi4.
The sheets are labelled “AnDi4 Port1” for the first … “AnDi4 Port4”
for the fourth channel.
Manufact.
is an item that shows the 3-letter manufacturer code after
successful reading (“Connect to meter”). The item is read only.
Generation
shows the software revision of the firmware of the connected M-
Bus device. The item is read only.
Type
shows the type (here: AnDi4) of the connected device. This item is
read only.
M-Bus State
shows the M-Bus state of the connected device. This item is read
only.
ZVEI optical
mode
If this option is activated, devices with an optical interface and
protocol according to EN 1434-3 can be read and programmed
using an optical reading head (e.g. PadPuls M4 / M4L).
Autom. Readout
The software always reads the data after writing, if this option is
activated (useful for checking the correct programming).

User Manual AnDi1 / AnDi2 / AnDi3 / AnDi4 ·10/2017 · VERSION 1.3
10
AnDi1/2/3/4
Log-Window
The so-called log window is always visible. All M-Bus communication steps are logged in this
window. Data is displayed in hexadecimal notation. It is possible to mark outputs in the log
window and copy them with the keys “CTL-C” to the windows clipboard. Then the data can be
easily imported to any text editor for documentation. As soon as the max. storage capacity of
the window is achieved, no more data is logged. If you want to log further, you must delete the
logged data.
The following buttons are also always visible:
Erase log
clears all outputs inside the log window.
Exit
terminates the program and stores the current setting of serial port
(port no.) into the INI file.

User Manual AnDi1 / AnDi2 / AnDi3 / AnDi4 ·10/2017 · VERSION 1.3
11
AnDi1/2/3/4
3.3 Sheets AnDi4 Port1..4
These sheet shows the actual settings and values of the respective input channel of the AnDi 4
(in this example: Port 3). The following input boxes and buttons are used to change the
parameters of the A/D converter:
Prim. address
is the M-Bus address of the selected port. Values between 1 and
250 can be entered in this field for new assignment of the address.
After pressing the “Write” button the software programs this primary
address and further variable settings on this sheet into the M-Bus
device.
ID (sec. adr.)
is the 8 digit M-Bus ID (identification no.), which is also used for
secondary addressing of this port.
Medium
describes the measured medium of the connected meter.
Examples: Oil, Water, Heat, Electricity

User Manual AnDi1 / AnDi2 / AnDi3 / AnDi4 ·10/2017 · VERSION 1.3
12
AnDi1/2/3/4
Quantity
selects the measured physical quantity (e.g. pressure or external
temperature).
Unit
is the physical unit of the counter and of the pulse increment. The
selection list offers those units from the DIN EN 1434-3, which
correspond to the selected quantity.
Value
is the current measured value. This value must be multiplied by
the selected physical unit.
Installed ports
shows the installed and available ports.
Write protection
is marked, if the device is protected against programming. Then
you cannot configure the adapter. The protection can be removed
after opening the sealable housing and pressing the “Unprotect”
pushbutton for a minimum of 4 seconds.
EEPROM error
is marked, if an error occured while reading the non-volatile
memory. In this case you must reconfigure the device !
Calibration
required
is marked, if the internal calibration constants are corrupt. In this
case the measured values could be wrong. The device has to be
recalibrated by the supplier.
Range overflow in
last measurement
is marked, if the measured value extends the upper value of the
input range.
Operating mode
shows / selects operating mode of the A/D converter:
a) Sensor with 4..20mA signal
b) Sensor with 0..20mA signal
c) Sensor with 0..10V signal
You can only switch between current and voltage mode by setting
the jumper inside the device !
Value at 0mA/0V
is the lower limit of the measuring range at 0mA or 0V in the
operating mode 0..20mA or 0..10V.
Value at 4mA
is the lower limit of the measuring range at 4mA in the operating
mode 4..20mA.
Value at 20mA/10V
is the upper limit of the measuring range at 20mA or 10V.
Write protect
Transmits a command to the AnDi4 to activate write protect. The
AnDi4 then allows no further configuration. It is protected against
unnoticed manipulation.

User Manual AnDi1 / AnDi2 / AnDi3 / AnDi4 ·10/2017 · VERSION 1.3
13
AnDi1/2/3/4
Read
reads the M-Bus device and refreshes the data on the selected
sheet.
Write
sends the current options to the analogue converter, which saves
this data into the non-volatile memory. The AnDi4 changes the
options only if the write protect is deactivated. It is recommended
to read the data after writing and check it.
Notes:
1. Please press first the button „Connect to meter“ after connecting a new M-Bus device.
Afterwards all sheets are refreshed.
2. Examples for configuration of measuring ranges:
•Temperature sensor with 4mA = 0°C and 20mA = 100°C
(Measured quantity: external temperature):
a) Resolution 0,01°C: Unit = 0,01°C, Value 4mA = 0, Value 20mA = 10000
b) Resolution 0,1°C: Unit = 0,1°C, Value 4mA = 0, Value 20mA = 1000
c) Resolution 1°C: Unit = 1°C, Value 4mA = 0, Value 20mA = 100
•Pressure sensor with 0V = 2bar and 10V = 20bar (Measured quantity: pressure):
a) Resolution 0,001 bar: Unit = 1mbar, Value 0V = 2000, Value 20V = 20000
b) Resolution 0,01 bar: Unit = 0,01bar, Value 0V = 200, Value 20V = 2000
b) Resolution 0,1 bar: Unit = 0,1bar, Value 0V = 20, Value 20V = 200
The examples demonstrate that the selection of the unit has a direct influence to the
resolution of the measurement. The optimal settings for these examples are the suggestions
marked with “a)”.

User Manual AnDi1 / AnDi2 / AnDi3 / AnDi4 ·10/2017 · VERSION 1.3
14
AnDi1/2/3/4
4 M-Bus Telegrams
Configuration of AnDi 4 with SND_UD:
Position
1
2
3
4
5
6
7
8
9
10
11
12
Name:
Start
Length
Length
Start
C
A
CI
DIF1
VIF1
PAdr
DIF2
VIF2
Value (hex):
68
1C
1C
68
53
51
01
7A
07
79
13
14
15
16
17
18
19
20
21
22
23
24
25
26
ID0
ID1
ID2
ID3
Man0
Man1
Gen
Med
DIF3
VIF3
VIFE3
Offs0
Offs1
DIF4
AC
48
3x
02
40
27
28
29
30
31
32
33
34
VIF4
VIFE4
Max0
Max1
DIF5
Anw.
CS
Stop
48
0F
16
Configuration telegram
A: primary address
PAdr: new primary address
ID0-3: identification no. for secondary addressing
Man0-1: manufacturer code
Gen: revision of firmware (current: $31, reserved range: $30 .. $3F)
Med: medium
VIF3=VIF4: configured VIF with extension bit (MSB) = 1
Offs0-1: binary value for the offset
Max0-1: binary value for the maximum (upper limit)
Anw.: is only used by AnDi4 for addressing with primary address 254 for selection of one
channel: (00: Port1, 01: Port2, 02: Port3, 03: Port4).
CS: checksum

User Manual AnDi1 / AnDi2 / AnDi3 / AnDi4 ·10/2017 · VERSION 1.3
15
AnDi1/2/3/4
Respond telegram from AnDi4 to Master (RSP_UD)
Position
1
2
3
4
5
6
7
8
9
10
11
12
Name:
Start
Length
Length
Start
C
A
CI
ID0
ID1
ID2
ID3
Man0
Value (hex):
68
1F
1F
68
08
72
AC
13
14
15
16
17
18
19
20
21
22
23
24
25
26
Man1
Gen
Med
TC
Status
Sig0
Sig1
DIF1
VIF1
VIFE1
Offs0
Offs1
DIF2
VIF2
48
10
00
00
02
40
02
27
28
29
30
31
32
33
34
35
36
37
VIFE2
Max0
Max1
DIF3
VIF3
Mess0
Mess1
DIF4
Info
CS
Stop
48
0F
16
RSP_UD telegram
Fields analogue to SND_UD
TC: Transmission Counter (no. of transmitted RSP_UD, overflows to 0 at 256)
Status: state of application:
Bit7: direct readout of mean value 128 (only for debug purposes)
Bit6: direct readout of single measurement (only for debug purposes)
Bit5: range overflow
Bit4: permanent error (channel is not calibrated)
Bit3: temporary error (EEPROM checksum error)
Bit2-0: not used
VIF1=VIF2: configured VIF with extension bit (MSB) = 1
VIF3: like VIF1 with extension bit (MSB) = 0
Mess0-1: the measured value in binary format
Info: Byte with the following information:
Bit7-4: Information about the available modules in AnDi4
Bit3: protection bit (1: protected)
Bit2-1: no. of selected channel (0: Port1 ... 3: Port4)
Bit0: operating mode (1: current, 2: voltage)

User Manual AnDi1 / AnDi2 / AnDi3 / AnDi4 ·10/2017 · VERSION 1.3
16
AnDi1/2/3/4
Activating the protection
Position
1
2
3
4
5
6
7
8
9
10
11
Name.:
Start
Length
Length
Start
C
A
CI
DIF
Prot.
CS
Stop
Value (hex):
68
05
05
68
53
51
0F
55
16
Protection telegramm
Selecting the channel for use with address 254
Position
1
2
3
4
5
6
7
8
9
10
11
Name
Start
Length
Length
Start
C
A
CI
DIF
Anw.
CS
Stop
Value (hex):
68
05
05
68
53
51
0F
16
Selection telegramm

User Manual AnDi1 / AnDi2 / AnDi3 / AnDi4 ·10/2017 · VERSION 1.3
17
AnDi1/2/3/4
5 Technical Data
Supply voltage: 24V DC 5%, maximum 160mA
Sensor supply: 15..17,5V unregulated, min. 35mA ,short-circuit protected
Galvanic insulation: 1kV
Input ranges: 0 / 4mA –20mA
0 .. 10V selectable by jumpers
Input resistor: 120current mode 11kvoltage mode
Configurable measuring range: -32767 .. + 32767
Resolution: 12 bit, 1LSB typ.
2 LSB in the complete temperature range
CE conformity: The AnDi4 is labelled with the CE sign (see chapter 9.3).
Case:
Mounting Rail 35mm according to DIN EN 50022 or mounting on wall
Material ABS plastic
Colour light-grey (similar to RAL 7035)
W x L x H 100 x 75 x 105 mm
Protective class IP40
Environment:
Operating temperature 0 to 55 °C
Storage temperature -20 to 60 °C
Humidity (non condensing) 10% to 70%
M-Bus: physical characteristics
M-Bus quiescent current typ. 1.25 mA, max. 1.5 mA (1 unit load)
Space(0-Bit) current quiescent current (1.25 mA) plus typ. 13 mA
M-Bus Interface TI TSS721 with 2 x 215protection resistors, galvanic
insulation 1kV to all other parts
M-Bus Protocol
Standard EN1434-3
Transmission speed 300 or 2400 Baud
Addressing Primary and secondary addressing with wildcards,
each channel : 1 primary and secondary address
Supported functions SND_NKE, REQ_UD2, SND_UD

User Manual AnDi1 / AnDi2 / AnDi3 / AnDi4 ·10/2017 · VERSION 1.3
18
AnDi1/2/3/4
6 CE Declaration

User Manual AnDi1 / AnDi2 / AnDi3 / AnDi4 ·10/2017 · VERSION 1.3
19
AnDi1/2/3/4
Notes:

This manual suits for next models
3
Table of contents
Other Relay Media Converter manuals