manuals.online logo
Brands
  1. Home
  2. •
  3. Brands
  4. •
  5. Relee
  6. •
  7. Motorcycle Accessories
  8. •
  9. Relee M1 User manual

Relee M1 User manual

Popular Motorcycle Accessories manuals by other brands

SRC H-ADV150-04-01AL quick start guide

SRC

SRC H-ADV150-04-01AL quick start guide

DMD P1 owner's manual

DMD

DMD P1 owner's manual

GIVI Airflow AF1110 manual

GIVI

GIVI Airflow AF1110 manual

Suzuki 99143-00A1 000 Series installation instructions

Suzuki

Suzuki 99143-00A1 000 Series installation instructions

Cardo Systems FREECOM 4+ Pocket guide

Cardo Systems

Cardo Systems FREECOM 4+ Pocket guide

Shark S 700 user manual

Shark

Shark S 700 user manual

R&G CR0081 Fitting instructions

R&G

R&G CR0081 Fitting instructions

SRC B-TRK502-01-01-SL quick start guide

SRC

SRC B-TRK502-01-01-SL quick start guide

hepco & becker 6307520 00 01 manual

hepco & becker

hepco & becker 6307520 00 01 manual

HOMCOM AA0-077 user manual

HOMCOM

HOMCOM AA0-077 user manual

hepco & becker 6307558 00 01 manual

hepco & becker

hepco & becker 6307558 00 01 manual

SHOEI JO Instructions for use

SHOEI

SHOEI JO Instructions for use

Wunderkind Custom 106503-F15 Installation and safety

Wunderkind Custom

Wunderkind Custom 106503-F15 Installation and safety

Suzuki 57100-05881 installation instructions

Suzuki

Suzuki 57100-05881 installation instructions

SIKH HELMETS Y-61 quick start guide

SIKH HELMETS

SIKH HELMETS Y-61 quick start guide

Dräger HPS 3500 Instructions for use

Dräger

Dräger HPS 3500 Instructions for use

M-WAVE SKI manual

M-WAVE

M-WAVE SKI manual

Kuryakyn 6212 installation instructions

Kuryakyn

Kuryakyn 6212 installation instructions

manuals.online logo
manuals.online logoBrands
  • About & Mission
  • Contact us
  • Privacy Policy
  • Terms and Conditions

Copyright 2025 Manuals.Online. All Rights Reserved.

Helmet (M1)
(User Manual)
Dear customer before using the product
Please read the instructions and precautions carefully
EN
Front
Back
Left
Right
Welcome to the Relee smart cycling helmet, this guide will guide you on how to use this product.
This manual will be updated from time to time, and you can also learn more about
the helmet on the official Relee website.
7.TF Card Slot
5. Recording/WiFi
6. Microphone
10.BT Microphone
4.On/Off (Indicator)
13. Type-C Charging Port
12.BT Speaker (Right)
9.Buzzer
8.Reset
11.BT Speaker (Left)
1.Decoration Light 2.Camera / Flashlight
(User can choose
either one of the two)
Ⅰ .Introduction
3. Rear Warning Light
1
14. Replaceable Top Cover
15.Headlight Control
20.Charging Indicator
16. Left-turn Signal
Light Control
18. Rear Warning Light Control
19.Intercom Control
21.Type-C Charging Port
17.Right-turn Signal
Light Control
2
2.
1.
3.
4.
5.
6.
7.
8.
9.
11.
10.
12.
13.
14.
15.
16.
17.
18.
19.
20.
21.
Definition of Button Functions
Decoration Light Press to turn on/off
Camera/Light
The two versions are not applicably
combined for the helmet.
Buyer can choose either of the two,
which is factory setting.
Rear Warning Light Press to turn on/off
On/Off Press and hold the button for 2
seconds to turn on/on the helmet
Recording/WiFi
Press and hold the button for 1
second to start/stop
recording; press and hold for 3
seconds to turn on/off WiFi
Camera Mic To pick up voice when the camera
gets into recording status
TF Card Slot Open the silicone cover to put card
inside
Reset Use a sharp object like needle to
restore the helmet
Buzzer A speaker to reflect the current
status of camera recorder
BT Microphone To pick up voice after BT gets
connects for intercom
BT Speaker (Left) For BT Broadcast
BT Speaker (Right) For BT Broadcast
Type-C Interface for connecting to charge
the helmet
Replaceable Top
Cover
Different colors of removable cover
for replacement
Headlight Control
[Camera version]: Short press to turn
on/off the front decorative light
[Lighting version]: Short press 1 time
for low light,
short press 2 times to highlight,
short press 3 times to turn off
Left-turn Signal
Light Control Press to turn on/off the light
Right-turn Signal
Light Control Press to turn on/off the light
Short press to turn on/off parking lights
(in any light mode);When the parking
light is off, press and hold for 3 seconds
to enter the multi-color light mode,
and press and hold again for 3 seconds
to turn off
Rear Warning
Light Control
Intercom Control When using Weila for chatting, press
19. to send audio messages
Charging Indicator Red light means charging;
green light means fully charged
Type-C Interface for connecting to charge the
RC watch
(must with adaptor DC 5V 1A)
Front and rear warning lights (Flashlight Version) are
controlled by remote controller buttons.Before the
operation for the first time of remote controller, please get
Bluetooth paired with helmet. Pairing method:Press power
button of the helmet;the helmet is turned on and it says
"Bluetooth is on, waiting for connection"; press Headlight
button on the remote controller and hold for 3seconds;
release the button when four LEDs light on; the four LEDs will
blink for 5 times then turn off, whichmeans pairing successful.
3
User Manual *1
Ⅱ.Packing list Ⅲ.Wearing Instructions
Power adaptor is optional (not included in the list)
Please open box to check the list of standard packaging:
Helmet *1
Mode of Charging
Note.
Please use power adaptor DC 5V/1.5A to charge the helmet;
If any kind of charging problem arises out of the adaptor,
please change another one or buy from us.
13.Charging Current 1.5A
20.In charging
20.Full charge
1.Put properly the helmet
over the head,
lower than the forehead.
2.The center part of the strap
shall lie below user’s ears;
make sure ears feel well and
comfortable.
3.Fasten the buckle properly
and adjust the length of the strap.
4.Tighten or loosen the
strap to let helmet for
a comfortable fit,
to avoid moving back and forth.
5.Whenever it’s necessary, you can adjust
by tightening or loosening the strap to
achieve the best wearing fit of helmet.
4
2.
1.
3.
4.
5.
6.
7.
8.
9.
11.
10.
12.
13.
14.
15.
16.
Ⅳ:Precautions
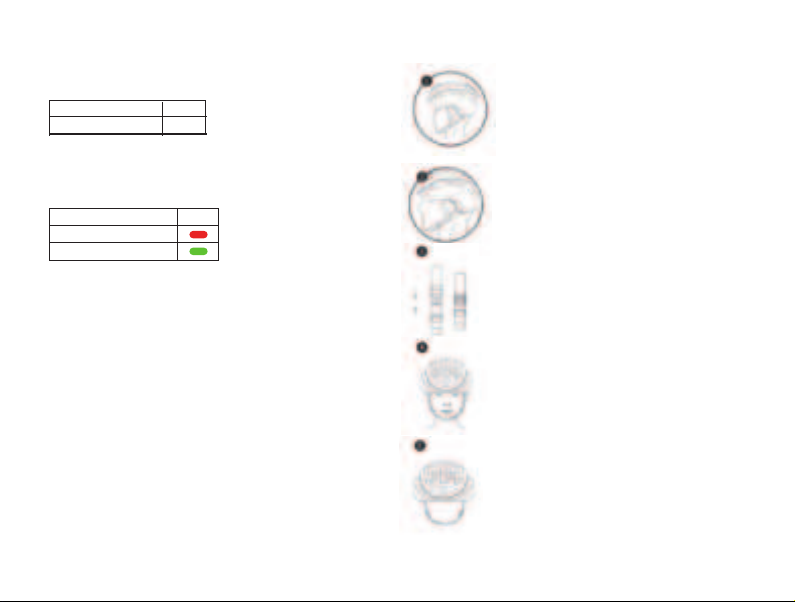
In order to achieve the best wearing fit and the
protective effect of the helmet,please choose the size
which feels secure and comfortable on the head.
When wearing, insert the lace buckle, adjust the lace
and adjust the head circumference adjuster.
Take good care of the helmet. Do not use corrosive
solvents to clean the helmet.The chemical composition
may cause damage to the surface or material of
the helmet.
It is forbidden to soak the helmet in water. Long-term
soaking between the ABS and EPS gaps will damage the
performance of the product.
Changing or removing any original part of the helmet is
not allowed,unless by a serviceman or technical person.
Do not wear the helmet which got exposed to accidents
or severe strikes.
Only if it fits well and correctly, the helmet can help
reduce the risk of getting injured during riding, rather
than a complete avoidance of getting injured.
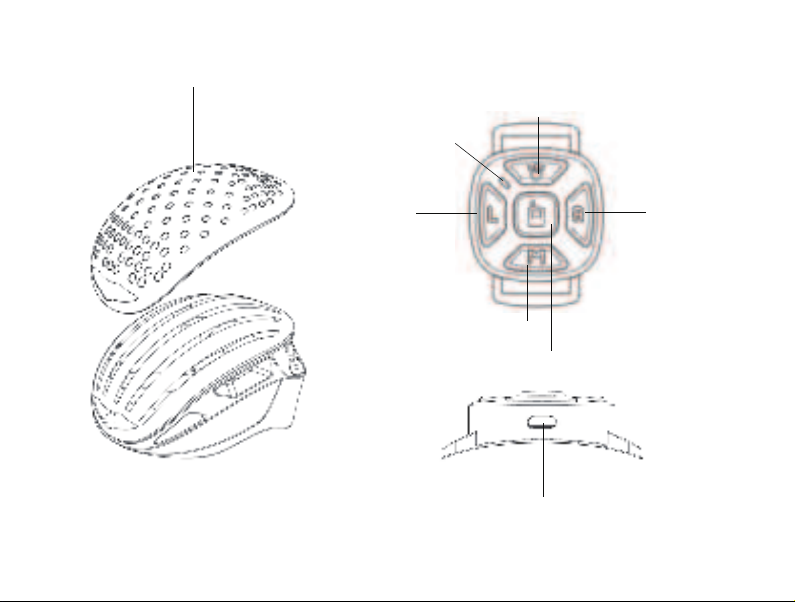
When an abnormal phenomenon occurs during operation,
please refer to "Common Troubleshooting"If no solution
is found, please press ⑧【reset hole】with the thimble to
restore the factory state.
The display interface in the illustration is slightly different
from the actual one, and the actual product shall prevail.
Regularly (15-20 days) save backups or format memory
cards to prevent data loss and reduce DV failures
When using it for the first time, please remove the
protective film on the 2. camera, so as not to affect
the video clarity and light transmittance.
Before using the helmet recorder function, please
format the memory card toimprove the compatibility
of the card and this unit.
A memory card is not recognized by the helmet,
indicating that the card speed is not OK. Please use
original card produced by branding suppliers or buy
from us of Class 10 or above by a capacity of
8GB-128GB.
Do not store the helmet in an environment with
temperature of -20 ℃ ~ +60 ℃,to avoid affecting its
service life and functions.
Helmets are for cycling use only. It meets the quality and
safety standards of a cycling helmet, but is not suitable
for special jobs such as construction work. Please wear it
properly before riding. If you do not operate the helmet
in accordance with this instruction manual or violate
relevant traffic laws, it may cause personal injury or
economic loss to the user or a third party. Relee is not
responsible for any damages caused during use that are
not related to the quality of the product.
You can use a soft cloth dipped in water to clean and
wipe the shell and accessories; please wipe the lens
gently with the lens cloth, the inner lining is velcro
paste, and can be removed for washing
5
17.
18.
19.
Product storage: the helmet shall be stored in a well-
ventilated indoor place;before the helmet is to store for a
long time, please charge it fully and keep power-off; it’s
advisable to do periodic charge every two months, being
fully loaded.
Functions are not comprehensively introduced in this
manual, among the type of smart helmet *** 001A/B/C,
due to different configurations of them.
Service life of the helmet: 3 years
Ⅴ:Camera Functions & Mobile APP
1.For iPhone users, please search in the APP Store“LuckyCam”
or scan QR code to download the APP and install in the phone;
For Android users, please search in the market store
“LuckyCam”or scan QR code to download the APP and install in
the phone.
(Registration is not requested to use the APP for the first time
both.) in mainland and abroad.
2.Press On/Off and hold for 2 seconds Please listen carefully
to voice like "Bluetooth has been turned on waiting for
connection" (or it says Bluetooth connected after successful
connection); meanwhile, Bluetooth, lights and recording
camera are on and standby.
3.Press the ⑤WiFi button and hold for 1 second to start
recording, press again to stop recording; please listen carefully
to voice like "Recording is on" or "Recording is off"; after WiFi
gets connected, user can start or stop recording by pressing
relative button.
4.Press the ⑤WiFi button and hold for 3 seconds to turn on
WiFi signal; press the button again to disconnect WiFi; please
listen carefully to voice like "WiFi is on" or "WiFi is off"; WiFi
automatically turned on once helmet is on; if no operation of
connecting WiFi in 5minutes, WiFi will shut down.
LuckyCam APP Android iOS
6
5.Make settings of Location in the phone ON (Open location
service, ); open the APP to click【Connect Device]】; go back
to phone settings to enable WiFi; find WiFi name like "TXTK_
***_ A_ ***** (* refers to random numbers)" ; put in password
"12345678" (can modify name and password) to get
connected.
Note: when getting helmet WiFi connected, user will see
"WLAN cannot access the Internet, whether to continue to use
this WLAN"; please select "Use"
6. After the WiFi connection is successful, select the icon on the
upper left to return to the APP and it will automatically go to
the window of live streaming, which can show horizontally;
below the window, there are options referring to photo,
recording, settings, etc. (please stop recording before doing
settings).
7. Click Back to go to Home of the APP; user can see options
like【Video】, 【File】, and 【Settings】.
8. Click【File】to enter the folder, view, play, delete, download,
and share the files in the helmet memory card and the local
device. Downloaded files and locked files/and photos in
emergencies.
9. Go to【Settings】 to modify WIFI name and password;
select sensitivity of the gravity sensor lock file; pixel resolution
and other functions, enter the device settings page, and check
the APP version.
Ⅵ:Voice-activated BT Functions
1.Precautions: before using voice-activated BT functions,
Android phone user shall let WiFi disconnected because
helmet WiFi occupies network channel; mobile phone is
connectionless and voice command gets invalid.
2.Press On/Off to turn on the helmet and user can operate
it. When using for the first time, user shall find in the
phone settings the Bluetooth name "ZNTK_ ***" to get
connected; once user hears a voice like "Bluetooth
connected", meaning connection done.
3.After Bluetooth being connected, open the voice assistant
in the phone settings;
(Voice control cannot be activated in the feature phones).
7
4. No matter what brand of smartphone,
use "Hey Siri" to demonstrate
Huawei
Settings - Click Smart Assistant - Smart Voice
- Voice wake-up option, enable Bluetooth
device wake-up, voice control for incoming and
outgoing calls, voice control for incoming and
outgoing calls, smart phone calls, incoming calls
are always broadcast, lock screen calls are fully
enabled
Settings - Tap Siri & Search - Turn on Wake up
with "Hey Siri" - Lock is to allow using Siri to
turn on - Voice Feedback - Always On
Settings - Click Xiao Ai to turn on voice wake-up
- headset wake-up and turn on Bluetooth headset
wake-up voice broadcast - incoming call and
outgoing call broadcast
Settings - click Breeno voice selection.... Incoming
calls and outgoing calls wake up and open the APP
permissions that need to be used,such as navigation,
etc.
Settings - click on JOVI-Jovi ability to set voice
assistant- select to enable... Wake up from incoming
calls and outgoing calls and enable APP permissions
that need to be used, such as navigation, etc.
iPhone
Xiaomi
OPPO
VIVO
Say "Hey Siri", and user can hear a sound
"Dong" then going to next command
"Hey Sir"; navigate to *******(Exact address)
"Hey Siri", make a call to *** (must be the full
name )Incoming call, just say "Answer the
phone" or "Reject the call"
"Hey Siri, send a text message to ***", the
device replies: please say the text message,
you say send the content; the machine will
repeat it once and confirm, you say
"confirm send"
"Hey Siri, send a WeChat to ***", the device
replies: please say the WeChat, you say send
the content; the machine will repeat it once
and confirm, you say "confirm send"
"Hey Siri", "Volume Up", "Volume Down",
"Volume Percentage ****
"Hey Siri, turn on QQ Music (or the name
of other music APP) and play **** (can be
name of a song or a singer)"; "Hey Siri,
next song/last song/stop playing
"Hey Siri, sports news", "Hey Siri, finance news",
…
"Hey Siri,Weather"
"Hey Siri, tell a joke", "Hey Siri, send location
via Wechat to ******
Demonstration
of Operation
Navigation
Make a call
Messages
WeChat
Adjust volume
Play music
News
Weather
Others
8
Ⅶ:Warning Lights and Remote Controls
Headlight
Control Key
Lighting Version
(NO camera)
Camera Version
(NO lighting)
Short Press
1st time
Short Press
1st time
The decorative light1.and flashlight2.are both Low lighting,
with voice prompt: [Low Brightness Headlight]
The decorative light(1) and flashlight(2) are both High lighting,
with voice prompt: [High Brightness Headlight]
The decorative light(1) and flashlight(2) are both Off,
with voice prompt: [Headlight Off]
The decorative light(1) is Low lighting,
with voice prompt: [Low Brightness Headlight]
The decorative light(1) is OFF,
with voice prompt:[Headlight Off]
The left-turn signal light is ON and left rear yellow light is flashing,
with voice prompt [Left Turn Light On]
The left-turn signal light is ON and left rear yellow light is flashing,
with voice prompt [Left Turn Light Off ]
If it is not closed after 40 seconds, it will be broadcast every 10 seconds after that.
Long Press 3 seconds,Chinese and English conversion,
the four lights on the side flash 3 times at the same time.
The right-turn signal light is ON and left rear yellow light is flashing,
with voice prompt [Right Turn Light On]
The right-turn signal light is ON and left rear yellow light is flashing,
with voice prompt [Right Turn Light Off]
If it is not closed after 40 seconds, it will be broadcast every 10 seconds after that
Short Press
2nd time
Short Press
3rd time
Short Press
1st time
Short Press
3rd time
The decorative light(1) is High lighting,
with voice prompt: [High Brightness Headlight]
Short Press
2nd time
Short Press
2nd time
Long Press
Short Press
1st time
Short Press
2nd time
Long Press 3 seconds,Chinese and English conversion,
the four lights on the side flash 3 times at the same time.
Long Press
Left-turn
Signal Light
Control
Key
Right-turn
Signal Light
Control
Key
9