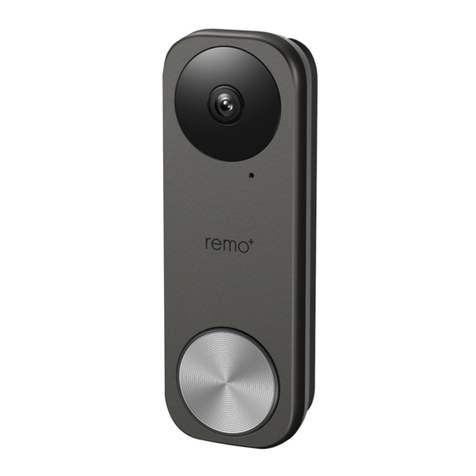
Remo+ DoorCam 2 User manual

Quick Start Guide
DoorCam™ 2

2
WHAT’S IN THE BOX
3 D-CELL BATTERIES
BATTERY COVER SCREW
"PROTECTED BY REMO+"
STICKER
MOUNTING SCREWS
(Optional)
HEX WRENCH
DOORCAM™ 2

3
MEET DOORCAM™ 2
*Remove the protective lm before use
**Optional to secure the Battery Cover
***Optional for mounting
9
10
11
12
13
14
15
Camera’s Bracket
Adjustment Screw
Mounting Holes***
Body’s Bracket
Adjustment Screws
Status Button
Status LED
Wi-Fi Antenna
Battery Cover
1
2
3
4
5
6
7
8
PIR Sensor
IR LED
Microphone
Camera Lens
ALS Sensor
Speaker
Adhesive Pad*
Battery Cover Screw**
11 11
12
13
14 15
10 10

4
CREATE AN ACCOUNT
1. Make sure your mobile device is connected to
your home’s 2.4GHz Wi-Fi (5GHz not supported).
2. Download and launch the Remo+ app.
3. Press "Sign Up" at the bottom of the login page.
4. Enter your email and create a password. Then
press "Sign Up". For Help, press the at the top
right corner. Once you have signed up, you are
ready to register your device.
Remo+ :
DoorCam &
RemoBell

5
1. Have your Wi-Fi network password available. Make sure
the device you are using to register your DoorCam™ 2 is
already connected to your 2.4 Ghz Wi-Fi network before
beginning the process (5 Ghz network not supported).
TIP: If you are using a smartphone, turn OFF your cellular data
and connect to your home Wi-Fi network. You can also turn
Airplane Mode ON and connect to your home Wi-Fi network.
2. DoorCam™ 2's status LED light should
ash up and down. If it does not, press
the status button on the back of the device.
3. After logging into the Remo+ app, press "+" on the home
screen to add your device, and select your time zone.
4. Switch to your phone’s Wi-Fi settings, leaving the
Remo+ app open. Please DO NOT CLOSE THE APP.
5. Connect to the network
DoorCam2_xxxxxx. If you see
"internet is unavailable" or "no
internet" please ignore this
message.
if the network
DoorCam2_xxxxxx does not appear, please press the
status button on the back of your device and wait for
the lights to ash up and down.
6.
Once you’re connected to the DoorCam2_xxxxxx network,
switch back to the Remo+ app and press "Continue".
7. Select your home Wi-Fi network, enter the password,
then press "DONE". Your app will then complete the
registration. This may take up to 3 minutes.
REGISTER DOORCAM™ 2

6
We recommend installing DoorCam™ 2 at the center
of your door as shown below.
Remove the protective
lm from the Adhesive
Pad on the back of
DoorCam™ 2 body.
Use the Hex Wrench to
loosen the Camera’s
Bracket Adjustment
Screw and fully extend
the bracket.
Tighten the Camera’s
Bracket Adjustment Screw.
PHYSICAL INSTALLATION

7
ADJUST DOORCAM™ 2
DoorCam™ 2 supports both push-to-enter and
pull-to-enter doors.
If your door pushes-to-enter, follow Option A on page 8.
If your door pulls-to-enter, follow Option B on page 9.
INSIDE OUTSIDE
PUSH-TO-ENTER DOORS
INSIDE OUTSIDE
PULL-TO-ENTER DOORS

8
Option A
1. Use the Hex Wrench to
loosen the Body’s Bracket
Adjustment Screws.
2. Push the body inward
until the inside of the
body touches the door.
3. Use the Hex Wrench to
tighten the Body’s Bracket
Adjustment Screws.

9
Option B
1. Use the Hex Wrench
to loosen the
Camera’s Bracket
Adjustment Screw.
2. Push the camera
inward until the back
of the camera
touches the door.
3. Use the Hex Wrench
to tighten the
Camera’s Bracket
Adjustment Screw.

10
WARNING: This product may fall o if placed too close to the
edge of the door without being mounted. We recommend
placing DoorCam™ 2 at the center of your door. You can further
secure the device by using the included Mounting Screws.
PUSH-TO-ENTER DOORS
PULL-TO-ENTER DOORS

11
DoorCam™ 2 can use battery or USB power.
(Note : USB Power Adapter sold separately)
POWER SOURCE
IF USING BATTERIES:
3. Close the Battery Cover.
Optional: You can further
secure the Battery Cover by
using the Battery Cover Screw.
1. Remove the Battery Cover.
2. Install the batteries in accordance with the
engraved .

12
4. Hang DoorCam™ 2 over the
door and adjust the bracket
to t the door’s thickness.
See ADJUST DOORCAM™ 2
PAGE 7.
IF USING USB POWER:
(Note : USB Power Adapter sold separately)
1. Hang DoorCam™ 2 over the
door and adjust the Bracket
to t the door’s thickness.
See ADJUST DOORCAM™ 2
PAGE 7.
2. Remove the Battery cover
and connect DoorCam™ 2
to a power outlet using the
USB Power Adapter (sold
separately), then close the
Battery Cover. You can
attach the power cable to
the wall or door using the
cable clips (not included).
Not included

FAQ
What can I do if I keep getting the error
“Connect to DoorCam 2 network to continue…”?
1. Turn OFF cellular data under your Wi-Fi settings and
turn ON Airplane Mode
2. Turn OFF the following setting on your smart phone
or tablet:
If you are using an Android:
Go to your Wi-Fi settings
>Select “Advanced Settings” (top right)
>Turn OFF “Smart Network Switch”
If you are using an iPhone/iPad:
Go to your settings >Select “Cellular”
>Turn OFF “Wi-Fi Assist”
3. Forget the DoorCam™ 2 network from your phone’s
Wi-Fi settings
4. Close the Remo+ app and reset DoorCam™ 2
(see page 14).
5. Restart the registration process (see page 5).
* Once your DoorCam™ 2 is registered, you can return
your phone or tablet settings to normal.
How do I store my videos?
All DoorCam™ 2 videos are stored and saved on our
free 3-day rolling Cloud plan. All accepted and missed
activities can be viewed in your activity log for up to 3
days. Video recordings are protected with bank-level
security and can only be accessed by the registered
users, not our team.
13

Can I keep my videos for a longer time?
If you want to extend the time your videos are available
on your account, you can purchase additional Cloud
storage for $3/month or $30/year. You are also free to
download as many videos as you want and keep them
permanently by downloading them and saving them
onto your mobile device. To download, just open the
video you want to save and click on the download button
on the bottom left side of the screen. You can also share
videos with friends or family by clicking on the share
button on the bottom right side of the screen.
How to reset your DoorCam™ 2
1. Open the battery cover and
press the Reset button for 5
seconds.
2. Wait until the status LED light
ashes up and down, then go
back to the app and delete
your registered device.
3. To delete your device, open
the app and select the menu
icon in the top left corner of the home page.
4. Select "Devices".
5. Click on the trash icon in the bottom right corner.
6. Select the device you are resetting and conrm you
want to delete it.
7. Click on the "+" icon in the bottom left corner and
select DoorCam™ 2 as the model.
8. Then go back to page 5, step 3 to re-register your
DoorCam™ 2.
14

Can’t see videos on your Recent Activity?
For Android users, allow all permissions to the Remo+ app:
Settings >Applications Manager >Permissions >Storage
Check your Settings on the
Remo+ app:
Menu >Devices >Your Devices
>Turn on Motion Sensor
>
Turn on Save Videos to Cloud
>
Press the DoorCam™ 2 status
button to save the settings
Can I recover my videos if I delete them?
No, once they are deleted from your Remo+ app they
will no longer be available.
Forgot your password?
1. Press "Forgot Password" on the login page.
2. Enter your account email and click SEND.
3. Check your email (including the spam folder) for the
temporary password.
4. Open the Remo+ app and log in using your account
email and the temporary password.
5. Create a new password.
TIP: If you have been locked out of the app due to multiple
failed log-in attempts try uninstalling and then reinstalling the
remo+ app on your phone/tablet. Once the app is reinstalled,
go to "forgot password" and follow the above steps.
15
remo+
Save Videos to Cloud
Motion Sensor

How many users can access the DoorCam™ 2?
You can view DoorCam™ 2 from up to 5 iOS/Android devices.
How do I add users?
1. Have the new user download the Remo+ app.
2. Open the Remo+ app and log in using the same
account email and password.
3. Once logged in, they will automatically be created
as a new user. You can enter a dierent prole
name for the user (this will show in the Viewers list).
Menu >Viewers >Click on Viewer XXXX >
4. Type in your preferred viewer name
* All users will have the same access to the device and device recordings.
How many Remo+ devices can I add to my account?
You can add up to 5 Remo+ devices.
How do I add another Remo+ device to my account?
1. Open the Remo+ app and press the menu icon in
the top left corner of the home page.
2. Select "Devices" from the list.
3. Select the "+" symbol in the bottom left corner.
4. Select the device you would like to add and follow
the steps to register it.
16

SUPPORT
We’re happy to help!
(888)-985-1849
Mon-Fri 8:30am to 5:30pm ET (except holidays)
LIMITED WARRANTY
1. LISCENSOR DOES NOT WARRANT THAT THE FUNCTIONS CONTAINED
IN THE LICENSED PRODUCT AND HARDWARE WILL MEET LICENSEE’S
REQUIREMENTS OR THAT THE OPERATION OF THE SOFTWARE AND
HARDWARE WILL BE UNINTERRUPTED OR ERROR-FREE. LICENSOR DOES
WARRANT THAT THE MEDIA ON WHICH THE SOFTWARE IS FURNISHED
AND THE HARDWARE WILL BE FREE FROM DEFECTS IN MATERIAL AND
WORKMANSHIP UNDER NORMAL USE FOR A PERIOD OF ONE YEAR
FROM THE DATE OF DELIVERY (”WARRANTY PERIOD”). THIS LIMITED
WARRANTY IS VOID IF FAILURE OF THE MEDIA ON WHICH THE
PRODUCT OR SOFTWARE IS FURNISHED HAS RESULTED FROM
ACCIDENT, ABUSE, OR MISAPPLICATIONS.
2. EXCEPT AS PROVIDED ABOVE, THE LICENSED PRODUCT IS PROVIDED
“AS IS” WITHOUT WARRANTY OF ANY KIND, EITHER EXPRESS OR
IMPLIED INCLUDING, BUT NOT LIMITED TO, IMPLIED WARRANTIES OF
MERCHANTABILITY AND FITNESS FOR A PARTICULAR PURPOSE. THE
ENTIRE RISK AS TO THE QUALITY AND PERFORMANCE OF THE LICENSED
PRODUCT AND HARDWARE IS WITH LICENSE.
HOW TO DISPOSE YOUR BATTERIES
Alkaline batteries are not listed as a hazardous waste
under the Resource Conservation and Recovery Act (RCRA).
Most states classify alkaline batteries according to RCRA regulations.
however, some states have more rigorous regulations. The hazardous
waste characterization requirements of Alaska, California, Minnesota,
Rhode Island and Washington include bioassay. South Carolina
regulates all types of batteries as special waste. Therefore, disposal of
alkaline batteries in South Carolina must be accomplished accordingly.
Please call 1-877-2-RECYCLE for information on recycling your used
alkaline battery or visit www.call2recycle.org.
17

18
FCC COMPLIANCE STATEMENT
This device complies with part 15 of the FCC rules. Operation is subject to the
following two conditions: (1) This device may not cause harmful interference,
and (2) this device must accept any interference received, including
interference that may cause undesired operation.
FCC INTERFERENCE STATEMENT
This equipment has been tested and found to comply with the limits for a Class
B digital device, pursuant to part 15 of the FCC Rules. These limits are designed
to provide reasonable protection against harmful interference in a residential
installation. This equipment generates, uses and can radiate radio frequency
energy and, if not installed and used in accordance with the instructions, may
cause harmful interference to radio communications. However, there is no
guarantee that interference will not occur in a particular installation. If this
equipment does cause harmful interference to radio or television reception,
which can be determined by turning the equipment o and on, the user is
encouraged to correct the interference by one of the following measures:
• Reorient or relocate the receiving antenna.
• Increase the separation between the equipment and receiver.
• Connect the equipment into an outlet on a circuit dierent from which the
receiver is connected.
• Consult the dealer or an experienced radio/TV technician for help.
FCC CAUTION
Any changes or modications not expressly approved by the party responsible
for compliance could void the user's authority to operate this equipment. This
transmitter must not be co-located or operating in conjunction with any other
antenna or transmitter.
FCC RADIATION EXPOSURE STATEMENT
This equipment complies with FCC radiation exposure limits set forth for an
uncontrolled environment. This equipment should be installed and operated
with minimum distance 20 cm between the radiator and your body. This
transmitter must not be co-located or operating in conjunction with any other
antenna or transmitter.
FOLLOW US ON
Table of contents
Other Remo+ Intercom System manuals
Popular Intercom System manuals by other brands

Lorex
Lorex ACCHM1 Series quick start guide

RTS
RTS AIO-16 user manual

IPS
IPS EggBell instruction manual

Channel Safety Systems
Channel Safety Systems EntriTech HF Operation and installation manual

Erreka
Erreka BATL1 installation manual

PACH & COMPANY
PACH & COMPANY QUANTUM QC1 Installation and programming manual