Renogy PHOENIX 1000 User manual

VERSION A1
Portable Power Station
RENOGY 1000
RPS100150AA-PCS
USER MANUAL

Before Getting Started
The user manual provides important operation and maintenance instructions for RENOGY 1000 Portable Power
Station (hereinaer referred to as Portable Power Station).
Read the user manual carefully before operation and save it for future reference. Failure to observe the instructions
or precautions in the user manual can result in electrical shock, serious injury, or death, or can damage the portable
power station, potentially rendering it inoperable.
zRenogy ensures the accuracy, suiciency, and the applicability of information in the user manual at the time
of printing due to continual product improvements that may occur.
zRenogy assumes no responsibility or liability for personal and property losses, whether directly and indirectly,
caused by the user’s failure to install and use the product in compliance with the user manual.
zRenogy is not responsible or liable for failures, damages, or injuries resulting from repair attempted by
unqualified personnel, improper installation and operation.
zThe illustrations in the user manual are for demonstration purposes only. Details may appear slightly dierent
depending on product revision and market region.
zRenogy reserves the right to change the information in the user manual without notice. For the latest user
manual, visit renogy.com.
Disclaimer
RENOGY 1000 Portable Power Station User Manual © 2023 Renogy. All rights reserved.
RENOGY and are registered trademarks of Renogy.
zAll information in the user manual is subject to copyright and other intellectual property rights of Renogy
and its licensors. The user manual may not be modified, reproduced, or copied, in whole or in part, without
the prior written permissions of Renogy and its licensors.
zThe registered trademarks in the user manual are the property of Renogy. The unauthorized use of the
trademarks is strictly prohibited.
Online Manual
User Manual
DC Home App
DC Home App

Symbols Used................................................................................................................................ 1
What’s In the Box?.......................................................................................................................... 1
Optional Accessories ...................................................................................................................... 1
Get to Know RENOGY 1000 Portable Power Station ........................................................................... 2
LCD Display ................................................................................................................................... 3
Environmental Conditions .............................................................................................................. 3
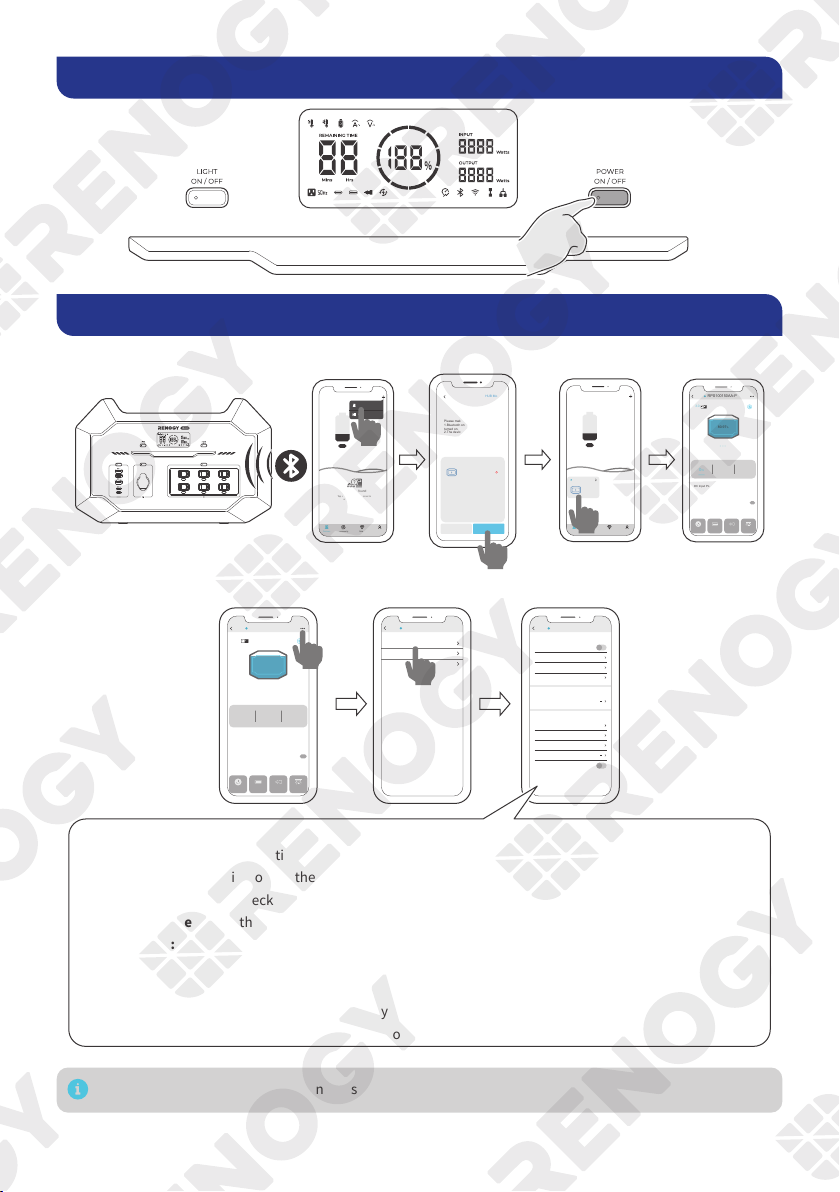
Turning On/O............................................................................................................................... 4
Communication with DC Home........................................................................................................ 4
Bluetooth Connection........................................................................................................................................4
How to Customize Parameters ..........................................................................................................................4
How to Charge by Solar Panels ........................................................................................................ 5
How to Charge by AC Power ............................................................................................................ 5
How to Charge by Car ..................................................................................................................... 5
How to Power Your Devices ............................................................................................................. 6
USB-A/USB-C Devices ........................................................................................................................................6
Car-Powered Devices via CIG.............................................................................................................................6
AC Devices ..........................................................................................................................................................7
Automatic Power-O...................................................................................................................... 7
Standby Power Supply (SPS)........................................................................................................... 7
Parallel Connection........................................................................................................................ 8
Strip Lights Operation .................................................................................................................... 8
Troubleshooting ............................................................................................................................ 9
Specifications.............................................................................................................................. 10
General .............................................................................................................................................................10
Battery ..............................................................................................................................................................10
Input .................................................................................................................................................................10
Output ..............................................................................................................................................................10
Maintenance & Storage................................................................................................................. 11
Inspection.........................................................................................................................................................11
Cleaning............................................................................................................................................................11
Storage..............................................................................................................................................................11
Important Safety Instructions....................................................................................................... 12
General Safety Information .............................................................................................................................12
Portable Power Station Safety.........................................................................................................................12
Charging Safety ................................................................................................................................................12
Discharging Safety ...........................................................................................................................................12
Solar Charging Safety ......................................................................................................................................12
Renogy Support........................................................................................................................... 13
Warranty..................................................................................................................................... 13
Table of Contents

— 1 —
Symbols Used
The following symbols are used throughout the user manual to highlight important information.
WARNING: Indicates a potentially dangerous condition which could result in injury or death.
CAUTION: Indicates a critical procedure for safe and proper installation and operation.
NOTE: Indicates an important step or tip for optimal performance.
What’s In the Box?
VERSION A1
Portable Power Station
RENOGY 1000
RPS100150AA-PCS
USER MANUAL
RENOGY 1000
Portable Power Station × 1
AC Power Cable × 1 Car Charge Cable × 1
User Manual × 1 Solar Charge Cable × 1
Make sure that all accessories are complete and free of any signs of damage.
Optional Accessories
Split Phase Parallel Kit
(US/CA/JP Models Only)
Single Phase Parallel Kit
The optional accessories are available on renogy.com.

— 2 —
Get to Know RENOGY 1000 Portable Power Station
LCD Display
Power On/O Button
AC On/O Button
Parallel Outlet
DC Input Port
Light On/O Button
LED Strip Lights
USB On/O Button
Overload Protector
AC Inlet
USB-A Ports
USB-A Fast
Charge Port
CIG On/O Button AC Outlets
United States/Canada/Japan Europe/South Korea China
United Kingdom Australia
USB-C Ports
CIG Port

— 3 —
LCD Display
High Temperature
Protection
Low Temperature
Protection
Battery Protection
AC Outlet Status
USB-C Port Status
USB-A Port Status CIG Port Status
SPS Mode Status
Current Protection
Voltage Protection
Battery Level
Output Power
iBoost Mode Status
Single Phase Parallel
Mode Status
Split Phase Parallel
Mode Status
Wi-Fi Status
Bluetooth Status
Input Power
Operating Status Ring:
- The Ring Segments Lighting Up Clockwise: Charging
- All the Ring Segments On: Fully Charged
- The Ring Rotating Counterclockwise: Discharging
- One Ring Segment Flashing Slowly: The Battery Level < 10%
Remaining Time
:
The amount of time
before the portable power
station is completely
charged or discharged. In
idle state, the remaining
time shows 99 hours.
Pay attention if the [High Temperature Protection], [Low Temperature Protection], [Battery Protection],
[Current Protection], or [Voltage Protection] icon appears. Please refer to the “Troubleshooting” section for
detailed instructions.
When no operation is made for 5 minutes, the LCD Display will go out automatically to save energy. Short
press the Power On/O Button to light up the LCD Display.
Environmental Conditions
≥4 inches (101.6 mm)
Wall Outlet
Recommended Ambient Temperature:
32°F~104°F / 0°C~40°C
KEEP DRY FRAGILE
VENTILATION

— 4 —
Turning On/O
Turning On: Short Press
Turning O:
Long Press for 3s
Communication with DC Home
Bluetooth Connection
My Renogy
Time remaining
---
- -
Devices Select MeCommunity
Phoenix
RPS100150AA-PCS
- -
BT-TH-ACD8295C1805
Devices Select MeCommunity
My Renogy
- -
No device found
Tap+ in the upper-right corner to
add your first device.
Add Devices
Add Renogy ONE
HUB Mode
Please make sure:
1.Bluetooth on this phone/tablet is
turned on.
2.The device is running properly.
3.The device's Bluetooth is turned on.
Searching for device
Found Devices
Renogy
RPS100150AA-PCS
BT-TH-ACD8295C1805
Cancel Confirm
RPS100150AA-PCS
23.0
80.97
- - -
0
-
W
0W
%
CF
Input
0W
Output
DC Input Power
0WAC Input Power
UPS
AC USB CIG Light
Off
Light
How to Customize Parameters
RPS100150AA-PCS
23.0
80.97
- - -
0
-
W
0W
%
CF
Input
0W
Output
DC Input Power
0WAC Input Power
UPS
AC USB CIG Light
Off
Light
Parameter Settings
Device Info
WI-FI
System Settings
Input Settings
Output Settings
Shut Down
LCD Display Timeout
Unit Timeout
Battery Reserve Level
AC Charging Speed
USB Timeout
DC Timeout
AC Timeout
AC Output Frequency
iBoost Mode Enable/Disable
Shut Down: Power on/o the portable power station.
LCD Display Timeout: Set the timeout of the LCD Display.
Unit Timeout: Set the timeout of the potable power station.
Battery Reserve Level: Check the battery reserve level of the portable power station.
AC Charging Speed: Set the AC charging parameters.
USB Timeout: Set the timeout of the USB-A Ports, the USB-A Fast Charge Port, and the USB-C Ports.
DC Timeout: Set the timeout of the CIG Port.
AC Timeout: Set the timeout of the AC Outlets.
AC Output Frequency: Set the output frequency of the AC Outlets.
iBoost Mode Enable/Disable: Turn on/o the iBoost Mode of the AC Outlets.
RPS100150AA-PCS RPS100150AA-PCS
The portable power station only connects to the 2.4GHz Wi-Fi network.

— 5 —
How to Charge by Solar Panels
10V~100V
10A
400W Max
Solar
Charge
Cable
How to Charge by AC Power
JP: 85V~120V
US & CA: 90V~140V
EU, UK, AU, KR & CN:
200V~240V
About 45Hz~55Hz / 57Hz~65Hz
998W Max
AC Power Cable
The iTurbo technology enables the portable power station to be charged up to 80% within 1 hour.
When the charging current exceeds the current rating of the AC Inlet, the Overload Protector will pop up
automatically and the AC charging stops. Please disconnect the AC power cable first and press down the Overload
Protector to reset it. Contact us for help if the Overload Protector pops up again: renogy.com/contact-us/.
How to Charge by Car
Start
The
Car
Engine
Car Charge Cable

— 6 —
How to Power Your Devices
The portable power station can provide a total output power of up to 2100W. When the portable power station is
overloaded, it will turn o the USB-A Ports, USB-A Fast Charge Port, and USB-C Ports, CIG Port, and AC Outlets in
sequence until the total output power drops below 2100W.
The portable power station might not be able to deliver exact 998.4Wh energy when powering high power
devices.
USB-A/USB-C Devices
12W Max
18W Max
100W Max
On: Short Press
O: Long Press for 3s
When both the USB-C Ports are in use, each USB-C Port can only deliver up to 60W output power.
To get up to 18W output power from the USB-A Fast Charge Port, the USB-A device must support the Quick
Charge (QC) standard.
To get up to 100W output power from the USB-C Input/Output Port, the USB-C device must support the
Power Delivery (PD) standard.
When the device draws low or no power from the USB-A Ports, USB-A Fast Charge Port, and USB-C Ports for 1
hour, the USB-A Ports, USB-A Fast Charge Port, and USB-C Ports will turn o automatically to save energy.
Car-Powered Devices via CIG
On: Short Press
O: Long Press for 3s 136W Max
When the device draws low or no power from the CIG Port for 1 hour, the CIG Port will turn o automatically
to save energy.

— 7 —
AC Devices
The iBoost mode allows the AC Outlets to power most resistive AC devices rated between 1500W and 3000W, The
iBoost mode is enabled by default. The iBoost mode is not applicable for the inductive and capacitive AC devices
with strict voltage limits.
1500W Rated
3000W Surge
On: Short Press
O: Long Press for 3s
Please select the output frequency of the portable power station in accordance with the AC device
specifications.
The portable power station might not be able to power the AC devices that require high starting currents
even though they are rated under 1500W.
When the device draws low or no power from the AC Outlets for 1 hour, the AC Outlets will turn o
automatically to save energy.
Automatic Power-O
When the Portable Power Station is not being charged and the USB-A Ports, USB-A Fast Charge Port, USB-C Ports, CIG
Port, and AC Outlets are o for 1 hour, the portable power station will turn o automatically to save energy.
Standby Power Supply (SPS)
The portable power station can work as a SPS to deliver emergency AC power to devices during a power outage.
Transfer Time: < 20 ms
1
AC
Power
Cable
1500W Max
2
DO NOT connect AC devices that require a transfer time less than 20ms (such as data servers and
workstations) to the portable power station for uninterrupted AC power. Please check the holdup time of the
power supply units (PSU) in the AC devices to confirm the compatibility.
The iBoost mode will be automatically disabled when the SPS mode is turned on.

— 8 —
Parallel Connection
The iStack technology allows two RENOGY 1000 portable power stations to be connected in parallel to deliver
1996.8Wh capacity and 2700W AC output.
Single Phase Parallel Kit
Split Phase Parallel Kit
Split-Phase AC Device: 2700W Max
Single-Phase AC Device: 2700W Max
Please ensure that the AC Outlets of the two portable power stations have the same output voltage and
output frequency.
Please ensure that the two RENOGY 1000 portable power stations have AC Outlets turned on.
The AC Inlet will be disabled with AC charging and SPS mode o when the single phase parallel kit is
connected to the portable power station.
The AC Outlets will be turned o temporarily when connecting the two portable power stations in parallel.
Strip Lights Operation
On: Short Press
O: Long Press for 3s
When the LED Strip Lights are on, short press the Light On/O Button to switch the lighting modes, and the
LED Strip Lights light o. The LED Strip Lights oer three lighting modes – solid, breath, and flow.
When the portable power station is being charged, the LED Strip Lights will automatically turn on in breath
mode by default.

— 9 —
Troubleshooting
If the portable power station does not operate properly, refer to the table below for possible causes and corrective
steps. If the corrective steps do not work, contact our customer service through renogy.com/contact-us/.
Icons Possible Causes Corrective Steps
Slow Flash
AC Input
Overvoltage/Undervoltage
zDisconnect the AC Inlet from the wall outlet.
zMeasure the voltage of the wall outlet. Stop using the wall outlet
if its voltage falls outside the specifications of the AC Inlet.
zConnect the AC Inlet to the wall outlet with the appropriate
voltage. Charging can be resumed.
Slow Flash
DC Input
Overvoltage/Undervoltage
zDisconnect the charging source from the DC Input Port.
zCheck the voltage rating of the charging source. Stop using the
charging source if its output voltage is rated lower than 10V or
higher than 100V.
zConnect a charging source with the appropriate voltage rating to
the DC Input Port. Charging can be resumed.
Slow Flash
zUSB-A
zUSB-A Fast Charge
zUSB-C
zCIG
zAC Output
Overvoltage/Undervoltage
zDisconnect the devices from the alarm ports.
zShort press the On/O Buttons corresponding to the alarm ports
with the LCD Display lit up to release the protection.
zReconnect the devices to the alarm ports.
zContact us for help if the icons persist.
Slow Flash
zUSB-A
zUSB-A Fast Charge
zUSB-C
zCIG
zAC Output
Overcurrent/Short Circuit
zDisconnect the devices from the alarm ports.
zRemove the short circuit if the alarm port is shorted.
zCheck the current rating and power rating of the device. If the
current and power of the device exceed the alarm port ratings,
stop using the device.
zShort press the On/O Buttons corresponding to the alarm ports
with the LCD Display lit up to release the protection.
zConnect the device with the appropriate current rating to the
alarm ports. Power can be resumed.
Slow Flash
Inverter High Temperature
zCheck if the fan inlet and outlet are blocked.
zCool down the portable power station to the room temperature.
zShort press the AC On/O Button with the LCD Display lit up to
release the protection. Power can be resumed.
Slow Flash
Total Output Overload
zReallocate the output power to ensure that the total output
power is under 2100W.
zShort press the Power On/O Button with the LCD Display lit up
to release the protection.
zShort press the USB On/O Button, CIG On/O Button, or AC On/
O Button to turn on the USB-A Ports, USB-A Fast Charge Port,
and USB-C Ports, CIG Port, or AC Outlets again. Power can be
resumed.
Slow Flash
Battery High Temperature
zDisconnect all the connections from the portable power station.
zCheck if the fan inlet and outlet are blocked.
zCool down the portable power station to the room temperature.
zReconnect the charging source(s) to the portable power station.
Charging can be resumed.
zShort press the USB On/O Button, CIG On/O Button, or AC On/
O Button to turn on the USB-A Ports, USB-A Fast Charge Port,
and USB-C Ports, CIG Port, or AC Outlets again. Power can be
resumed.

— 10 —
Icons Possible Causes Corrective Steps
Slow Flash
Battery Low Temperature
zWarm up the portable power station.
zCharging can be resumed automatically.
zShort press the USB On/O Button, CIG On/O Button, or AC On/
O Button to turn on the USB-A Ports, USB-A Fast Charge Port,
and USB-C Ports, CIG Port, or AC Outlets again. Power can be
resumed.
Fast Flash
Single/Split Phase Parallel
Failure
zDisconnect the single/split phase parallel kit from the portable
power stations.
zCheck the models of the portable power stations. Stop
connecting the portable power stations in parallel if they are of
dierent models.
zCheck the output voltages of the AC Outlets. Stop connecting
the portable power stations in parallel if their AC Outlets have
dierent output voltages.
zSet the AC Outlets of the portable power stations to the same
output frequency.
zFully charge the portable power stations.
zReconnect the portable power stations in parallel with the
single/split phase parallel kit.
Specifications
General
Dimension 18.27 x 10.79 x 11.57 inch / 464 x 274 x 294 mm
Weight 41.0 lbs / 18.6 kg
Charge Temperature 32°F~104°F / 0°C~40°C (Recommended)
32°F~131°F / 0°C~55°C (Extreme)
Discharge Temperature -4°F~104°F / -20°C~40°C (Recommended)
-4°F~131°F / -20°C~55°C (Extreme)
Storage Temperature -4°F~95°F / -20°C~35°C
Battery
Type Lithium Iron Phosphate
Capacity 41.6V, 24000mAh / 998.4Wh
Cycle Life 3000 Cycles (80% DOD, 80% EOL)
Input
AC Input 85V~120V (JP)/90V~140V (US & CA)/200V~240V (EU, UK, AU, KR & CN)
About 45Hz~55Hz/57Hz~65Hz, 998W Max
DC Input 10V~100V 10A, 400W Max
Output
USB-A Output (x2) 5V 2.4A, 12W Max
USB-A Fast Charge Output (x1) 5V 3A, 9V 2A, 12V 1.5A, 18W Max
USB-C Output (x2) 5V 3A, 9V 3A, 12V 3A, 15V 3A, 20V 5A, 100W Max

— 11 —
CIG Output (x1) 13.6V 10A, 136W Max
AC Output (x3/x6) 100V (JP)/120V (US & CA)/220V~240V (EU, UK, AU, KR & CN)
About 50Hz/60Hz, 1500W Rated, 3000W Surge
Total Output 2100W Max
Maintenance & Storage
Inspection
For optimum performance, it is recommended to perform these tasks regularly.
zCheck the appearance of the portable power station to make sure it is clean and dry.
zEnsure the portable power station is used or stored in a clean, dry, and ventilated area.
zMake sure that the LCD Display is in normal state.
zEnsure there is no corrosion, insulation damage, or discoloration marks of overheating or burning.
Risk of electric shock! Make sure that all power is turned o before touching the terminals on the portable
power station.
The portable power station may release toxic gases when burning. Be sure to wear a gas mask when
approaching. Put out the fire with a FM-200 or CO fire extinguisher. If pungent gases are inhaled, leave the
contaminated area immediately and seek medical attention.
Cleaning
Follow the steps below to clean the portable power station regularly.
zRemove all the connections from the portable power station and turn o the portable power station.
zClean the casing of the portable power station with a so dry cloth.
zTurn the portable power station back on and reconnect the devices to the portable power station.
Storage
zCharge the portable power station to 50%.
zRemove all the connections from the portable power station and turn o the portable power station.
zStore the portable power station in a well ventilated, dry, clean area with temperatures between -4°F (-20°C) and
95°F (35°C) and humidity between 10% and 90%.
zFor long term storage, discharge the portable power station to 30% and charge it to 50% every 6 months.
zFully charge the portable power station when it is taken out of the storage.
Handle the portable power station carefully to avoid sharp impacts or extreme pressure on the casing of the
portable power station.

— 12 —
Important Safety Instructions
General Safety Information
zKeep the portable power station out of the reach of children.
zDo not dispose of the portable power station as household waste. Comply with local, state, and federal laws and
regulations and use recycling channels as required.
zIn the event of fire, use fire extinguishers suitable for electrical equipment. Acceptable fire extinguishers include
an FM-200 or CO fire extinguisher.
zDo not expose the portable power station to flammable or harsh chemicals or vapors.
Portable Power Station Safety
zDo not puncture, drop, crush, penetrate, shake, strike, or step on the portable power station.
zDo not open, dismantle, repair, tamper with, or modify the portable power station.
zDo not insert foreign objects into the portable power station.
zDo not immerse the portable power station in water or leave it out in the rain.
zDo not expose the portable power station to direct flame.
zKeep the portable power station away from flammable or combustible materials.
zKeep the portable power station away from heating equipment.
zEnsure that there is no water source including downspouts, sprinklers, or faucets above or near the portable
power station.
zEnsure that snow does not accumulate around the portable power station.
zRisk of explosion! When being charged, the portable power station may give o noxious or explosive gas. Make
sure there is good ventilation.
zDo not expose the portable power station to strong electrostatic fields, strong magnetic fields, or radiation.
zDo not lean on, stack anything on top of, or hang anything from the portable power station or from cables
leading to the portable power station.
zDo not touch the exposed electrolyte or powder if the portable power station is damaged.
zPlease inspect the portable power station before each use. Stop using the portable power station if any visible
damages including cracks, dents, and deformation or abnormalities including unusual smells and heating are
observed.
Charging Safety
zOnly use Renogy approved accessories to charge the portable power station.
zDo not use damaged accessories to charge the portable power station as it might cause electric shock.
zDo not charge the portable power station immediately aer a long heavy run.
zThe portable power station turns on automatically once it detects the charging source(s).
zTo prevent car battery overdischarge, charge the portable power station while the car enginer is started.
zDo not charge the portable power station at high temperatures above 131°F (55°C) or low temperatures below
32°F (0°C). The recommended charge temperature range is between 32°F (0°C) and 104°F (40°C).
Discharging Safety
zPlease charge the portable power station immediately when the battery level drops below 10% to prevent
overdischarge.
zDo not discharge the portable power station at high temperatures above 131°F (55°C) or low temperatures below
-4°F (-20°C). The recommended discharge temperature range is between -4°F (-20°C) and 104°F (40°C).
zTo extent the cycle life, please fully charge the portable power station before each use.
zDo not use the portable power station with life support equipment or other medical equipment.
Solar Charging Safety
zDo not use damaged solar panels.
zPlace a solar panel (sold separately) under direct sunlight. Steer clear of objects that can shade the solar panel
and slow down the charging process.
zFor optimal charging performance, it is recommended to charge the portable power station with the solar panel
array on bright sunny days free of clouds.

— 13 —
Renogy Support
To discuss inaccuracies or omissions in this quick guide or user manual, visit or contact us at:
renogy.com/support/downloads contentservice@renogy.com
For technical questions about your product in the U.S., contact the Renogy technical support team through:
renogy.com/contact-us 1(909)2877111
For technical support outside the U.S., visit the local website below:
Canada ca.renogy.com China www.renogy.cn
United
Kingdom uk.renogy.com U.S. www.renogy.com
Australia au.renogy.com Japan renogy.jp
France fr.renogy.com Germany de.renogy.com
Spain es.renogy.com South Korea kr.renogy.com
Italy it.renogy.com Other Europe eu.renogy.com
Warranty
Check out the warranty policies for the product from your local Renogy website. For customers in the U.S., register
your product and get your e-warranty at https://renogy.force.com/helpcenter/s/warrantyregister.
FCC Statement
This device complies with Part 15 of the FCC Rules. Operation is subject to the following two conditions:
(1) This device may not cause harmful interference, and
(2) This device must accept any interference received, including interference that may cause undesired operation.
FCC ID: 2ANPB-RPS100150AA
This equipment has been tested and found to comply with the limits for a Class A digital device, pursuant to Part
15 of the FCC Rules. These limits are designed to provide reasonable protection against harmful interference in a
residential installation. This equipment generates uses and can radiate radio frequency energy and, if not installed
and used in accordance with the instructions, may cause harmful interference to radio communications. However,
there is no guarantee that interference will not occur in a particular installation. If this equipment does cause harmful
interference to radio or television reception, which can be determined by turning the equipment o and on, the user
is encouraged to try to correct the interference by one or more of the following measures:
(1) Orient or relocate the receiving antenna.
(2) Increase the separation between the equipment and receiver.
(3) Connect the equipment into an outlet on a circuit dierent from that to which the receiver is connected.
(4) Consult the dealer or an experienced radio/TV technician for help.
FCC Radiation Exposure Statement
This equipment complies with FCC radiation exposure limits set forth for an uncontrolled environment. This
equipment should be installed and operated with minimum distance 20cm between the radiator & your body.

RENOGY.COM
Renogy aims to empower people around the world through education and distribution of DIY-friendly
renewable energy solutions.
Renogy Power Plus allows you to stay in the loop with upcoming solar energy innovations, share your
experiences with your solar energy journey, and connect with like-minded people who are changing the
world in the Renogy Power Plus community.
We intend to be a driving force for sustainable living and energy independence.
In support of this eort, our range of solar products makes it possible for you to minimize your carbon
footprint by reducing the need for grid power.
Renogy Empowered
Live Sustainably with Renogy
Did you know? In a given month, a 1KW solar energy system will...
Save 170 pounds of coal from being burned
Save 300 pounds of CO2 from being released into the atmosphere
Save 105 gallons of water from being consumed
@Renogy Solar @Renogy@renogyoicial
Renogy Power PLUS
R210-
189209
Renogy reserves the right to change the contents of this manual without notice.
Other manuals for PHOENIX 1000
2
This manual suits for next models
1
Table of contents
Other Renogy Power Supply manuals
Popular Power Supply manuals by other brands

Wibre
Wibre 5.0670.00.18 installation manual

ViSAGE
ViSAGE LED HANDY CON 101 user manual

Westinghouse
Westinghouse 91308 quick start guide

POWER DESIGNS
POWER DESIGNS TP340 instruction manual

Keysight
Keysight E4356A operating guide

Stanford Research Systems
Stanford Research Systems PS355 Operation and service manual