Repatha Pushtronex User manual

Page 1
Instructions for Use:
Pushtronex®System for
Repatha®(ri-PAth-a)
(evolocumab)
Single-Use On-Body Infusor and Prefilled Cartridge
Guide to parts
Prefilled Cartridge
White plunger
Cartridge top (Do not rotate)
Cartridge bottom
MedicineCartridge label
On
-
Body Infusor
Front view
Skin
adhesive
Status
light
Start button
(Do not press until ready to inject)
Cartridge door
(Do not close
without cartridge)
Medicine window
Pull tabs
Back v
iew
Needle cover
Adhesive paper
Battery
Strip
Left pull tab
Needle inside
(under cover)
Right pull tab
Important:
Needle is inside
.

Page 2
Important
Before you use the on-body infusor and prefilled cartridge for use with
Repatha (evolocumab), read this important information:
●It is important that you do not try to give yourself the injection unless you have
received training from your healthcare provider.
●Children who are 13 to 17 years of age should use the on-body infusor and prefilled
cartridge under adult supervision, as instructed by the healthcare provider.
Storing your on-body infusor and prefilled cartridge
●
Keep the
o
n
-
b
ody
i
nfusor
and prefilled cartridge
in the original carton to protect
from light or physical damage.
●The on-body infusor and prefilled cartridge must be kept in the refrigerator 36°F to
46°F (2°C to 8°C).
●For your injection, take your on-body infusor and prefilled cartridge out of the
refrigerator and let them sit at room temperature for at least 45 minutes before
you
inject.
●After you remove the on-body infusor and prefilled cartridge from the refrigerator,
they should be kept at room temperature at 68°F to 77°F (20°C to 25°C) in the
original carton and must be used within 30 days.
●
Do not
store the
on
-
body
infusor
and prefilled cartridge
in
temperatures above
77°F (25°C) such as in your vehicle’s glove box or trunk. Do not freeze.
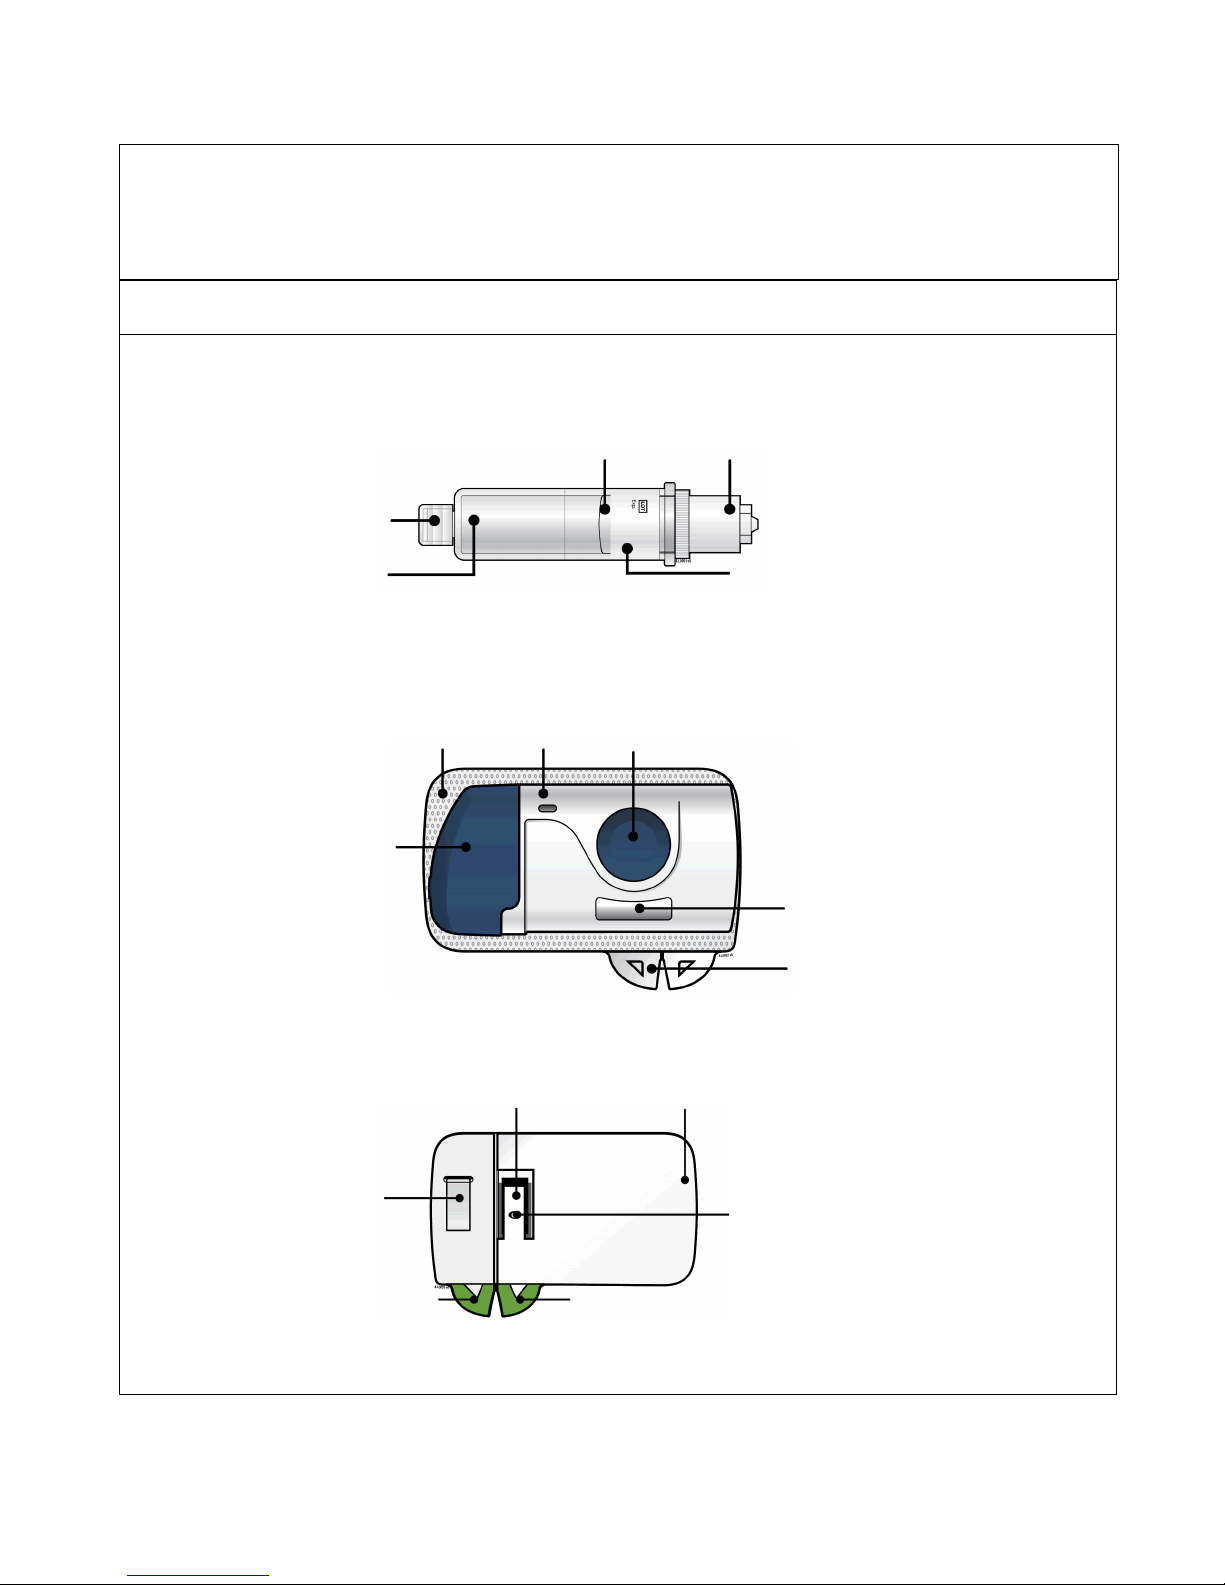
Using your on-body infusor and prefilled cartridge
●Do not shake the on-body infusor or prefilled cartridge.
●Do not remove the on-body infusor and prefilled cartridge from the box or clear
tray until you are ready to inject.
●Do not touch the start button until you place the loaded on-body infusor and
prefilled cartridge onto your skin and are ready to inject.
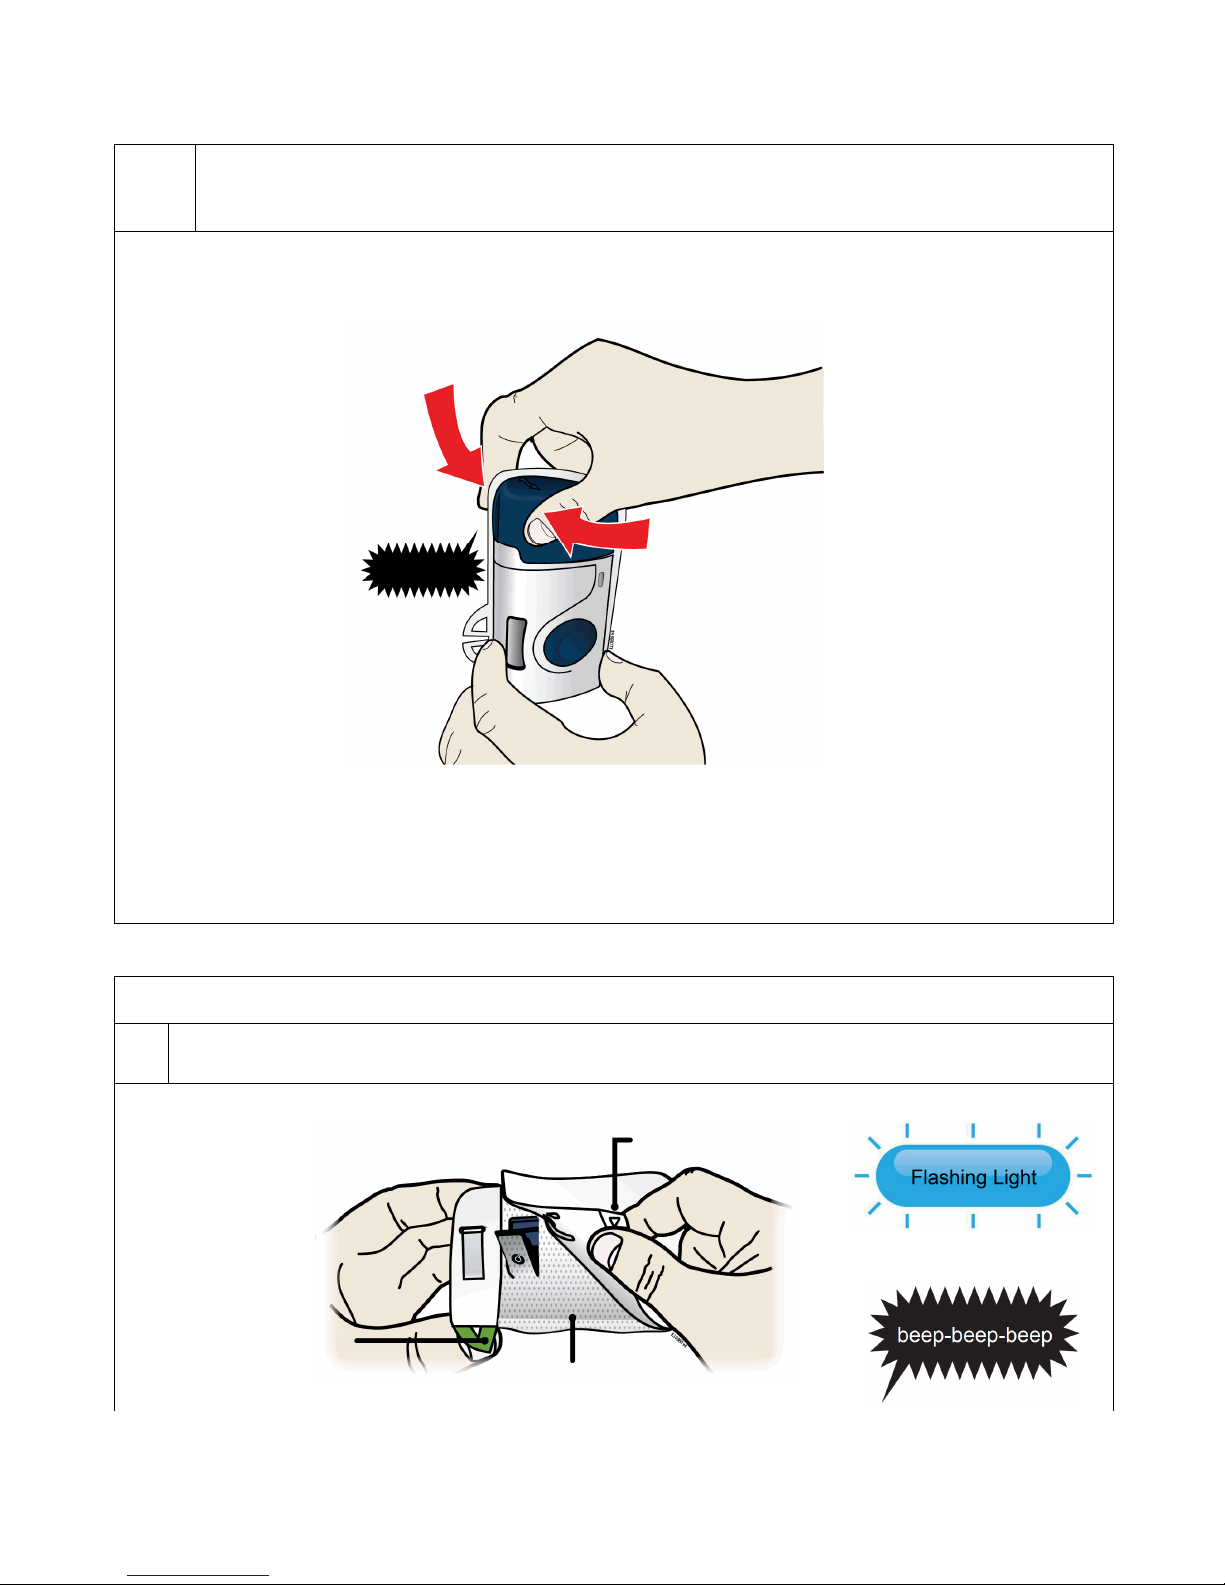
●After you insert the cartridge into the on-body infusor, make sure you give your
injection within 5 minutes. Waiting longer than 5 minutes can dry out the medicine.
●You can only press the start button 1 time. If an error occurs, the on-body infusor
cannot be used.
●Do not use the on-body infusor and prefilled cartridge if either has been dropped
onto a hard surface. Part of the on-body infusor and prefilled cartridge may be
broken even if you cannot see the break. Use a new on-body infusor and prefilled
cartridge.
●Do not reuse the on-body infusor and prefilled cartridge. The on-body infusor and
prefilled cartridge are for single-use only.
●
Do not let the on-body infusor get wet from water or any other liquids. It contains
electronics that should not get wet.

Page 3
●
The single-use on-body infusor for subcutaneous injection is made to only be used
with the prefilled cartridge.
●
Moderate physical activities can be done during the injection process, such as
walking, reaching and bending.
●
Do not use the on-body infusor and prefilled cartridge after the expiration date on
the carton.
●
The on-body infusor and prefilled cartridge are not made with natural rubber latex.
A healthcare provider who knows how to use the on-body infusor should be able to
answer your questions. For more information, call 1-844-REPATHA (1-844-737-2842) or
visit www.REPATHA.com.
Keep the on-body infusor and prefilled cartridge out of the reach of children.
Step 1: Prepare
1A
Remove the
on
-
body infusor
and prefilled cartridge
carton from the refrigerator.
Wait at least 45 minutes before injecting for the on-body infusor and prefilled
cartridge in the carton to naturally reach room temperature.
Do not try to warm the prefilled cartridge by using a heat source such as
hot water or a microwave.
In any above cases, use a new on-body infusor and prefilled cartridge and call
1-844-REPATHA (1-844-737-2842) or visit www.REPATHA.com.
1B
Open the carton and peel away the white paper cover. Remove the
plastic
cover
from the clear tray.
Clear tray
Prefilled
cartridge
On-body infusor
Plastic cover
Leave the on-body infusor and prefilled cartridge in the clear tray until you are ready to
inject.
●
Do not touch the start button until the on-body infusor is on the skin and you are
ready to inject.
●
Do not use if the white paper cover is missing or damaged.

Page 4
1C Gather all materials needed for your injection and then wash your hands well with
soap and water.
On a clean, well-lit work surface, place the:
● Clear tray containing the on-body infusor and prefilled cartridge
● Alcohol wipes
● Cotton ball or gauze pad
● Adhesive bandage
● Sharps disposal container
1D
To securely attach the on-body infusor, prepare and clean an injection site that is
less likely to have body hair, or you can trim the area. Use a firm and flat skin
surface.
You can use:
● Your thigh
● Stomach area (abdomen), except for
a two-inch area right around your
navel
● Outer area of upper arm (only if
someone else is giving the injection)
Upper arm
Stomach area
(abdomen)
Thigh
Clean your injection site with an alcohol wipe. Let your skin dry.
●
Do not
touch this area again before injecting.
●
Do not inject into areas where the skin is tender, bruised, red or hard. Avoid
injecting into areas with wrinkles, skin folds, scars, stretch marks, moles and
excessive hair.
Important: To attach the on-body infusor securely, it is important to use a firm
and flat skin surface.

Page 5
Step 2: Get ready
2A Open the on-body infusor by swinging the cartridge door to the right. Then, leave
the door open. Do not close the cartridge door before the cartridge is loaded.
If you accidently close the cartridge door,
press on the left side of the door to release
the door latch.
If you are still unable to open the door, call
1-844-REPATHA (1-844-737-2842) or visit
www.REPATHA.com.
Do not press the start button until you are
ready to inject.
2B Inspect the cartridge.
Cartridge
bottom
White
Medicine plunger
Cartridge
label
Expiration date Cartridge top
(Do not rotate)
Check the expiration date: do not use if this date has passed.
Make sure the medicine in the cartridge is clear and colorless to slightly yellow.
●
Do not use if the medicine is cloudy or discolored or contains flakes or particles.
●
Do not use if any part of the cartridge looks cracked or broken.
●
Do not use if pieces of the cartridge are missing or not securely attached.
In any above cases, use a new
o
n
-
b
ody
i
nfusor
and prefilled cartridge and call
1-844-REPATHA (1-844-737-2842) or visit www.REPATHA.com.

Page 6
2C Clean the cartridge bottom.
Grab Here
With 1hand, hold the cartridge barrel and clean the cartridge bottom with an alcohol
wipe.
●
Do not remove or rotate the cartridge top or bottom.
●
Do not touch the bottom of the cartridge after cleaning with alcohol wipe.
2D
Load the cleaned cartridge into the on-body infusor and firmly press on the top
until it is secured in place. Make sure that you give your injection within 5
minutes after loading the cartridge. Do not insert the cartridge more than 5
minutes before injection. This can dry out the medicine.
Load
cartridge
straight
Press
down
firmly
Inject within
5 minutes
after loading
the cartridge
Insert the cartridge bottom first.
●
Do not
touch the start button until you have placed the loaded
o
n
-
b
ody
i
nfusor
on your skin.
5 minutes

Page 7
2E
Swing the door to the left. Then, squeeze firmly until it snaps shut. Apply enough
pressure when closing the door and make sure there is a “snap”before going to
the next step.
Squeeze
Tight
Make sure the cartridge fits securely in the on-body infusor before you close the door.
●Do not close the door if the cartridge is missing or not fully inserted.
●Do not touch the start button until you have placed the loaded on-body infusor
on your skin.
Important:
After you load the
on
-
body infusor
,
go
to the next step
right away
.
Step 3: Inject
3A Peel away both green pull tabs to show the adhesive. The on-body infusor is on
when the blue status light flashes.
Right pull tab
Left pull tab
Skin adhesive
“snap”

Page 8
You must remove both green pull tabs to turn the loaded on-body infusor on. You will
hear beeping and see a flashing blue status light.
● Do not pull the skin adhesive backing off the on-body infusor.
●Do not touch the skin adhesive.
●Do not touch the start button until you have placed the loaded on-body infusor
on your skin.
●Do not touch the needle cover area.
●Do not place the loaded on-body infusor on your body if the red status light
flashes continuously.
●Do not fold the skin adhesive over onto itself.
3B
Choose your
on
-
body infusor
injection
site
.
Only use the outer arm if someone else
is giving the injection.
Stomach area placement Thigh placement
or
Stretch method for stomach Do not stretch for thigh
Important:
Adjust your body posture to avoid skin folds and bulges.
3C
When the blue light flashes, the on-body infusor is ready. Keep the stretch
(stomach area method only). Hold the loaded on-body infusor with the blue light
visible, and place it on your skin. You may hear beeps.
Stomach area placement
or
Thigh placement
The
loaded
on
-
body infusor
will lay flat on your body. Make sure
all of the
adhesive is
attached to your skin. Run a finger around the adhesive edges to secure it.
Make sure
clothing does not get in the way of the loaded
on
-
body
infusor
, and you can
see the blue light at all times.
●
Do not
move
the loaded
on
-
body infusor
after it has been placed onto
your
skin.

Page 9
3D Firmly press and release the start button. A flashing green light and a click
signals the injection has started.
You may hear a pumping sound.
You may feel a pinch.
Make sure you see a green, flashing status light.
You may hear beeps that mean your injection has started.
Important: If medication leaks from the on-body infusor, call 1-844-REPATHA
(1-844-737-2842) or visit www.REPATHA.com.
3E The injection takes about nine minutes to finish. The status light turns solid
green, and the device beeps, when done.
It is okay to hear a pumping sound start and stop during
injection.
Injection is finished when:
The status light changes to solid green.
You hear several beeps.
The plunger fills medicine window all the way.

Page 10
Step 4: Finish
4A
When the injection is done, grab the skin adhesive to carefully peel the on-body
infusor off skin. After removal, check the medicine window. The green light should
now be off.
Used plunger filling medicine window
Check to see that the used plunger fills the medicine window all the way, and the green
solid light turns off, letting you know all medicine has been injected. If the plunger did
not fill the window, call 1-844-REPATHA (1-844-737-2842) or visit www.REPATHA.com.
●The used on-body infusor will beep when removed from your skin.
●It is normal to see a few drops of fluid on your skin after you remove the used
on-body infusor.
4B Throw away the used on-body infusor in a sharps container.
The on-body infusor contains batteries, electronics, and a
needle.
Put the used on-body infusor in a FDA-cleared sharps disposal
container right away after use. Do not throw away (dispose of)
the on-body infusor in your household trash.
If you do not have a FDA-cleared sharps disposal container, you
may use a household container that is:
omade of a heavy-duty plastic,
ocan be closed with a tight-fitting, puncture-resistant lid,
without sharps being able to come out,
oupright and stable during use,
oleak-resistant, and
oproperly labeled to warn of hazardous waste inside the
container.
When your sharps disposal container is almost full, you will need
to follow your community guidelines for the right way to dispose

Page 11
of your sharps disposal container. There may be state or local
laws about how you should throw away used needles and
syringes. For more information about safe sharps disposal, and
for specific information about sharps disposal in the state that
you live in, go to the FDA’s website at:
http://www.fda.gov/safesharpsdisposal.
Do not dispose of your used sharps disposal container in your
household trash unless your community guidelines permit this.
Do not recycle your used sharps disposal container.
Do not recycle the on-body infusor or sharps disposal container
or throw them into household trash.
Important: Always keep the sharps disposal container out of the
reach of children.
4C Check the injection site.
If there is blood, press a cotton ball or gauze pad on your injection site. Do not rub the
injection site. Apply an adhesive bandage if needed.
Troubleshooting
What do I do if the loaded on-body infusor status light continuously flashes red and I
hear beeps?
Stop using
the loaded
o
n
-
body infusor
. If the
o
n
-
body infusor
is attached to your body,
carefully remove it. Call 1-844-REPATHA (1-844-737-2842) or visit www.REPATHA.com.

Page 12
Commonly Asked Questions
What if I hear the on-body infusor beep and see a red blinking light when it is
on my body?
This means that an error has happened. When this happens, the injection will stop by
itself. Remove the on-body infusor from your body by slowly and carefully peeling it
off of your skin, call 1-844-REPATHA (1-844-737-2842) or visit www.REPATHA.com.
What should I do if the on-body infusor comes off my body during the
injection?
Though unlikely, if the on-body infusor comes off during the injection, the on-body
infusor will make a beeping sound, you will see the blinking red light, and the
on-body infusor will stop. The loaded on-body infusor can no longer be used, and do
not reapply to your body. Call 1-844-REPATHA (1-844-737-2842) or visit
www.REPATHA.com.
What if I push the start button before I place the on-body infusor on my skin?
If you have removed the adhesive backing and pressed the start button, the on-body
infusor will make a beeping sound and you will see the blinking red light. The on-body
infusor will stop. Stop using the on-body infusor, call 1-844-REPATHA
(1-844-737-2842) or visit www.REPATHA.com.
What if the on-body infusor does not beep and the blue status light does not
blink when I remove the pull tabs?
Check to see if both green pull tabs have been fully removed from the on-body
infusor, including the adhesive paper over the battery strip and needle cover. If both
green pull tabs have been fully removed and the on-body infusor still does not turn
on, use a new on-body infusor and prefilled cartridge. Call 1-844-REPATHA
(1-844-737-2842) or visit www.REPATHA.com.
What if I push the start button and nothing happens?
Remove the on-body infusor by slowly and carefully peeling it away from your skin.
Do not reapply the same on-body infusor that you have already placed on your skin.
Call 1-844-REPATHA (1-844-737-2842) or visit www.REPATHA.com.
What if I cannot open the cartridge door to insert the cartridge?
To open the on-body infusor door, press on the left side of the door to release the
door latch. If you are still unable to open the door, call 1-844-REPATHA
(1-844-737-2842) or visit www.REPATHA.com.
This Instructions for Use has been approved by the U.S. Food and Drug Administration.

Page 13
Manufactured by:
Amgen Inc.
One Amgen Center Drive
Thousand Oaks, CA 91320-1799
© 2015-2017, 2019 Amgen Inc.
All rights reserved.
<part number> Revised: 04/2019 v5
U.S. License Number 1080
Additional environmental conditions
Relative humidity range is 15% to 85%.
Altitude range is
-
984
feet to 11483
feet
(
-
300
meters to 3500
meters
).
During injection, keep the
on
-
body infusor
a minimum of
4
inches (
10
cm
)
away from
other electronics such as cellular phones.
Warning: Do not modify the device.
On
-
body infusor
operating temperature range is
59°F to 104°F
(
15°C to 40°C
).
www.devicepatents.com
.
SYMBOL TABLE
Do not re-use Serial number Type BF
Applied Part
Do not use if
packaging is
damaged
On-Body
Infusor
containing
420 mg/3.5 mL
(120 mg/mL)
Sterilized using
ethylene oxide
Refer to
Instructions for
Use
Lot number Keep dry Open here
Table of contents
Popular Medical Equipment manuals by other brands

E-Pill
E-Pill MedTime Station instruction manual

Deltec
Deltec CADD-Legacy PCA 6300 Operator's manual

Bioness
Bioness bioventus StimRouter user guide

HurryWorks
HurryWorks HurryCane Instructions and safety precautions

Medivance
Medivance ArcticSun 5000 Service manual

fasciotens
fasciotens Carrier Instructions for use