ReSound Azure User manual


Thank you for purchase a ReSound headset. Using the telephone, while
using your hearing instruments with the headset, may require some
practice. This user manual will help you make the most of your headset.
We hope you enjoy it!
Your ReSound headset lets you do all this:
• Answer calls
• End calls
• Reject calls*
• Voice dial*
• Redial last number*
• Call waiting*
• Call hold*
* If your cellular phone supports this feature
Page
Introduction........................................................4
What’s in the Box...................................................4
Specications ......................................................5
Use..................................................................6
Charging your Headset.............................................6
Using the Button: Modes of activation . . . . . . . . . . . . . . . . . . . . . . . . . . . . 8
Pairing your Headset with Your Cellular Phone . . . . . . . . . . . . . . . . . . . 9
Turning the Headset On and Off . . . . . . . . . . . . . . . . . . . . . . . . . . . . . . . . . .11
Low Battery Waring ...............................................12
Adjusting the Volume .............................................12
Connecting the headset to the cellular phone . . . . . . . . . . . . . . . . . . . 13
Making and Ending a Cellular Phone Call. . . . . . . . . . . . . . . . . . . . . . . . .14
Answering and Ending an Incoming Cellular Phone Call. . . . . . . . .14
Switching between Headset and Cellular Phone. . . . . . . . . . . . . . . . . 15
Rejecting an Incoming Call........................................15
Staying within Range .............................................16
What the Lights Mean.............................................16
Advanced Features................................................17
Making a Call with Voice Dial .....................................17
Re-dialling the Last Number......................................17
Using Call Waiting and Placing a Call On Hold . . . . . . . . . . . . . . . . . . . 17
Bluetooth Hub for Desk Phone Use. . . . . . . . . . . . . . . . . . . . . . . . . . . . . . . 19
Using the Hub .....................................................19
JABRA Bluetooth Hub Setup ......................................20
Daily use of the headset and the JABRA Bluetooth Hub . . . . . . . . .24
Maintenance ......................................................27
Precautions and Warnings........................................28
Taking Care of Your Headset......................................28
Batteries and Product Disposal . . . . . . . . . . . . . . . . . . . . . . . . . . . . . . . . . .28
Glossary ...........................................................29
Troubleshooting................................................30-31
Need more Help? ..................................................31
Key Word Index.................................................32-33
2 3
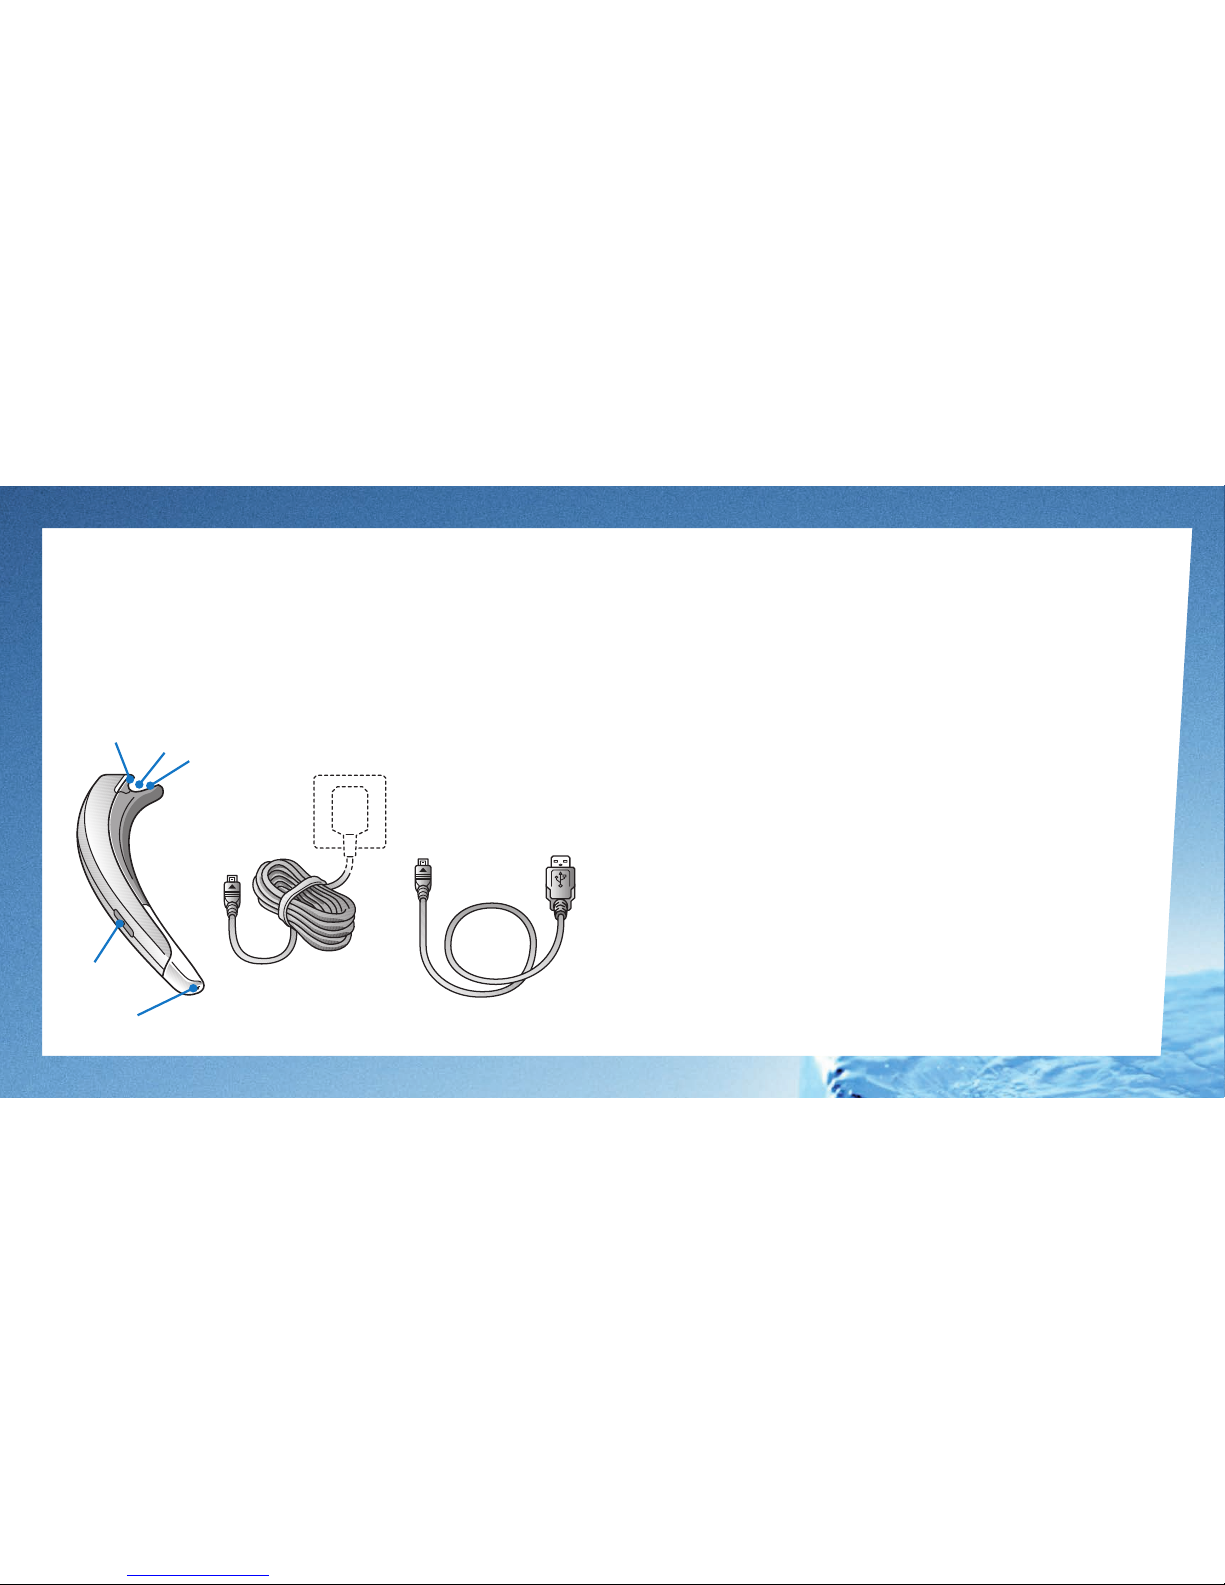
A. ReSound headset
1. Light indicator (LED)
2. Socket for hearing instrument
3. Charging socket (inside the socket for the hearing instrument)
4. Function button
5. Microphone
• Up to 4 hours talk time, up to 120 hours stand by time
• Rechargeable battery with charging option from AC power supply
and via a USB/PC cable
• Headset less than 12 grams
• Operating range up to 33 feet/10 meters
• The headset is designed to work with Bluetooth cellular® phones
and the Jabra Bluetooth Hub that can be purchased separately
• It can also work with other Bluetooth® devices that are Bluetooth
version 1.1 or 1.2 compliant and support a headset and/or
hands-free prole. For instance a computer.
4 5
123
4
5
USB/PC cable
AC power
supply
Important: Before setting up your headset be sure that all parts have
been above room temperature 32 ºF/0ºC for at least 30 minutes
Note! The headset has its own built-in battery, and does not use the bat-
tery of the hearing instrument.
Make sure thatyour headset is fully charged before you start using it.
The rst full charge takes approximately 2 hours.
You have three options for charging the headset.
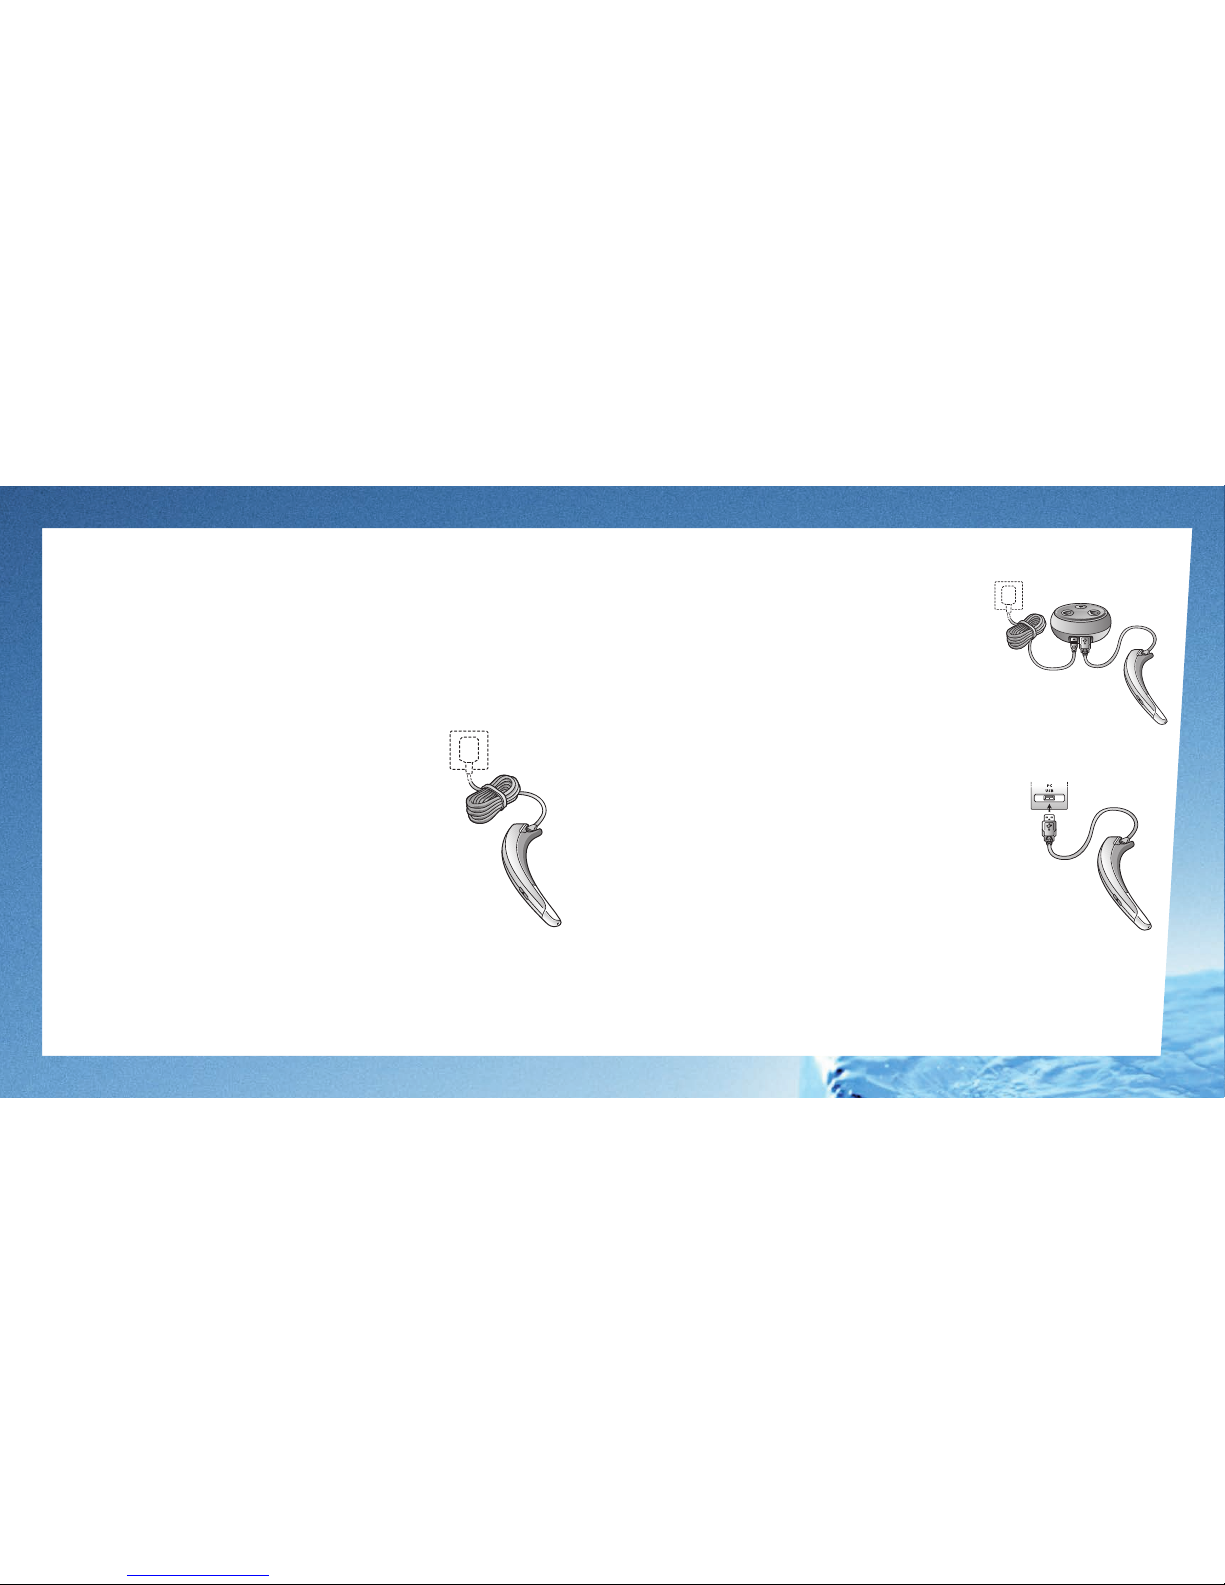
a. The headset should be disconnected from the
hearing instrument.
b. Connect your AC power adaptor to the wall power
socket and to the charging socket on the headset
In case the headset is left unused for a longer period of time,
it needs to be recharged. We advice you to recharge the headset at
least every 6 months! Otherwise the internal battery of the headset will
decompose and the headset will cease to function. ReSound does not
accept any responsibility for problems resulting from failure to comply
with the recharge guidelines
6 7
a. The headset should be disconnected
from the hearing instrument.
b. Connect the charger to the power supply
with the AC power adaptor included with
the charger
c. Connect the USB end of the USB/PC cable to the USB socket
on the charger. Connect the other end of the PC/USB cable to
the charging socket on the headset
a. The headset should be disconnected from the
hearing instrument.
b. Connect the USB end of the USB/PC cable to the
USB socket on the PC. Connect the other end of the
PC/USB cable to the charging socket on the headset
When the LED is steady yellow/light green, your headset is charging.
When the LED is green, it is fully charged. If the headset has not
been charged for a very long time, the headset will need a bit of
charging before constant yellow light turns on.
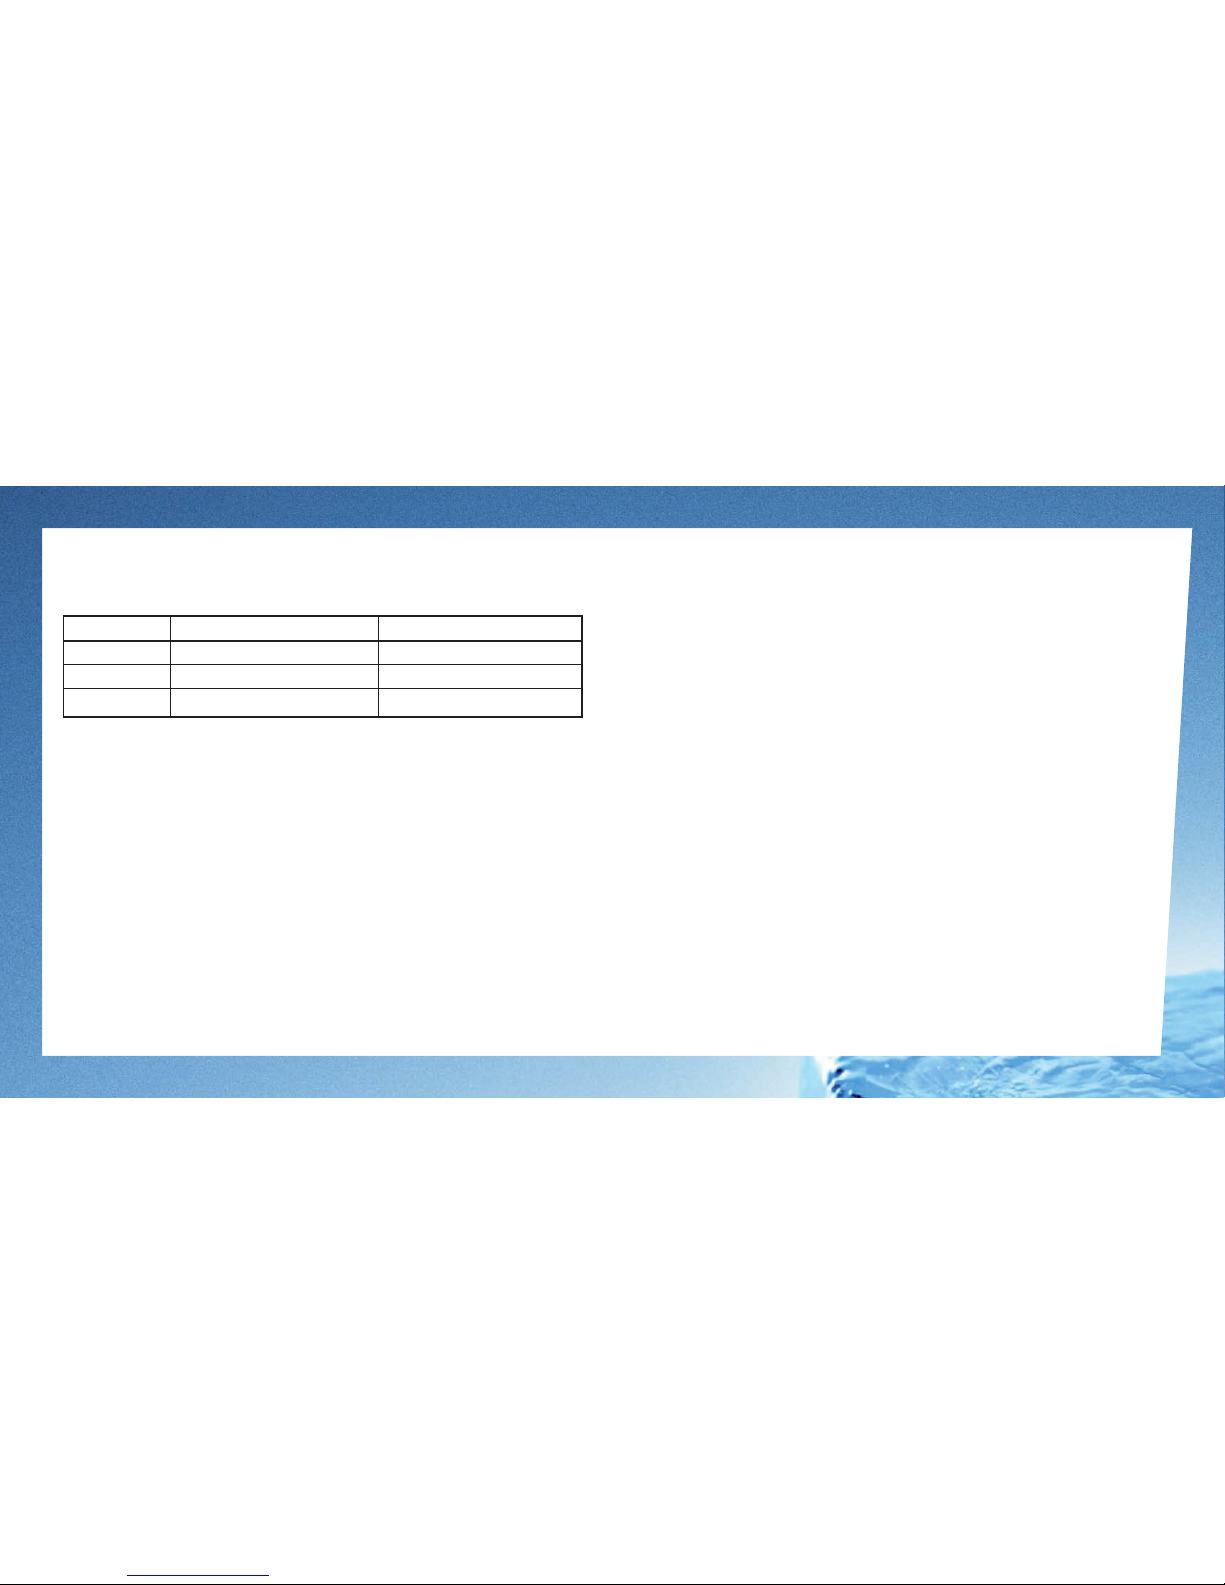
When using the headset, the functions are activated by the function
button.
Tap Press briey 1 click
Press Approximately 1 second 2 clicks
Double tap Press briey and repeat 1 click + 2 fast clicks
Note: Before use, please charge your headset.
Before you use your headset the rst time with a cellular phone, you
need to pair it with your cellular phone:
2. Press the function button on the headset. The headset will now
emit a solid blue light
3. Set your Bluetooth® phone to “discover” the ReSound headset. Fol-
low your phone instruction guide. This usually involves going to a
“setup”, “connect” or “Bluetooth” menu on your phone and select-
ing the option to “discover” or “add” a Bluetooth® device
4. Your phone will nd the ReSound headset and will ask if you want
to pair with it
5. Accept pairing by pressing Yes/OK (or similar) on the phone and
conrm with PIN “0000” (4 zeros)
6. Your phone will conrm when pairing is complete.
7. The headset emits blue ashes and turns off
8 9

• The headset is in pairing mode for two minutes. If it turns off after
one minute, and if you did not nish the pairing process, you need to
go back to step 2.
• If pairing is unsuccessful for some other reason, repeat the steps
above.
: If you accidentally put the headset into pairing mode, tap the
pairing button to exit pairing mode. Also note that the headset will
automatically turn itself off 10 seconds after being paired with either
a phone and/or the hearing instrument. Once the headset is discon-
nected from the hearing instruments or if the hearing instruments are
turned off the headset is no longer active/ON.
: The same headset can be paired with multiple phones.
1. Connect the hearing instrument to the headset.
Initially, it will be most easy to connect the
two devices before the hearing instrument
is placed on the ear. With some training it is
possible to connect the headset while
wearing the hearing instrument
2. The headset emits 4 quick blue ashes and is
now turned on. The headset will continuously
emit slow blue ashes indicating it is active
3. To turn off the headset, remove it from the
hearing instrument. The headset emits
4 fast blue ashes and turns off
For optimal performance, the ReSound headset
and your cellular phone should be worn on the same
side of your body. In general, you will get better performance when
there are no obstructions between your headset and your cellular
phone.
10 11

When the headset is running low on battery the headset beeps and the
LED blinks yellow (while in a call, every second, otherwise every third
second).
Note that the battery will have less capacity after two years use, which
means that standby and talk time is reduced. When the battery runs
out of power, the headset will automatically turn off.
The automatic volume control of the headset elevates sound level
and quality to match your environment. If necessary, use the volume
buttons on your cellular phone.
1. If the headset has not been paired to the cellular phone, follow the
pairing instructions (page 6).
2. Turn the headset on by attaching it to the hearing instrument.
3. When the cellular phone is within range (max 10 meters) and has
Bluetooth enabled, the headset and the cellular phone will connect.
This is shown on most cellular phones as a quick status message
and a permanent headset symbol on the cellular phone display.
Note: If you detach the headset from the hearing instrument, the
connection will be lost. When you attach the headset to the hearing
instrument again, the connection is automatically re-established.
12 13

1. Make sure the headset is attached to your hearing instrument and is
connected to your cellular phone.
2. Make the call from your cellular phone
3. On most phones the call will transfer to your headset automatically
(see your cellular phone User Manual to nd out how to activate this
feature if it is not active by default). If your phone does not allow the
automatic transfer, see your cellular phone User Manual on how to
answer a call with a headset.
4. To end a call, tap the headset function button, OR press End/No (or
similar) on your cellular phone.
1. When the phone rings, the headset emits fast blue ashes
2. To answer, tap the headset function button on your headset.
3. To end a call, tap the headset function button, OR press End/No (or
similar) on your cellular phone.
Important: If you answer a call on your cellular phone handset, certain
cellular phone models will not automatically transfer the call to your
headset.
Note: When you are in an active call on one phone, the headset can not
answer a call from another paired phone.
You can switch the call from your headset to your cellular phone, or
from your cellular phone to the headset during an active call. Use the
menu on your cellular phone to switch between headset and cellular
phone during an active call (see your cellular phone User Manual)
1. Press the headset function button when the phone rings to reject
an incoming call
2. Depending on your phone settings, the person who called will
either be forwarded to your voice mail or hear a busy signal
* Cellular phone dependant. Check your cellular phone User Manual
for further information.
14 15

The sound in your headset will deteriorate if you move beyond range
(up to 33 feet / 10 meters in line of sight). Move back into range to re-
store sound quality.
If you move too far from
your cellular phone, the call
might be ended or re-routed to your
cellular phone, depending on what cellular phone
model you are using. Please see your cellular phone
User Manual for more information on this function.
Only one colour will be visible at any one time.
When your headset LED does this… It means…
Green steady Charge complete
Blue slow ash Headset on (sleep mode)
Blue quick ash Headset on (active mode)
Blue steady Headset in pairing mode
Yellow/light green ash Low battery
Yellow/light green steady Charge in progress
1. Press the headset function button to enter Voice Dial mode
2. Consult your cellular phone User Manual for more information
about how to use this feature
3. For best results, record the voice dialling tag through your headset.
1. Double tap the headset function button.
1. This lets you put a call on hold during a conversation and answer a
waiting call.
2. Press the function button once to put the active call on hold and
answer the waiting call.
3. Press the function button to switch between the two calls.
4. Tap the headset function button to end the active conversation
**If the cellular phone supports this feature
16 17
33 feet / 10 meters

Your headset can be paired with up to 8 devices at the same time. How-
ever, only two can be connected (paired with the headset, turned on
and in range) with the headset at a time. This could be any Bluetooth®
devices, for example:
• Two cellular phones
• A cellular phone and a Hub
• A Blueetooth-enabled PC and a cellular phone
If you want to connect a third device and have two devices connected
already, then turn off one of the two connected devices or take it out-
side the range of the headset so that the connection is broken. The third
device will now make a connection with the headset.
The JABRA Bluetooth® Hub is an optional product that you can acquire
from your hearing care professional.
When using the Bluetooth® Hub the phone call is at all times managed
from the phone. The JABRA Bluetooth® Hub allows you to choose if you
want the sound output to be on the phone handset or on the headset.
The sound can be switched between headset and phone handset as
many times as you wish during the telephone call.
Note: Before use, please charge your headset.
18 19
Other manuals for Azure
1
This manual suits for next models
2
Table of contents
Other ReSound Headset manuals


