Restek Q-sep Multispeed Centrifuge User manual

www.restek.comwww.restek.com
Q-sep Multispeed Centrifuge
Operator’s Manual

2 www.restek.com
Table of Contents
Model Description..........................2
Intended Use...............................2
Warranty ...................................2
Safety Warnings ............................2
Initial Setup ................................3
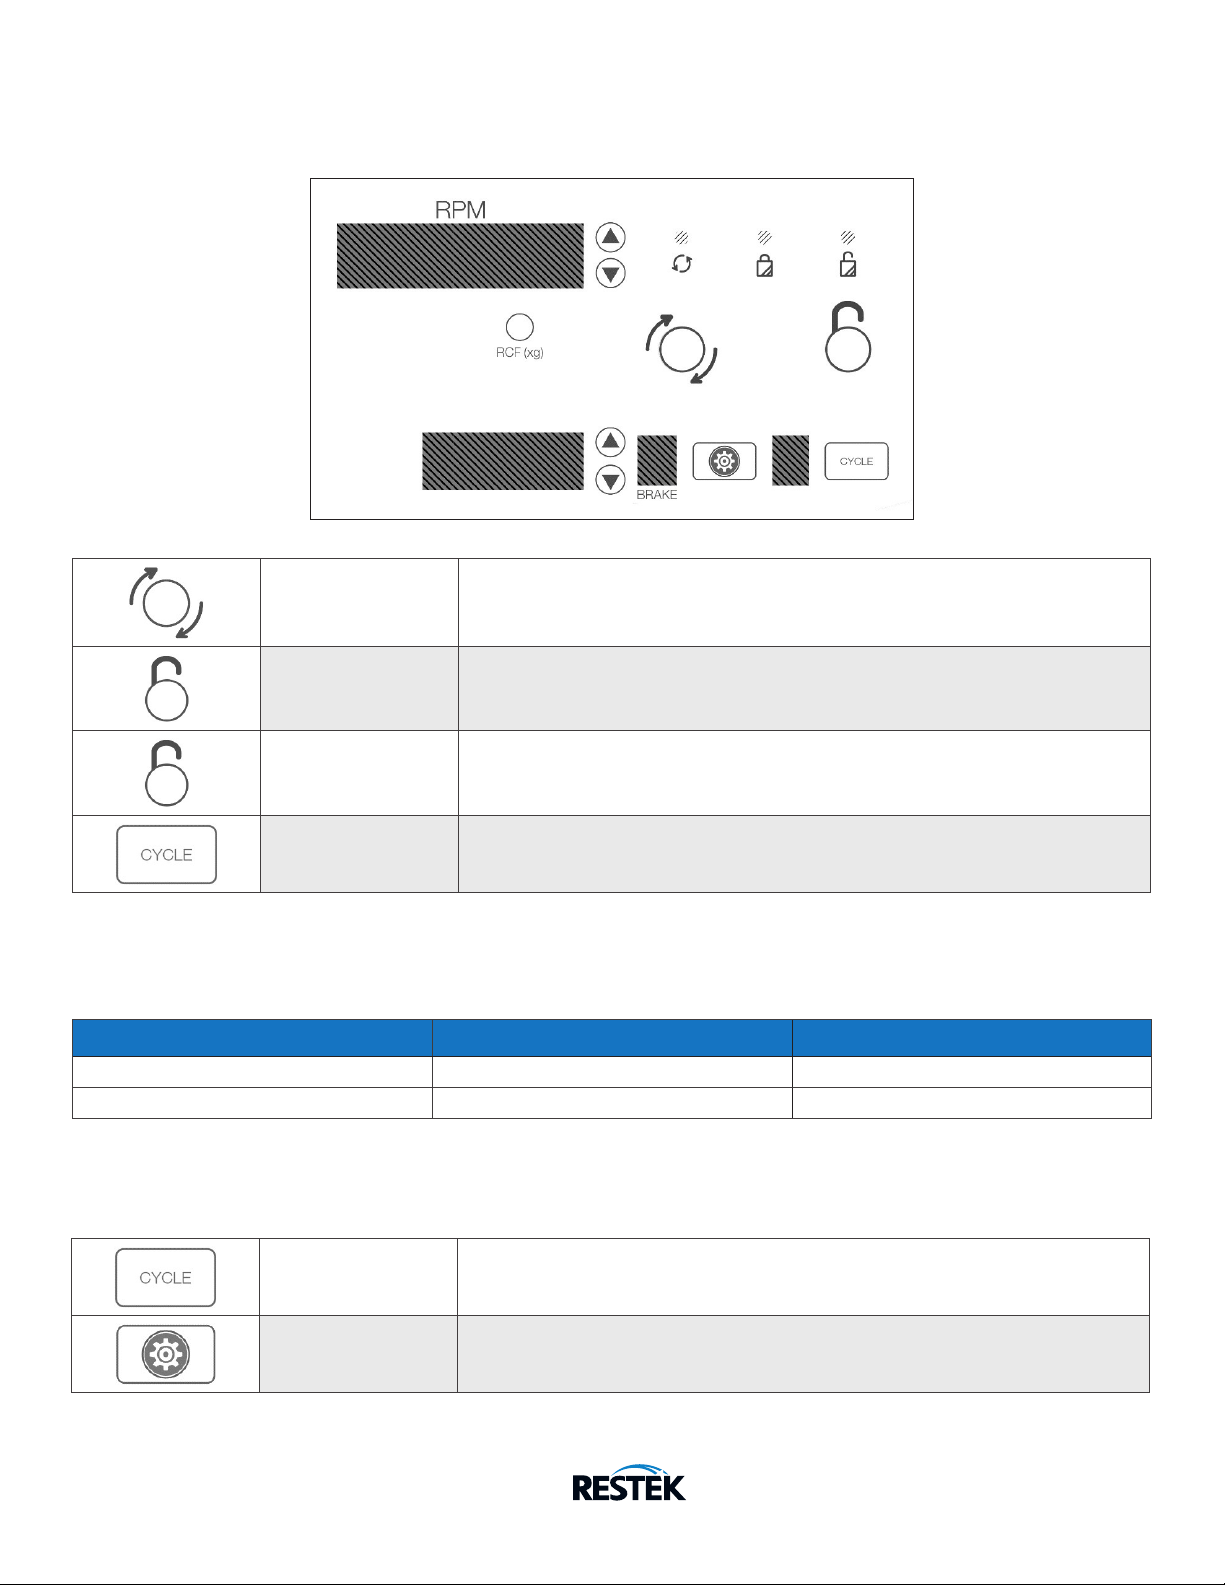
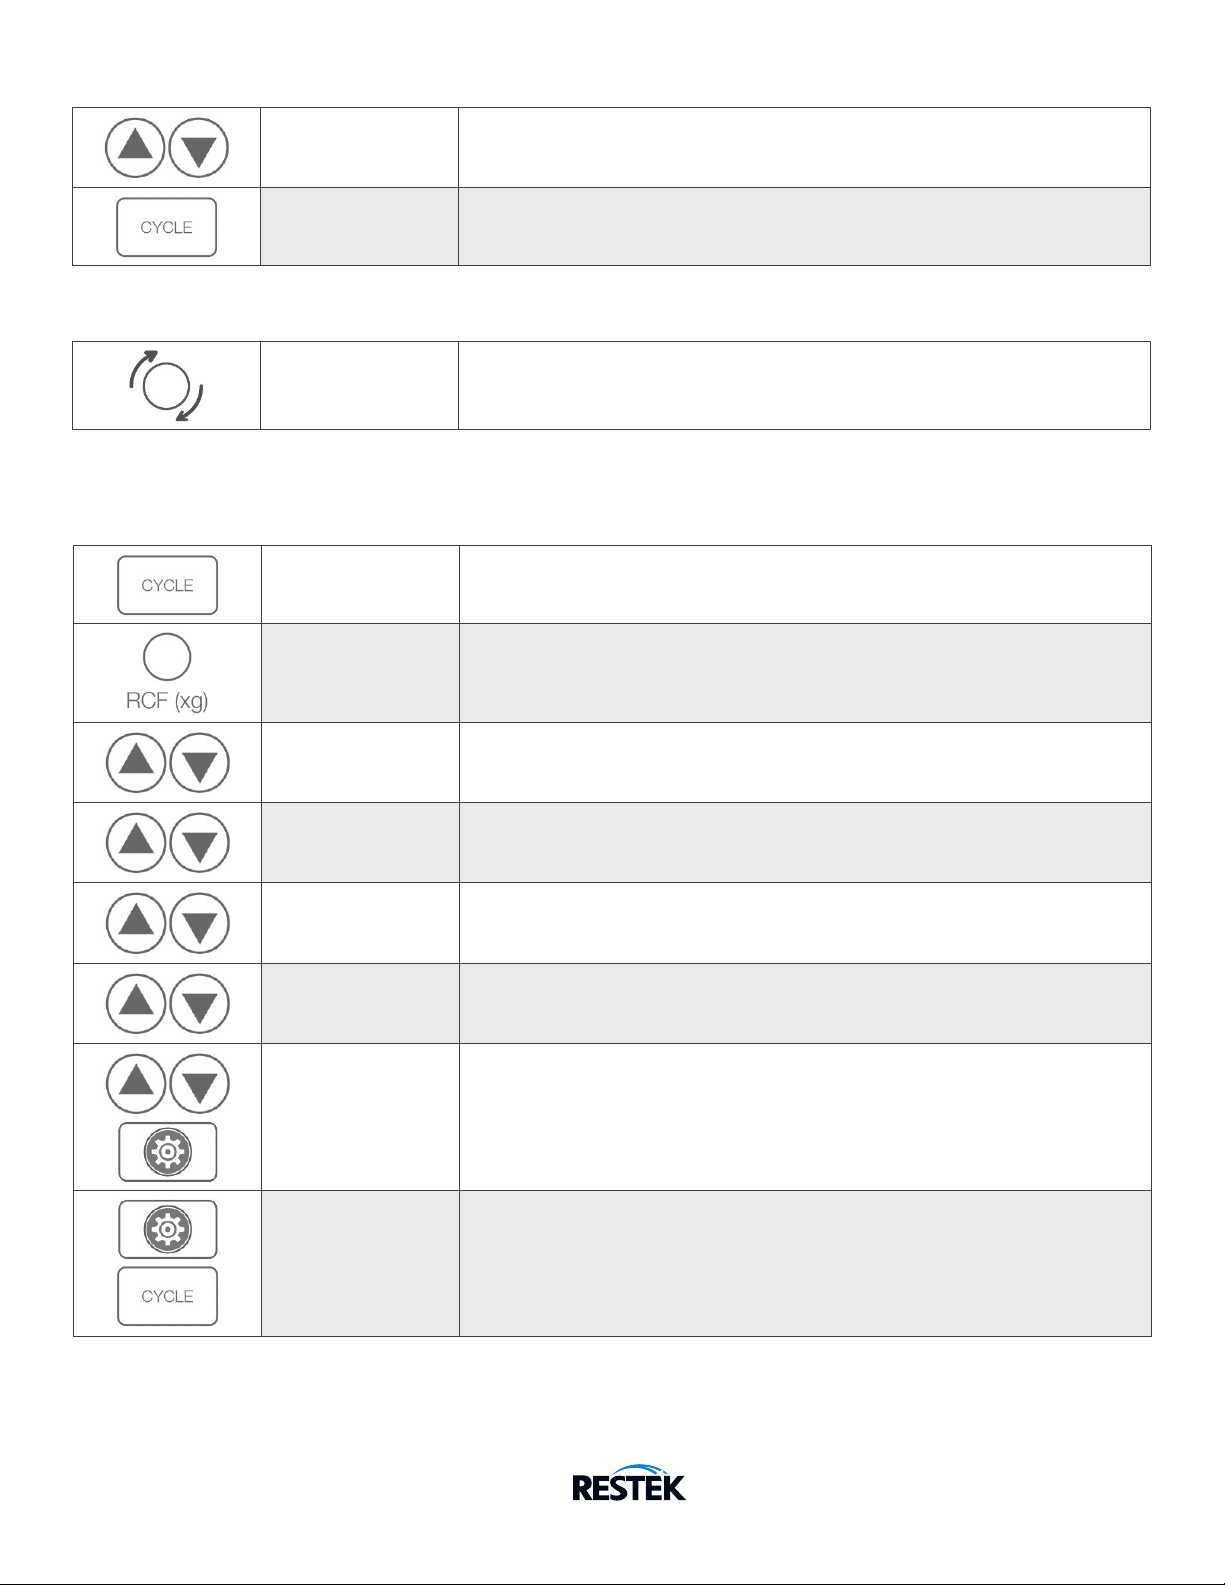
Control Panel...............................3
Quick Start .................................4
Settings ..................................4-7
Operation ..................................8
Tube Holder Configuration .................8
Balancing Loads ............................9
Care and Preventative Maintenance.........9
Cleaning and Disinfection .................10
Safety Features............................10
Emergency Rotor Chamber Entry ..........10
Troubleshooting...........................11
General Specifications .....................12
Calculating the G-Force....................12
Model Description
The Q-sep multispeed centrifuge is a continuous-duty, electronically
controlled, horizontal laboratory centrifuge with a lid safety interlock
system. The unit is controlled by an electronic push-button timer that is
variable from one to 30 minutes for precise spin times and ease of use.
Samples can be safely viewed through the transparent lid. The imbalance
detection system safely terminates a run cycle in the event that a load is
severely imbalanced. Entry into the machine is restricted during opera-
tion by the safety interlock system. The Q-sep multispeed centrifuge
features a lighted control panel that displays the status of the machine,
and is easily viewable from a distance.
Intended Use
General-purpose laboratory centrifuge intended for safe and rapid den-
sity-based separation of fluids, including physiologic fluids, in approved
specimen receptacles for qualitative or quantitative test procedures. As
a general-purpose laboratory centrifuge, it is designed to also run other
approved containers filled with chemicals (nonflammable, nonexplosive,
nonvolatile, and non-highly reactive only), environmental samples, and
other nonhuman body samples. This device is intended to be operated
by properly trained personnel who have carefully read the operating
manual and are familiar with the function of the device.
(Refer to the clinical laboratory method specified by the specimen re-
ceptacle manufacturer or established by the medical technology for the
products applications.)
Warranty
Restek warranties that this centrifuge is free from defects in workman-
ship and parts for two years.
Safety Warnings
• For the safety of both the operator and service personnel, care should be taken when using this centrifuge if handling sub-
stances that are known to be toxic, radioactive, or contaminated with pathogenic microorganisms. Use appropriate personal
protection equipment (PPE). When Risk Group II materials are used, (as identified in the World Health Organization “Laboratory
Bio-Safety Manual”), a Bio-Seal should be employed. In the event that materials of a higher risk group are being used, more than
one level of protection must be provided. The use of flammable or explosive materials, as well as those materials which have a
vigorous chemical reaction, is prohibited.
• Unplug the centrifuge before cleaning or performing maintenance.
• Inspect centrifuge for cracks or physical damage to cabinet, lid, rotor, or tube holders. Damage may result in unsafe operation.
Discontinue use until repairs have been performed.
• This equipment generates, uses, and can radiate radio frequency energy, and if not installed and used in accordance with this
operator manual, may cause interference to radio communications.
• Operation of this equipment in a residential area may cause interference, in which case the user will be required to correct the
interference at his/her own expense.

www.restek.com 3
Initial Setup
• Unpack and verify that all the following are included:
1. Centrifuge
2. 15 mL four-place tube holder (6)
3. 50 mL single-place tube holder (6)
4. 50 mL conical tube insert (6)
5. 2 mL tube adaptors (24)
6. U.S. power cord (1)
7. Global/universal power cord (1)
• Set up the centrifuge on a flat, level surface. A bench top clearance
height of 21” (54 cm) is required to open the lid.
• There must be 6” (15 cm) of clear space around the centrifuge.
Proper ventilation is necessary to prevent the overheating of samples as
well as premature failure of the centrifuge. Choose an area that allows
unencumbered air flow and has a temperature that remains between
16 °C and 32 °C.
• No hazardous material is permitted in the centrifuge's clearance space
during operation.
• The operator time within the centrifuge's clearance space should be limited
to the time necessary for loading, unloading, and centrifuge operation only.
• Plug the line cord into the centrifuge.
• Plug the line cord into an approved electrical outlet.
Be sure the electrical outlet is always accessible as the line cord is the means
of emergency disconnection!
Selecting the Power Cord
Your centrifuge includes two power cords. The three-prong cord is intended for use
in the United States, and the two-prong cord is intended for use in other countries.
1.
2. 3.
6.
7.
4. 5.
Control Panel
RUN
Indicator
LATCH
Indicator
UNLOCKED
Indicator
START
Button
STOP/EMERGENCY
UNLOCK button
CYCLE
selection button
CYCLE indicator
MENU
gear button
BRAKE
setting indicator
TIME/COUNTDOWN
TIMER display
RPM/CYCLE
NAME display
RCF/XG
display toggle

4 www.restek.com
Start Begins running the cycle displayed on the screen. The lid must be closed.
Unlock Allows access into the rotor chamber by engaging the unlocking mechanism.
Entry is only possible when the rotor is stopped.
Stop Pressing the UNLOCK button during operation will terminate the run and unlock
the lid after the rotor has come to a stop.
Cycle Selection Press the CYCLE button to select the desired saved cycle.
Settings
Presets
Time G-Force
AOAC 1 minute 1500 xg
EN 5 minutes 3000 xg
Access the Menu
From Preset
Access the Menu Hold the CYCLE button until you hear a double beep. The cycle number should
begin flashing.
Enter the
Advanced Menu Press the MENU gear button to enter the advanced menu.
Quick Start
The top screen display alternates between the name and speed of the currently selected cycle. The bottom screen displays the
time setting.

www.restek.com 5
From Free Mode
Access the Menu Press the MENU gear button.
Exit the Menu
From Preset
Exit the Menu Press the MENU gear button, followed by the CYCLE button.
From Free Mode
Exit the Menu Press the MENU gear button.
Free Mode
Change time, RPM or g-force for a single cycle.
Setting Speed
To change the speed (RPM) shown on the top display, use the up and down but-
tons next to that screen. The CYCLE number is replaced with a “--“in the display,
and the top screen displays the speed.
Setting by G-Force
Press and hold the RCF/XG button while changing the displayed setting on the
top screen, using the up and down buttons next to it. The RPM will automatically
adjust.
Setting Time Press the up and down buttons next to the TIME display.
Change Brake
Values
Access the menu.
Press the down key next to the top screen until it shows “Brake.” To turn brake
on and off, use the up and down buttons next to the TIME display.
Exit the menu.
Turn Beeper
On or Off
Access the menu.
Press the up and down keys next to the upper screen until “Beeper” shows on
the upper screen. Switch ON or OFF with the keys next to the lower screen. This
setting will apply to all cycles.
Exit the menu.

6 www.restek.com
Modifying a Preset
Save up to 10 custom cycles. The top screen alternates between cycle name and speed.
Access the Menu With desired cycle selected, access the menu.
Setting by G-Force
(Recommended)
Press and hold the RCF/XG button while changing the setting using the UP and
DOWN buttons next to the display. The RPM will automatically adjust.
Setting Speed
(Alternate)
To change the speed (RPM), use the UP and DOWN buttons next to the display.
The g-force will adjust automatically and can be verified by pressing the RCF
button.
Setting Time Press the UP and DOWN buttons next to the TIME display.
Change Brake
Values
While in the advanced menu, navigate to “Brake.” Use the UP and DOWN but-
tons next to the TIME screen to turn brake on and off.
Turn Beeper
On or Off
While in the advanced menu, navigate to “Beeper.” Switch ON or OFF with the
UP and DOWN buttons next to the TIME display. This setting will apply to all
cycles.
Naming the Cycle
While in the advanced menu, navigate to the cycle name with the UP and
DOWN arrows. Press the START button. The * (asterisk symbol) indicates the
space selected. Use the UP and DOWN buttons to change characters; then, move
to the next space with the right arrow >. Press the MENU gear button to return
to the main programming menu.
Save and Exit
Settings Mode Press the MENU gear button, followed by the CYCLE button to exit the menu.
Create New Cycle
Change Settings Refer to previous table (Free Mode) to change speed and time to desired values.
Save Cycle Hold the CYCLE button until you hear a double beep.
Display Cycle Count
Display Cycle Count With the lid open and the unit powered on, press and hold the START button.
The cycle count will be displayed until the START button is released.

www.restek.com 7
Deleting a Cycle
Save up to 10 custom cycles. The top screen alternates between cycle name and speed.
Enter the
Advanced Menu With the desired cycle selected, access the menu, and enter the advanced menu.
Navigate to Delete
Using the UP and DOWN buttons, navigate to DELETE. Exit the menu.
WARNING: CYCLE WILL BE DELETED IF MENU IS EXITED WITH DELETE
SELECTED.
Confirm Deletion Press the CYCLE button to delete the cycle.
Cycle Lock
To ensure repeatability, the centrifuge can be locked on one cycle (Single Cycle Lock) or restricted to the saved cycles
(Preset Lock). The Single Cycle Lock also prevents making changes to the selected cycle parameters. The Preset Lock
allows selection of any saved cycle and prevents changing the parameters of saved cycles.
Enter Single Cycle Select desired cycle. With lid open, press and hold the UNLOCK button. One
beep will confirm that cycle selection is locked.
Enter Preset Lock
Continue holding the UNLOCK button to enter Preset Lock. Two beeps will con-
firm that cycle selection is now locked. Note: If Single Cycle Lock is set, it must be
canceled before Preset Lock can be set.
Cancel Lock Hold the UNLOCK button. Three beeps will confirm that the cycle selection is
now unlocked.

8 www.restek.com
Operation
· Place the tubes into the tube holders. Be sure to follow the rules for balanced loads as listed in the next section.
· Close the lid and turn the lid knob clockwise to its complete stop position.
The digital screen shows the currently selected cycle. To select another cycle, press the UP or DOWN button in succession until
the desired cycle is selected.
· Pushing the START button on the control panel will start the spin cycle.
· When the cycle is completed, the rotor will slow to a complete stop and the lid light will flash.
· The unlocking mechanism will engage for 60 seconds to allow entry into the rotor chamber. To unlock after more than 60
seconds have elapsed, press the UNLOCK button. The lid will unlock for another 15 seconds.
· Turn the lid knob counterclockwise and open the lid. The lid light will turn off.
· You may now safely remove the samples.
Tube Holder Configuration
The Q-sep multispeed centrifuge has been designed to work with 50, 15, and 2 mL centrifuge tubes using the appropriate acces-
sories. The black tube holders with the larger top opening are designed to hold 50 mL round, conical, or flat bottom centrifuge
tubes. Up to six 50 mL tubes can be processed at the same time. When using 50 mL conical bottom centrifuge tubes, place conical
tube inserts into the bottom of the 50 mL tube holder to prevent damage to the centrifuge tubes. The black tube holders with
four-position inserts are designed to hold 15 mL round or conical bottom centrifuge tubes. Up to eighteen 15 mL tubes can be
processed at the same time. When processing 15 mL tubes, one of the inner (lower) positions in the tube holder must be left
empty to prevent the tubes from contacting each other when the holder moves into the horizontal position. Note that either the
left or right position may be left empty, but this must be consistent across all holders to maintain a balanced load. Purple inserts
can be used to adapt the black tube holder for use with 2 mL round or conical bottom centrifuge tubes. Up to twenty-four 2 mL
tubes can be processed at the same time using these inserts. Different sizes of tubes can be processed simultaneously as long as
the balance is properly maintained (see Balanced Loads below).
Tube Loading Configurations
Tube Size (mL) Holder Color Max Number of Tubes per Load
2Black (use purple tube adaptors) 24
15 Black 18
50 Black 6

www.restek.com 9
Balancing Loads
Your centrifuge must contain a balanced load in order to work properly. To ensure that the load is balanced, keep these rules
in mind when inserting test tube samples:
1. Opposing tube holders must be identical.
2. Opposing tube holders must be empty or loaded with an equal number of equally weighted samples.
3. If an odd number of samples is to be spun, use a water-filled tube to balance the unpaired one.
Note: The Q-sep multispeed centrifuge is designed to detect serious, unbalanced situations and will safely terminate an
unbalanced run by cutting the power to the motor. If this occurs, wait for the rotor to stop spinning before unlocking. Balance
the load before restarting the centrifuge motor.
4. When loading tubes into opposing holders, the holders will be balanced when the tubes are loaded diagonally from one
another. See the illustration below.
Note: When loading 15 mL tubes, the maximum capacity is three (3) tubes per holder. Keep a lower position empty to prevent tubes from
contacting each other when the holder moves to the horizontal position. See diagram to properly balance holders with empty positions.
For 15 mL tubes, leave one
inner position empty.
Care and Preventative Maintenance
With proper care and maintenance, your centrifuge will provide years of laboratory service. For proper care, the following steps
should be taken:
· Always Spin Balanced Loads: Make certain that you are always spinning a balanced load as shown in the previous section.
These centrifuges have a unique counterbalanced motor mounting design that produces excellent vibration dampening.
However, unbalanced loads may break glass test tubes and may produce unsatisfactory separation results. Proper load
balancing will improve sample separation and extend the life of the centrifuge.
· Motor and Electrical Maintenance: The highest quality electrical components have been selected for the centrifuge and
should not need maintenance or servicing for the life of the centrifuge.
· Tube Holder Replacement: It is recommended that the tube holders be replaced after 24 months of use. Inspect tube holders
regularly for cracks. If cracks are discovered, replace immediately.
· Remove Accessories Before Moving: All tube holders, samples, and caps must be removed from the rotor chamber before
transporting or storing the centrifuge to prevent damage and injury.

10 www.restek.com
Safety Features
· Lid Safety Switch: The Q-sep multispeed centrifuge lid is secured to the top of the cabinet by a latching knob and pawl
system. When the knob is rotated clockwise, the pawl grips the underside of the cabinet opening and prevents the lid from
opening. A mechanical stop positions the pawl and prevents it from rotating completely. When rotated to the stop position,
the pawl makes contact with a microswitch mounted underneath the cabinet top. The lid safety switch prevents the centri-
fuge from operating while the lid is open. An indicator light on the front of the machine will illuminate when the lid has been
latched properly.
· Lid Safety Interlock System: In addition to the Lid Safety Switch, the Q-sep multispeed centrifuge has a true “0 RPM” lid-
locking system. The lid safety interlock system keeps the lid locked at all times (even during power failure) and requires that the
rotor be at rest in order to unlock the lid. The centrifuge will not allow entry into the rotor chamber unless the centrifuge has
power and the rotor is stopped. To open the lid, make sure that the centrifuge is plugged in and, with the rotor stopped, press
the OPEN/EMERGENCY STOP button.
Note: After the centrifuge has started spinning, it may be possible to rotate the lid knob enough to cause the pawl to lose contact with
the lid safety switch. If this happens, the centrifuge motor may lose power, but the lid will still remain locked. If the knob is accidentally
moved and this situation should occur, rotate the knob fully clockwise to its stop position, and the centrifuge will resume operation
after a few seconds.
· Circuit Breaker: The Q-sep multispeed centrifuge is protected with a 4-amp circuit breaker located at the rear of the machine
and mounted to the base. Any electrical short circuit will cause the breaker to cut power to the machine.
· Imbalance Detection System: In the event that an unbalanced load is spun in this centrifuge, the run will be aborted. The
centrifuge will stop and beep continuously, signaling that an imbalance was detected.
Emergency Rotor Chamber Entry
In the event of power failure, it may be impossible to unlock the lid by conven-
tional means. In this case, entry into the rotor chamber may be made by remov-
ing the latch label and using a pen to manually disengage the locking mecha-
nism (see photo). Pull the mechanism towards the control panel, then unlatch
and open the lid. If the unit is damaged, contact Restek Corporation or your
distributor.
Cleaning and Disinfection
To prolong the life of the centrifuge, cleaning and disinfection is recommended every six months or whenever there is a spillage or
tube breakage. Contaminants must be removed immediately or corrosion and premature degradation of components can occur.
Before using any cleaning or decontamination methods other than those recommended by the manufacturer, users should verify
with the manufacturer that the proposed method will not damage the equipment.
· Unplug the centrifuge before cleaning or performing maintenance.
· Use appropriate personal protective equipment (PPE).
· Apply cleaning solutions with a towel or cloth. Do not submerge the centrifuge in water or other cleaning solutions as this will
cause damage and void the warranty.
· ONLY isopropyl alcohol or a 10% (5500 PPM) bleach solution should be used to disinfect the centrifuge and its accessories.
· All surfaces must be dried immediately after cleaning and disinfecting.
TBQ GERMICIDAL PRODUCTS ARE NOT RECOMMENDED AS THEY MAY CAUSE DAMAGE TO THE CENTRIFUGE. WIPE OFF
THOROUGHLY AFTER USE TO PREVENT VOIDING THE WARRANTY.
· Fully/partially halogenated hydrocarbons, ketones, esters, ethers, benzyls, ethyl benzenes, and all other chemicals not pre-
scribed by the manufacturer cannot be used as they may cause damage to the rotor chamber, rotor, tube holders, accessories
and centrifuge exterior and will void the warranty.

www.restek.com 11
Troubleshooting
The centrifuge does not run ·Verify that the centrifuge is powered. One of the LED lights should be on.
·If “Lid not closed” message is displayed, make sure the lid latch is turned completely
clockwise to its stop position.
·If the centrifuge still does not run, contact Customer Service for further assistance.
The rotor does not spin freely ·Make sure nothing has fallen into the rotor chamber, following the procedure above.
·If nothing obstructs the rotor, the rotor may be damaged. Contact Customer Service for
further assistance.
The centrifuge makes a rattling
noise when running
·Stop the centrifuge. Open the lid.
·Wearing PPE, remove tubes and tube holders/buckets and look for fallen objects or
debris. Carefully reach inside the rotor chamber with a tool to remove them.
·Inspect the rotor, tube holders or buckets for damage.
·If the tube holders or buckets have any damage, even slight, safely dispose of them and
replace them.
·If the rotor appears damaged, contact Customer Service for further assistance.
Excessive noise or vibration
when the centrifuge is running
·Verify that all four centrifuge feet are properly seated on a flat surface.
·Ensure that the load is balanced according to instructions in the “Balancing Loads”
section of this manual.
·Make sure that nothing has fallen into the rotor chamber.
“Abort” is displayed on the
top screen
The centrifugation cycle has been interrupted.
The centrifuge stops and beeps
continuously
The load is not balanced. Press the UNLOCK button, open the lid, and balance the load as
recommended elsewhere in this manual.
The centrifuge is stuck on one
of the settings
Cycle selection is locked. Press the UNLOCK button for 5 seconds.
Only a few cycles can be
accessed
The Preset Lock is active. To deactivate it, press the UNLOCK button for 5 seconds, until you
hear two beeps, then again until the next two beeps. All cycles can now be accessed and/or
amended.
The cycle time and speed are
not set to the desired value
Check the setting by following the instructions in the section on Changing Cycle Settings. If
the preset is not the desired length, follow the procedure on the same page to change the
preset time.
Cycle parameters cannot be
changed
·If cycle selection is locked on one cycle, press the UNLOCK button for 5 seconds. Then,
press the GEAR button and follow the instructions elsewhere in this manual.
·If different saved cycles can be selected but not modified, the centrifuge is in Preset Lock
mode. Press the UNLOCK button for 5 seconds until two beeps are heard, then again
until the next two beeps. You should now be able to change cycle parameters.
The centrifuge does not unlock
after a run is completed
·Wait until the rotor has come to a complete stop. If the lid knob still cannot be rotated,
press the UNLOCK button and try again.
·If no LED light is on, the unit is not powered, and the lid will not unlock by conventional
means. Remove the latch label and use a pen to manually disengage the locking mecha-
nism. Pull the mechanism towards the control panel and then unlatch and open the lid.
·If the unit is damaged, contact Customer Service for further assistance.
The lid does not open ·Ensure that the lid knob is turned fully counterclockwise.
·If the knob cannot be turned counterclockwise, turn it fully clockwise, press UNLOCK, and
turn counterclockwise.
·If the lid remains locked after this and will not unlock, the electronics may have been
damaged. Contact Customer Service for further assistance.
Clicking noise during braking
gets loud
·Make sure that the screw in the center of the rotor is tight.
Lid does not stay up ·Tighten the center screw on the lid hinge.
Note: The latch must be turned completely clockwise to its stop position for the centrifuge to operate.

Calculating The G-Force
The IFUs of tube manufacturers recommend cycles at a
minimum G-force, which can be calculated if you know
the RPM and the radius.
In Centimeters:
RCF or G-force = 0.00001118 x
Rotor Radius (cm) x (RPM)2
In Inches:
RCF or G-force = 0.0000284 x
Rotor Radius (in) x (RPM)2
Radius 6.0 in (15.3 cm)
General Specifications
The rotor and accessories are rated for the maximum
rotation frequency shown below.
Tube Capacity 6 x 50 mL tubes
18 x 15 mL tubes
24 x 2 mL tubes
Dimensions (H x W x D) 9 in x 14.5 in x 17 in
(23 cm x 37 cm x 43 cm)
Weight 39 lb (17 kg)
Sound Level 64 dB A
Environmental Range 16–32 °C
Voltage 95–253 VAC
Frequency 50/60 Hz
Power Requirement 220 Watts
Centrifuge Motor ½ HP Brushless DC
Max g-Force 3450 xg
Max Speed 4500 RPM
Cycle Time 30 sec to 99 min 59 sec (±2%)
INSTRUCTIONS FOR DISPOSAL OF WEEE BY USERS IN THE EUROPEAN UNION
This product must not be disposed of with other waste. Instead, it is the user’s responsibility to dispose of their
waste equipment by handing it over to a designated collection point for the recycling of waste electrical and
electronic equipment. The separate collection and recycling of your waste equipment at the time of disposal
will help to conserve natural resources and ensure that it is recycled in a manner that protects human health
and the environment. For more information about where you can drop off your waste equipment for recycling,
please contact your local city office, waste disposal service, or wherever you purchased the product.
© 2020 Restek Corporation. All rights reserved. Printed in the U.S.A.
www.restek.com
#803-03-03 Rev. date: 09/20
Restek patents and trademarks are the property of Restek Corporation. (See www.restek.com/Patents-Trademarks for full list.) Other trademarks in Restek literature
or on its website are the property of their respective owners. Restek registered trademarks are registered in the U.S. and may also be registered in other countries.
Questions about this or any other Restek product?
Contact us or your local Restek representative (www.restek.com/contact-us).
FDA LISTED
E112532
RoHS
Compliant
Complies with UL61010-1/CSA C22.2 No. 61010-1 and IEC61010-2-020
Protected by U.S. Patents #6,811,531; # 7,422,554; #D718,463 & #D734,489. Other Patents Pending
Table of contents
Other Restek Laboratory Equipment manuals