RetroBelt Tri Five User manual

MODERN SAFETY FOR YOUR CLASSIC
www.retrobelt.com
1955-57 CHEVROLET 3-POINT SEATBELT KIT
INSTALLATION GUIDE

1
TABLE OF CONTENTS
WELCOME 2
INSTALLATION HARDWARE 3
PRECAUTIONS 4
INSTALLATION GUIDELINES
INSTALLING ANCHOR POINTS 5
FRONT SEATS SEDAN/WAGON 7
FRONT SEATS COUPE/CONVERTIBLE 10
BACK SEATS 11
USE AND MAINTENANCE 13
LIMITED WARRANTY 14
INSTALLATION NOTES 16

2
Copyright 2015 RetroBelt USA, LLC
WELCOME
Thank you for purchasing a RetroBelt® 3-point seatbelt kit. This two
passenger retractable lap and shoulder system is perfect for front
bench seat installations. This system features a 20-inch push-button
buckle and all hardware needed for installation into your 1955-57
Chevrolet. The retractor is an inertia locking system that locks during a
sudden stop or with any unintended motion. This installation requires
advanced fabrication skills to install anchor points. By choosing to
install a RetroBelt®3-point system, you’ve chosen to invest in the
safety of yourself and your family.
General Features
• Twenty inches of webbing on receiver (perfect for bench seat installations)
• Meets or exceeds federal motor vehicle safety standards
• Grade 5 hardware kit
• Grade 5 mounting hardware included
• Starburst push-button buckle and chrome belt ends
• Eight colors available with color-matched retractors
• 1 year parts and labor warranty
The information enclosed in this manual is to be used as a guide to assist you
with installation and operation of your seatbelts. This guide does not cover every
installation possibility, vehicle, or aspect of the installation process.
RetroBelt USA, LLC, or its subsidiaries, assume no responsibility for any installation.
This manual may be updated from time to time.
Visit our website for the latest version: www.retrobelt.com.

3
INSTALLATION HARDWARE
The installation hardware below is designed to cover as many
variations of the 1955-57 Chevrolet as possible. If your vehicle
has existing anchor points installed, you may not need all of this
hardware. Feel free to contact us if you have any questions.
The retrotting instructions in this manual are only to be used as a
guide for installing anchor points in vehicles that are not already
equipped with them. The retrotting steps in this manual should
only be performed by a professional installer to ensure that the
installation is as safe as possible.
Grade 5
Anchor Mount
QTY: 2
Grade 5
Anchor Adapter
QTY: 2
7/16” Grade 5 Hex
Anchor Bolt
QTY: 2
2.48” Oversized
Fastener/Anchor
QTY: 6
7/16” Nut
QTY: 14
7/16” Washer
QTY: 10
7/16” Grade 5
Hex Anchor Bolt
QTY: 8
7/16” Nylon
Spacers
QTY: 8
7/16” Grade 5 Hex
Shoulder Anchor Bolt
QTY: 2

4
Copyright 2015 RetroBelt USA, LLC
PRECAUTIONS
This seatbelt kit has been rigorously tested by an independent laboratory to meet or
exceed Federal Motor Vehicle Safety Standards (FMVSS) #208, #209, #302.
Legal Disclosure
RetroBelt USA, LLC, or its subsidiaries assume no responsibility for proper or improper
installation. Every attempt has been made to make this user’s manual as informative
as possible. This manual may be updated from time to time. The retrotting steps in
this manual should only be performed by a professional installer to ensure that the
installation is as safe as possible.
Government Regulations
All US passenger cars manufactured after 1961 have seatbelt anchor points for at
least two lap belts in the front seat area. Since January 1, 1968, vehicle manufacturers
have been required to install lap belt anchor points for each front and rear seating
position as well as upper torso belt anchor points at each forward facing outboard
seating position. On January 1, 1972, this requirement became effective for trucks.
Warnings
Always use factory ttings added by the manufacturer whenever possible.
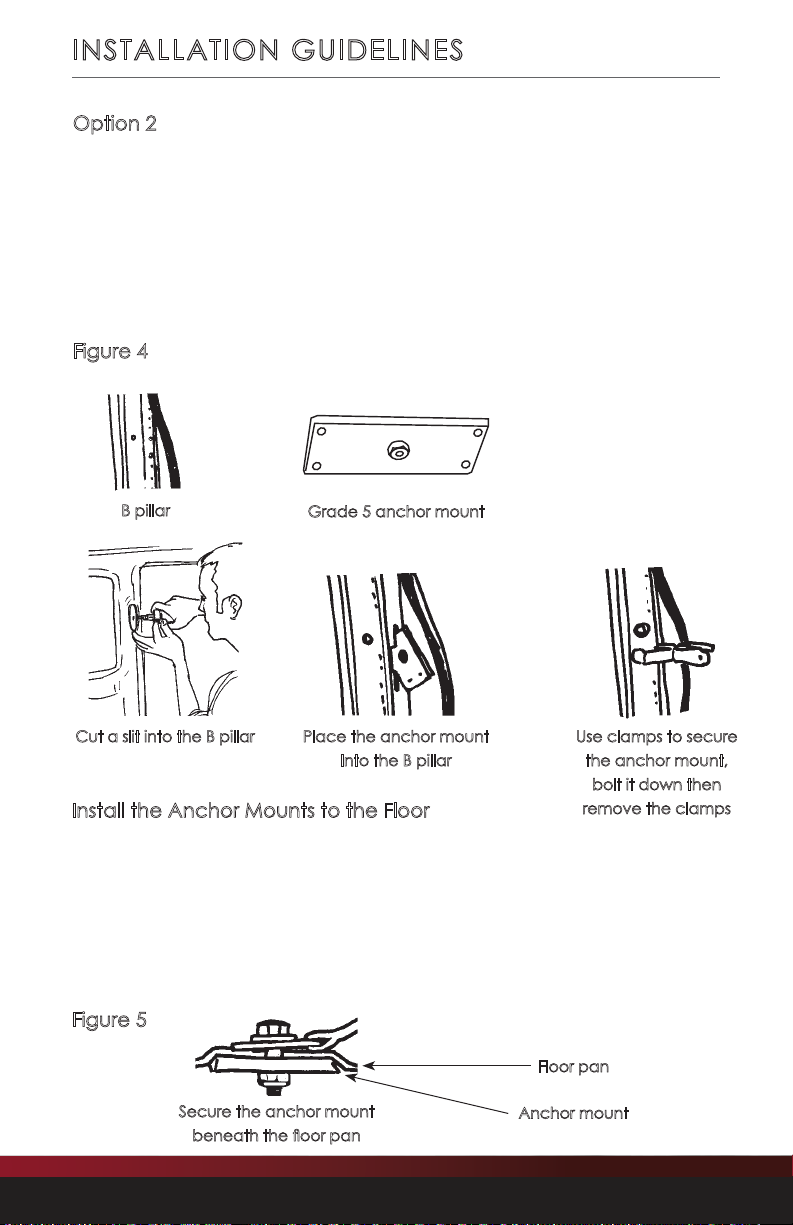
When using the vehicle manufacturer’s threaded oor ttings, it is important that all
full threads be engaged to obtain maximum strength of the anchor point.
Seatbelts should NEVER be attached to the seat unless the vehicle manufacturer
specically designed the seats and seat mounting systems to withstand seatbelt
assembly loads.
When drilling, make sure you don’t drill through the fuel lines, exhaust system, gas
tank, brake lines, or electrical wiring.
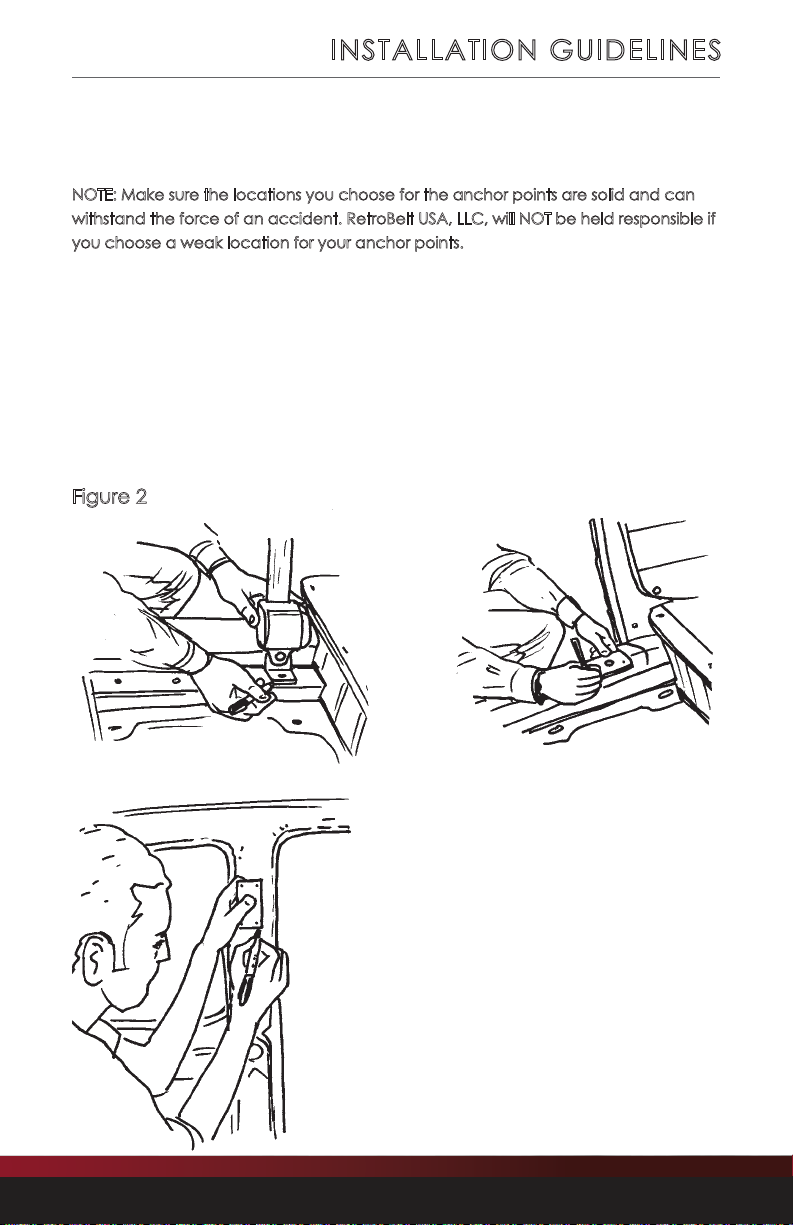
Be certain that the area you plan to install your anchor mount to is strong enough
before installing your anchor point.
Always reinforce the anchor points to ensure the safety of the driver and passengers.
Some installations may require modication to the chassis, frame, or interior to
allow for safe installation of an anchor point. This should only be attempted by a
professional installer.
If you are reusing existing anchor points, make sure you inspect them for cracks, rust,
or other weaknesses. Do not reuse them if they are damaged in any way.

5
INSTALLATION GUIDELINES
Installing Anchor Points
First determine if your installation is a retrot or if you are replacing
existing 2-point seatbelts. If your vehicle has existing 2-point
seatbelts, you need to determine if the anchor points are installed
correctly and are not worn or damaged in any way. If the anchor
points look good, you can reuse them; but you’ll still need to install a
third anchor point for the shoulder harness. If your car does not have
seatbelts already installed, you’ll need to create new anchor points.
Choose a Location for the Anchor Points
This section is for vehicles that are not already equipped with
anchor points. The retrotting steps in this section should only be
performed by a professional installer.
Place the seatbelts on the seats and move them into position to
check for placement (See Figure 1). Remove the seats if necessary
and check beneath the oor pan and behind the side panel for
room to drill.
NOTE: Most 1955-57 Chevrolets require drilling and mounting of anchor points as well
as the installation of anchor mounts beneath the oor and behind the side panels to
ensure a safe installation.
Figure 1
Location of the anchor point
for upper body support

6
Copyright 2015 RetroBelt USA, LLC
INSTALLATION GUIDELINES
Once you have chosen the location for the anchor points, you need
to determine that they are solid and that you have access to them.
NOTE: Make sure the locations you choose for the anchor points are solid and can
withstand the force of an accident. RetroBelt USA, LLC, will NOT be held responsible if
you choose a weak location for your anchor points.
Line up the retractor and shoulder guides to your desired position.
Make sure the installation does not interfere with the seatbelt
webbing. The retractor will not operate properly if the seatbelt is
obstructed. The best way to prepare your anchor point is to hold the
mounting bracket in place and outline it with a felt-tipped marker.
Mark where the holes are (See Figure 2). Measure the distance on
both sides of the vehicle to make sure they are the same.
Figure 2

7
INSTALLATION GUIDELINES
Front Installation for Sedan or Wagon
If your car is a sedan or wagon, you will need to mount the
shoulder harness to your vehicle’s B pillar. This is the most difcult
part of the installation process. We recommend using one of these
two options to do this.
Option 1 (recommended option)
One way to install the anchor point is to weld the anchor mount
to the B pillar. Fully integrate the mount into the pillar to allow the
shoulder mount to be bolted solidly to the B pillar (See Figure 3).
We recommend that this done by a professional installer.
Figure 3
Weld the anchor mount
to the B pillar
Anchor mount fully
integrated into
the B pillar by welding

8
Copyright 2015 RetroBelt USA, LLC
INSTALLATION GUIDELINES
Option 2
Another way to install the anchor point is to use a power saw
to open the side of the B pillar behind where you marked your
mounting point. Insert the anchor mount between the medal of
the B pillar, and use clamps to hold the plate in place. Drill a 7/16”
hole to allow mounting of the anchor mount to the B pillar
(See Figure 4), then remove the clamps.
Figure 4
Grade 5 anchor mount
Cut a slit into the B pillar
B pillar
Place the anchor mount
Into the B pillar
Use clamps to secure
the anchor mount,
bolt it down then
remove the clamps
Install the Anchor Mounts to the Floor
Using the templates you made with the felt-tipped marker, drill a
hole in the correct location for the second and third anchor points.
Secure the anchor mounts beneath the oor pan using the bolts
provided (See Figure 5) or by welding (use the same method as
above if you choose to weld your anchor point).
Figure 5
Secure the anchor mount
beneath the oor pan
Anchor mount
Floor pan

9
INSTALLATION GUIDELINES
Next, install the retractor and shoulder guides into the anchor
points, and tighten them down (See Figure 6). Make sure the
webbing of the seatbelt is tangle free and allows for unobstructed
operation. Finally, test the function and t of the seatbelts.
Figure 6
New anchor point
close up
Cutaway of B pillar showing
placement of anchor mount
Belt end mounts to oor
using round anchor mount
installed beneath oor pan
Retractor
Anchor adapter
close up

10
Copyright 2015 RetroBelt USA, LLC
INSTALLATION GUIDELINES
Front Installation for Convertible or Coupe
If your car is a convertible or coupe, it won’t have a B pillar. Instead
you’ll install the anchor point directly to the frame of the car below
the rear window panel (See Figure 7). The retrotting steps in this
section should only be performed by a professional installer.
Remove the interior paneling, and check the desired anchor point
location for structural integrity and signs of rust. Hold the anchor
mount in place and trace with a felt-tipped marker to make a
template. Then drill your hole and install the anchor mount by
holding the mount into place and placing the bolt through the hole.
You can also reinforce the anchor mount by riveting or welding the
mount into place (See page 8 for welding instructions). Tighten the
bolt down and reinstall interior panels. Then install the belt end
(See Figure 7).
Figure 7
Cutaway of behind and
below window panel
showing placement of
anchor mount
Belt end mounts to oor
using round anchor mount
installed beneath the oor
pan or to the frame.
Placement of anchor mount
for front shoulder harness

11
Back Seat Installation
Use a rear RetroBelt®system for the back seats. You will need to
install anchor mounts behind the back seat. To do this, rst remove
the package tray, then nd a good spot on the oor pan or frame
to install your anchor point. Make a template by using a felt-tipped
marker like you did in the previous steps. Check under the car and
make sure you won’t drill into the gas tank, fuel lines, exhaust pipes,
etc. Once you’ve measured your templates and ensured that
everything lines up, drill your holes and install the anchor mounts
beneath the oor pan (See Figure 8). Now install the retractor to
the anchor mount.
INSTALLATION GUIDELINES
Figure 8
Back seat Back seat
Area behind back seat
Floor pan
Retractor
Anchor mount

12
Copyright 2015 RetroBelt USA, LLC
You may need to remove the seats to get to the oor pan to install
your nal anchor mounts. Install the last anchor mounts in the same
way as you did in the previous steps, then mount the seatbelts
and run them through the crack between the backrest and
bottom of the seat (See Figure 9). Reinstall the package tray, and
route the seatbelt from the retractor through the crack between
the package tray and the back seat. Check to ensure proper
operation. Make sure the retractor is not obstructed in any way.
INSTALLATION GUIDELINES
Figure 9

13
USE AND MAINTENANCE
Always wear your seatbelt. If you need information on how to use your seatbelt
safely, visit www.nhtsa.gov.
Adjust and wear the lap belt portion low and tight across your hips.
Each seatbelt is intended to restrain only one person at a time.
Never attempt to restrain a child in your lap by using the 3-point retractable seatbelt
around both you and the child. The child could be severely injured or killed in the
event of an accident. Check with your state for local laws regarding the use of
seatbelts and small children.
Do not us this seatbelt or parts of this seatbelt kit with other types of seatbelts. Doing
so may result in serious injury or death in the event of an accident.
WARNING: FAILURE TO PROPERLY INSTALL, USE, PERIODICALLY
INSPECT AND MAINTAIN THIS SEATBELT COULD LEAD TO SERIOUS
INJURY OR DEATH.
Maintenance
Inspect the seatbelt and retractor assembly regularly. If the assembly does not work
properly or if the seatbelt has cuts or frayed, worn webbing, it must be replaced.
More frequent inspections may be necessary if the seatbelt is subjected to harsh
treatment or extreme conditions.
Whenever a vehicle is involved in a collision you must replace every part of the
seatbelt kit including the mounting hardware.
Clean seatbelts with mild soap and water. NEVER bleach or re-dye the seatbelts.
Doing so will severely weaken the webbing.
Exposure to the elements will weaken the webbing on your seatbelts reducing the
effective safety feature by more than 50%. Inspect your seatbelts regularly.
Caution
Death or serious injury could result from not properly threading the webbing through
the adjustable ends. Maintain a minimum of one inch of webbing beyond the anchor.
If the xed end of a seatbelt is too long to allow a snug t on a small occupant, do not
use the belt. Children weighing less than 80 lbs should only be secured in an approved
child safety or booster seat according to the manufacturer’s recommendations.

14
Copyright 2015 RetroBelt USA, LLC
Limited Warranty
If your unit does not work properly because of defects in materials and workmanship, RetroBelt
USA, LLC (collectively referred to as “the warranter”) will, for the length of the period indicated in
the chart below, which starts with the date of original purchase (“warranty period”), at its option
either (a) repair your unit with new or refurbished parts, or (b) replace it with a new or refurbished
unit. The decision to repair or replace will be made by the warranter.
CATEGORIES PARTS LABOR
3-Point Seatbelt Kit One (1) Year One (1) Year
During the “Labor” warranty period, there will be no charge for labor. During the “Parts” warranty
period, there will be no charge for parts. You must mail in your unit prepaid during the warranty
period. This warranty only applies to products purchased and serviced in the United States or
Puerto Rico. This warranty is extended only to the original purchaser of a new product which was
not sold “as is.”
A purchase receipt or other proof of the original purchase date is required for warranty service.
Authorization (RA) number. All returns and warranty issues must be accompanied by a Return
Authorization number. Any product received without a RA number will be refused.
LIMITED WARRANTY-LIMITS AND EXCLUSIONS
This warranty ONLY covers the buckle assembly and retractor. Seatbelt webbing and associated
hardware ARE NOT COVERED under warranty. This warranty ONLY COVERS failures due to
defects in materials and workmanship, and DOES NOT COVER normal wear and tear or cosmetic
damage. If the seatbelt has been involved in an accident, RetroBelt USA, LLC, cannot be held
liable, and the seatbelt kit cannot be warrantied, repaired, or returned. This warranty ALSO DOES
NOT COVER damages which occurred during shipment, failures which are caused by products
not supplied by the warranter, failures which result from accident, misuse, abuse, neglect,
pest infestation, mishandling, misapplication, alteration, faulty installation, set-up adjustment,
maladjustment of consumer control, improper maintenance, modication, commercial use or
rental use of the product, or service by anyone other than RetroBelt USA, LLC, or damage that is
attributable to acts of God.
THERE ARE NO EXPRESS WARRANTIES EXCEPT AS LISTED UNDER “LIMITED WARRANTY”. THE
WARRANTER IS NOT LIABLE FOR INCIDENTAL OR CONSEQUENTIAL DAMAGES RESULTING FROM
THE USE OF THIS SYSTEM, OR ARISING OUT OF ANY BREACH OF THIS WARRANTY. (As examples,
this excludes damages for lost time, cost of having someone remove or re-install an installed
system if applicable, travel to and from the servicer, etc. The items listed are not exclusive, but
are for illustration only.) ALL EXPRESS AND IMPLIED WARRANTIES, INCLUDING THE WARRANTY OF
MERCHANTABILITY, ARE LIMITED TO THE PERIOD OF THE LIMITED WARRANTY.
Some states do not allow the exclusion or limitation of incidental or consequential damages, or
limitations on how long an implied warranty lasts, so the exclusions may not apply to you. This
warranty gives you specic legal rights, and you may also have other rights which vary from state
to state. If a problem with this seatbelt kit develops during or after the warranty period, you may
contact your dealer or RetroBelt USA, LLC. Warranty valid in U.S.A. and Canada only.
LIMITED WARRANTY

15
INSTALLATION NOTES

16
Copyright 2015 RetroBelt USA, LLC
INSTALLATION NOTES

MODERN SAFETY FOR YOUR CLASSIC
RetroBelt USA, LLC, 7370 Eastgate Road, Suite 125 Henderson, NV 89011
p) 702.483.2222 | f) 702.483.2229 | www.retrobelt.com
Table of contents
Other RetroBelt Automobile Accessories manuals