manuals.online logo
Brands
  1. Home
  2. •
  3. Brands
  4. •
  5. Retrospec
  6. •
  7. Automobile Accessories
  8. •
  9. Retrospec Cascade User manual

Retrospec Cascade User manual

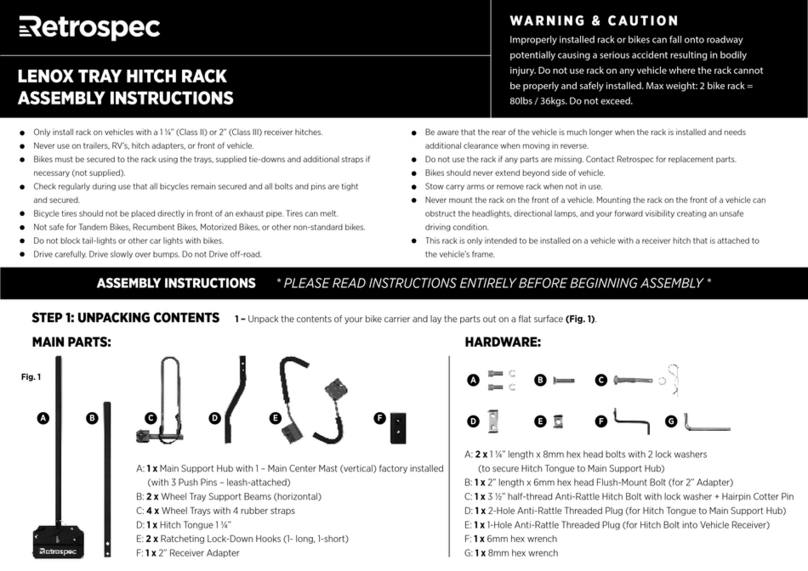
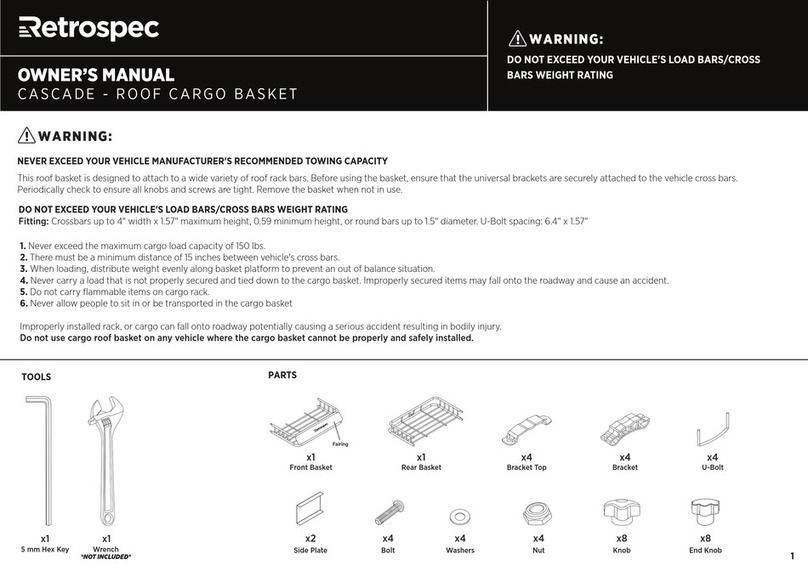
WARNING:MAIN PARTS:
2- Basket halves
1- Central Support Tube (square tube)
1- Hitch Insert
STEP 1 : STEP 2:
Fig. 2 Fig. 3Fig. 1
ASSEMBLY INSTRUCTIONS
* PLEASE READ INSTRUCTIONS ENTIRELY BEFORE BEGINNING ASSEMBLY *
PARTS LIST:
8- Short Bolts, nuts, & washers (M10 x 20mm – 7/8”)
3- Carriage Bolts, nuts, & washers (M12 x 75mm – 3”)
2- Basket Connector Plates
1- Large Carriage Bolt & nut (M16 x 80mm – 3 1/8”)
1 - Straight Pin & Hairpin Cotter Pin/Locking Clip
1- 3 ¼” half-threaded Anti-Rattle Bolt with lock washer & Hairpin Cotter Pin / Locking Clip
1 - AntiRattle Adapter (minimizes wobble)
2 - 17/19mm open end wrenches
2 - 22/24mm open end wrenches
NOTE: The supplied nuts have a Nylon threadlocker to prevent them from vibrating lose. When
installing the nuts onto the supplied bolts they will thread on easily until the bolt reaches the outer end
of the nut. After that you will feel some resistance as the nut is threaded onto the remainder of the bolt.
WARNING:
Improperly installed rack, bikes, or cargo can fall onto
roadway potentially causing a serious accident resulting in
bodily injury. Do not use rack on any vehicle where the
rack cannot be properly and safely installed.
Place the two Basket Halves bottom up on a flat surface and slide together using the locating pins at the end of each
basket half to help mate the two pieces together. (Fig 1)
Place the square Central Support Tube between the two halves of the cargo basket so that the three holes on the Basket
Halves and the Central Support Tube line up with each other. Make sure that the protruding portion of the central support
tube is on the hitch side of the basket, the side without red reflector stickers. (Fig. 2)
Insert a carriage bolt through each of the three holes in the Basket Halves and the Central Support Tube and thread the
corresponding nuts & washers onto the bolts. (Fig. 2)
Tighten the bolts so they are snug but not fully tightened allowing for a small amount of movement.
You will fully tighten them later in the assembly process.
•
•
•
•
•
•
•
•
•
•
•
•
•
•
•
Flip the basket over and attach the two central connecting plates to the outside of the basket. One in front (with logo) and one
on the hitch side (no logo). Attach using the short bolts placing them through the outside oof the basket (4 per face plate).
Secure by threading the nuts (and washers) onto the bolts fro the inside of the basket. Full tightne the nuts and bolts. (Fig. 3)
This rack is only intended to be installed on a vehicle with a 2” receiver hitch that is attached to the vehicle’s frame.
Never mount to a trailer or the back of a recreational vehicle. Never mount to a bumper hitch adapter. These
mounting positions are not secure and can cause the rack and its contents to bounce and sway excessively resulting
in damage to rack contents, rack, and the vehicle.
Distribute weight evenly along basket platform to prevent an out of balance situation
Never exceed maximum load weight of 500lbs
Never allow people to sit in or be transported in the cargo basket
Never carry a load that obscures your tail/brake lights, directional signals, license plate, or backup camera
Never carry a load that is wider or deeper than the cargo basket
Never carry a load that is not properly secured and tied down to the cargo basket. Improperly secured items may fall
onto roadway and cause an accident
Never allow any part of your cargo to be in direct path of your exhaust pipes as this could cause a fire or burn your
cargo. Do not carry flammable items on cargo rack
STEP 3:
Now fully tighten the three carriage bolts on the square
central tube from step #1.
Fig. 4 Fig. 5 Fig. 6 Fig. 7
RETROSPEC ACCESSORY HITCH CARRIER LIMITED WARRANTY
STEP 4 :
Connect the Hitch Insert assembly to the square Central Support Tube on the basket by inserting the large bolt through hole
A (Fig. 4) and secure with the corresponding nut. Tighten the bolt and nut so that it is very snug but allows the Hitch Insert
to rotate up and down on the Central Support Tube.
Rotate the hitch connector up and place the Straight Pin through hole B (Fig 5) and insert the Hairpin Cotter Pin/Locking Clip
through the hole at the other end of the Straight Pin making sure that it fully clips in place. Having the Hitch Insert in the
upright position will allow for a more compact profile making it easier to store and easier to mount onto the hitch of the
vehicle.
STEP 5 :
Insert AntiRattle Adapter into Hitch Insert, slide in up to the Limit Tab (Fig.6).
Install the now assembled rack into your vehicle’s 2” hitch receiver. Line up the holes in the Hitch Insert and AntiRattle Adapter with the
hole in the receiver then insert and thread the large 3 ¼” bolt through the holes. Tighten securely using wrenches.
Thread-in 3 ¼” bolt from same side as Limit Tab. When tight, insert Hairpin Cotter Pin/Locking Pin into hole in end of Anti-Rattle Bolt.
Warning! Never use the rack without the hitch
bolt in place, securely tightened, and Hairpin
Cotter Pin in place. Failure to install and
properly tighten the hitch bolt will allow the
rack to separate from the vehicle and fall
onto the roadway potentially causing a
serious accident.
Remove the Straight Pin and Locking Clip (hole
B from Step 4), rotate the rack down, replace
the Straight Pin through hole C and secure with
Hairpin Cotter Pin/Locking Clip. (Fig 7)
•
•
•
•
•
•
•
•
•
•
•
•
•
•
•
•
•
•
•
•
•
Retrospec grants the original purchaser of a new Retrospec accessory hitch carrier a non-transferable limited lifetime warranty subject to the limitations, terms and conditions stipulated below.
TERMS & CONDITIONS:
The product is warranted against defects in the materials and workmanship for the useful life cycle of the product. All products have a useful life cycle. Once the product has reached the end of its lifecycle it will no longer be
eligible for warranty replacement or adjustments.
This warranty applies to the original retail purchaser and is non-transferable.
When contacting us for a warranty issue an original proof of purchase is required clearly identifying the product.
The product must be returned to Retrospec for inspection along with copies of the original proof of purchase. The owner of the product is responsible for shipping costs.
Should Retrospec determine that the product or any of its components are covered by this warranty, Retrospec’s determination of the product’s eligibility for warranty repair or replacement is final and binding.
If, at the time of replacement, Retrospec does not have available the same product, the consumer may be oered a substitute product of equal or better value.
ITEMS NOT COVERED BY THE LIMITED WARRANTY:
Damage due to improper assembly
Damage due to mounting the rack on the back of a trailer, Recreational vehicles, or to bumper hitch adapters.
Normal wear and tear
Damage due to lack of maintenance
Damage due to installation of non-original parts, components, or accessories
Damage due to loading of the bicycle carrier with non-standard bicycles, items that are not standard bicycles, or any product that exceeds the stated weight capacity of the bicycle carrier.
Damage or failure due to improper use, accidents, neglect, or failure to follow the instructions provided with the product.
The paint and finish of the bicycle carrier.
Damage to bicycles or automobile
Damage or injury due to the rack or bicycles falling from the car.
This warranty is expressly in lieu of all other warranties. Any implied warranties of merchantability or fitness for a particular purpose created hereby are limited to the same duration as the express warranty herein. This warranty is void in its entirety if the product is
modified in any manner. All provisions in this limited warranty are separate and severable. If any provision is held invalid and unenforceable, such determination shall not aect the validity or enforceability of the other provisions hereof. Except to the extent
specifically prohibited by law, Retrospec shall in no way be responsible for direct, incidental or consequential damages, including, without limitation, damages for personal injury, property damage, or economic losses whether based on contract, warranty, negli-
gence, product liability, or any other theory.
A
B
C
CORRECT BOLT
DIRECTION - BOLT ENTERS
ON THE LIMIT TAB SIDE
(NUT SIDE)
LIMIT TAB HAIRPIN COTTER
PIN

Other Retrospec Automobile Accessories manuals

Retrospec LENOX User manual

Retrospec

Retrospec LENOX User manual

Retrospec CASCADE User manual

Retrospec

Retrospec CASCADE User manual

Popular Automobile Accessories manuals by other brands

AFX MOTORSPORTS CAN020 installation manual

AFX MOTORSPORTS

AFX MOTORSPORTS CAN020 installation manual

Westin 32-2360 instructions

Westin

Westin 32-2360 instructions

The Handy GRUNTAVORE LIFT 16867 Instruction & parts manual

The Handy

The Handy GRUNTAVORE LIFT 16867 Instruction & parts manual

Thule 21 manual

Thule

Thule 21 manual

Cruz Alu Cargo R Assembly instructions

Cruz

Cruz Alu Cargo R Assembly instructions

Fortin EVO ALL THAR-FOR4 manual

Fortin

Fortin EVO ALL THAR-FOR4 manual

ACME CH103 user manual

ACME

ACME CH103 user manual

Axis JS1409Q instruction manual

Axis

Axis JS1409Q instruction manual

Brink 727673 installation instructions

Brink

Brink 727673 installation instructions

KRAM telecom Drive & Talk quick guide

KRAM telecom

KRAM telecom Drive & Talk quick guide

Kuda-Phonebase 292370 Installation instruction

Kuda-Phonebase

Kuda-Phonebase 292370 Installation instruction

FILTRON K 1296 Installation instruction

FILTRON

FILTRON K 1296 Installation instruction

Memo Europe Sky-Star Fitting instructions

Memo Europe

Memo Europe Sky-Star Fitting instructions

HOOKE ROAD MMR.30016 installation instructions

HOOKE ROAD

HOOKE ROAD MMR.30016 installation instructions

iDataLink ADS-ALCA Install guides

iDataLink

iDataLink ADS-ALCA Install guides

iOttie CHY-CC-U2CQ3C manual

iOttie

iOttie CHY-CC-U2CQ3C manual

kincrome K12310 Owner's assemble and Operating manual

kincrome

kincrome K12310 Owner's assemble and Operating manual

Fortin EVO KEY manual

Fortin

Fortin EVO KEY manual

manuals.online logo
manuals.online logoBrands
  • About & Mission
  • Contact us
  • Privacy Policy
  • Terms and Conditions

Copyright 2025 Manuals.Online. All Rights Reserved.