Revelo FLEX User manual

Thank you for choosing a Revelo FLEX,
the world’s smartest folding and portable electric bike
that fits you and your lifestyle.
2016 Manual
Warnings - Read This First
How To Assemble
Getting Started
FLEX
Designed in Canada
FLEX_Manual_0316.indd 1 2016-01-09 6:20 AM

Warnings - Read This First!
1. To prevent unexpected engagement of the motor when
the battery power is ON, cut the power by keeping the
red throttle button in the OFF (protruding) position or by
squeezing on either brake lever.
2. Like all wired electrical devices, take extra caution in
preventing wires from getting pinched, severed, or overly
twisted as this may cause the bike to stop working.
3. Learn to ride the FLEX in a safe open area with a smooth
surface that is away from other pedestrians and vehicles
(eg. a vacant parking lot) before taking it into traffic.
4. The FLEX has immediate acceleration and nimble steering.
Relax during acceleration and do not make twitchy
steering adjustments.The FLEX will ride stably once rolling
momentum is reached.
5. Never use the FLEX on steep hills and only go slowly
downhill.The FLEX is NOT designed to coast freely at high
speed like a standard bicycle.
6. Apply both brakes simultaneously to stop as you would a
standard bicycle especially down hills.
7. Do not attach a front bicycle basket to the handlebars or
dangle any bags/objects from the handlebar/stem unless
they are designed to specifically work with your FLEX.
8. Do not use the battery surface as a rack to store items.
9. The total weight of the rider and backpack must not
exceed 100kg (220lbs).
10. Do not ride on surfaces where the wheel or pedals could
get caught (e.g. on train/tram tracks, or potholes) and do
not ride directly into bumps or curbs.
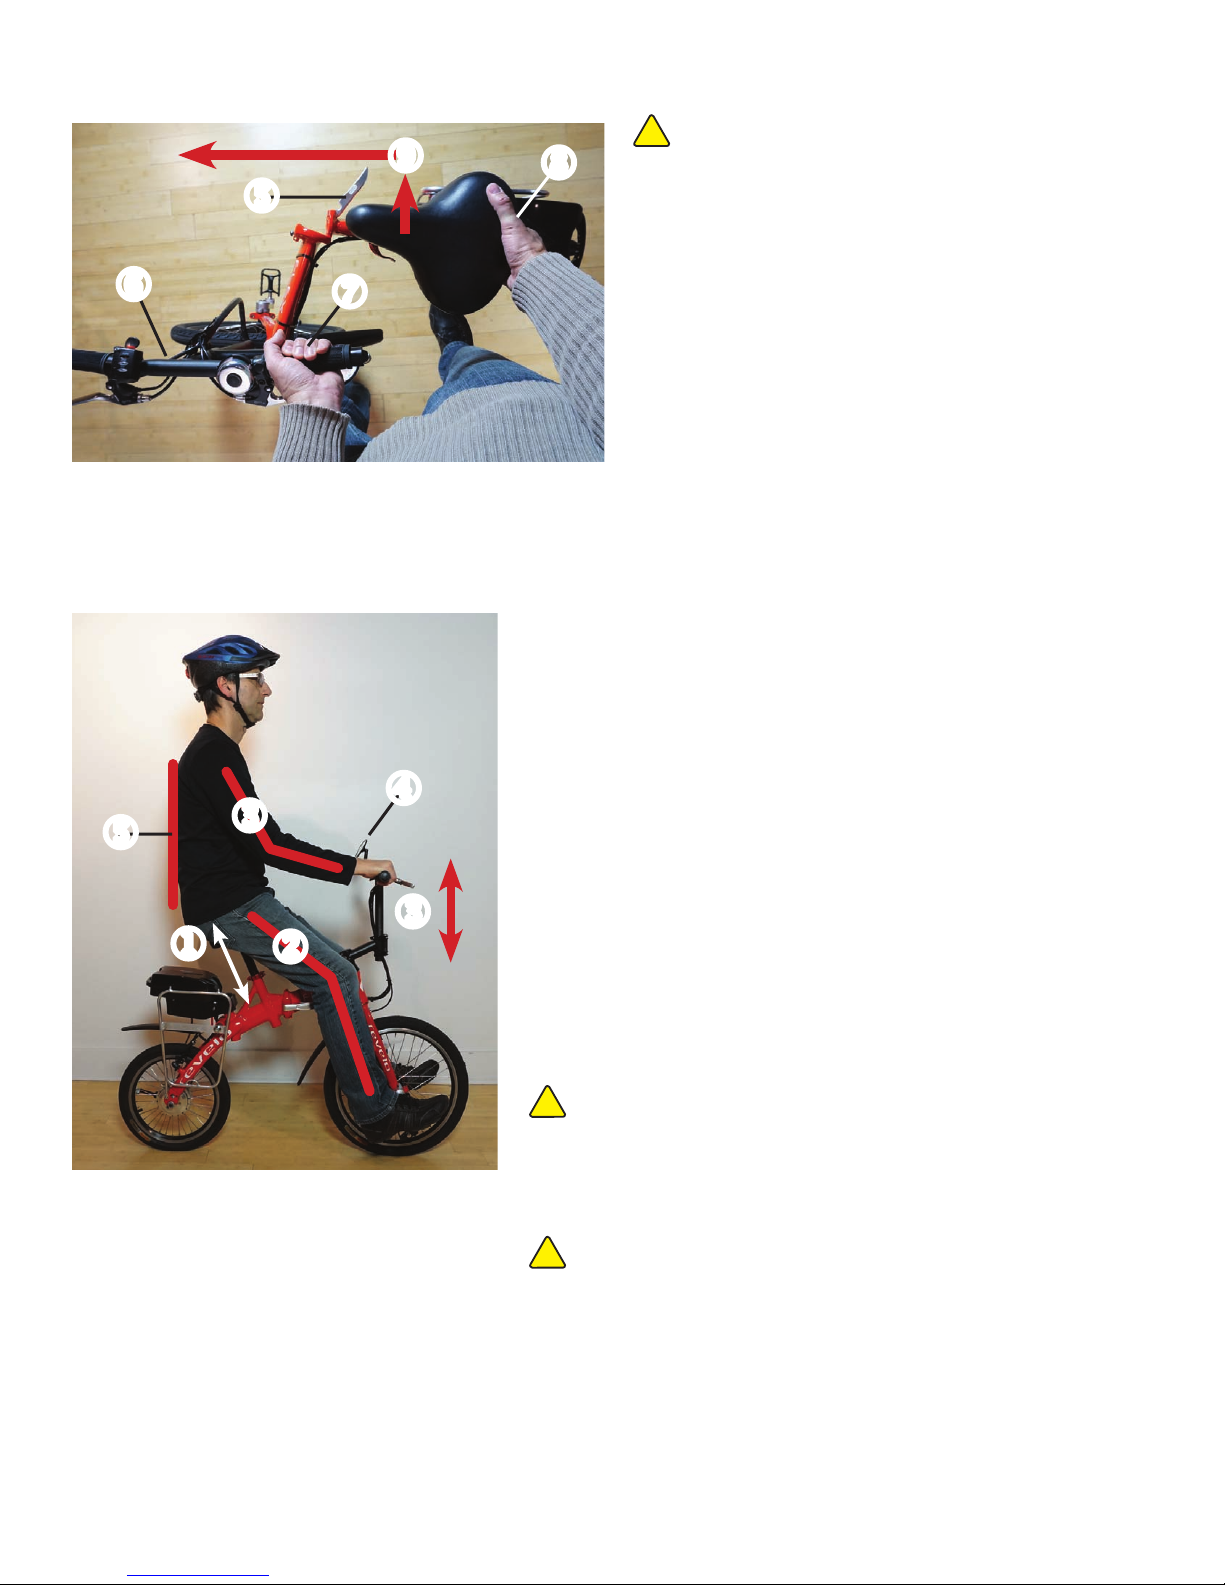
11. Always ride with both hands on the handlebar grips.
Always ride with your body centered and resting on the
seat. Do not lean too far forward or backwards. Maintain a
balanced, relaxed posture.
12. Always ride with your shoes resting on the pedals with the
balls of your feet positioned over the pedal axle.
13. Wear a regionally certified, properly fitted bicycle helmet.
14. Do not wear clothes that could get caught in the wheel/
spokes. For example, do not wear heels that could get
caught in the spokes. Do not ride barefoot or with loose
sandals.
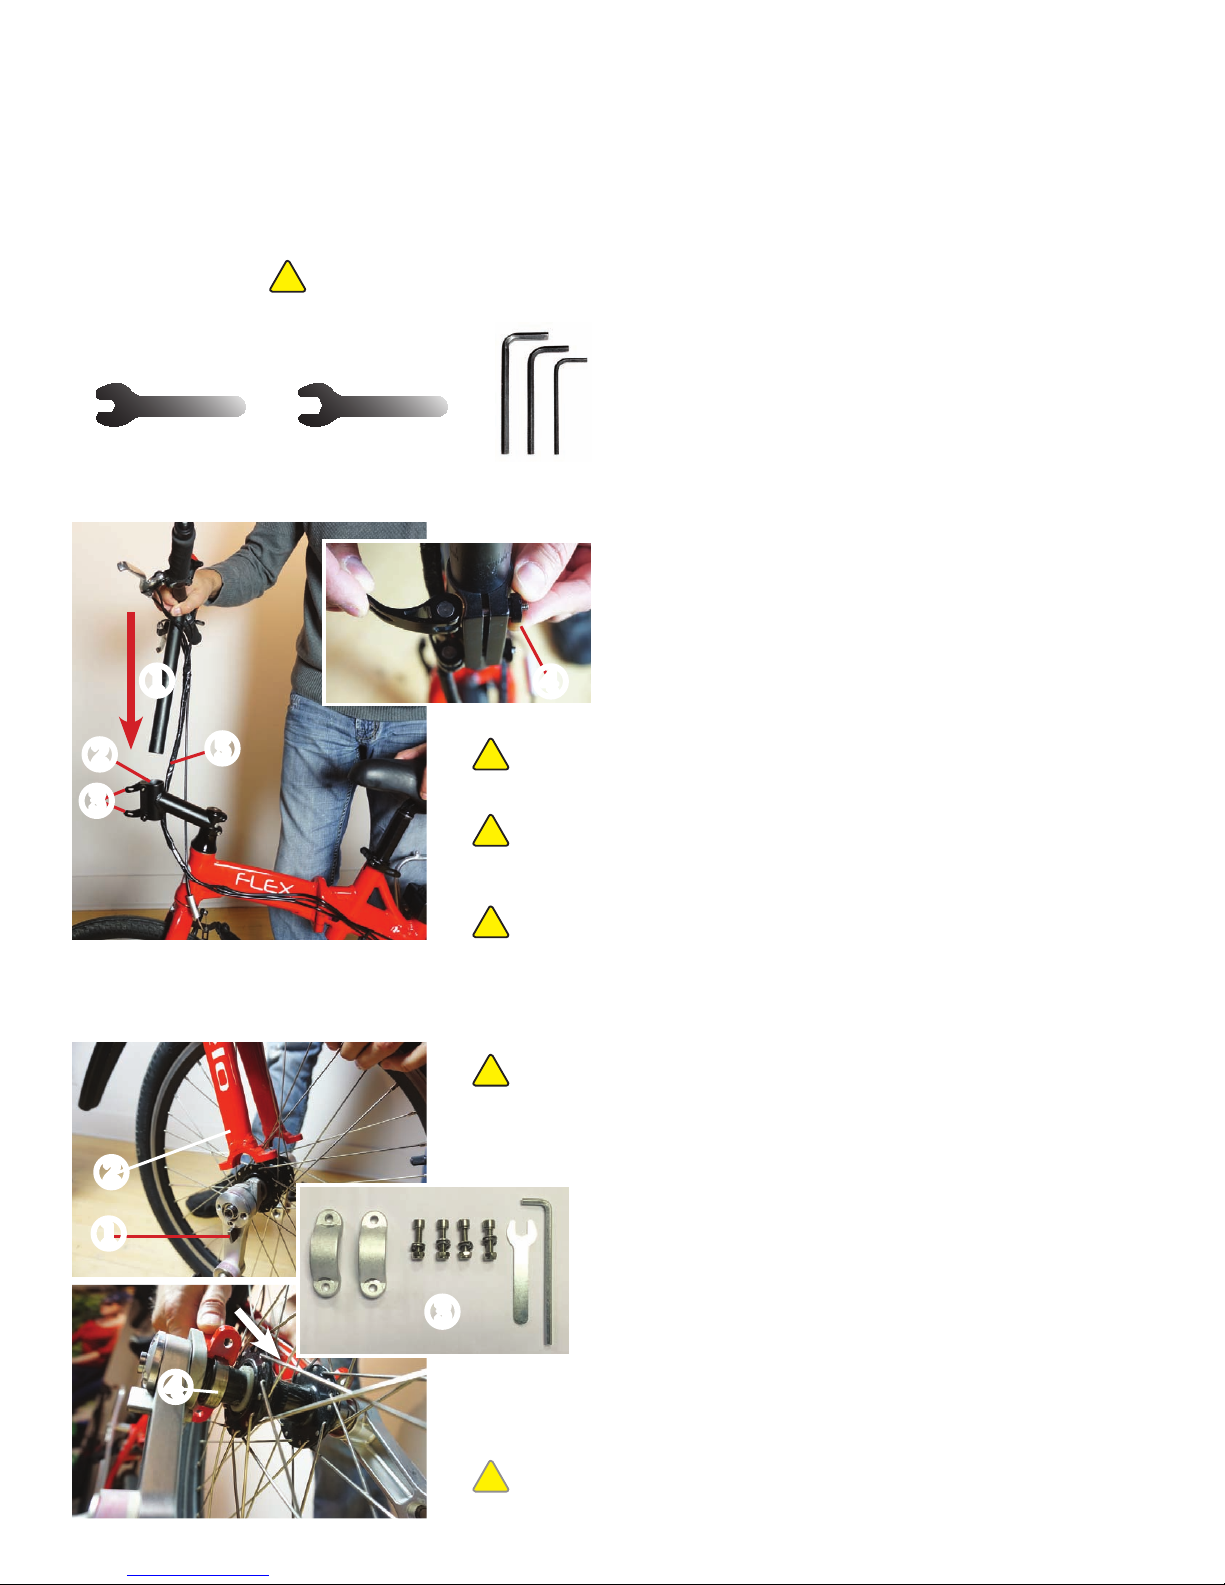
15. Always make sure the stem, handlebar and seat are fully
tightened by making sure the quick release levers are
properly closed.The optimal closing pressure is one that
leaves a small impression on the palm of your hand after
closing.
16. Make sure the quick release lever for the folding hinge
is securely closed.The optimal adjustment is one that
provides a moderate“snap”when closing the lever.
17. Do not ride the FLEX in road traffic unless it is legal in
your area and until you have become proficient with the
operation and handling of the FLEX.
18. For night riding always have your front and rear lights on
and wear reflective gear.
19. Tires should not be inflated past the recommended
pressure that is marked on the sidewall.
20. Keep the FLEX well maintained by a qualified bicycle shop.
21. Do not do any stunt riding on the FLEX (eg. jumps, sharp
turns, wheelies.)
22. Do not use on slick surfaces such as snow, sand, ice and
standing water.
23. Obey all local and national traffic, insurance, registration,
helmet laws and never ride while under the influence of
drugs or alcohol.
24. The FLEX rides quietly and lower to the ground than other
bikes so ride in a manner that allows you to be seen and
heard by others.
25. Do not allow anyone else to ride your FLEX unless they
follow all the guidelines of this manual.
The FLEX has unique characteristics that are different from a standard bicycle.
To avoid the risk of loss of control, injury or death follow these warnings.
! !
FLEX_Manual_0316.indd 2 2016-01-13 9:40 AM

How to Assemble
This guide provides the basic information to get you going quickly before you ride.
If you are unsure of any aspect of the FLEX and how to use it, please refer to our detailed manual online at www.revelo.ca.
Or, contact Revelo directly at support@revelo.ca or 1.888.504.3576.
Tools You Need (included) Wrench to attach front wheel
15mm wrench to attach pedals
4mm, 5mm and 6mm allen keys
Step 1: Attach Handlebar Insert vertical handlebar post down into the
stem so that the mirror is on the left side.
Tighten by closing both quick release levers .
If necessary, rotate the adjustment knob
clockwise to increase clamping strength and
counter-clockwise to loosen.
For handlebar height refer to the“Rider Position” section.
!Keep wiring to the right side of the stem and ensure not to
wrap or twist wiring.
!Ensure handlebar cannot twist or move after quick release
levers are firmly closed.
!
Insert handlebar post to at least the bottom of the stem head
or more. If the minimum insertion marking appears on the
vertical post then insert the post deeper into the stem.
Attach the front wheel to the forks with the two
bearing clamps and four supplied bolts and nuts .
Use the included 5mm allen key and wrench.
Step 2: Attach Front Wheel
!Ensure that the swivelling crankarm is installed on the bike’s
right hand side.
Loosely position wheel between forks then using both
hands grab forks and push firmly down to insert wheel
between brake pads and onto the wheel hub .
✓If inserting the wheel past the brake pads is difficult, try
deflating the tire first.
Due to possible last minute variances in manufacturing,
some illustrations may not be exactly as shown.
!
FLEX_Manual_0316.indd 3 2016-01-25 11:29 AM

Step 2: Attach Front Wheel (continued...)
Attach bearing clamp to the
fork using supplied bolts
and allen key . Use supplied
wrench to hold the bolt in place
while tightening. Balance the gap
between the clamp and fork .
!Do not overtighten bolts.
Hand tighten only.
Step 3: Attach Front Brake
Pull brake cable noodle and
slot the end cap through the
opening of the cradle .
✓See rear brake assembly for
reference.
Step 4: Attach Pedals
Left Pedal: Insert pedal axle into crank arm threads
and turn axle counter-clockwise. Start by using fingers first
then tighten with the supplied 15mm wrench.
Right Pedal: Insert pedal by turning axle clockwise.
!Left and right pedals are marked“L” and “R” and MUST be
installed as labelled to avoid stripping the threads.
!Pedals tighten opposite to each other. The left pedal (L)
tightens counter-clockwise. The right (R) pedal tightens
clockwise.
Once tightened, push pedal inwards towards wheel to
release locking pegs then fold . Reverse procedure
to unfold pedals.
✓Always fold pedals for easier
folding and compact storage.
FLEX_Manual_0316.indd 4 2016-01-25 11:30 AM

Step 5: Attach Seat
Ensure seatpost clamp jis open, then insert seatpost k
into frame l.Tighten seatpost clamp so that the lever is
folded over and closed. If necessary, rotate the adjustment
knob mclockwise to increase clamping strength and
counter-clockwise to loosen.
For seat height refer to the“Rider Position” section.
!Ensure seatpost is inserted so that the minimum insertion
line is not visible above the clamp.
Getting Started
Step 1: Charge Battery
The FLEX comes with a battery jand charger k.
Connect the charging plug linto the battery
port mand plug the charger into any household
outlet n. Approximate time to charge from empty
is 3 to 5 hours.
The top of the battery pack has LED indicator
lights. Press and hold the battery power button o
to check charge percentage. Charge percentage
will also be reflected on the throttle (see section on
Using The Throttle).
!
Always charge in a dry environment.
Avoid extreme temperature, moisture and
humidity.
Step 2: Attach Battery
Battery attaches to the metallic
base jalong grooved edges k
and rear semi-circular flanges l.
Slide horizontally to connect to
metal prongs m.
!A firm push may be required to fully seat the battery. Check that it
is properly aligned prior to applying any force to avoid damage.
u
w
v
x
u
v
w
x
y
z
u
v
ww
x
FLEX_Manual_0316.indd 5 2016-01-09 6:21 AM

Step 3: Powering the Battery On/Off
Power ON: Insert key into ignition slot j.
Turn key clockwise until it aligns with“ON”k.
Power OFF/Lock: Turn the key until it aligns with
“OFF”l.You can remove the key from the ignition
switch and the battery will remain locked to the bike.
You can also charge the battery.
Power OFF/Unlock: Press the key inwards and then
turn counter-clockwise to the“UNLOCK” position m.
Remove key from ignition switch. Grab the battery
handle with one hand and tug backwards to remove.
!Do not travel with all your bike keys. Keep
spare keys in a safe location.
!Never leave the ignition key in the bike
unattended.
Step 4: Using the Throttle
Once the battery is charged and attached to the bike,
ensure that the key is turned clockwise to the “ON”position.
Press the red throttle button jinwards to activate the
throttle.The FLEX is now ready to be propelled by gently
pressing down on the thumb paddle k. Available battery
charge is indicated by throttle LEDs l.
!To prevent unexpected sudden acceleration, red throttle
button jmust be in the OFF (protruding) position.
!
Practise applying gradual pressure on the paddle to avoid
sudden acceleration. For safety, remember that squeezing
either brake lever at any time will cut power.
Step 5: Using the Dual Mode Crank (DMC)
u
v
w
x
OFF/Lock
Unlock
ON
v
u
w
uw
vThe FLEX has a unique pedalling hub
on the front wheel combined with
a right-sided Dual Mode Crankarm
(DMC) jwhich allows you to
dynamically alternate from Cruising k
to Pedalling lpositions.
FLEX_Manual_0316.indd 6 2016-01-09 6:21 AM

u
Step 5: Using the Dual Mode Crank (DMC) continued...
Cruising Position: In this mode the FLEX is propelled by
throttle only and is the most common way to ride.
To engage cruising, press the button jinwards on the
right crank (see photo on previous page) and then turn the
crank counter-clockwise.The DMC should naturally pivot
down towards the ground until both feet can rest freely
side-by-side at the same level k.
Pedalling Position: Rotate the DMC clockwise until it locks
into a position that is opposite to the left crank l.You can
also combine throttle power with pedal power.
!
FLEX is designed for transportation and is not intended to be
used as a bicycle without electricity. Pedalling is best used to
assist on steeper hill climbs. Pedalling can also be used in the
rare situation when the battery has been fully depleted.
Step 6: Folding
Twist the Handlebar: With the kickstand down, stand on
the left side of the bike, release the stem’s quick release
levers jthen drop the handlebar downwards towards
the front tire k.Twist the handlebar 90° clockwise or
counterclockwise lthen lock into place with levers j.
!
Before any folding ensure power is OFF. During the“break-
in”period, the folding hinge of the frame may exhibit some
stiffness.This will improve quickly with regular use.
!Do not pinch or over-twist the cabling as this may
cause the bike to stop working.
Folding the Frame: The FLEX frame is securely locked in
place with a hinge clamp and lever.To unlock, first position
yourself on the left side of the bike. Place the right palm of
your hand over the frame lever jand tuck your fingers
under the lever kand behind the locking tab l. Push
the tab straight forward towards the front of the bike and
simultaneously pull the lever out away from the bike.
v
w
v
w
u
v
v
v
!
The hinge clamp is factory set for optimal clamping. Over
time, if opening/closing the lever becomes difficult or
loose, adjust the locking screw mbehind the lever.Turn
clockwise to loosen.Turn counter-clockwise to tighten.
Optimal clamping is one that provides a moderate“snap”.
w
x
FLEX_Manual_0316.indd 7 2016-01-09 6:21 AM

Step 6: Folding (continued...)
Fold the left pedal.With the frame hinge
clamp/lever open nand handlebar locked in
a 90° position o, place your left hand on the
handlebar p. Grasp and lift the rear of the
seat qand pivot the frame rto draw the
rear wheel towards the front wheel. Rotate
the right crank to ensure that the right
pedal avoids contacting the rear tire. The
magnets will lock the fold in place for storage.
!
BEFORE FINAL FOLDING: Remove or lock
the battery to it’s base. Ensure kickstand is up.
Lower the seat as much as possible and tighten
seatpost clamp. Disengage the DMC so that
both pedals are situated down side-by-side.
Thank you for choosing a Revelo FLEX. Enjoy your ride!
03.16
This guide provides the basic information to get you going quickly before you ride.
If you are unsure of any aspect of the FLEX and how to use it, please refer to our detailed manual online at www.revelo.ca.
Or, contact Revelo directly at support@revelo.ca or 1.888.504.3576.
y
z{
|
}
Step 7: Rider Position
Using the quick release clamp, adjust the seat height j
so that you can rest the balls of your feet on the pedals
with your legs slightly bent k. Legs should never be fully
extended to reach the pedals.When stopped, you should
be able to easily rest both feet flat on the ground.
Adjust the handlebar vertically so that arms are slightly
bent l. Arms should never be fully extended to reach
the handlebar. Adjust the rear view mirror mso that you
have a clear view of all traffic behind your left side.
Once the seat, handlebar and mirror have been adjusted,
the rider should be able to sit in a relaxed, upright
position n, bent knees, and comfortably bent arms.
!
Practice test riding! Before taking the FLEX into traffic,
test ride it in a safe open area with a smooth surface that
is away from other pedestrians and vehicles (eg. a vacant
parking lot).
v
w
wx
y
u
!
The FLEX has immediate acceleration and nimble
steering. Relax during acceleration and do not make
twitchy steering adjustments.The FLEX will ride stably
once rolling momentum is reached.
FLEX_Manual_0316.indd 8 2016-01-13 9:40 AM
Table of contents