Revere 61098 User manual

1
Inflatable
Personal Flotation Device (PFD)
OWNER’S MANUAL
DO NOT REMOVE THIS PAMPHLET PRIOR TO SALE
Revere Manual P/N 61107-1, Rev. D, Feb. 17/2015
This manual contains important information. Read it!
Keep this book and the sales receipt together in a safe place for future reference.
Please record your PFD’s model’s information:
Lot Number: Purchase Date: Retailer:
COMFORT MAXTM
BELT PACK
Model 61098
Manual Inflation
USCG Approved Type III PFD
Packed Inflated

2
TABLE OF CONTENTS
1.0 Personal Flotation Device Safety ..……………………………………………. Pg. 3
2.0 Approval Conditions and Carriage Regulations…….………….……………. Pg. 3
3.0 Mandatory Carriage Requirements……………….……………….……………. Pg. 3
4.0 Parts and Features…..…………..…...…………….…………………………... Pg. 4
5.0 About Your PFD……………..……………...….……………………………….. Pg. 5
6.0 Instructions for Use…………………...……………………….………………... Pg. 6
6.1 Pre-Donning Inspection…………………………………………….…….. Pg. 6
6.1.1 Check for Green “OK” Service Indicator .……………………….. Pg. 6
6.1.2 Check Manual Pull Tab Access…………………………….………. Pg. 6
6.1.3 Basic Visual Inspection for Damage………………...….....………. Pg. 6
6.2 Putting on Your PFD (Donning)……………………………………………. Pg. 7
6.3 Inflating by Using the CO2 Inflator Mechanism………………………….. Pg. 8
6.4 Inflating by Mouth (Oral Inflation)……………………………...………… Pg. 8
6.5 Deflating Your PFD………………………………………………………..... Pg. 8
6.6 Use Below Freezing……...………………….………………………………. Pg. 8
6.7 Rearming the CO2 Inflator Mechanism…………………………………… Pg. 9
6.8 Refolding Your PFD………………………………………..……………… Pg. 12
7.0 Is Your PFD in Good and Serviceable Condition?…………………………… Pg. 14
8.0 Care and Maintenance Instructions……………………………………….…. Pg. 14
8.1 Service Test Procedures…………………………………...…………… Pg. 14
8.1.1 Visual Inspection ………………….………..……………………… Pg. 14
8.1.2 Leakage Test………………………………………………………… Pg. 14
8.2 Cleaning……………………………………………………………………… Pg. 14
8.3 Storage……………………………………………………………………… Pg. 14
8.4 Professional Servicing……………………………………………………… Pg. 15
9.0 Why are PFD's Required Safety Equipment?………………………………… Pg. 15
10.0 How and Why Do You Test Your PFD?……………………………………….. Pg. 16
10.1 How Do You Test Your PFD Using the Manual Inflator?................… Pg. 16
10.2 How Do You Test Your PFD Using the Oral Inflator?……………….... Pg. 17
11.0 Wear Your PFD………………………………………………………………….... Pg. 17
12.0 Hypothermia……………………………………………………………………… Pg. 18
13.0 Each of These Devices is Intended to Help You Save Your Own Life ……. Pg. 19
14.0 Additional Information…………………………………………….……………... Pg. 19
14.1 Do Not Attach PFD’s to Your Boat ………….……………...…………... Pg. 19

3
2.0 Approval Conditions and Carriage Regulations
This inflatable PFD is approved by the U.S. Coast Guard for use as a Type III
Personal Flotation Device (PFD).
This inflatable was designed to be more comfortable and less restrictive to wear
than inherently buoyant PFD’s. It is not approved for water skiing or other high
impact, high-speed activities. When worn, used, and serviced according to this
owner’s manual, this PFD can greatly increase your chances of survival in the
water. Not recommended for non-swimmers or weak swimmers. Users of
inflatable PFDs must be at least 16 years old.
3.0 Mandatory Carriage Requirements
Federal regulations in 33 CFR 175-1993 require you to carry Coast Guard
approved personal flotation devices (PFDs) legibly marked with the Coast
Guard approval number which are in good and serviceable condition and are
the correct size for each person on board. To be considered serviceable, this
PFD shall not exhibit deterioration that could diminish its performance such as
broken or deformed hardware, detached webbing, rotted structural
components, air leaks, or nonfunctional oral inflation tube. Unless worn, this
PFD must also be properly armed with a full CO2 cylinder, inflation system
status indicator, and an accessible manual inflation lanyard. A PFD which is
approved only when wornor required to be wornmust be worn under the
specified conditions.
1.0 Personal Flotation Device Safety
This Personal Flotation Device (PFD) does not provide any buoyancy
unless inflated. You must inflate the PFD to float.
Never inflate the PFD by mouth first and then pull the handle. Doing so
may over inflate and damage the inflatable cell.
Each CO2 cylinder will only inflate the PFD once. The PFD must be re-
armed with a new CO2 cylinder after each use.
Do not dry clean, iron or machine wash your PFD.
Do not use the PFD in weather below freezing temperature (32oF / 0oC),
unless partially inflated.
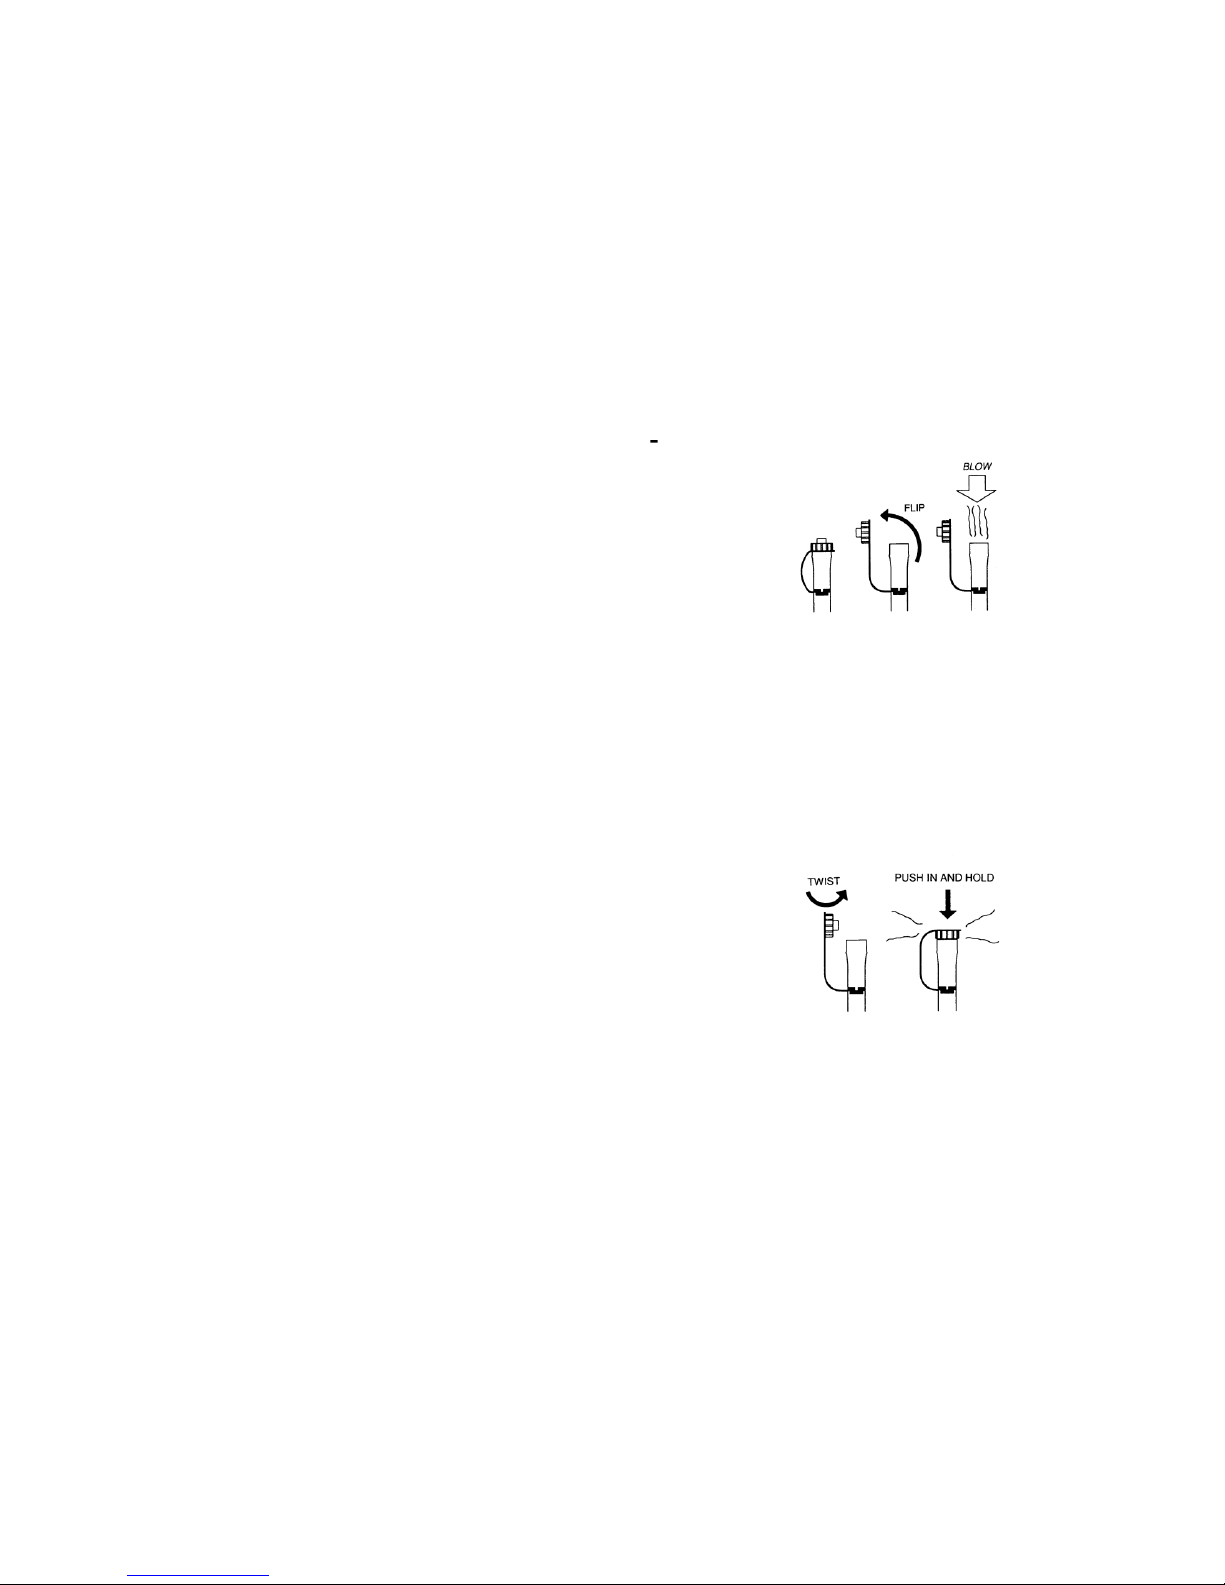
Inflatable devices filled with carbon dioxide (CO2) deflate faster than those
filled with air. You will have to replenish the cell sooner and more often
with oral tube.
Do not use damaged PFDs. Discard them, or return to REVERE for re-
pair.
Do not use on personal watercraft, or for water skiing, knee boarding or
similar uses.

4
4.0 Parts and Features
The REVERE COMFORT MAXTM BELT PACK PFD is designed for adults
weighing more than 80 lbs. (36 kg) with chest sizes between 30 inches (76 cm)
and 52 inches (132 cm) in circumference.
Figure 1
(1) Storage Pouch
(2) Inflator Pull Tab Opening
(3) Buckles
(4) Velcro®
(5) Clear Window
(6) Retroreflective Tape
(7) Oral Tube (Valve in tip)
(8) Oral Tube Dust Cover
(9) Inflatable Chamber
(10) Neck Ties
(11) CO2 Cylinder
(12) Center Adjustment Strap
(13) Inflator Mechanism
(14) Inflation “Jerk” Pull Tab
Storage Pouch
with Top Flap Open
PFD Inflated
Inflation System

5
5.0 About Your PFD
Your REVERE COMFORT MAXTM BELT PACK inflatable personal floatation
device (PFD) consists of an inflatable air-holding chamber, an inflation system,
and a storage pouch. The PFD is designed to be lightweight and comfortable
so it can be worn deflated and around your waist while on your boat. The stor-
age pouch keeps the deflated chamber packed securely allowing you to per-
form activities without interference. The PFD provides no buoyancy unless it is
inflated.
Model 61098 is a manually activated PFD. It has a carbon dioxide (CO2) cylin-
der and its activating mechanism, as well as an oral tube to blow air into the
chamber in the event of failure of the inflator mechanism. The PFD is inflated
by pulling down hard on the yellow handle marked "JERK" on the right hand
side of the pouch. This causes the PFD's CO2 inflation mechanism to puncture
a self-contained carbon dioxide cylinder and discharge this harmless gas into
the inflatable chamber. The chamber then inflates and bursts from the storage
pouch. You do NOT need to open the pouch or remove the chamber.
Once out of the pouch, the inflated chamber is placed over your head and worn
about your neck. It can be adjusted to fit the wearer by using the center adjust-
ment strap. The oral inflation tube provided can be used for topping the PFD off
by mouth. After use, the inflation system can be rearmed, a new CO2 cylinder
installed, and the PFD can be repacked to be used again and again.
The PFD is also equipped with retro-reflective tape panels for better visibility at
night.

6
6.0 Instructions for Use
6.1 Pre-Donning Inspection
Each time before you put on your PFD, follow the steps in Sections 6.1.1
through 6.1.3 to check the condition of your PFD.
6.1.1 Check for Green “OK” Service Indicator
Look through the clear plastic window on the front of the belt pack to view the
service indicator on the inflator. Refer to Figure 2. The indicator must be
GREEN to show a properly armed mechanism. If the service indicator is RED,
rearm the mechanism per the instructions in Section 6.7, Rearming the CO2
Inflator Mechanism.
Figure 2
6.1.2 Check Manual Pull Tab Access
Check that the yellow “JERK” tab is hanging through the cutout hole of the belt
pack.
6.1.3 Basic Visual Inspection for Damage
Visually examine the Inflatable PFD for damage or excessive abrasion, fading,
wear, tear, or contamination. Particular attention must be paid to the seams,
stitching, straps and webbing attachments, hardware (buckles and slides), etc.
Check for strength by pulling seams and attachments snugly. Make sure that
the PFD and inflation chamber is not twisted and is free from rips, tears, or
punctures. If PFD shows any signs of damage, perform a Leak Test, or send it
to an authorized repair facility or replace the entire device.
WARNING: DO NOT USE DAMAGED PFD’S. DISCARD THEM, OR
RETURN TO REVERE FOR REPAIR.

7
Step 1 Put belt around your
waist and buckle on your
left side. Adjust free
end of belt until snug.
Step 2 Pull yellow “ JERK” tab
down to inflate.
Step 3
Pull inflated PFD over head
with oral tube facing away from
body. Tighten center
adjustment strap snugly to
ensure PFD remains secure on
your head when jumping into
the water.
Step 4 Tie neck straps in a
knot as tight as possible.
Figure 3
6.2 Putting on Your PFD (Donning)
Put the PFD is worn about your waist like a belt. Refer to Figure 3. Buckle it at
the left side of the pouch and and tighten the waist strap. The yellow “JERK”
pull tab for the inflation mechanism protrudes from an opening on the right side
of the storage pouch. Check its location by hand and know where it is.

8
6.3 Inflating by Using the CO2 Inflator Mechanism
To manually inflate the PFD instantly, pull sharply in a downward direction on
the yellow handle marked “JERK” to discharge the CO2 cylinder.
WARNING: INFLATABLE DEVICES DEFLATE GRADUALLY DUE TO
PERMEATION LOSSES THROUGH THE MATERIAL OF THE
CELL. THESE LOSSES ARE GREATER WHEN THE DEVICE IS
INFLATED WITH CARBON DIOXIDE (CO2) THAN WITH AIR.
THEREFORE, EARLIER REPLENISHMENT BY MEANS OF THE
ORAL INFLATION SYSTEM WILL BE NECESSARY.
6.4 Inflating by Mouth (Oral Inflation)
To inflate the PFD orally, flip the replaceable black
dust cap off from the top of the red oral tube and
blow air into the oral tube (see Figure 4) until the
PFD is firm. To make oral inflation easier, open the
Velcro closures of the PFD and unfold. Practice
this procedure a few times until you are confident
how to orally inflate your PFD. Replace the dust
cap on top of the oral tube when you are done.
Occasionally, dust particles get trapped in the oral valve,
causing it to leak slightly. Blowing into the valve and/or tapping on the valve
with a finger will usually clear the dust and stop the leak. Keep the dust cap in
place at all times.
6.5 Deflating Your PFD
Remove the black dust cap from the top of the red
oral tube. Twist the dust cap around and insert the
small topside of the dust cap into the oral tube.
Hold in place to keep the valve open (see Figure 5).
At the same time, squeeze the PFD to force all the
gas out through the oral valve until the PFD is fully
evacuated and flat.
6.6 Use Below Freezing
When the PFD is used in weather below freezing temperature (32oF / 0oC), it
should be partially inflated by mouth. At these lower temperatures, the inflation
time is longer using only the CO2 inflator mechanism. A partially inflated device
will provide initial buoyancy while the PFD inflates.
Under cold weather conditions, CO2 inflation may not be adequate. Additional
oral inflation may be needed after inflation.
Figure 4
Figure 5

9
Follow the Steps 1 thru 7 shown in Figures 6A and 6B.
Parts Required: One (1) REVERE Rearming Kit 61026. This kit contains a
replacement cylinder and bayonet assembly.
Step 4
Push and hold the manual lever
in place against the inflator.
Figure 6A
Step 1
Open the Belt Pack and remove
chamber. Spread chamber out so
that the manual inflator and
cylinder are visible.
Step 2
Remove the old cylinder &
bayonet assembly by rotating the
cylinder counterclockwise then
pull out. Discard the old
assembly.
Step 3
Check the new cylinder & bayonet
assembly to be sure the sensor
ring is not broken, the O-ring is in
place, and the cylinder has not
been pierced. Do not install
assembly if not in proper condition.
Refer to Figure 7.
NOTE: The inflator will not allow
the installation of an assembly with
broken sensor ring.
NOTE: Rearming must follow the sequence below and on the next page.
6.7 Rearming the CO2 Inflator Mechanism
Each time the CO2 inflation mechanism on your PFD is actuated, the inflator
must be rearmed (reset) and the empty CO2 cylinder replaced. All the neces-
sary parts are included in the rearming kits available from your local REVERE
retailer.

10
Step 6
Check to be sure the service indicator
is GREEN.
Step 7
Refold the PFD (see Section 6.8)
and place back into Belt Pack so
that the GREEN service indicator
is visible through the clear
Step 5
Install a new cylinder & bayonet
assembly by (A) engaging the
tabs on the bayonet into the
housing, pushing in firmly, then
(B) turning clockwise 1/8 turn to a
full stop.
Check the bayonet viewport. One
of the black bayonet tabs will be
entirely visible through the view-
port. If a red or white indicator is
displayed or the tab is not fully
visible, the cylinder & bayonet
assembly is not completely in-
stalled and needs to be turned
clockwise further to a full stop.
WARNING: PFD WILL ONLY
INFLATE IF THE CYLINDER &
BAYONET ASSEMBLY IS
TURNED TO A FULL STOP.
Figure 6B

11
Figure 7

12
6.8 Refolding Your PFD
Before packing, completely deflate PFD and re-arm cylinder. Refer to Section
6.5, Deflating Your PFD, for additional instructions on deflating your PFD.
Read thoroughly then complete each step in Figures 8A and 8B.
Figure 8A
TO DEFLATE
Press down on oral tube. Squeeze ALL air
from bladder.
STEP 1
Close side of bag using Velcro®
STEP 2
Lay the PFD out flat with the cylinder and
oral tube face down. Fully lengthen center
adjustment strap.
STEP 3
Fold the right side of the PFD over so
oral tube is visible, as shown. Fold left
side over so cylinder is visible, as shown.
STEP 4
Turn PFD over so the cylinder is face down.
Starting from the top, fold down twice.
&
STEP 5
Fold in half so reflective tape in facing up-
wards.

13
STEP 7
Store all labels in pouch. Close pouch
using the Velcro® along the length of the
pouch.
STEP 6
Flip folded PFD chamber over so cylinder is
visible. Place folded PFD chamber into
pouch so the cylinder head is visible
through the window. Gently slide yellow
“Jerk” tab through bottom hole, as shown.
Figure 8B

14
7.0 Is Your PFD in Good and Serviceable Condition?
Check your PFD between outings to be sure that it is properly armed (see
Section 6.1.1, Check for Green “OK” Service Indicator); that it is free of rips,
tears or holes; that all seams are securely sewn; and that the fabric, straps and
hardware are still strong. Inspect the inflatable portion of the PFD in
accordance with Section 8.0, Care and Maintenance Instructions.
8.0 Care and Maintenance Instructions
8.1 Service Test Procedures
Service Test includes leakage test and visual inspection. Perform Service Test
at the beginning of each boating season and before any long voyage.
8.1.1 Visual Inspection
Before each outing, open the Belt Pack and unfold the PFD. Check the PFD's
inflatable cell looking for rips, tears, holes or punctures that might indicate
damage.
8.1.2 Leakage Test
Test the PFD’s inflatable cell for leaks at the beginning of each season and at
least once every two months afterwards. Inflate the PFD orally until the cell
becomes firm. Refer to Section 6.4, Inflating by Mouth (Oral Inflation). Allow
the PFD to sit overnight for 16 hours and then check to see if the inflatable cell
is still firm. A leaking PFD will have become soft and should not be used.
WARNING: DO NOT USE DAMAGED PFD’S. DISCARD THEM, OR
RETURN TO REVERE FOR REPAIR.
8.2 Cleaning
Your PFD is made of materials designed to resist soiling and mildew. If
cleaning is required, use mild hand soap and cool water. Rub gently. Do not
scrub or use abrasive cleaners.
CAUTION: DO NOT DRY CLEAN, IRON OR MACHINE WASH YOUR PFD.
DO NOT USE BLEACH.
8.3 Storage
Store your PFD in a cool, dry, well-ventilated place. A damp or wet PFD should
be hung by its collar on a clothesline before storage. Do not store PFD where it
can be exposed to chemicals. Do not leave your PFD in direct sunlight or in hot
areas for long periods when your boat is not in use. Avoid storing the PFD
inflated.
CAUTION: NEVER DRY YOUR PFD ON A HEATER, RADIATOR, OR WITH
A DIRECT HEAT SOURCE.

15
8.4 Professional Servicing
For the location of the nearest REVERE authorized service facility or to obtain
full factory service, product literature, rearming kits, or customer assistance for
your REVERE COMFORT MAXTM PFD, please contact:
REVERE SURVIVAL INC.
Vest Service Department
5323 Highway Ave.
Jacksonville, Florida 32254 USA
Tel. No.: 904-503-9733
sales@reveresurvival.com
www.reveresurvival.com
9.0 Why are PFD’s Required Safety Equipment?
Drownings are the leading cause of fatalities involving recreational boating. A
PFD provides flotation to help keep your head above water, help you stay face
up in the water, and increases your chances for survival and rescue. Most
adults only need an extra 7 to 12 pounds of flotation to keep their heads above
water. The proper size PFD will properly support the weight of the wearer.
Since this inflatable PFD does not have inherent buoyancy, it provides flotation
only when inflated. Familiarize yourself with the use of this PFD so you know
what to do in an emergency.

16
Figure 9
10.0 How and Why Do You Test Your PFD?
WARNING: PRIOR TO INFLATING PFD WITH CO2, BE SURE YOU HAVE
THE REQUIRED REARMING KIT.
Inflate your PFD and try it out in the water to:
Make sure it floats you:
Comfortably (when worn properly).
Adequately for expected wave conditions (Body shapes/densities affect
performance).
Make sure it works:
A flow of bubbles should not appear. (see Section 8.1.2, Leakage Test).
It should inflate quick and easily.
Learn how it works by:
Activating the CO2 inflation system.
Rearming the CO2 inflation system.
Using the oral inflator tube.
The U.S. Coast Guard recommends that you purchase two rearming kits. One
to be used immediately in testing the inflation system (see Sections 10.1) and
the other to carry onboard as a spare.
10.1 How Do You Test Your PFD Using the Manual Inflator?
1. To test your inflatable PFD, you will need:
Your fully armed PFD, and
REVERE Rearming Kit Part No. 61026.
2. Put on the PFD.
3. Actuate the inflation system by jerking firmly downward on the yellow pull-
handle. The PFD should fully inflate within 5 seconds.
4. Get into shallow water, just deep enough that you can stand with your
head above the surface.

17
5. See if the PFD will float you on your back or just slightly back of vertical.
In a relaxed floating position, verify that your mouth is well above the
water’s surface. Note the effect of where you hold your legs on how you
float.
6. Get out of the water and remove the PFD. Remove the used CO2 cylinder
from the PFD inflator. Completely deflate the PFD using the oral inflator.
7. Let the PFD dry thoroughly. REARM AND REPACK the PFD in
accordance with the instructions in Section 6.7 and 6.8!
10.2 How Do You Test Your PFD Using the Oral Inflator?
1. To test your inflatable PFD, you will not need any spare parts, or rearming
kits.
2. Remove the CO2 cylinder & bayonet assembly, to prevent inadvertent
activation of the manual inflation system, which could potentially
damage the PFD. Inspect the cylinder & bayonet assembly to ensure
it is unused (see Figure 7).
3. Put on the PFD.
4. Get into shallow water, just deep enough that you can stand with your
head above the surface.
5. If you are a weak swimmer or non-swimmer, inflate the PFD partially so
that you are supported well enough to be able to complete inflation without
touching bottom, either orally or manually. Note this level of inflation
because it is the minimum needed for you to safely use this inflatable
PFD.
6. Fully inflate the PFD using the oral inflator.
7. See if the PFD will float you on your back or just slightly back of vertical.
In a relaxed floating position, verify that your mouth is well above the
water’s surface. Note the effect of where you hold your legs on how you
float.
8. Get out of the water and remove the PFD. Completely deflate the PFD
using the oral inflator.
9. Let the PFD dry thoroughly. REARM AND REPACK the PFD in
accordance with the instructions in Sections 6.7 and 6.8.
11.0 Wear Your PFD
In approximately 80 percent of all boating fatalities, the victims were not
wearing a PFD. Most fatal accidents happen on calm sunny days. This
inflatable PFD is much more comfortable to wear than other PFD types. Get
into the habit of wearing this PFD. Non-swimmers and children especially
should wear a hybrid or non-inflatable PFD at all times when on or near the
water.

18
4. Keep a positive attitude about your survival and rescue. This will improve
your chances of extending your survival time until rescued. Your will-to-
live does make a difference!
5. If there is more than one person in the water, huddling is recommended
while waiting to be rescued. This action tends to reduce the rate of heat
loss and thus increase the survival time.
12.0 Hypothermia
Prolonged exposure to cold water causes a condition known as hypothermia - a
substantial loss of body heat, which leads to exhaustion and unconsciousness.
Most drowning victims first suffer from hypothermia. The following chart shows
the effects of hypothermia:
PFDs can increase survival time because they allow you to float without using
energy treading water and because of their insulating properties. Naturally, the
warmer the water, the less insulation you will require. When operating in cold
waters [below 60oF (15.6oC)] you should consider using a coat or jacket style
PFD or a Type V Thermal Protective PFD as they cover more of the body than
the vest or belt style PFDs.
Some Points to Remember about Hypothermia Protection:
1. Always wear your PFD. Even if you become incapacitated due to
hypothermia, the PFD will keep you afloat and greatly improve your
chances of rescue.
2. Do not attempt to swim unless to reach a
nearby craft, fellow survivor, or a floating
object on which you can lean or climb.
Swimming increases the rate of body heat
loss. In cold water, drown proofing method
that require putting your head in water are
not recommended. Keep your head out of
the water. This will greatly lessen heat loss
and increase your survival time.
3. Use the standard H.E.L.P. position when
wearing an inflatable PFD. Wrap your arms
around your torso, under the PFD, and
drawing the legs up to a seated position,
because doing so will help you conserve body heat. Figure 10

19
13.0 Each of These Devices is Intended to Help You Save Your
Own Life
For your PFD to function properly, follow these suggestions to verify that it fits,
floats, and remains in good condition.
1. Check the inflation mechanism service indicators before each use.
2. Get in the habit of rearming the inflation mechanism right after each CO2
inflation.
3. Try your wearable PFD on and adjust it until it fits comfortably in and out of
the water.
4. Mark your PFD with your name if you are the only wearer.
5. Do not alter your PFD. It doesn't fit properly get one that does. An altered
device is no longer Coast Guard approved.
6. Your PFD is not intended for use as a fender or kneeling pad.
7. If your PFD is wet, allow it to dry thoroughly before storing it. Store it in a
well-ventilated area.
8. Do not dry your PFD in front of a radiator or other source of direct heat.
14.0 Additional Information
If you need more information about PFDs and safe recreational boating, contact
your state boating authority, U.S. Coast Guard Auxiliary, U.S. Power Squadron,
Red Cross, or your nearest unit of the U.S. Coast Guard. To find out about the
free boating courses in your area, call 1-800-336-BOAT (in VA, 1-800-245-
BOAT) or see the USCG Boating Web Page at www.uscgboating.org.
14.1 Do Not Attach PFD’s to Your Boat
Each PFD has straps, hooks, buckles, or other means for securing the device
in place on the wearer. Some PFDs also incorporate decorative dee rings or
tabs. Such items are not to be used to attach the device to the boat. Attaching
the device to the boat will not permit it to perform as intended.

20
REVERE SURVIVAL INC.
5323 Highway Ave.
Jacksonville, Florida 32254 USA
Tel. No.: 904-503-9733
www.reveresurvival.com
Table of contents