Revolutionary Science Saniclave 200 User manual

The Saniclave 200
Instruction Manual
RS-SC-200

Instruction Manual for the
Revolutionary Science RS-SC-200
Saniclave 200
Table of Contents
Introduction 2
Display, Symbols, Control and Parts 3
Installation, Instructions and Intended Use 4
Intended Use 4
Safeguards and Cautions 5
Operating t e Saniclave 200 6
Printer 6
Troubles ooting and Error Modes 10
Warranty, Registration and Policy 12
Specifications 13
Contact Information 13
C ecklist and Notes of Service Record 14
Care, Storage and Maintenance 15
Sterilization Monitoring Guidelines 16
NOTE: Read t is manual before use! T is manual contains important information, safeguards
and operating instructions for t e operation of t e REVOLUTIONARY SCIENCE model RS-
SC-200 Saniclave 200 by Alternative Pioneering Researc & Development, Inc. (APR&D, Inc.)
© Alternative Pioneering Researc and Development, Inc.
1

Introduction
Dear Valued Customer,
T ank you for purc asing t e Revolutionary Science RS-SC-200 Saniclave 200. We are
confident t at w en used correctly, t e Saniclave 200 will provide years of reliable service.
T e ig quality of construction and durable parts deliver a performance equivalent to muc
costlier equipment.
You are invited to visit our web site at www.revsci.com. Please know t at we welcome any
feedback t at mig t elp us en ance and improve future RevSci products.
Sincerely yours,
REVOLUTIONARY SCIENCE
2

3

Installation Instructions
Remove Saniclave 200 from packaging and place it on a dry level surface. Plug it into an
accessible 120 VAC power receptacle. For printer setup, see page 6. T e Saniclave 200 is
now ready for use. See operating instructions on page 7.
Upon receiving the Saniclave 200, it is i portant that you follow these si ple steps:
1. Examine carton and contents for possible damage to t e product caused during s ipping.
If damage is present contact carrier at once. Failure to do so immediately may
release t e carrier from any liability of damage.
2. Fill out t e c ecklist (see instruction manual). If t e s ipment is incomplete, please
contact us at [email protected] or 651-257-0633.
3. Carefully read t is instruction manual before operating t e Saniclave 200.
4. Fill out warranty registration card and mail it to
Revolutionary Science
17319 Lake Blvd.
S afer, MN 55074.
Intended Use
T e Revolutionary Science Saniclave 200 is designed to be used in medical and dental clinics,
ospitals and ot er facilities w ere reusable sterile equipment is used. It is intended to sterilize
wrapped and unwrapped eat and moisture stable solid instruments, mated surfaces, knurled
and inged devices (excluding lumened devices and dental and pieces) t at are compatible
wit saturated steam sterilization at 121 degrees Celsius for 30 minutes.
4

Safeguards & Cautions
WARNING! Do not use this autoclave in an explosive or oxygen rich at osphere. Failure
to do so ay result in serious injury or death.
Li itations of Use
Revolutionary Science is not responsible for isuse of the Saniclave 200
1. NEVER attempt to dismantle or modify t e Saniclave 200.
2. NEVER leave operating Saniclave 200 unattended.
3. NEVER block drain (located on t e inside of t e c amber below eating element).
4. NEVER block steam trap (located on t e inside of t e c amber, near t e top, directly above drain).
5. NEVER operate t e Saniclave 200 wit a damaged cord or plug or after t e appliance malfunctions
or as been damaged in any manner.
6. NEVER use accessory attac ments not recommended by Revolutionary Science. T eir use may
cause fire, electrical s ock or injury.
7. NEVER place t e Saniclave 200 or any part of t e Saniclave 200 on or near a ot gas or electric
burner or ot er eating source.
8. NEVER use t e Saniclave 200 or any purpose ot er t an t e intended use.
9. ALWAYS close t e door properly before operating.
10. NEVER attempt to force t e door open or release pressure w ile sterilizer is in operation.
11. ALWAYS turn off t e unit by using t e 'CLR/OFF' button before unplugging t e Saniclave 200 from
t e power outlet.
12. ALWAYS use ONLY distilled water and never fill c amber wit more or less t an t e
recommended amount of distilled water.
13. NEVER reuse water left in t e ex aust tank. Re-used water may contain endotoxins. Drain
water tank and refill c amber wit clean, distilled water before eac cycle.
14. NEVER attempt to modify t e plug to fit an outlet ot er t an t e required 3-slot, grounded outlet.
T e enclosed 3 prong plug is equipped wit a grounded type 3 conductor wire to furt er ensure
t e safe operation of t e Saniclave 200.
15. NEVER immerse t e autoclave, cord, or plug in water or operate on wet surfaces.
16. NEVER fill t e ex aust tank wit water (See page 3 for location of ex aust tank and cap). T e
Saniclave 200 must be filled by pouring water directly into t e c amber.
17. ALWAYS load t e Saniclave 200 wit instruments compatible wit steam sterilization at 121
degrees Celsius for at least 30 minutes. Always contact t e instrument’s manufacturer if you are
unsure t at t is sterilization tec nique is suitable for instruments being sterilized.
18. ALWAYS inspect t e silicone seal before eac use for dirt, grime or cracks.
19. NEVER clean t e Saniclave 200 wit organic solvents like t inner or benzene. It will damage t e
surfaces.
20. ALWAYS test regularly wit Geobacillus stearot ermop ilus. See page 14 for sterilization
monitoring and control for more information.
21. T is sterilizer as not been validated for double pouc ing.
Operating the Saniclave 200
5

Preparation for Sterilization (Default ode)
1. War up cycle: Run a warm up cycle eac day prior to use. Cycle may be aborted during t e
sterilization mode to conserve on time. Remove door. Unplug t e cord, replug t e cord and
commence wit sterilization needs.
2. Preclean instruments according to t eir manufacturer's recommendations.
3. Follow instrument manufacturer’s instructions for correct cleaning and lubricating procedures.
WARNING! Failure to properly clean instru ents before autoclaving, ay result in unsterile
equip ent. Using unsterile equip ent ay result in serious injury or death.
4. It is recommended t at all instruments be dismantled, if possible.
5. Make sure packs do not touc . Do not stack packs or single piece instruments on top of eac
ot er.
CAUTION: Stacking instru ents i properly ay result in unsterile equip ent!
6. Use a sterilization indicator strip wit eac set of instruments being autoclaved.
7. T e recommended load is 4.5 lbs (not including t e rack). Never exceed the axi u load.
Exceeding axi u load ay result in unsterile equip ent.
8. Run a biological indicator spore test (Geobacillus stearot ermop ilus) at least weekly to confirm
proper sterilization. For additional information on purc asing biological indicators, see page 12.
Printer installation and operation
T e recommended printer model is t e Zebra 2844 wit a serial cable connection. Printouts s ould be made in accordance to
your facility’s standard operating procedures. Printers are available for purc ase t roug Revolutionary Science. Printer
paper must accommodate printout widt of 4 inc es. Follow printer manufacturer’s recommendations for regular repair,
cartridge replacement and service.
T e printer must be powered and connected to t e Saniclave 200 via a serial cable prior to use. Sufficient paper must be
installed in t e printer. At t e end of t e cycle (w et er it is a complete cycle or a failure), t e SET button, found on t e
control panel may be pressed to obtain t e printout. If t e Saniclave 200 is reset or powered down, t e printout data
cannot be recovered.
Sample printout. A successful printout s ould look similar to t e following:
6

Operating Instructions
1. Place Saniclave 200 on a dry, level surface.
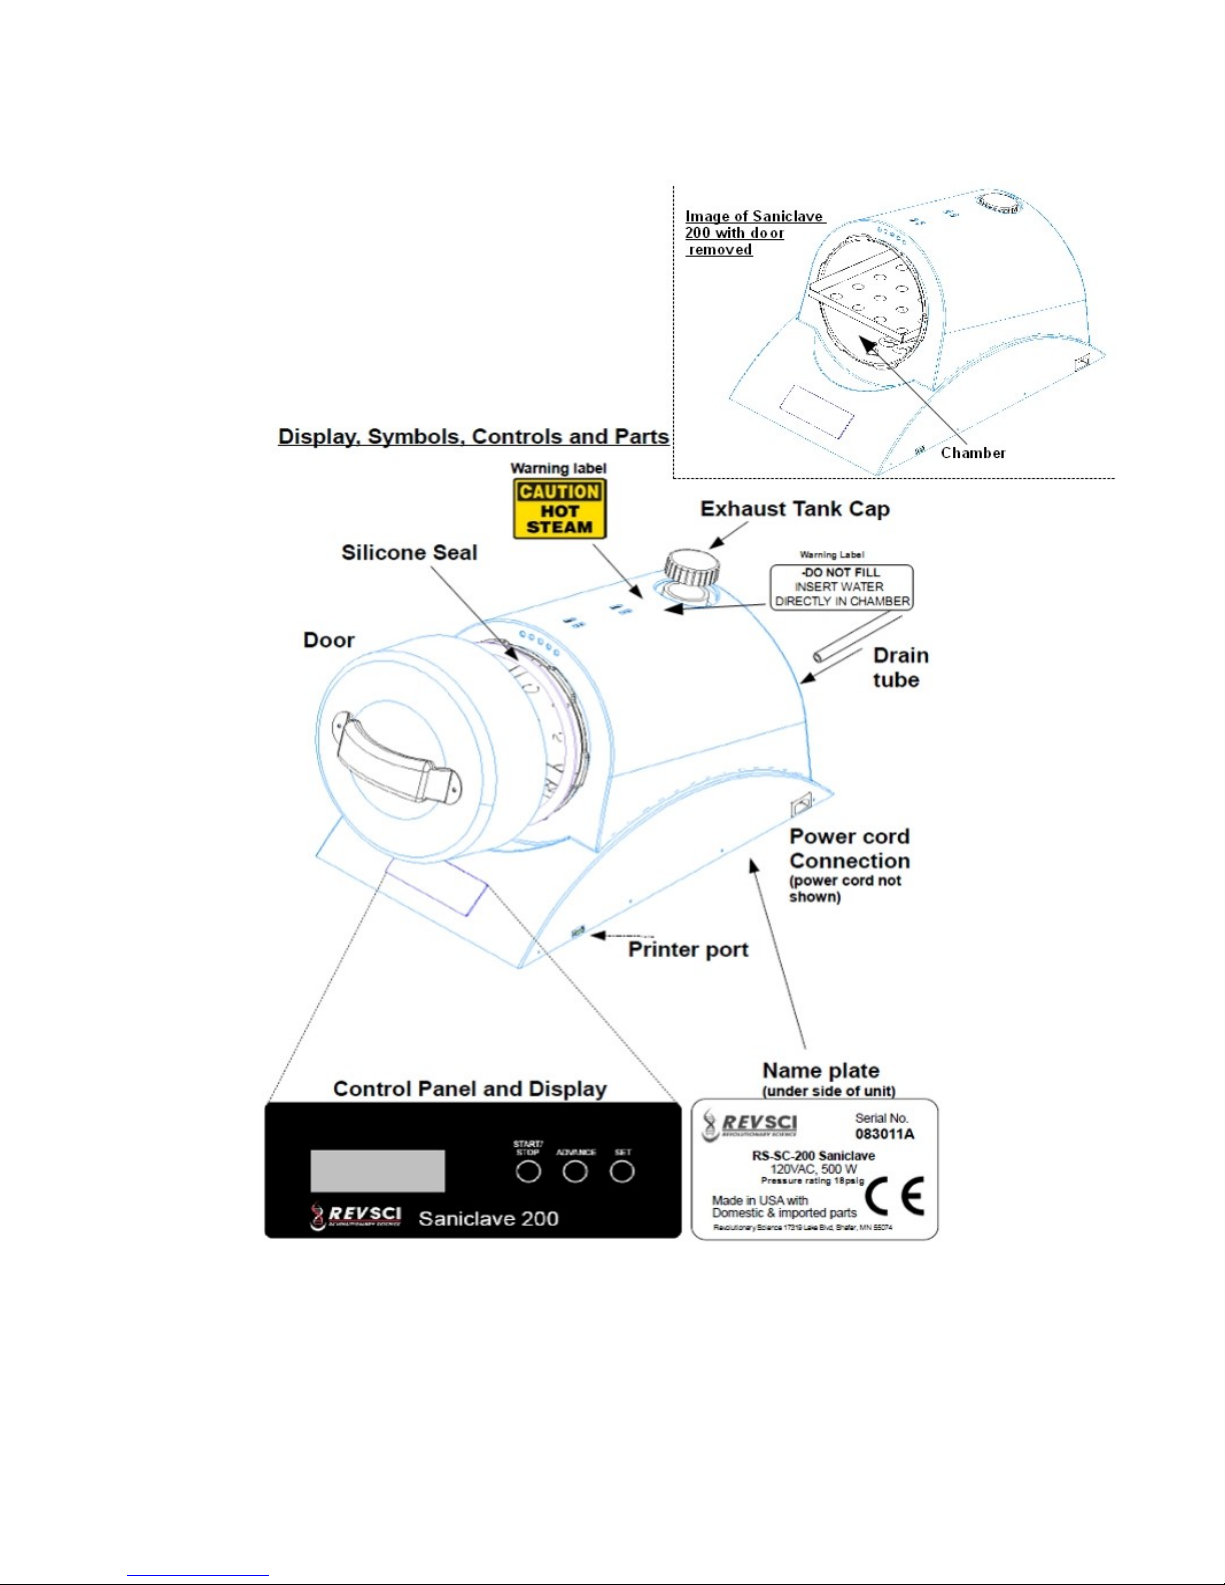
2. Remove c amber door by rotating door counter clockwise.
3. Fill c amber wit 500mL of distilled water.
4. Place rack in t e bottom of t e c amber and place instruments to be sterilized (wrapped or
unwrapped) on top of rack.
5. Inspect t e door to assure t at t e seal is clean and not damaged. Be sure t at t e inner portion of
t e door is also clean and clear, ensuring a secure fit.
6. If t e silicone seal as been removed re-install silicone seal in t e door by evenly tucking seal
under all lugs. Seal may be cleaned wit warm, soapy water (replace seal w en it becomes
noticeably cracked or worn).
7. Place t e door on t e c amber, ensuring t at t e arrow on t e door is aligned wit t e “open”
arrow on t e autoclave.
8. Press t e door in snugly and gently turn t e door andle clockwise until it can no longer turn. T e
door arrow s ould be aligned wit t e “close” arrow on t e autoclave.
9. Insert t e plug of t e cord into t e wall outlet. NEVER modify t e plug to make it fit, as t e plug will
only fit in one way. Autoclave ust be grounded when in use.
10. Standby Mode: T e 4-digit LED indicator will turn on and appear as “0000.”
11. Press 'START/STOP' to begin t e default 30 minute sterilization cycle.
12. Preheat Mode: Display will c ange to 'P ' for t e pre eat mode (about 25 minutes).
13. Observe t e display. If an error warning is displayed, t e cycle will be aborted (see
troubles ooting section on page 10).
14. Sterilization Mode: After t e pre eat mode, t e display will automatically begin to count down
from 30 minutes. For your convenience, t e display will s ow t e temperature reading. To view
t e pressure or cycle time left, see page 8
15. To abort t e cycle at any time, press 'START/STOP' again. Display will t en read “Err 1” and
c amber will instantly depressurize. Allow a few minutes for t e c amber to depressurize before
opening t e door.
16. Drain Mode: At t is point, t e display will read “dry” and t e unit will automatically depressurize.
Due to door locking safety feature of t e silicone seal, t e opening of t e door is not possible until
t e c amber is completely depressurized.
You may ear sound of t e c amber depressurizing. T is is normal.
17. Dry Mode: After t e c amber drains, t e autoclave will sound an audible alarm t at reads “turn
door.” Rotate door counter clockwise until it is in t e “open/dry” position. T en press t e
ADVANCE button and t e alarm will cease. During t is mode, t e eater warms t e c amber for
30 minutes. Moist air vents out of t e door gap.
18. Cycle Co plete: “CC” will display if t e cycle was successful.
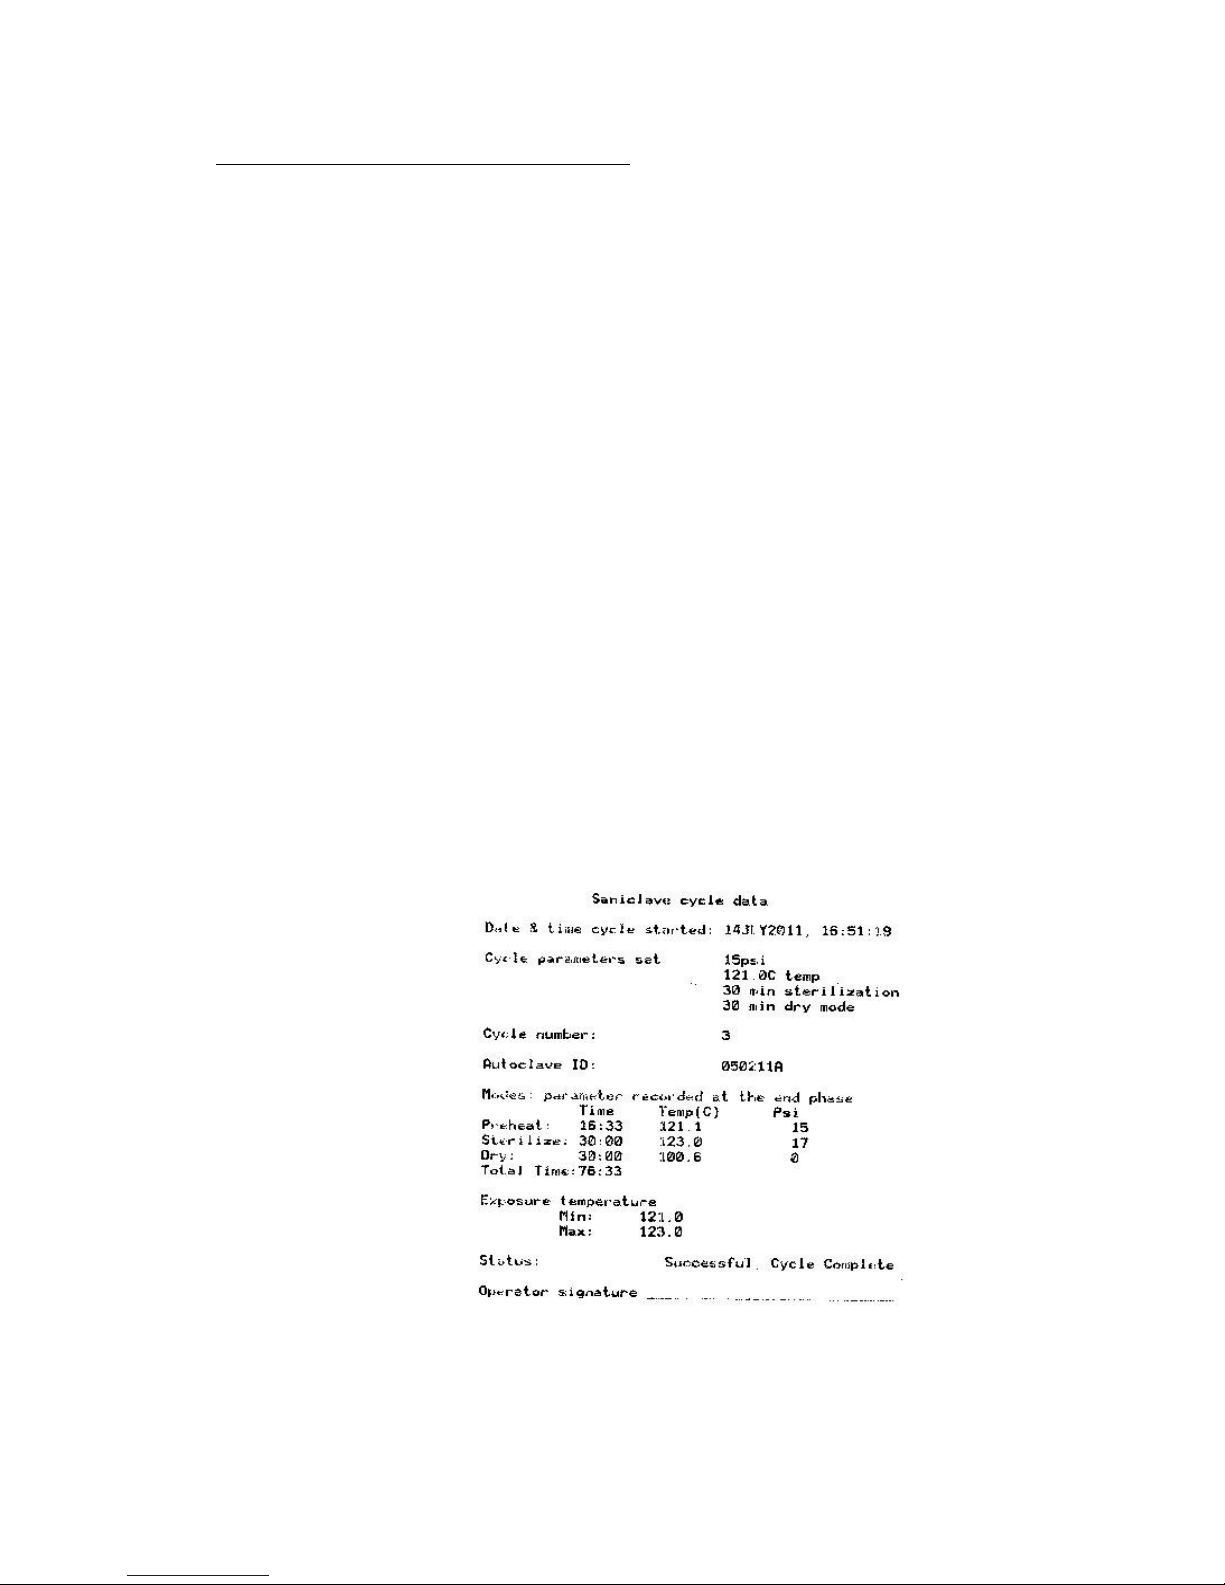
19. Print Mode: If t e Saniclave 200 is connected to a printer, a cycle report will print w en SET
button is pressed, s owing t e date/time, preset and ac ieved parameters.
Caution: internal cha ber contents ay be hot to the touch.
7

Reco ended Load Configuration
Load including t e trays must not exceed 4.5 lbs.
Cycle Phases
Fill Display reads “Fill” if t e 'START' button is pressed and t e c amber as
not yet been filled wit sufficient water.
Preheat Mode. Display will read 'P ' for Pre eat. T is mode will usually last for
about 30 minutes, depending on t e load size.
Sterilization Mode Display will s ow temperature in Celsius:
•Press ADVANCE to view t e pressure reading in PSIg.
•Press SET to view t e cycle time remaining.
Dry Mode W en t e sterilization cycle is successfully completed, t e display
will read 'dry,' for drain mode. As t e water drains, t e c amber
completely depressurizes and s ortly t ereafter (if selected), t e
Dry Mode begins. Display will alternate between “dry” and t e 30
minute timer. W en t e display reads “turn door,” t e door must
be opened by rotating t e door counter clockwise to t e “open/dry”
position until t e Dry Mode is complete.
CC Mode After a successful completion of t e entire cycle, t e display will
read 'CC' for Cycle Complete. Remove t e door and remove t e
instruments. Instruments may be warm to t e touc .
Print Date/time, preset and ac ieved parameters are printed only if t e
printer is on and properly connected to t e printer port.
8

Setting Your Saniclave 200.
T e sterilization cycle parameters are as follows: 30 minutes, 121C, 15psi. T e sterilization
cycle parameters cannot be adjusted.
Load Settings
Load type Instructions
Unwrapped Loads Press and old t e ADVANCE button. T e display s ould c ange
from “0000” to “oooo.”Press ADVANCE once more. T e SET button
can be used to toggle between “dry” and “off.” Select "off." Dry
mode will not commence at t e end of t e cycle.
The dry mode should not be used for unwrapped loads
Wrapped Loads Press and old t e ADVANCE button. T e display s ould c ange
from “0000” to “oooo.”Press ADVANCE once more. T e SET button
can be used to toggle between “dry” and “off.”Select "dry."Dry time
is 30 minutes.Dry mode will commence at t e end of t e cycle.
The dry mode should be used for wrapped loads
Note: For wrapped loads, the user ust use wraps or pouches that are cleared by the
FDA for hu an use. Unwrapped loads ust be used i ediately upon sterilization.
Set Ti e and Date – To set t e time and date, press and old t e 'SET' button. T e
'ADVANCE' button may be used to advance from t e time, date and year. T e 'START'
and 'SET' buttons can be used to adjust t e settings up and down. Disconnecting t e
power between uses may interrupt t e clock's timing. Date and time may need to be
reset. If set correctly, t e time and date will be printed on t e printout.
Print – To print, t e printer must be connected to mains and plugged into t e Saniclave 200
prior to use. After a cycle is complete, w en display reads 'CC,' press t e SET button
once. Ot er t an t e cycle count, date and time, t e Saniclave 200 does not store cycle
data. If you wis to keep records, t e printer must be properly connected.
See page 6 for more printer information.
9

Troubleshooting
Error Conditions and Display Readings
Note: If a failure occurs, the load ust be considered non-sterile. T e sterilizer and
load s ould t en be investigated. Contact Revolutionary Science if problem persists.
1. Manual Cycle Abort: If 'START' is pressed, display will read 'Err 1' for
cycle abort. User may abort t e cycle anytime,
during, pre eat, sterilize or dry modes. If cycle is
aborted, t e contents of t e load s all be
considered non-sterile. Press SET to acknowledge
t e error.
2. Preheat too long (Door Ajar): If door is not closed properly and t e cycle is
initiated, t e cycle will fail w en t e autoclave
cannot pressurize. Display will read 'Err 2.' Press
SET to acknowledge t e error. Take off t e door.
Remove door gasket. Inspect t e door gasket for
cracks. Replace wit a new gasket if necessary.
Reinstall gasket into door. Properly close door by
lining up arrows on door and on body and twisting
t e door closed. Restart t e cycle.
3. Over Te perature Alar : If temperature exceeds t e maximum of 124°C t e
display will read 'Err 3.' Allow unit to drain t e
reservoir fully into t e ex aust tank or sink. Press
SET to acknowledge t e error. Open door w en
c amber as cooled. Remove load from c amber.
Refill reservoir. Reinsert load. Close t e door.
Restart cycle. If an over-temperature condition
occurs again, contact Revolutionary Science to
investigate t e problem furt er. Discontinue use
until problem is resolved.
4. Under Te perature Alar : If t e temperature or pressure of t e
c amber falls below sterilization temperature of
121°C during t e sterilization cycle, t e digital
display will read 'Err 4.' Press SET to acknowledge
t e error. Open door w en c amber as cooled.
Remove load from c amber. Refill reservoir.
Reinsert load. Close t e door. Restart cycle. If an
under-temperature condition occurs again, contact
Revolutionary Science to investigate t e problem
furt er. Discontinue use until problem is resolved.
5. Low Water: T e display will read 'Err 5' if t ere is an insufficient
amount of water in t e c amber. Press SET to
acknowledge t e error. Fill reservoir up to t e
temperature sensing probe. Restart cycle.
10

6. Exhaust tank full: T e display will read 'Fill' if water is in t e ex aust
tank. Drain water from t e tank into a sink or bucket
by opening t e manual drain valve. Close t e valve
and restart t e cycle.
Printouts
If t e printer is connected and SET is pressed following t e displayed error, a printout will
provide a brief description of t e failure. T e printout will not display any sterilization time if t e
failure occurred during t e sterilization mode.
Additional errors
Note: A printout will not be provided for t e following.
Power Outage. If a power outage occurs t e display will revert to
standby mode and read '0000.' It will not display “CC”
until t e Saniclave 200 is restarted and a successful
cycle is passed. T is would appen even if t e outage
took place after a successful completion of a cycle and
t e unit was left unattended. If t is occurs refill wit
water and restart sterilization cycle.
Water Leakage. Water may leak from t e unit if t e drain valve is left
open. C eck drain valve and move it into t e 'closed'
position. If leaking persists, unplug from mains and
contact Revolutionary Science.
If any of t e above occurs, turn off Saniclave 200 and investigate. If problem persists,
contact Revolutionary Science
11

Warranty Registration
Please fill out t is page, or a copy of it, and send it to t e address below to validate your
warranty. Warranty Registration Card for t e REVOLUTIONARY SCIENCE RS-SC-200
Saniclave 200. (Please Print)
Date Purc ased ______________________ Serial Number_____________________________
Purc ased
From________________________________________________________________________
(Please c eck one) ________ Company ________ Sc ool ________ Individual____
Name of Department or Institution:
____________________________________________________________________________
Address:
____________________________________________________________________________
____________________________________________________________________________
____________________________________________________________________________
Intended use:
____________________________________________________________________________
W ere did you ear of our product?
____________________________________________________________________________
Comments:
____________________________________________________________________________
____________________________________________________________________________
____________________________________________________________________________
____________________________________________________________________________
Warranty
Your REVOLUTIONARY SCIENCE RS-SC-200 Saniclave 200 is warranted to be free from
defects of material and workmans ip under normal use for a period of two years from date of
purc ase. If your RS-SC-200 Saniclave 200 proves to be defective wit in t is warranty period,
APR&D, Inc. will repair or replace your unit at our option. T is warranty will be void if
malfunction is caused by accident, misuse, negligence, tampering, abuse, and/or damage in
transit. T is warranty excludes any relief for incidental or consequential damages.
12

Specifications
Power requirements: 120 VAC, 500 watts,
grounded outlet
Net weig t: 20 lb.
Dimensions: 16 in. tall x 13.5 in. wide x
21 in. deep
Internal c amber dimensions: 9 in. diameter x 10.5 in. long
Pressure: 15-18 psi
Normal operating temperature: 121-124°C
Temperature lower tolerance: 121°C
Temperature upper tolerance: 124°C
Pre eat time: Automatic
Sterilization time: 30 minutes
Dry time: 30 minutes
Capacity: 12.5 Liters
Further Questions?
Contact Infor ation
Revolutionary Science
17319 Lake Blvd
S afer, Minnesota 55074, USA
Customer Service: 1(800) 775-7942
Tec nical Assistance: (651) 674-3112
Fax: (775) 218-7015
Web site: www.revsci.com E- ail: [email protected]
13

Checklist
(See page 3 for visual identification of c ecklist parts)
Part: Model number:
_ Autoclave 200-A00001
_ Door 100-A00002
_ Silicone seal 200-A00003
_ Rack 100-A00004
_ Manual 310-A00001
_ Detac able power cord
Notes & Service Record
For your own future reference and to expedite answers to your questions, please complete t e
following information:
Date Purc ased: _________________________________________
Serial Number: __________________________________________
Model Number: __________________________________________
Purc ased From: _________________________________________
Your Notes:
____________________________________________________________________________
____________________________________________________________________________
____________________________________________________________________________
____________________________________________________________________________
____________________________________________________________________________
____________________________________________________________________________
________________________________________________
Revolutionary Science recommends t e weekly use of G. Bacillus Stearother ophilus
biological indicator a pules. Place indicator in center of full load and test weekly.
14

Care, Storage and Maintenance Instructions
Daily Inspect and clean door gasket wild mild soap or detergent. Rinse with distilled
water, wipe with damp lint free cloth. Inspect for cracks. Reinstall in door.
Clean Chamber with mild soap or detergent. Inspect chamber for calcium or other
deposits. Wipe with damp, lint free cloth. If needed, repeat cleaning procedure.
Do not use harsh chemicals in autoclave.
Weekly Clean rack and coils with warm water and a mild soap or detergent. Inspect rack
and holder for residues or deposits. Repeat cleaning if necessary. Rinse in warm,
distilled water and wipe with a clean, lint free cloth.
As Needed Replace door gasket if torn or cracked. If a printer is installed, replace paper and
ink cartridges as needed and according to printer manufacturer's instructions.
For regular Sterilizer Monitoring Guidelines, see page 16
W en storing t e Saniclave 200:
1. Disconnect Saniclave 200 from mains and printer.
2. Drain all water from t e c amber and ex aust water tank. To drain t e water
ex aust tank, turn t e manual drain valve (located in t e rear, rig t side of t e
unit to t e open position. W en ex aust tank is empty, close t e manual drain
valve.
In t e rare situation w ere water remains in t e c amber after use (suc as after
a power failure). Drain t e c amber by tipping t e Saniclave 200 unit forward,
emptying t e c amber into a s allow vessel or sink.
Caution: Water fro the exhaust water tank or cha ber ay be war or
hot!
3. W en your Saniclave 200 is cool, wipe bot t e exterior and t e interior of t e
autoclave wit a clean, dry paper towel or terry clot . If needed, clean plastic
parts wit warm water or isopropyl alco ol. To remove calcium buildup, pour a
small amount of calcium, lime and rust removal (suc as CLR® ) into c amber
and clean t oroug ly wit a dry terry clot .
ALL REPAIRS MUST BE PERFORMED BY A TRAINED PROFESSIONAL. CONTACT
REVOLUTIONARY SCIENCE FOR MORE INFORMATION. (SEE THE CONTACT SECTION
ON PAGE 12)
15

Sterilization Monitoring Guidelines
Note
Revolutionary Science provides t e following information only for reference. T e user must
contact state and local government for proper regulations regarding sterilizer use and
sterilization monitoring. In addition, t e Centers for Disease Control and Prevention (CDC),
American Dental Association (ADA) and t e Organization for Safety and Asepsis Procedures
(OSAP) may be contacted for furt er information regarding infection control.
Physical Monitors
Sterilizer malfunctions may be detected by pressure and temperature measurement devices. T e
sterilizer's programming aborts t e cycle and displays a message on t e display screen if p ysical
conditions exceed t e proper limits. A record of eac load's actual cycle time, temperature and
pressure can be created by use of t e optional printer.
Note
Only FDA cleared c emical indicators and biological indicators designed for steam
sterilization are to be used. Additionally, suc indicators must be compatible wit t e cycle
parameters of t e Saniclave 200. W en monitoring t e cycle wit suc indicators, load t e
c amber according to your facility's standard operating procedures.
Che ical Indicators
T e purpose of c emical indicators (CI) is to determine w et er t e sterilization cycle parameters
are sufficient to accomplis an effective sterilization. CI's are not intended to be used to validate t e
sterility of t e load. However, if t e CI s ows failure, t e load must be considered non-sterile and
t e load configuration and sterilizer s all be investigated, due to t e fact t at proper cycle
parameters may ave not been correctly ac ieved. Note: Improper wrapping , packing and loading
may result in failures. In addition, t e failure may be a result of sterilizer malfunction. C eck load
configuration and verify t at it is in accordance wit t e manufacturer's instructions. Also, c eck t e
CI's instructions for proper use, storage and disposal. Only CI's t at are cleared by t e FDA and
labeled for use wit t e same cycle parameters (of exposure time and temperature) of t e Saniclave
200 s all be used to monitor sterility conditions of loads processed in Saniclave 200.
Biological Indicators
Microbial devices suc as biological indicators (BI) are designed to accompany a load to be
sterilized. W en a BI s ows failure, t e load must not be considered sterile. Note: Improper
wrapping , packing and loading may result in failures. In addition, t e failure may be a result of
sterilizer malfunction. C eck load configuration and verify t at it is in accordance wit t e
manufacturer's instructions. Also, c eck t e BI's instructions for proper use, storage and disposal.
Only BI's t at are cleared by t e FDA and labeled for use wit t e same p ysical parameters (of
exposure time and temperature) of t e Saniclave 200 s all be used to monitor sterility of loads
processed in Saniclave 200.
Use an FDA approved biological indicator (BI) weekly to confirm sterility. Follow t e BI
manufacturer's instructions. Revolutionary Science recommends t e use of BI's manufactured by
SPS Medical.
SPSmedical Supply Corp. 6789 W Henrietta Road Rus , NY 14543 USA
(800) 722-1529 www.spsmedical.com
16

This manual suits for next models
1
Table of contents