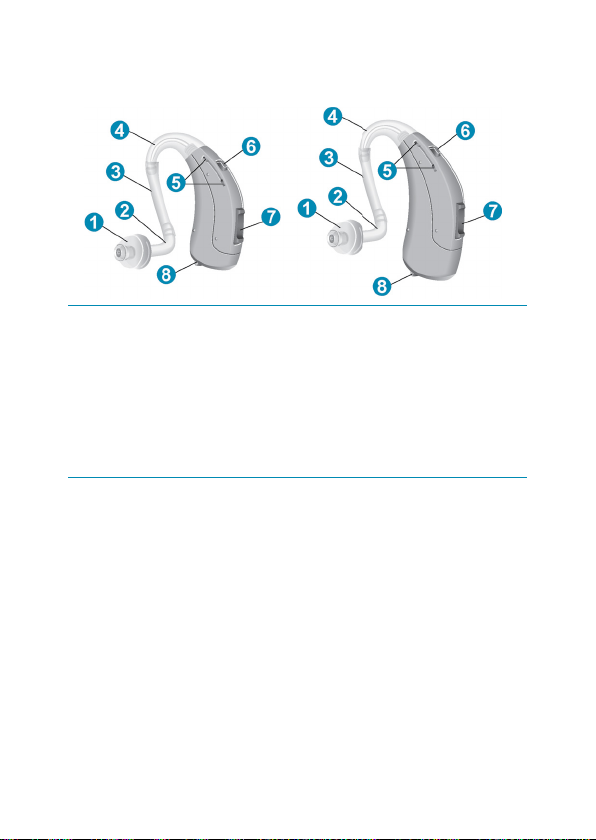
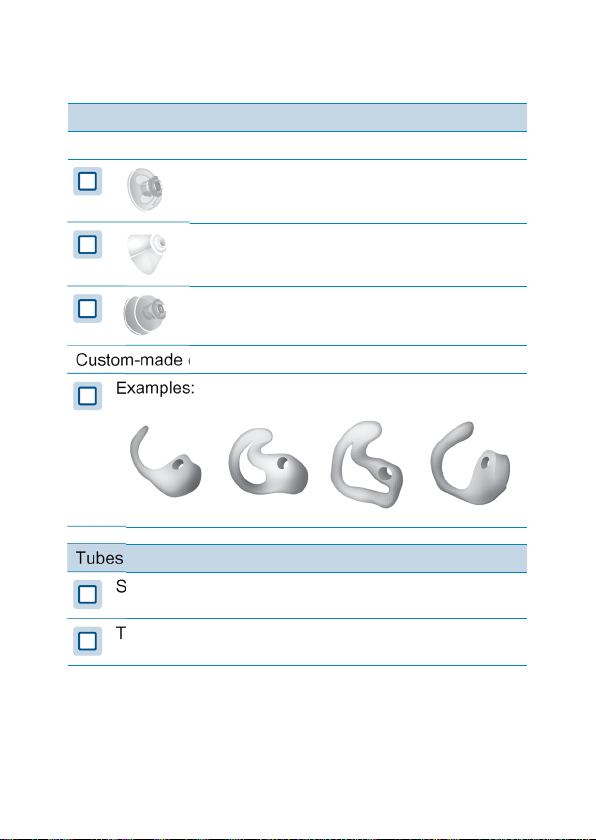
Rexton Targa S 5 User manual

www.rexton.com
Targa S/P/HP 5
User Guide

2
Content
Welcome 4
Your hearing inruments 5
Inrument type 5
Getting to know your hearing inruments 5
Components and names 6
Controls 9
Settings 11
Batteries 12
Battery size and handling tips 12
Replacing batteries 13
Daily use 14
Turning on and o 14
Inserting and removing the hearing inruments 16
Adjuing the volume 19
Changing the hearing program 19
Locking the controls (optional) 20
Special liening situations 21
On the phone 21
Audio induction loops 22
Audio input (FM syem) 23

4
Welcome
Thank you for choosing our hearing inruments to
accompany you through everyday life. Like anything new,
it may take you a little time to become familiar with them.
This guide, along with support from your Hearing Care
Professional, will help you underand the advantages
and greater quality of life your hearing inruments oer.
To receive the mo benet from your hearing
inruments, it is recommended that you wear them every
day, all day. This will help you get adjued to them.
CAUTION
It is important to read this user guide and the safety
manual thoroughly and completely. Follow the
safety information to avoid damage or injury.

5
Your hearing inruments
This user guide describes optional features that
your hearing inruments may or may not have.
Ask your Hearing Care Professional to indicate the
features that are valid for your hearing inruments.
Inrument type
Your hearing inruments are BTE (Behind-The-Ear)
models. A tube delivers the sound from the hearing
inrument into the ear. The inruments are not intended
for children under the age of 3 years or persons with a
developmental age of under 3 years.
Getting to know your hearing inruments
It is recommended to familiarize yourself with your new
hearing inruments. With the inruments in your hand
try using the controls and note their location on the
inrument. This will make it easier for you to feel and
press the controls while wearing the hearing inruments.

6
Components and names
This user guide describes several types of hearing
inruments. Use the following pictures to identify the type
of hearing inrument that you use.
Targa S 5
➐
➐
➊
Ear piece (Open Tip)
➋
Retention rand
(optional)
➌
Tube (ThinTube)
➍
Adapter for ThinTube
➎
Earhook
➏
Microphone openings
➐
Push button (control)
➑
Battery compartment
(on/o switch)

7
Targa P 5 Targa HP 5
➊
Ear piece
➋
Adapter for ear piece
➌
Tube for earhook
➍
Earhook
➎
Microphone openings
➏
Push button (control)
➐
Rocker switch (control)
➑
Battery compartment
(on/o switch)

8
Ear pieces and tubes
Ear pieces Size
Standard ear pieces
Open Tip open or closed
Open Tip semi-open
Open Tip double
Cuom-made ear pieces
Examples:
Tubes Length
Standard tube (ThinTube)
Tube for earhook
You can easily exchange the andard ear pieces
and clean the andard tube. Read more in section
"Maintenance and care".

9
Controls
With the controls you can, for example, adju the volume
or switch hearing programs. Your hearing inruments
either have a push button and a rocker switch or a
push button only.
Your Hearing Care Professional has programmed your
desired functions to the controls.
Control Left Right
Push button
Rocker switch

10
Rocker switch function L R
Press briey:
Volume up/down
Sound mixer (audio input)
L = Left, R = Right
Push button function L R
Press briey:
Program change
Press long:
Standby/turn on
L = Left, R = Right
Push button and rocker switch function L R
Lock/Unlock the controls
Read more in section "Locking the controls".
L = Left, R = Right

11
Settings
Hearing programs
1
2
3
4
Read more in section "Changing the hearing program".
Features
Power-on delay enables while-free insertion of
hearing inruments.
Read more in section "Turning on and o".
A telecoil is built into the inrument, so it can
connect with audio induction loops.
Read more in section "Audio induction loops".

12
Batteries
When the battery is low the sound becomes weaker
or you will hear an alert signal. The battery type will
determine how long you have to replace the battery.
Battery size and handling tips
Ask your Hearing Care Professional for recommended
batteries.
Battery size: 312 13 675
■ Always use the correct battery size for your hearing
inruments.
■ Remove the batteries if you intend not to use the
hearing inruments for several days.
■ Always carry spare batteries.
■ Remove empty batteries immediately and follow your
local recycling rules for battery disposal.

13
Replacing batteries
Removing the battery:
XOpen the battery compartment.
XPush the battery out
(refer to the picture).
Inserting the battery:
XIf the battery has a protective lm, remove it
only when you are ready to use the battery.
XInsert the battery with the "+" symbol
facing up (refer to the picture).
XCarefully close the battery compartment. If you feel
resiance, the battery is not inserted correctly.
Do not attempt to close the battery compartment by
force. It can be damaged.

14
Daily use
Turning on and off
You have the following options to turn your hearing
inruments on or o.
Via battery compartment:
XTurning o: Open the battery
compartment fully.
XTurning on: Close the battery compartment.
The default volume and hearing program are set.
Via push button:
XTurning on or o: Press and hold the push button for
several seconds. Refer to section "Controls" for the
settings of your controls.
After turning on, the previously used volume and
hearing program remain set.

15
When wearing the hearing inruments, an alert tone can
indicate when an inrument is being turned on or o.
When the power-on delay is activated, the hearing
inruments turn on after a delay of several seconds.
During this time you can insert the hearing inruments
into your ears without experiencing unpleasant feedback
whiling.
The "power-on delay" can be activated by your Hearing
Care Professional.

16
Inserting and removing the hearing inruments
Your hearing inruments have been ne-tuned for your
right and left ear. Colored markers indicate the side:
■ red marker = right ear
■ blue marker = left ear
Inserting a hearing inrument:
XHold the tube close to the ear piece.
XCarefully push the ear piece
into the ear canal ➊.
XTwi it slightly until it sits
well.
Open and close your mouth
to avoid accumulation of air
in the ear canal.
XLift the hearing inrument
and slide it over the top of
your ear ➋.
CAUTION
Risk of injury!
XInsert the ear piece carefully and not too deeply
into the ear.

17
■ It may be helpful to insert the right hearing
inrument with the right hand and the left
hearing inrument with the left hand.
■ If you have problems inserting the ear piece,
use the other hand to gently pull your earlobe
downwards. This opens the ear canal and eases
insertion of the ear piece.
The optional retention rand helps to securely retain the
ear piece in your ear. To position the retention rand:
XBend the retention rand and
position it carefully into the
bottom of the bowl of your ear
(refer to the picture).

18
Removing a hearing inrument:
XLift the hearing inrument
and slide it over the top of
your ear ➊.
XHold the tube close to
the ear piece and pull the
ear piece out carefully ➋.
CAUTION
Risk of injury!
XIn very rare cases the ear piece could remain in
your ear when removing the hearing inrument.
If this happens, have the ear piece removed by
a medical professional.
Clean and dry your hearing inruments after usage.
Read more in section "Maintenance and care".

19
Adjuing the volume
Your hearing inruments automatically adju the volume
to the liening situation.
XIf you prefer manual volume adjument, press the
rocker switch briey.
Refer to section "Controls" for the setting of the
rocker switch.
An optional signal tone can indicate the volume change.
Once the maximum or minimum volume has been
reached, you may hear an optional signal tone.
If you turn o the hearing inruments immediately
after changing the volume, the volume change may
not be saved. Wait 5 seconds before turning the
hearing inruments o.
Changing the hearing program
Depending on the liening situation, your hearing
inruments automatically adju their sound.
Your hearing inruments may also have several hearing
programs which allow you to change the sound, if needed.
An optional signal tone can indicate the program change.
XTo change the hearing program, press the push button
briey.
Refer to section "Controls" for the setting of your
controls. Refer to section "Settings" for a li of your
hearing programs.

20
Locking the controls (optional)
To prevent any accidental operation you can lock the
controls. When the controls are locked, both push button
and rocker switch are disabled.
XTo lock the controls, press the top of the rocker switch
and hold it. Simultaneously press the push button on
the same hearing inrument for 3 seconds.
XTo unlock the controls, press the bottom of the
rocker switch and hold it. Simultaneously press the
push button on the same hearing inrument for
3 seconds.
Whether this function is congured for your hearing
inruments is lied in section "Controls".
This manual suits for next models
2
Table of contents
Other Rexton Hearing Aid manuals

Rexton
Rexton M-Core B-Li-M User manual

Rexton
Rexton Adore MB PB User manual

Rexton
Rexton M-Core B-Li-M User manual

Rexton
Rexton BTE User manual

Rexton
Rexton inoX 6C User manual

Rexton
Rexton Finesse 2c User manual

Rexton
Rexton RX12 User manual

Rexton
Rexton Gem User manual

Rexton
Rexton M-Core SR User manual

Rexton
Rexton Adore StyleLine BT User manual