Rexton Finesse 2c User manual

BTE & OPEN FIT INSTRUMENTS
INSTRUMENTOS DE AJUSTE RETROAURICULAR Y OPEN
OPERATING INSTRUCTIONS
MANUAL DE INSTRUCCIONES

2
TABLE OF CONTENTS
Welcome to Better Hearing ............................................................3
Types of Hearing Instrument Technology ..........................................4
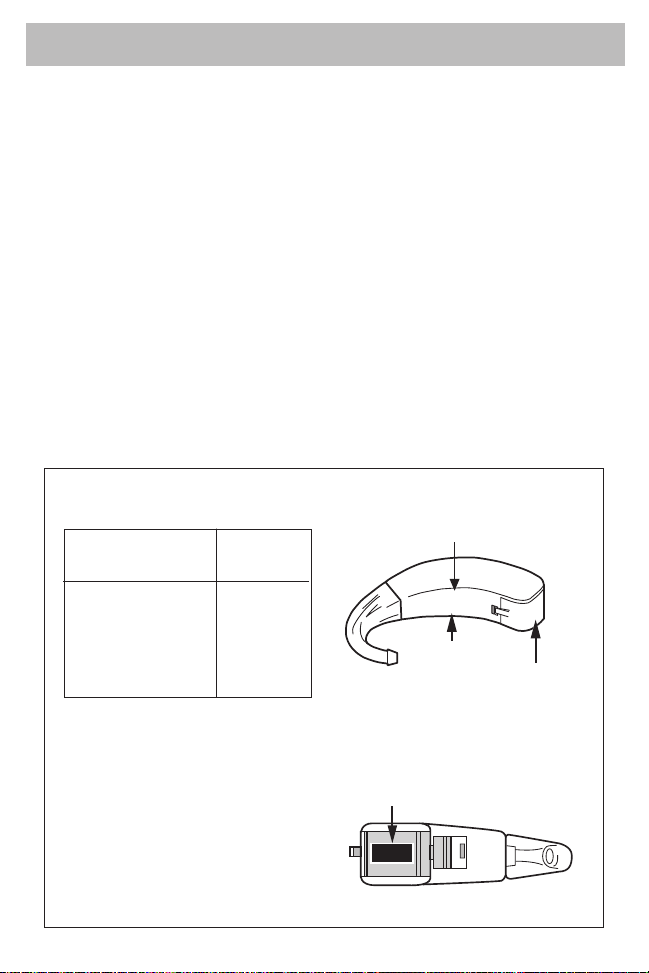
BTE Identification ..........................................................................5
BTE Styles (Standard, Power, High-Power)........................................6
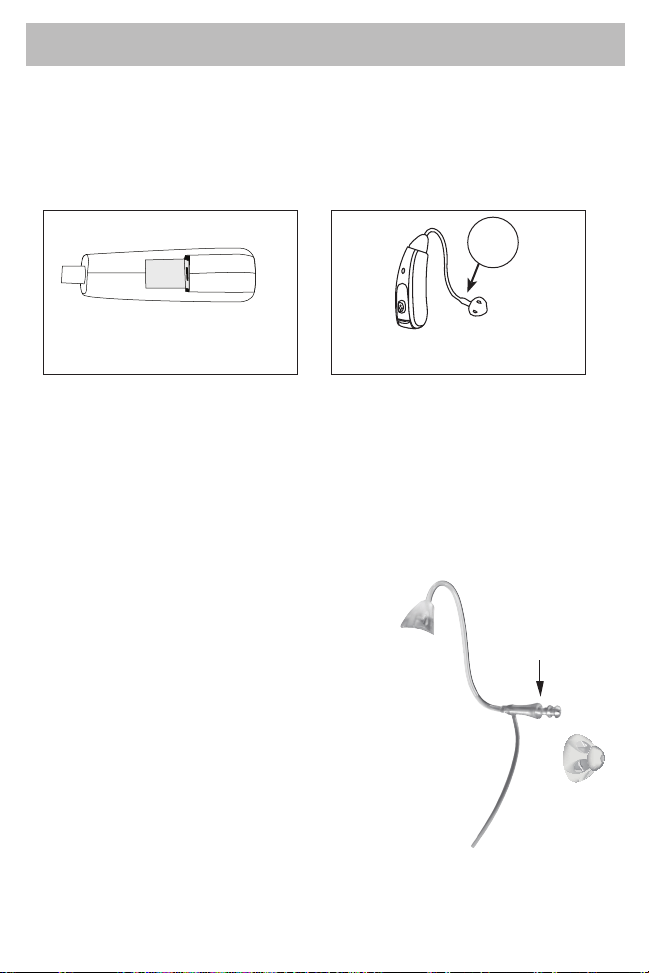
BTE Styles (Free & Open) ...............................................................7
Free/Open Fit Instruments ..............................................................8
Power Instruments........................................................................10
Using your BTE Hearing Instruments...............................................12
Inserting and Removing the Hearing Instrument ...............................15
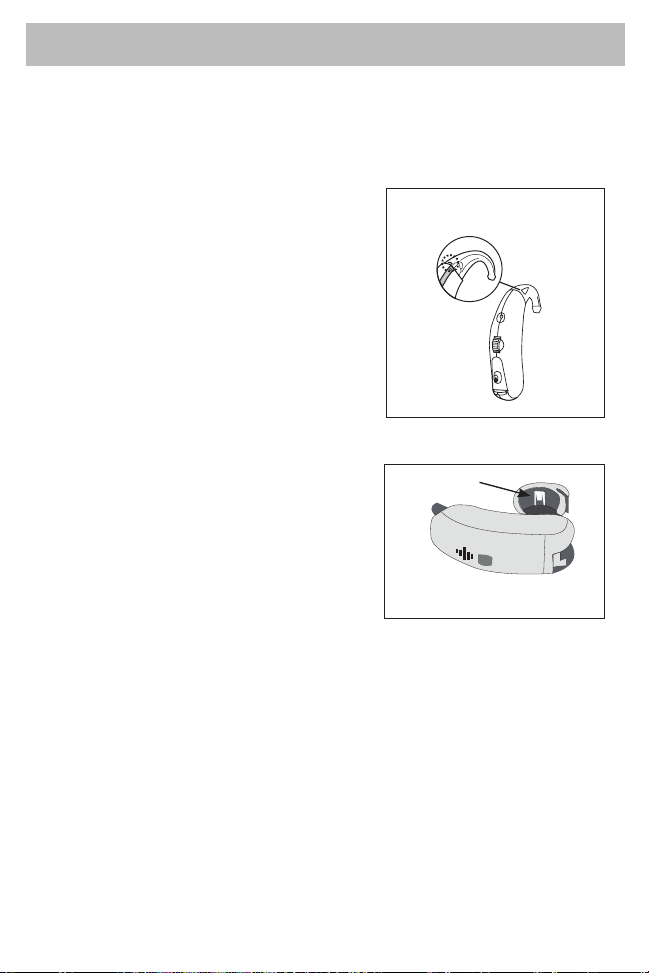
Hearing Instrument Features.....................................................16-18
Using the Telephone....................................................................19
Direct Audio Input System ............................................................20
Binaural Amplification .................................................................20
Battery Size................................................................................21
Maintenance and Care................................................................21
Listening Tips ..............................................................................22
Tips on Batteries..........................................................................23
Hearing Instrument Care ..............................................................24
Daily Cleaning ...........................................................................25
Hearing Instrument Warnings .......................................................26
Troubleshooting ..........................................................................27
Warranty and Service .................................................................28
Warning to Hearing Health Professionals.......................................29
Important Notice for Prospective Hearing Aid Wearers....................30
Follow-Up Visits...........................................................................31
Owner Information......................................................................32
Wireless Information...............................................................33-34

3
ENGLISH
WELCOME TO BETTER HEARING!
Congratulations! As the proud owner of a Rexton hearing instrument
you are entering a new world of better hearing and better living. As
you familiarize yourself with your hearing instrument, you will begin to
recognize and enjoy more of the sounds of your environment, family, and
friends. Your decision to purchase a Rexton hearing instrument reflects
the importance you place on quality and reliability in hearing instruments.
Rexton began making hearing instruments nearly 50 years ago and is
one of the most experienced manufacturers of hearing instruments in the
world today.
Acclaimed by health care professionals for their excellent electroacoustic
characteristics, all Rexton hearing instruments are hand-crafted and tested
to stringent quality control standards, ensuring excellent performance
over a long operational life.
Please keep in mind that learning to use your hearing instrument requires
a period of adjustment and patience. The adjustment period varies for
each individual depending on the extent of the hearing loss.
Remember that just as hearing is not always lost overnight, it may take
time to get used to the sounds a hearing instrument brings back. Take the
time to familiarize your family with your new instrument and ask them to
work with you and to be patient as you re-discover sounds you haven’t
heard for awhile.
These instructions, along with the guidance of your hearing health
professional, will help you understand how your new instrument works.
Remember, the instrument is a finely-tuned precision device specially
designed and expertly adjusted for your individual needs. Please handle
it with care.
WE WISH YOU HAPPINESS IN YOUR NEW WORLD OF BETTER
HEARING WITH YOUR REXTON HEARING INSTRUMENT.

4
TYPES OF HEARING INSTRUMENT
TECHNOLOGY
FULLY DIGITAL HEARING INSTRUMENTS
Your digital hearing instrument features a microphone, analog-to-digital
converter, digital signal processor, receiver, and other specialized
components to process sound.
The microphone picks up sound waves and converts them to an electrical
signal. The analog-to-digital converter encodes the electrical signal into a
digital signal, or a series of numbers. The receiver then converts the digital
signal back into sound waves. Advanced computer software allows your
hearing health professional to configure programmable digital circuits to
meet your specific listening requirements. Non- programmable hearing
instruments can be adjusted with potentiometers.

5
ENGLISH
BTE IDENTIFICATION
Each hearing aid has an identifying serial number engraved on it. The
location of the serial number will vary according to the style of hearing
aid you have chosen. Serial numbers can be found on the battery door,
either on the bottom or on the edge of the battery door, inside of the
battery door on the housing, or on the housing.
The year of manufacture is incorporated into the serial number. The
warranty is based upon the date of purchase, not the date of manufacture.
The second letter of the serial number refers to the date of manufacture.
The below year chart applies.
Your hearing health professional can answer any questions you may
have about the identifying code on your hearing instrument.
Serial
Number
Manufacturer
& Model
0 3
Year of
Manufacture
Rexton/xxx
AB12345
AB12345
+
-
Serial number
CODE (2nd Digit) YEAR
B, C 2012
D, E, F 2013
G, H 2014
L, M 2015

6
BTE STYLES: POWER & HIGH-POWER
These illustrations show the various styles of Behind-the-Ear, fully digital
hearing aids. Find the model that most closely matches the features and
appearance of your hearing aid. RIGHT instruments are color coded in
red while LEFT instruments are color coded in blue.
1. EARHOOK
2. MEMORY BUTTON
3. BATTERY DOOR
4. VOLUME CONTROL
5. CHARGING CONTACT
Arena 1P, 1HP, 1Pa, HP+
Arena 1S, 2S
Bridge+, Insite+, Day+PFinesse 2c, Accord 2c, Joy 2cP
Day+HPFinesse 2c, Accord 2cHP
11
1
1
1
1
2
2
2
2
2
2
33
333
3
4
4
4
4
4
4
5

7
ENGLISH
BTE STYLES: FREE & OPEN
These illustrations show the various styles of FREE and Open Fit BTE
Instruments. Find the model that most closely matches the features and
appearance of your hearing aid. RIGHT instruments are color coded in
red while LEFT instruments are color coded in blue.
1. FREE/OPEN TUBING
2. FREE/OPEN TIP
3. MEMORY BUTTON SWITCH
4. BATTERY DOOR
5. CHARGING CONTACT
6. VOLUME CONTROL
Finesse 2c, Accord 2c, Bridge+,
Insite+, Day+M (FREE)
Joy 2cM (FREE)
Finesse 2c, Accord 2c, Bridge+,
Insite+, Day+S (OPEN)
Joy 2cS (OPEN)
111
1
2
22
2
33
444
4
5
3 6
or
3 6
or

8
FREE/OPEN FIT INSTRUMENTS
R/L Indicators, Power On/Off, Programming Socket, Type Plate,
Tube Size Indicator
INSERTING R/L EAR INDICATOR: FREE FIT INSTRUMENTS
Insert the small plastic Red or Blue indicator in the top of the earhook
or thin tube. Use this stick to thread the indicator into the tear-shaped
hole on the side of the ear hook or thin tube. Once the marker is flush
with the side of the earhook or thin tube, remove the excess plastic
stick by twisting and pulling until it releases.
TO POWER ON AND OFF
Power is provided via the battery door, which also acts as an On/Off
switch. To turn on: Make sure the battery door is completely CLOSED. To
turn off: Press down slightly on the door lip. When the door moves down
one click and remains SLIGHTLY OPEN, the BTE is OFF. Fully open the
battery door to remove/replace the battery.
INSERTING R/L EAR INDICATOR: OPEN/
FREE FIT INSTRUMENTS
Open the battery compartment and locate the white marker that
comes with the hearing aid from factory. Remove the white color
marker, using a small screwdriver or tweezers, and replace with the
red or blue marker.
ON OFF
R/L Ear Indicator Power On/Off

9
ENGLISH
REXTON
FREE FIT INSTRUMENTS TYPE PLATE
To remove the original plate insert a pick-type tool in between the battery
door and the type plate and lift the bottom of the type plate from the
housing. Insert the appropriate red or blue indicator in the top slots and
push down to lock the bottom of the plate in place.
TUBE SIZE INDICATOR
The tube size is located on the lower portion of the tubing near the dome.
Sizes range from 1-6. The right tubes are marked with a red number. The
left tubes are marked with a blue number.
Type Plate Tube Size Indicator
#
ATTACHMENT PROCEDURE FOR
FREE AND OPEN DOME
Grasp the rounded end of the dome
between your thumb and forefinger and
slide it over the Open tip Adapter until it
reaches the “flared portion” of the tube.
Push on the tip of the dome to make sure it
is snug against the tube tip.
REPLACEMENT PROCEDURE
Grasp the rounded end of the dome
between your thumb and forefinger and pull
it off the Open Tip Adapter. Use an alcohol
wipe to remove any wax and debris from
the tube and adapter. Use the blue cleaning
tool to clean the inside of the tube of any
moisture or debris. Reattach a new dome as
outlined above.
Dome
“flared portion”
Tube

10
POWER BTE INSTRUMENTS
R/L Indicators, Power On/Off, Programming Socket, Type Plate,
Accessing Audio Input
INSERTING R/L EAR INDICATOR
For Power products, remove the earhook
and insert the appropriate marker in the
small, curved holder at the top of the ear
hook.
ACCESSING AUDIO INPUT
Remove the Rexton name plate located on the belly of the BTE. Using a
small screwdriver, place the screwdriver into the notch above the name
plate and pop-off the plate.
R/L Ear Indicator
INSERTING R/L EAR INDICATOR
Open the battery compartment and
locate the white marker that comes
with the hearing aid from factory.
Remove the white color marker, using
a small screwdriver or tweezers, and
replace with the red or blue marker. R/L Ear Indicator

11
ENGLISH
TYPE PLATE
To remove the original plate insert a pick-type tool in between the battery
door and the type plate and lift the bottom of the type plate from the
housing. Insert the appropriate red or blue indicator in the top slots and
push down to lock the bottom of the plate in place.
Power is provided via the
battery door, which also
acts as an On/Off switch.
To turn on: Make sure the
battery door is completely
CLOSED. To turn off: Press
down slightly on the door
lip. When the door moves
down one click and remains
SLIGHTLY OPEN, the BTE is
OFF. Fully open the battery
door to remove/replace the
battery.
TO POWER ON AND OFF
ON OFF
Power On/Off
R
EXTON
Type Plate Audio Input

12
USING YOUR BTE HEARING INSTRUMENTS
INSERTING THE BATTERY
Before using your hearing instrument, place the battery into the battery
compartment door. Using the fingernail of either your thumb or index
finger, pull the tab on the door outward until it swings open all the way.
Place the proper size battery (see “Battery” section or consult your hearing
health professional) into the battery compartment door, observing the
correct polarity. The “+” sign on the battery must match the “+” sign
stamped on the top of the battery compartment door.
Gently close the battery compartment door. Do not force the door shut.
If it does not close easily, check to see if the battery is inserted properly.
Once the battery is in its proper position, your instrument is ready to
operate.
Make it a habit to remove the battery every time you take off your hearing
instrument.
Opened battery
compartment door
Battery
+
-

13
ENGLISH
BATTERY COMPARTMENT DOOR LOCK
Your hearing instrument may be equipped with a lock that prevents the
unintentional opening of the battery compartment door. This feature
is located inside the battery compartment door. Your hearing health
professional can instruct you on the use of this feature, if required.
Holding the hearing aid as shown, use a tiny screwdriver to push the
slide toward the right to lock the battery compartment door. Push the
slide toward the left to unlock it.
SLIDING BATTERY COMPARTMENT LOCKS
Push the slide downward to lock the compartment. Push the slide
upward to unlock the compartment.
Unlock Lock
Slide
Unlock Lock

14
POWER ON DELAY (WHERE PROVIDED)
Your hearing instrument may have a Power-on-Delay feature. This feature
helps reduce feedback that may occur while you place the instrument
into the ear. A 6, 12 or 18 second delay will occur after you have turned
on the instrument, giving you plenty of time to place the instrument into
the ear without feedback.
LOW BATTERY ALERT TONE (WHERE PROVIDED)
Your hearing instrument may be programmed to inform you when the
battery should be replaced. You may hear a series of two beeps, a
melody and/or experience a decrease in amplification or volume.
Change the battery immediately when any of these occur. Depending
on the model if one hearing instrument turns off due to low battery
voltage the wireless communication may turn off the other hearing
instrument.
ATTACHING THE EARMOLD
Gently insert the earhook into the tubing and earmold supplied by your
hearing health professional.
Earhook
Earmold
Tubing

15
ENGLISH
INSERTING AND REMOVING THE
HEARING INSTRUMENT
INSERTING THE INSTRUMENT
Take the earmold between your thumb and forefinger and insert into your
ear. Gently work the earmold into its proper position by slightly adjusting
it until it is firmly seated in your ear. Then, lift the hearing aid over the top
of your ear, and adjust it to fit behind your ear. Press slightly for a secure
and comfortable fit.
For an Open Fit instrument, place the retention strand into the bottom of the “bowl”
of your ear.
REMOVING THE INSTRUMENT
When removing the instrument from your ear, gently push on the back of
the ear to help release it and carefully pull it out.
For an Open Fit instrument, gently pull the Open Fit Tube and Open Fit Tip out of
the ear.
Retention
Strand
Always wear the Open Fit instrument with the Open Fit Tip.
• Make sure that the Tip is completely attached to the Tube.
• Change the Tube or Tip when they are cracked.
• Put the Tube with the Tip carefully and not too deep into the ear.
• Use the Tube and Tip only in the way described in this user guide.
WARNING!

16
HEARING INSTRUMENT FEATURES
WIRELESS COMMUNICATION
Wireless communication provides synchronization of the settings in the
hearing system if you are wearing two hearing instruments. Wireless
communication technology automatically adjusts the system to change
both hearing instruments simultaneously to adapt to different listening
situations. The wireless functionality allows use of an optional remote
control accessory. Your hearing health professional can activate or
deactivate the wireless functionality of your hearing system.
REMOTE CONTROL
An optional remote control is available for all wireless hearing instruments.
The remote control may be used to change the memory and volume of
your hearing system if needed. Some remote controls may be able to
power on/off the instruments, read out and display the program, volume
setting, and battery status of your instruments. For further information on
the remote control, speak to your hearing health professional.
The performance of the wireless communication could be temporarily affected when in close
proximity to electromagnetic noise sources, such as a computer monitor or television. Move away
from the noise source if you experience difficulty.
NOTICE!

17
ENGLISH
VOLUME CONTROL
Your hearing instrument may be equipped with a volume control wheel.
Rolling the wheel upward will increase your volume and rolling it
downward will decrease the volume.
If your model has no volume control wheel, it has been equipped with an
automatic volume control. This means the volume will change according
to the listening environment without any effort on your part.
Your hearing instruments may be equipped with a rocker volume control.
Pushing the upper portion increases the volume. Pushing the lower
portion decreases the volume. When you have reached the maximum or
minimum volume, the hearing aid will emit an audible end tone.
MEMORY BUTTON (WHERE PROVIDED)
Your hearing instrument may have a memory button that provides you
with selectable multiple memories.
• Memory 1 = 1 Beep
• Memory 2 = 2 Beeps
• Memory 3 = 3 Beeps
• Memory 4 = 4 Beeps
• Memory 5 = Ascending Tones
• Memory 6 = 4 Ascending/Descending Tones
Your Hearing Health Professional may be able to change the pitch and
loudness of the beeps if needed.

18
MEMORY BUTTON ON/OFF FEATURE
Your hearing instrument may have the on/off feature available
through the memory button or toggle switch. If equipped with this
feature, when you push the memory button/toggle switch and
hold it in for three seconds, the hearing instrument will turn off
completely. To turn the hearing instrument back on, you may either
push and hold the memory button/toggle switch again for three
seconds or open and close the battery door.
Each memory is different and designed to help you hear well. Below is a
list of the listening environments programmed into the memories of your
hearing instrument.
Memory Listening
Number Environment
1 _____________________
2 _____________________
3 _____________________
4 _____________________
5 _____________________
6 _____________________
If no memory button is provided, your hearing health professional will
adjust the aid to automatically adjust to a variety of listening environments
without any effort on your part.
DIRECTIONAL MICROPHONE
Your hearing instrument may be fit with a directional microphone option.
This feature allows you to automatically focus on the sounds in front of
you (directional mode). The hearing aid can also be adjusted for when
you are participating in more quiet environments and want to hear the
sounds around you (omni mode).
Your hearing health professional will program the operation of the
directional microphone automatically or in conjunction with the memory
button based upon your listening needs.

19
ENGLISH
USING THE TELEPHONE
Your hearing aid may be equipped with a telecoil for use with compatible
telephones.
All corded telephones should be compatible with telecoils. Cordless
phones may or may not be compatible. Please check the specification
supplied by the manufacturer to check for compatibility. Few cellular
phones are compatible with telecoils. Please check the specifications
supplied by the manufacturer to check for compatibility or contact the
manufacturer. Tcoil compatible phones have a T3 or T4 rating.
MICROPHONE MEMORY
When the memory button is in the Microphone Memory position, you
may use the telephone in a normal manner. If you experience a whistling
sound (feedback), tilt the telephone receiver away from your ear and/
or reduce the volume until the whistling stops, or switch the instrument
into the telecoil memory. By placing the telephone receiver in various
positions, you will discover what works best for you.
TELECOIL MEMORY
By pushing the memory button to the telecoil memory, the telecoil circuit is
activated and the microphone is turned off to improve your hearing when
using the telephone. Place the telephone receiver close to the hearing aid
for best reception. Try holding the telephone receiver in various positions
to discover the position where the telephone signal is the strongest. In
some cases, you may need to increase the volume of your hearing aid
while in the telecoil memory.
SWITCHLESS TELECOIL
A switchless telecoil option may allow you to use the telephone in a
normal manner. There is a switchless telecoil magnet accessory available
for your telephone that can be used with the switchless telecoil feature
of your hearing aid. Ask your hearing health professional about this
accessory and if it is right for your individual listening needs.

20
DIRECT AUDIO INPUT SYSTEM
(WHERE PROVIDED)
Your hearing instrument may be equipped to accept audio input devices.
This enables you to connect your hearing instrument into other audio
sources such as a MP3 player, television, FM receiver, or bluetooth
products. It can be useful for adults in difficult listening situations and for
children using auditory training equipment in classrooms.
Because the sound is coming directly from the sound source to the hearing
instrument by means of a connecting wire, the signal is clearer and is
unaffected by poor room acoustics. Your hearing health professional can
provide special instructions for the sound equipment you wish to connect
to your hearing instrument. Do not connect external inputs to the hearing
instrument unless instructed by your hearing health professional.
BINAURAL AMPLIFICATION
Binaural amplification (the wearing of two hearing instruments) is
recommended if you have a hearing loss in both ears and if you want
to receive the full benefits of amplification. By wearing two instruments,
sound signals are received by both ears allowing for improved clarity, a
better sense of direction and a more balanced sound. You will be more
relaxed as there is less strain on one ear.
When trying to turn up the volume on a single instrument in an effort
to improve hearing, the sound is often made louder but more distorted.
Binaural amplification usually overcomes this problem, providing
greater understanding as well as hearing. If you wish to try two hearing
instruments, please ask your hearing health professional about the
possibility at your next checkup. After all, being able to hear family and
friends allows everyone to better enjoy time spent together.
This manual suits for next models
17
Table of contents
Languages:
Other Rexton Hearing Aid manuals

Rexton
Rexton Gem User manual

Rexton
Rexton M-Core B-Li-M User manual

Rexton
Rexton M-Core SR User manual

Rexton
Rexton Adore StyleLine BT User manual

Rexton
Rexton Targa S 5 User manual

Rexton
Rexton BTE User manual

Rexton
Rexton RX12 User manual

Rexton
Rexton M-Core B-Li-M User manual

Rexton
Rexton Adore MB PB User manual

Rexton
Rexton inoX 6C User manual
Popular Hearing Aid manuals by other brands

Contacta
Contacta IL-RX30 Installation & user guide

Mimitakara
Mimitakara JAPAN DP-6K52 manual

oticon
oticon miniRITE Alta2 Instructions for use

Williams Sound
Williams Sound Personal FM PFM 863 Specifications

Bellman & Symfon
Bellman & Symfon VISIT BE1432 Medical device information

Hydas
Hydas 1190 instruction manual