Vêleuses HK – Modèles G121 – G126 – 2060
Information générale sur l`obstétrique
Il faut avoir des connaissances appronfondies du déroulement de la mise bas pour être en mesure d`effectuer une inter-
vention instrumentale. Il est important de rester patient et surtout de ne jamais intervenir trop tôt. Si la mise bas se dé-
roule normalement, il faut intervenir au plus tôt une à deux heures après l`éclatement de l`amnios. L`emploi d`une vêleuse
est seulement conseillé si les membres avant et la tête (position ‘tête la première’) ou bien les membres arrière et le bas-
sin (position ‘par le bassin’) sont étendus et qu`ils ne sont pas trop à l`étroit dans le bassin de la mère. Lorsque vous êtes
confronté à d`autres positions du veau impossibles à corriger ou que ce dernier est trop gros, il faut faire appel à un vété-
rinaire. Afin d`éviter des blessures de la mère et du veau, il faut bien maîtriser la vêleuse dans chaque situation, c`est-à-
dire il faut tirer lors des contractions, dans le bon sens (voir paragraphe 6) et avec une force bien proportionnée.
Après avoir assemblé votre vêleuse HK selon les instructions, vous procédez comme suit:
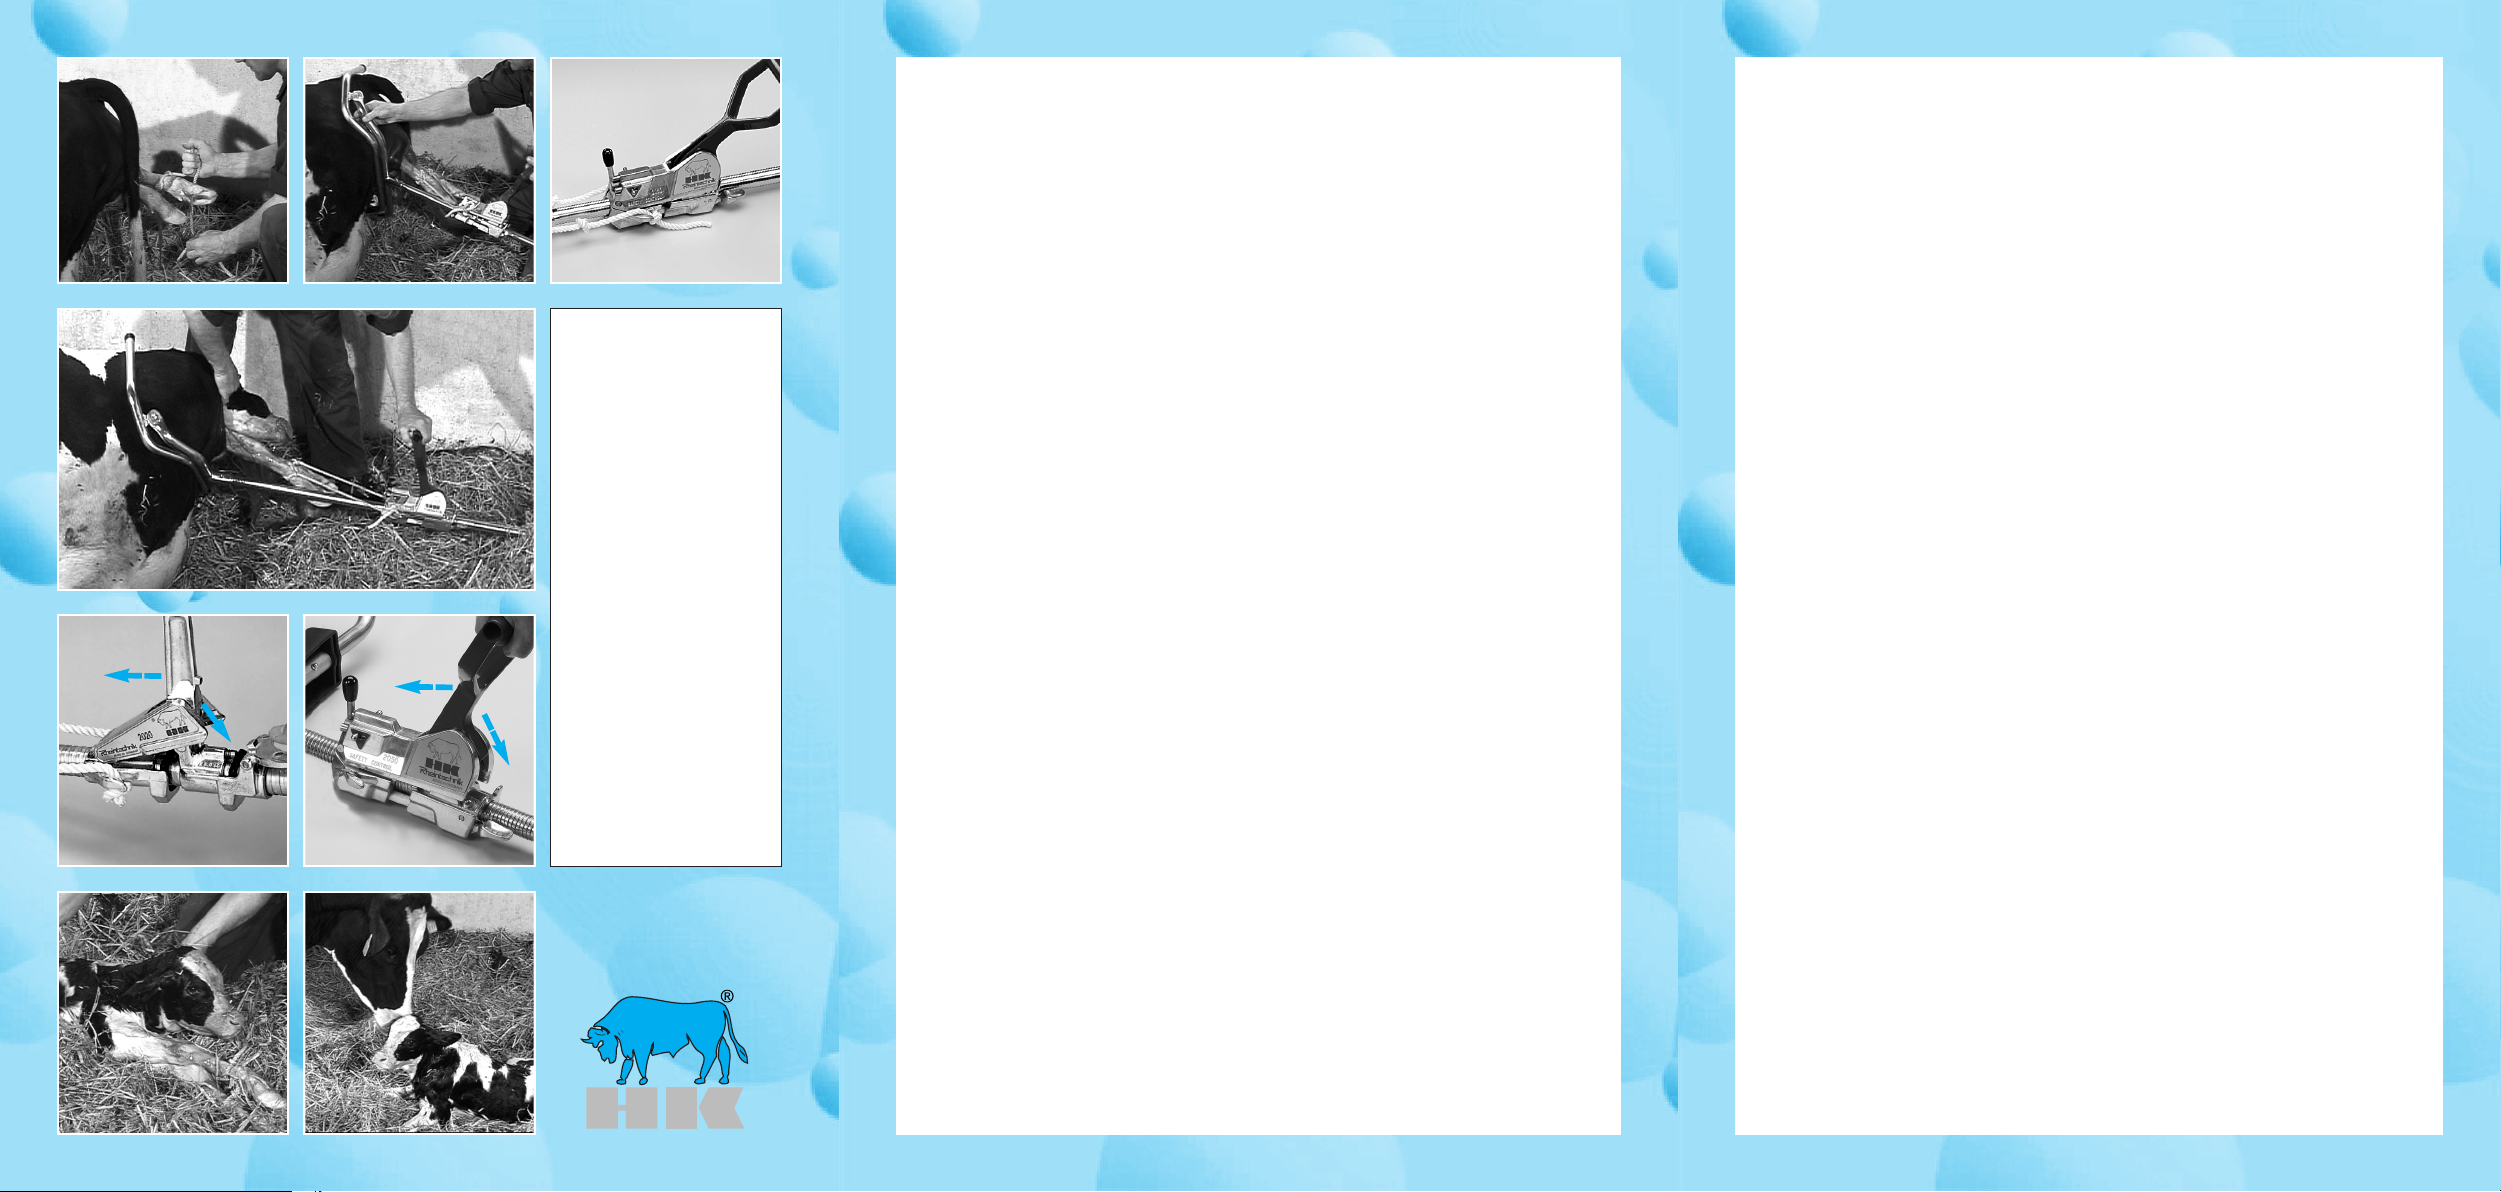
1. Préparer une couche épaisse de paille à un endroit propre. Prévoir assez de place pour l`emploi de la vêleuse HK. Net-
toyer le vagin et l`anus de l`animal avec du savon neutre et rincer à l`eau claire.
2. Contrôler la position exacte du veau en respectant une propreté maximale. Se laver les mains et les bras et les enduire
d`un produit lubrifiant stérile avant de procéder à un examen de contrôle.
3. Il faut soigneusement nettoyer à l`eau chaude les cordes de traction avant chaque application. Faire des noeuds cou-
lants, les passer autour des boulets (fig. 1) et serrer.
4. Positionner le support de la vêleuse HK en travers juste en dessous du vagin (fig. 2). Si vous utilisez l`étrier de retenue
(modèle G126 et 2060), il faut l`adapter à la largeur du bassin afin d`éviter qu`il ne glisse. Pour effectuer le réglage de
l`étrier, appuyer sur le poussoir, ajuster l`étrier et laisser le poussoir s`enclencher dans les trous prévus. Utilisation un
appui HK-Flexi pour races laitieres (52 cm) ou a viande (57 cm). Positionner l’appui si la piece mounvant juste en des-
sous du vagin qu’il ne glisse.
5. Attacher les cordes de traction aux crochets du dispositif mécanique à l`aide des noeuds préparés (fig.3). Il faut éviter
que les cordes soient trop longues. Dans le cas de chaînes, utiliser un gros maillon pour les attacher. Choisir les deux
crochets situés à la même hauteur pour exercer une traction simultanée sur les deux membres. Utiliser les deux cro-
chets diagonalement opposés pour exercer une traction alternative sur les deux membres. Le mecanisme 2060 avoir
deux crochet pour exercer une traction simultanee sur les deux membres.
Attention: Selon les dernières connaissances scientifiques, il est conseillé de tirer les deux membres en même temps.
A conditon d`être appliquée en douceur, cette technique facilite le dégagement des épaules et du bassin et permet
d`éviter que toute la force de traction soit exercée sur une seule patte, ce qui réduit le risque de blessures.
6. Tout en observant l`action des contractions, exercer un mouvement de va-et-vient avec la poignée du dispositif
mécanique pour accompagner l`expulsion par une traction contrôlée. Si possible, toujours maintenir tendues les cor-
des/chaînes. Il est d`une grande importance de tirer dans le bon sens pour réussir cette intervention instrumentale. Au
début, il faut tirer tout droit en prolongement de la colonne vertébrale de la vache (voir sens de la flèche A, fig. 4). Après
le dégagement de la tête et des épaules (ou du bassin en cas de la position ‘par le bassin’), il faut continuer à tirer en
direction du pis en inclinant lentement la barre de traction (voir sens de la flèche B, fig. 4).
7. Déblocage rapide du dispositif mécanique 2020/2060. Vous avez opté pour les avantages du déblocage rapide très
facile à employer. Appuyer du pouce ou du bas de la paume sur le déclencheur (fig. 5 ‘b’). Maintenir le déclencheur dans
cette position pour ramener le dispositif mécanique dans la position initiale. En même temps, abaisser la poignée de
l`autre main jusqu`à ce qu`elle touche la butée et la maintenir dans cette position. Il est alors facile de faire coulisser le
dispositif mécanique en direction du support. Attention: Pour le déblocage lors d`un effort de traction extrême, il est con-
seillé de pousser la poignée du dispositif mécanique d`abord vers le haut en direction du support (voir sens de la flèche
‘a’ dans la fig. 5) pour réduire la tension dans la chambre arrière. Ensuite appuyer sur le déclencheur (voir fig. 5 ‘b’), abais-
ser la poignée jusqu`à la butée (voir sens de la flèche ‘c’ dans la fig. 5), la maintenir dans cette position et ramener le
dispositif mécanique dans la position initiale.
8. Nettoyage et entretien
Nettoyer soigneusement l`appareil après chaque usage. De temps en temps, graisser légèrement les ressorts et les axes
ainsi que le filetage de l`entretoise (voir no 6 sur la liste des pièces détachées) afin de faciliter le démontage de la vê-
leuse pour un éventuel transport. Les parties inférieure et supérieure de la barre ainsi que les butées ( voir no 2, 3 et
10 sur la liste des pièces détachées) sont soumises à une usure naturelle qui varie selon la sollicitation.
H
HK
K-
-G
GE
EB
BU
UR
RT
TS
SH
HE
EL
LF
FE
ER
R
Modell G121 - G126 - 2060
B
Be
ed
di
ie
en
nu
un
ng
gs
sa
an
nl
le
ei
it
tu
un
ng
g
HK calving aid
Operating instructions
Vêleuses HK
Mode d’emploi
Hersteller · Manufacturer · Fabriquant:
Weiland und Kaspar GmbH & Co. KG
Insterburger Str. 8 · D-56564 Neuwied
Tel.: (+49) 0 26 31 / 9 39 81 30 · Telefax: (+49) 02631/ 9 39 8179
Wichtige Hinweise für das Modell 2060:
Die Zugkrafteinstellung
1. Prinzip der Zugkrafteinstellung
Sie haben sich für den Kauf des Modells
2060 und damit für die schonende Ge-
burtshilfe entschieden. Die Mechanik die-
ses Geburtshelfers verfügt über eine
regelbare Zugkrafteinstellung und läßt
Zugkräfte in zwei Stufen von 50 bis 100
daN und von 100 bis 160 daN zu. Bei Er-
reichen der jeweils eingestellten Zugkraft
wird der Handgriff gesperrt. Hierdurch wird
die Gefahr einer Verletzung, die durch un-
kontrolliertes Ziehen hervorgerufen werden
kann, verringert. Nur in Aus nahmefällen
sollte diese Begrenzung aufgehoben wer-
den. Die laut DLG-Prüfbericht Nr. 4975 ge-
messenen Zugkräfte erreichen
Maximalwerte von über 500 daN.
2. Einstellen der Zugkraft
Zum Einstellen der Zugkraft ist der Be-
grenzungshebel (Hebel mit schwarzer
Kappe) in die gewünschte Position zu brin-
gen. Zu Beginn der Zughilfe sollten 100
daN nicht überschritten werden. Ist diese
Zugkraft erreicht, wird der Handgriff ge-
sperrt. Zunächst ist die nächste Wehe des
Muttertieres abzuwarten. Sollte trotz wie-
dereinsetzender Wehe der Handgriff wei-
ter gesperrt sein, ist die Zugkraft zu gering
bemessen. Mittels Begren zungshebel ist
die nächst höhere Einstellung zu wählen.
Hierzu muß unter Zuhilfenahme der zwei-
ten Hand der Stift neben der Zahl 100 nach
unten gedrückt werden. Die Einstellung bis
160 daN reicht aus um den weitaus größ-
ten Anteil an Geburten zu beenden. In we-
nigen Ein zelfällen kann es notwendig sein,
die Zugkraftbegrenzung aufzuheben.
Hierzu wird der Stift im roten Dreieck nach
unten gedrückt und gleichzeitig der Be-
gren zungshebel umgelegt.
Achtung: Bei Anwendung der maximal
möglichen Zugkraft besteht ein hohes Ri-
siko für Verletzungen bei Muttertier und
Kalb. Wir empfehlen vor Aufhebung der
Zugkraftbegrenzung tierärztliche Hilfe in
Anspruch zu nehmen.
Important instructions for model 2060:
Setting the traction power
1. The principle of setting the traction power
You have decided to buy the model 2060
and thus opted in favour of the gentle cal-
ving aid. The mechanism of this calving aid
has an adjustable traction power control
system and allows pulling forces to be ap-
plied in two stages, from 50 to 100 daN
and from 100 to 160 daN. When the preset
traction power has been reached, the
handle is locked. This reduces the risk of
injuries that can result from unchecked
pulling. You should only override this limit
in exceptional cases. The traction power
measured according to the DLG test report
No. 2975 then reaches maximum values of
more than 500 daN.
2. Setting the traction power
To set the traction power, the limiting lever
(lever with the black top) should be placed
in the desired position. Initial settings for
the pulling aid should not exceed 100 daN.
Once this traction power has been rea-
ched, the handle is locked. You should then
wait for the animal’s next contraction. If the
handle continues to be locked despite the
next contraction having started, the trac-
tion power is too low. The next-higher set-
ting should be chosen, using the limiting
lever. To do this, use your other hand to
push down the pin next to the number 100.
The setting up to 160 daN is sufficient to
successfully complete the great majority of
births. It may be necessary, in a few indivi-
dual cases, to override the traction power
limit. To do so, press down the pin in the
red triangle and at the same time move the
limiting lever.
Warning: When using the maximum pos-
sible traction power, there is a high risk of
injury to the mother and calf. We suggest
that you consult a veterinary surgeon be-
fore overriding the traction power limit.
Informations importantes concernant le
modèle 2060: Le réglage de la force de
traction
1. Le principe du réglage de la force de
traction
Vous vous êtes décidé à acquérir le modèle
2060 et donc à assurer une aide au vêlage
en douceur. La mécanique de cette vêleuse
offre la possibilité de régler la force de
traction, permettant des forces de traction
à deux niveaux allant de 50 à 100 daN et
de 100 à 160 daN. Lorsque la force de
traction réglée est atteinte, la poignée se
bloquera. Ainsi, le risque de provoquer des
blessures par une traction incontrôlée est
réduit. Cette limitation ne devra être sup-
primée que dans des cas exceptionnels.
Les forces de traction mesurées suivant le
rapport de contrôle no 4975 de la DLG
pourront atteindre alors plus de 500 daN.
2. Le réglage de la force de traction
Pour régler la force de traction, amener le
levier limiteur (levier avec capuchon noir) à
la position souhaitée. Au début de l'inter-
vention instrumentale, il est recommandé
de ne pas dépasser 100 daN. Lorsque cette
force de traction est atteinte, la poignée se
bloquera. Attendre d'abord la prochaine
contraction de la vache. Si la poignée reste
bloquée malgré que la prochaine contrac-
tion commence, la force de traction réglée
est trop faible. Choisir alors le prochain ni-
veau à l'aide du levier limiteur. Pour ce
faire, presser vers le bas la tige disposée à
côté du chiffre 100 en s'aidant de l'autre
main. Le réglage jusqu'à 160 daN suffit
pour terminer la plupart des mises bas.
Dans des cas très rares, il peut se révéler
nécessaire de supprimer la limitation de la
force de traction. Pour ce faire, presser la
tige vers le bas dans le triangle rouge et en
même temps, changer le levier limiteur de
position.
Attention: L'utilisation de la force de trac-
tion maximale implique un risque de bles-
sure élevé pour la vache et le veau. Nous
recommandons de faire appel à un vétéri-
naire avant de supprimer la limitation de la
force de traction.
2013-5