Ricardo 069858634447 User manual

user care and instruction manual,
recipes & warranty
DIGITAL STAND MIXER
Thank you for purchasing the digital stand mixer.
Before using this product, please read the user care and instruction manual carefully.

1
User manual
IMPORTANT SAFEGUARDS
When using electrical appliances, basic safety precautions should always be followed to prevent
fire, electric shock, serious personal injury and/or property damage, including the following.
READ ALL INSTRUCTIONS CAREFULLY BEFORE FIRST USE.
:::This appliance is not a toy and should not be used by children. Keep appliance and its cord out
of the reach of children and pets. Close adult supervision is necessary when any appliance
is used near children.
:::Always place the appliance on a flat, stable and heat-resistant surface. Do not use the appliance
on temperature sensitive surfaces.
:::Do not place the appliance on or near a hot gas or electric burner or in a heated oven
or microwave oven.
:::Keep stainless steel bowl away from heat sources such as stovetops, ovens or microwaves.
:::This appliance is intended for household use only. Do not use outdoors.
:::Do not plug the appliance into an electrical outlet until the splashguard, the accessories
and the bowl have been assembled according to the instructions.
:::Do not operate the appliance under a wall cabinet.
:::Do not operate the appliance for more than 15 minutes continuously. Let appliance cool down
for 30 minutes before using it again.
:::Avoid contact with moving parts. Keep hands, hair, clothing, spatulas and other utensils away
from accessories or attachments during operation to reduce the risk of injury to persons
and/or damage to the appliance.
:::Do not use more than one accessory or attachment at a time.
:::Do not exceed the maximum capacities listed in this instruction booklet.
:::When using an optional, make sure to read the safety instructions that come with the particular
attachment before use.
:::Do not use the appliance for anything other than its intended use. Do not use attachments
or accessories that are not recommended or sold by the manufacturer.
:::Unplug to turn o the appliance before assembling or disassembling parts and before cleaning.
:::Do not leave the appliance unattended. Always unplug from the electrical outlet to turn
the appliance o when not in use.
:::Remove accessories or attachments from appliance before cleaning.
:::Do not let the power cord touch hot surfaces or hang (over the edge of a table or counter).
:::Do not operate the appliance with a damaged cord or plug, after the appliance malfunctions
or has been damaged in any manner. Do not attempt to repair this product yourself. If there
is a problem, please call 1-866-226-9222.
:::To protect against electrical shock, never immerse the power cord, the plug or the stand mixer
in water or other liquid.
:::Do not plug or unplug the product into/from the electrical outlet with wet hands.

2 3
User manual User manual
PARTS IDENTIFICATION
Product may vary slightly from diagram.
CONTROL PANEL
:::Use the provided plug only.
:::Connect the power plug to an easily accessible outlet so that the appliance can be unplugged
immediately in the event of an emergency.
:::To unplug, grasp the plug and pull it from the electrical outlet. Never pull the cord.
:::The cord for this appliance should be plugged into a 120 V AC electrical wall outlet.
:::The device must not be operated via an external timer or remote control.
SAVE THESE INSTRUCTIONS - FOR HOUSEHOLD USE ONLY
NOTE: The maximum rating is based on the attachment that draws the greatest power.
Other recommended attachments may draw significantly less power.
NOTES ON THE PLUG
As a safety feature, the appliance is equipped with a grounded plug, which will only fit into
a three-prong outlet. Do not alter the plug. Do not attempt to defeat this safety feature. Improper
connection of the grounding conductor may result in the risk of electric shock. Contact a qualified
electrician if there is doubt as to whether the outlet is properly grounded.
NOTES ON THE CORD
The short power-supply cord provided should be used to reduce the risk resulting from becoming
entangled in or tripping over a longer cord. Do not use an extension cord with this appliance.
ELECTRIC POWER
If the electrical circuit is overloaded with other appliances, the appliance may not operate properly.
It should be plugged into a separate electrical circuit.
TECHNICAL DATA
Main voltage: 120V / Frequency: 60Hz / Power consumption: 700 watts
1
2
3
4
8
9
10
12
7
5
6
11
14
13
1. Front attachment port to connect
optional accessories
2. Motor head
3. Top attachment port to connect
the optional blender
4. LED digital display with touch controls
5. Reference line for attaching
the splashguard to the stand mixer
6. Accessory shaft
7. Chef’s whisk
8. Head-lift release button
9. Flat mixing paddle with flexible
silicone edges
10. Dough hook
11. 5L Stainless steel bowl with side handles
12. Transparent splashguard with pour spout
13. Bowl clamping plate
14. Non-slip feet
5
4
1
2
3
2
1. Suggested accessory for chosen
speed setting
2. + or – buttons to adjust speed setting
and timer
3. Button to start or stop
the mixer / Power on button
4. Speed setting
5. Set timer countdown / Operating time
in count up

4 5
User manual User manual
BEFORE FIRST USE
1- Read all instructions and important safeguards.
2- Remove all packaging materials and ensure that all items have been received in good condition.
3- Tear up all plastic bags as they can pose a risk to children.
4-Do not plug the appliance into an electrical outlet before it is ready to be used.
5- Wash all removable parts (stainless steel bowl, transparent splashguard, Chef's whisk, flat
mixing paddle and dough hook) in hot soapy water or in the dishwasher and dry thoroughly.
6-Wipe the body of the stand mixer with a soft damp cloth. Dry thoroughly. NEVER IMMERSE
the appliance, the power cord or the power plug in water or any liquid.
7- Attachments (sold separately) must be cleaned according to instructions provided
with the product.
NOTE: Do not use abrasive cleaners or scouring pads or any other object that could scratch.
With one hand, gently
push the front side of
the motor head down,
then press on the head-lift
release button with
the other hand to unlock.
With the handles o center from the motor head, place the bottom of
the bowl inside the clamping plate. Be careful not to rub the stainless
steel bowl and handles with the white aluminum housing to prevent
grey scu marks to appear. Make sure the bottom of the bowl is fully
inserted and sits flat in the clamping plate.
Turn bowl gently
in clockwise
direction to lock in
place. The handles
will be parallel with
the motor head.
With the head locked in raised position, insert the central
part of the splashguard underneath the black area
at bottom of the motor head. Align the icon on
the splashguard with the reference line engraved on the
stand mixer then, push the lid completely up and rotate
clockwise to lock in place. When assembled properly,
the pour spout will be in front of the motor head.
To attach, slip the Chef's whisk, flat mixing paddle or dough
hook onto the accessory shaft aligning the slot located inside
the accessory with the pin on the shaft.
Press upward as far
as possible, then
turn accessory
to the right, hooking
accessory over
the pin on the shaft.
Gently lift the motor
head up until it locks
in place, a click
is heard.
NOTE: When locking the motor head in raised position, the power automatically turns o
for safety. Power will resume automatically as soon as the motor head is locked back in lower
mixing position.
ATTACHING THE SPLASHGUARD
Use the splashguard to prevent ingredients from splattering and to easily add ingredients
in the bowl through the wide pouring spout while mixing.
NOTE: The splashguard must be installed prior to the attachment of an accessory
with the appliance unplugged.
ATTACHING/REMOVING AN ACCESSORY
WARNING Unplug the appliance before attaching or removing an accessory and lock the motor
head in raised position.
ATTACHING/REMOVING BOWL
Unplug the appliance before attaching or removing the bowl and lock the motor head in raised position.
To remove, press
accessory upward
as far as possible,
turn it to the left to
release, then pull it
down out from
the accessory shaft.
To remove, gently
turn the bowl
counter clockwise
to unlock and lift it
up to remove from
the clamping plate.
ASSEMBLING
RAISING THE MOTOR HEAD

6 7
User manual User manual
With one hand, gently
lift the motor head
up, then press on
the head-lift release
button with the other
hand to unlock.
LOWERING THE MOTOR HEAD
Gently bring the
head down and
push it downwards
to lock in mixing
position, a click
is heard.
NOTE: Motor head must always be locked in lower position when using the appliance. Before
mixing, test lock by attempting to raise the motor head.
ACCESSORY SUGGESTED USES
Flat Mixing
Paddle with
silicone
edges
Use for stirring, mixing, creaming, shredding and
beatingingredients/mixtures.Idealformixingcookie
dough, cake and other batters. Also use for making
chunky guacamole, for mashing potatoes and
vegetables, shredding warm meats, etc.
Chef's Whisk
Designed to incorporate air into mixtures. Ideal
for whipping eggs, egg whites or heavy cream.
Use in recipes for angel food cake, sponge cake,
meringue, frosting, marshmallows. Also great for
making smooth guacamole.
Dough Hook
For mixing and kneading doughs to make breads,
pizza dough, focaccia, buns.
ACCESSORY GUIDE
USING THE DIGITAL STAND MIXER
During first use of the appliance, smoke and/or a slight odour may occur from the appliance because
of the initial warming process of the materials. This is normal and will quickly disappear. It will not
recur after appliance has been used a few more times.
1- Place the appliance on a flat, dry, stable and heat-resistant surface.
2- With the appliance unplugged, attach the splashguard, an accessory and the bowl filled with
mixture onto the stand mixer according to the ASSEMBLING section. Ensure all parts are attached
properly and locked in place before operating.
3- Lower the motor head and ensure it is locked in mixing position.
4- Plug the power cord into a 120V AC wall outlet to turn the appliance on. Appliance will beep
and display will show 0 / 00:00.
NOTE: The stand mixer has a safety mechanism that prevents the appliance from turning on
if the motor head is not locked in lower position. If the appliance doesn’t turn on when plugging
the power cord into a wall outlet, it means the motor head is not locked properly.
USING WITHOUT SETTING A TIMER
5- Press + or – buttons to set desired speed from 1 to 6.
6- Press twice on button to start mixing. The display will start counting up showing the operating time.
7- Anytime during use, press on button to stop mixing.
NOTE: For safety reasons, the appliance is programmed to stop automatically after running
continuously for 15 minutes. Let the appliance rest before using it again.
USING WITH A TIMER
5- Press + or – buttons to set desired speed from 1 to 6.
6- Press once on button to toggle to the timer function, the ‘‘00:00’’ on the lower display will
blink, indicating timer can be set.
7- Press + or – buttons to set desired timer by increment of 1 minute (up to 15 minutes). Holding down
on the + or – buttons will increase or decrease the set time faster.
8- Press once on button to start mixing. The set time on the lower display stops blinking
and the timer starts countdown. The machine will stop automatically once the set time is over.
NOTE
:::Anytime during use, press on button to stop mixing.
:::
Do not add mixture more than 1 kg (8 cups) when using the flat mixing paddle or the dough
hook and not more than 800 ml when using the Chef’s whisk .
:::
Do not exceed speed 3 when preparing yeast doughs as this may cause damage to the appliance.

8 9
User manual User manual
MIXING GUIDE
The following guidelines are intended as suggestions for selecting the proper mixing speed.
To prevent ingredients from splattering out of the bowl, start mixing at a lower speed until the ingredients
start to combine, then quickly increase to the selected speed for optimal performance.
SPEED ACTION SUGGESTED
ACCESSORY
USES
1
STIR
For slow stirring, combining,
mashing and starting all mixing
procedures. Use to add flour
and dry ingredients to batter
and to add liquids to dry
ingredients. Use to mix
or knead yeast doughs.
2
SLOW MIXING
For slow mixing, mashing, faster
stirring or shredding. Use to
mix and knead yeast doughs,
heavy batters and candies, start
mashing potatoes or other
vegetables, cut shortening into
flour, mix thin or splashy batters
and shred warm meats.
3
MIXING
For mixing semi-heavy batters,
such as cookie dough. Use to
combine sugar and shortening,
incorporate eggs and kneading
bread dough. Medium speed for
cake mixes.
4
BEATING,
CREAMING
For medium fast beating,
creaming butter and sugar. Use
to add sugar to egg whites for
meringues. Use to finish mixing
cake, doughnut and other
batters. High speed
for cake mixes.
5
FAST BEATING,
WHIPPING
For whipping cream, egg
whites, and frosting or for
making smooth guacamole.
6
FAST WHIPPING
For fast whipping of cream,
egg or for final whipping
of mashed vegetables.
7
BLENDING,
CRUSHING ICE
Speed 7 is exclusively designed
for use with the blender
attachment. It pulses 3 times
and then runs continuously
until desired texture is reached.
It automatically stops after
running 2 minutes.
:::CAUTION:
Do not scrape bowl while the appliance is in operation. The bowl and accessories are
designed to provide thorough mixing without frequent scraping. Scraping the bowl once or twice
during mixing is usually sufficient. Stop the appliance, wait for the accessory to stop spinning
and unplug the appliance before scraping the bowl.
:::The appliance may warm up during use. Under heavy loads with extended mixing time, the top
of the unit may become hot. This is normal.
:::Do not operate the appliance for more than 15 minutes continuously. Let the appliance cool down
for 30 minutes before using it again to prevent any damage to the stand mixer.
CHANGING SPEED DURING USE
Anytime during use, the mixing speed can be adjusted. Simply press + or – buttons
and the mixer will automatically adjust speed.
TURNING OFF THE APPLIANCE
Unplug to turn o the appliance.
NOTE : The appliance is programmed to automatically turn o after 20 minutes of inactivity.
To turn it on again, simply press on button.
NOTES
:::
Do not exceed speed 3 when preparing yeast doughs as this may cause damage
to the appliance.
:::
Do not add mixture more than 1 kg (8 cups) when using the flat mixing paddle or the dough hook
and not more than 800 ml when using the Chef’s whisk.

10 11
User manual User manual
USEFUL TIPS FOR BEST MIXING RESULTS
:::Proper measurements are very important when baking. To measure flour correctly, stir the flour
first, then spoon into the measuring cup. Level o the top with the blunt side of a knife blade
or the handle of a spoon. Do not press or compact flour. It is also very important not to measure
directly from the bag while the flour is pre-sifted, it has been pressed/compacted to fit into
the bag. Baked goods made from unstirred flour are likely to be heavy and dry because too
much flour is used.
:::For most baking recipes (except for otherwise indicated), refrigerated items like butter, milk
and eggs incorporate better when they are at room temperature.
:::To separate eggs for use in any recipe, break them one at a time into a small bowl. With half
of the shell, gently remove the yolks, then transfer the whites to a spotlessly clean glass
or stainless bowl. If a yolk breaks into a white, use that egg for another recipe. Just a drop
of egg yolk in the white prevents the white from whipping properly.
:::To help determine the ideal mixing time, observe the batter or dough and mix only until it has
the desired appearance described in your recipe, such as “smooth and creamy.” To select
the best mixing speeds, refer to the Mixing Guide section above.
:::Always add ingredients as close to the side of bowl as possible, not directly into moving
accessory. The use of the splashguard with pouring spout is recommended to simplify
adding ingredients.
WHIPPING EGG WHITES OR CREAM
:::For whipping egg whites, both the mixing bowl and Chef’s whisk must be spotlessly clean
and dry. Any trace of fat/oil will prevent the egg whites from whipping properly.
:::Egg whites at room temperature are best for whipping. Bring to room temperature safely
by placing uncracked eggs in a bowl of warm water for 10 to 15 minutes.
:::Add a small amount of acid, such as cream of tartar, lemon juice or vinegar, when whipping egg
whites to stabilize them and allow them to reach their optimum volume.
:::The time required to whip egg whites will vary with the temperature of the egg whites, age of egg
whites, and temperature/humidity of the kitchen. Keep a close watch while whipping egg whites.
:::Timing is important when adding sugar to egg. Add sugar slowly and gradually to the whipped
egg whites once they start to foam – do not add sugar directly to the center of the bowl on top
of beaten egg whites; doing this may cause them to deflate.
:::Do not add sugar too much in advance to eggs – this could “cook” the egg and render them
lumpy and keep your batter from being smooth.
:::Beaten egg whites should be used immediately after beating them. If they wait for longer than
5 minutes, they will begin to deflate and lose volume and structure. Overbeaten egg whites will
also separate or deflate in a meringue topping.
WHIPPING CREAM
:::To make 2 cups of softly whipped cream, put 1 cup of heavy/whipping cream into a well-chilled
mixing bowl. Add about ½ teaspoon pure vanilla or other pure flavored extract and 1 to 4
tablespoons granulated, superfine or confectioners’ sugar.
:::Watch cream closely during whipping as there are just a few seconds between
whipping stages.
:::Stop whipping cream before you feel they are ready as they may overwhip easily. Finish
the whipping at the lowest setting to better control the result.
KNEADING YEAST DOUGHS
:::Use the dough hook to mix and knead yeast doughs. Use speed 1, 2 or 3 to mix or knead
yeast doughs. Use of any other speed creates high potential for unit failure.
:::Do not use recipes calling for more than 1 kg (8 cups) all-purpose flour or 800 g (6 cups)
whole-wheat flour when making dough.
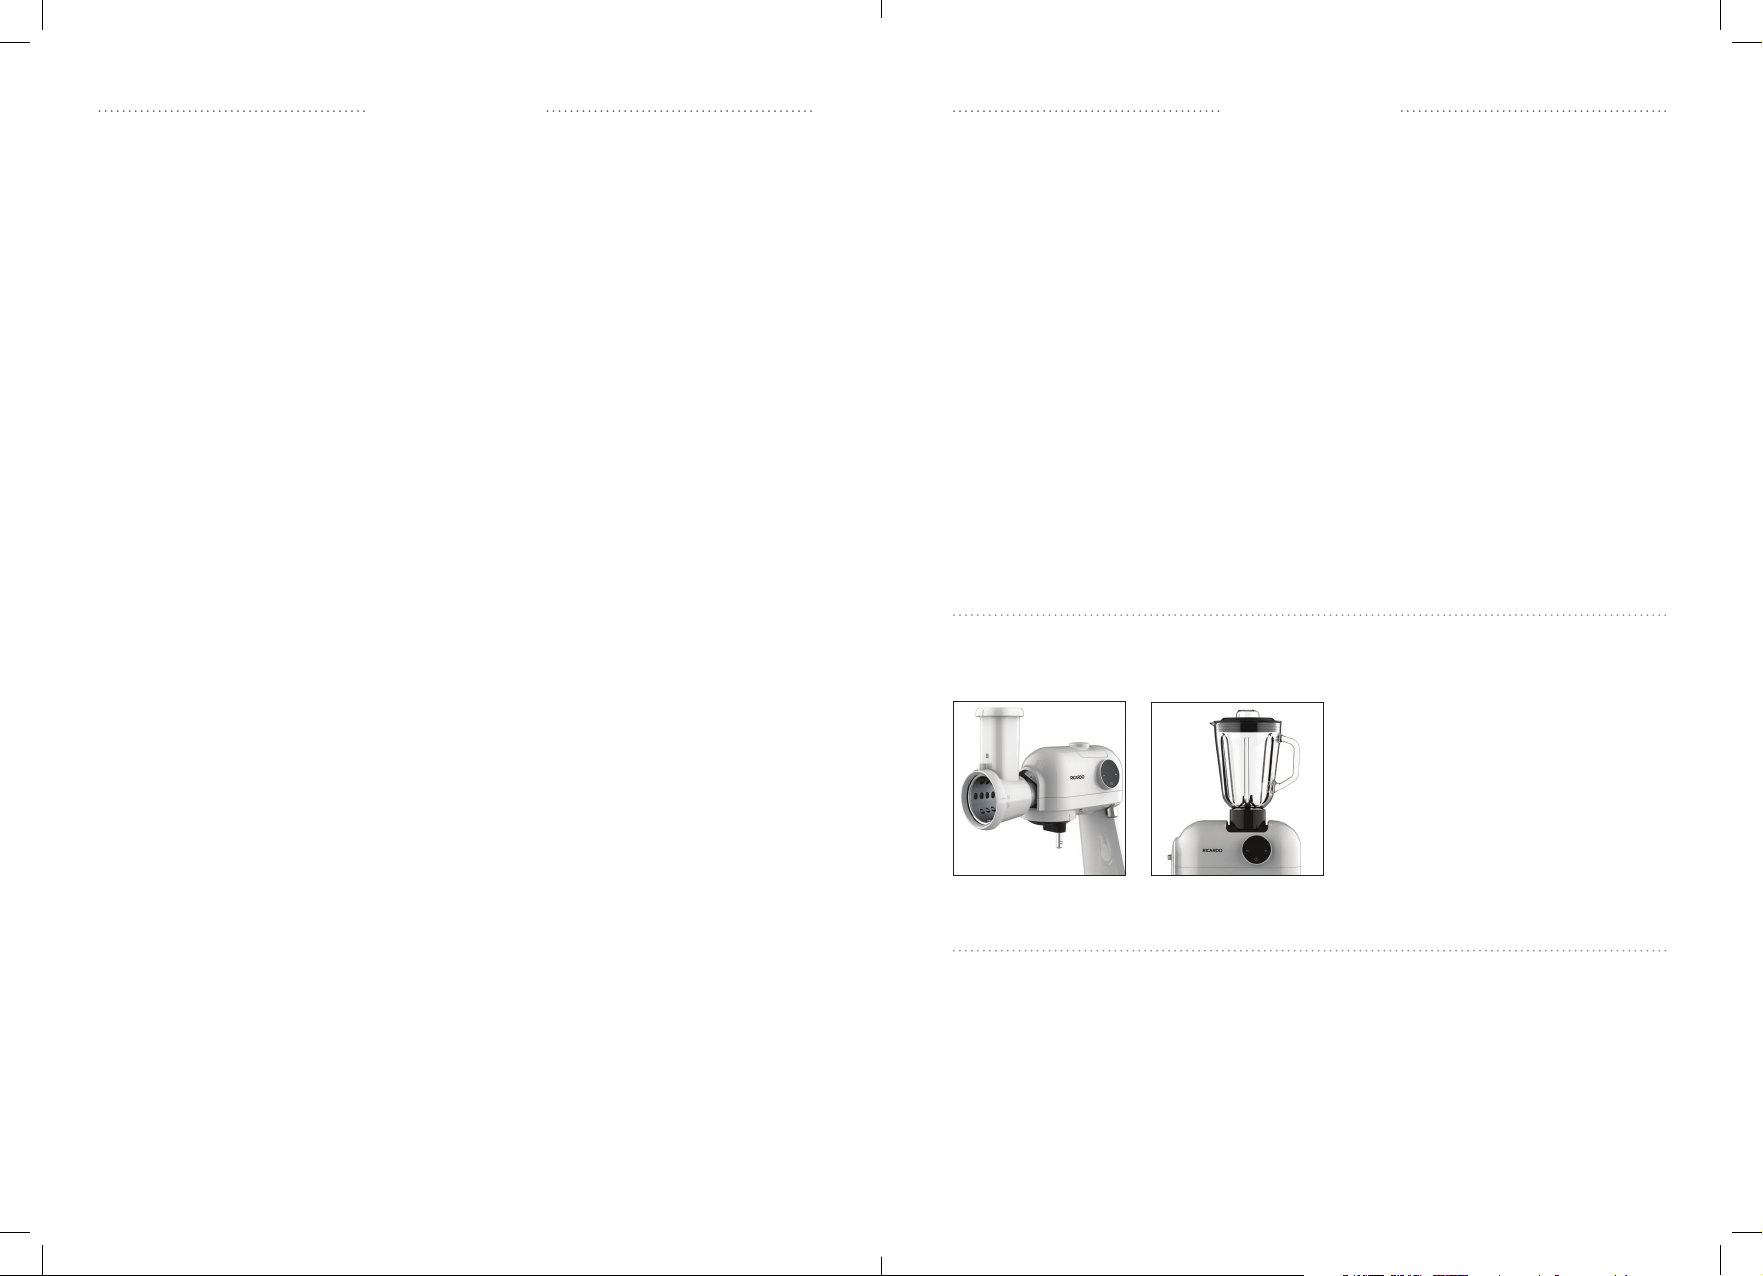
OPTIONAL ATTACHMENTS
There are 2 attachment ports on the stand mixer to connect optional attachments that can be
purchased separately. The Slicer & Grater connects to the port on the front of the stand mixer while
the blender attachment connects onto the top attachment port.
CLEANING
IMPORTANT: Unplug the appliance and ensure that moving parts have stopped rotating before
handling or cleaning.
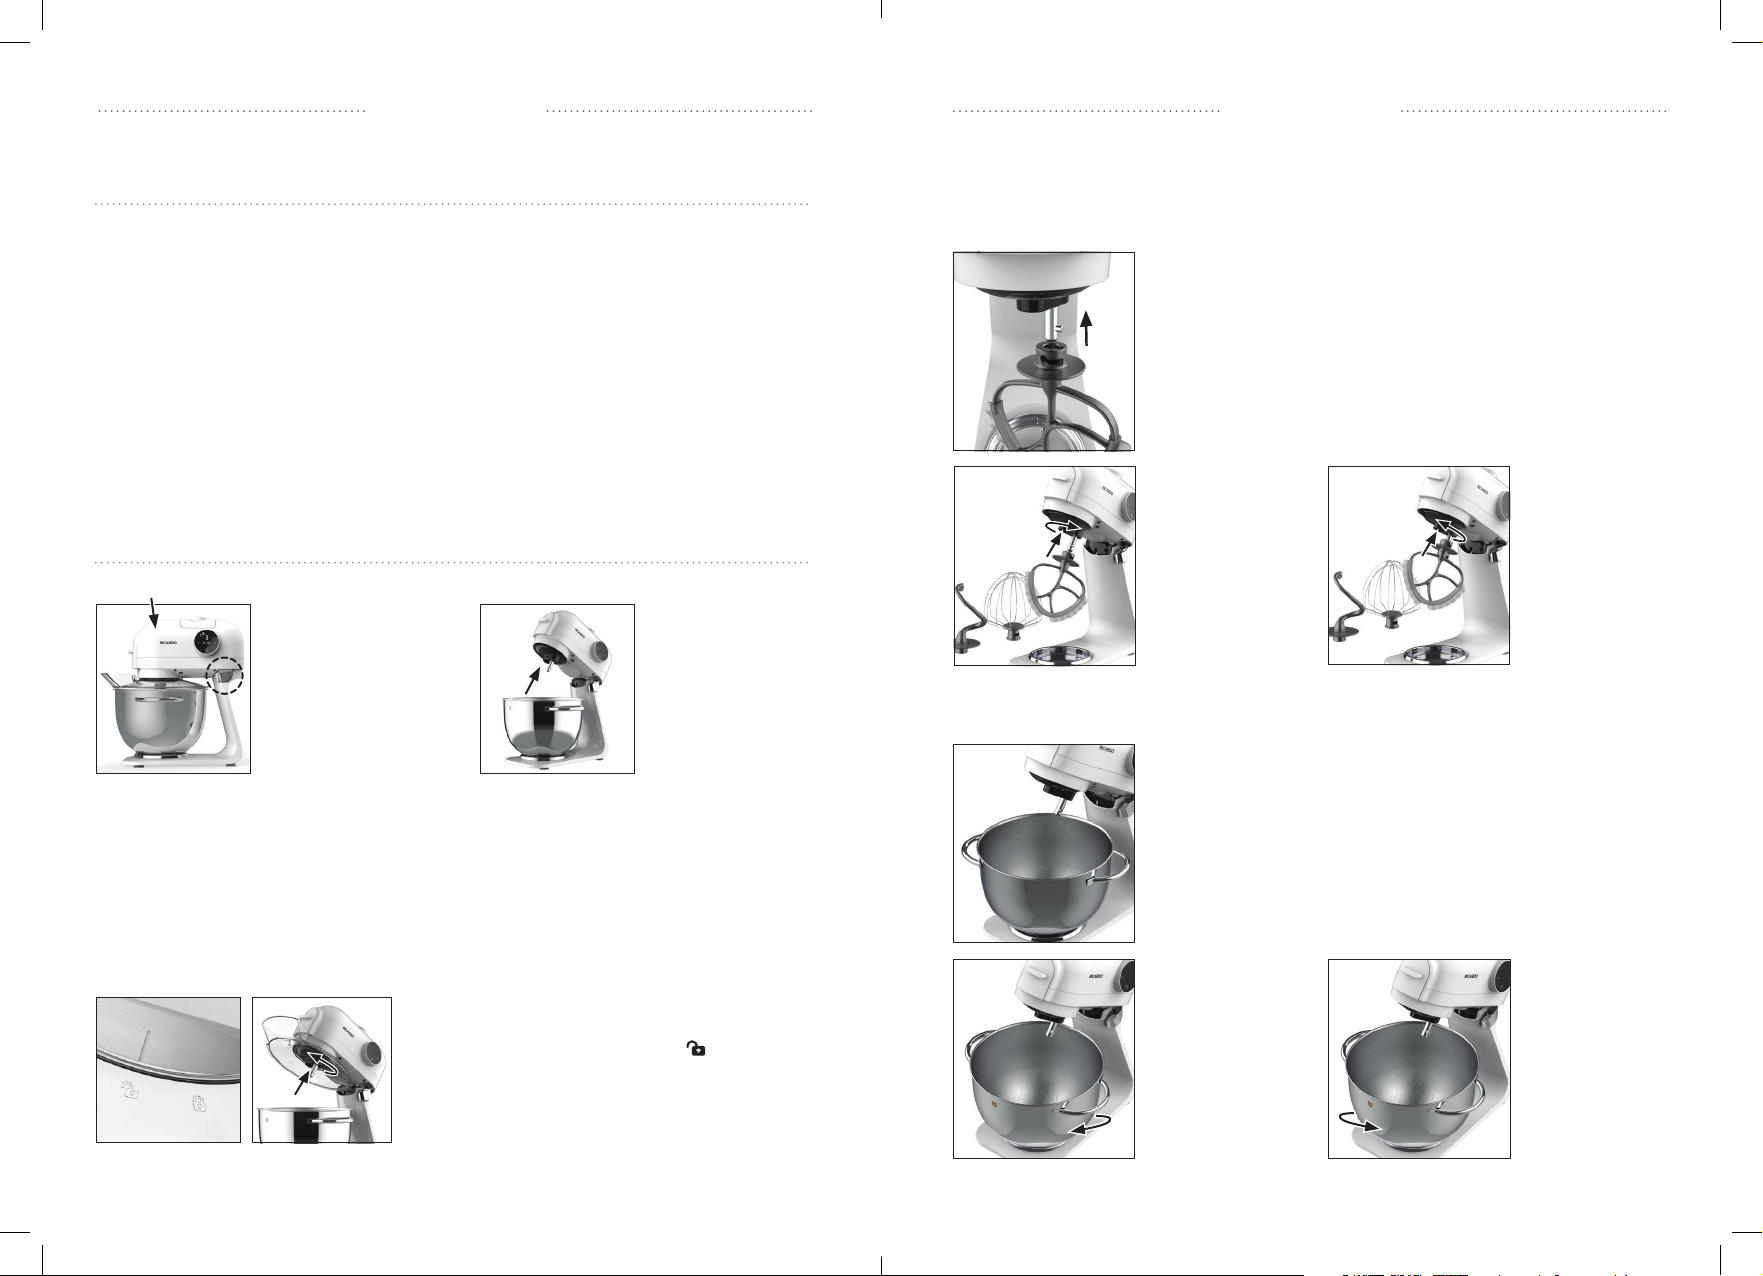
:::Remove the bowl, the accessories and the splashguard from the stand mixer following
the ASSEMBLING section. Wash all removable parts in hot soapy water or in the dishwasher
and dry thoroughly.
:::If needed, the body of the stand mixer can be cleaned with a soft damp cloth.
Dry thoroughly. NEVER IMMERSE the appliance, the power cord or the power plug
in water or any liquid.
Refer to the Use & Care instruction
manual provided with each specific
attachment for the recommended
assembling and using instructions.

12 13
User manual User manual
3-YEAR LIMITED WARRANTY
This limited warranty is non-transferable and applied only to the original end user purchaser. An
original sale receipt from the original retailer is required as proof of purchase to seek warranty service.
This limited warranty covers defects in materials and workmanship or quality when the product
is used in a normal domestic setting and in accordance with the use and maintenance instructions
found in the manual provided with the product.
3-year limited warranty on the die-cast aluminum housing and the digital display.
2-year limited warranty on all parts (stainless steel bowl, splashguard, Chef’s whisk, flat mixing
paddle and dough hook).
This limited warranty does not cover: normal wear and tear, stains, discoloration, chips, scratches
or scu marks, operating noise, creaking noise when lifting the motor head or any damages from
any of the following: negligent use, misuse of the product, accident or abuse, use on improper
voltage or current, use contrary to the operating instructions, use for commercial purposes
and disassembly, repair or alteration by anyone other than a RICARDO authorized service agent.
Operating or creaking noise, stains, discoloration and scratches on the outside of the appliance,
on the splashguard, the stainless steel bowl and the accessories constitute normal use, do not aect
performance and are not covered by this warranty.
Any complaints must be registered within the warranty period. The product will be repaired, replaced
(parts or entire appliance) or refunded at our sole discretion. Shipping charges may apply.
For assistance regarding this product or warranty, please contact our customer service:
:::by e-mail: ki[email protected]om
:::by phone: 1-866-226-9222
PROBLEM POSSIBLE CAUSE SOLUTION
Stand mixer doesn’t
turn on even if the
power cord is plugged
into a 120V AC wall outlet
A safety mechanism
prevents the appliance
from turning on if the
motor head is not locked
in lower position.
Raise the motor head up.
Then, following instructions in
the ‘’Lowering the motor head’’
section, gently bring the head
down and push it downwards
to lock in mixing position.
A click must be heard, indicating
it is locked properly. Plug the
appliance to turn it on.
Stand mixer shuts o
Overload protection:
Unit has overheated due
to overload. The device
shuts down to protect
the motor.
Unplug the appliance.
Let appliance cold down
for 30 minutes. Reduce the load
by removing some ingredients.
Plug in and reset the speed.
E2 error code appears
on the digital display
When the accessory
is stuck in the mixture for
3 seconds, the appliance
stops to protect
the motor.
-Unplug the appliance.
Let appliance cool down
for 30 minutes. Plug in and
the appliance will work again.
-If the appliance cannot turn on
or E2 still appear on the digital
display after 30 minutes, please
contact customer service. The
mainboard or PCB may be broken.
NOTE
:::If grey scu marks appear on the white aluminum housing, gently remove them with baking soda
on a humid or wet cloth. Use a light hand to not permanently damage the white surface finish.
:::Do not use abrasive cleaners or scouring pads or any other object that can scratch the surface.
STORAGE
Ensure all pieces are clean and dry before storing. Store appliance in a dry, clean place. Never wrap
the cord tightly around the appliance, as this could place undue stress on the cord where it connects
to the appliance, causing it to fray and break. Keep it loosely coiled.
TROUBLESHOOTING GUIDE

14 15
Recipes Recipes
gelatin-free strawberry mousse cake
preparation
1 hour
cooking
35 minutes
cooling
15 hours
servings
10, freezes well
genoise
4 eggs, at room temperature (see note)
¾ cup (160 g) sugar
1 tsp (5 ml) vanilla
¼ tsp salt
¼ cup (55 g) unsalted butter, melted
¾ cup (115 g) unbleached all-purpose flour
strawberry mousse
¾ cup (160 g) sugar
2 tbsp cornstarch
2 eggs
¾ cup (180 ml) strawberry purée (see note)
2 tbsp (30 ml) lemon juice
1 cup (250 ml) 35% whipping cream
toppings
½ cup (125 ml) 35% whipping cream
1 tbsp (15 ml) sugar
1 cup (135 g) strawberries, cut into rounds
Thyme leaves (optional)
genoise
1With the rack in the middle position, preheat
the oven to 350°F (180°C). Line the bottom of an 8-inch
(20 cm) springform pan with parchment paper. Do not
butter the sides.
2In the bowl of the stand mixer fitted with the Chef’s
whisk on speed 5 or 6, whisk the eggs, sugar, vanilla
and salt until the mixture triples in volume and falls
from the whisk in a ribbon, about 8 minutes. With the
mixer on low speed (2), drizzle in the melted butter.
Using a whisk, gently fold in the flour. Spread the
mixture out in the prepared pan. Wash out the bowl
of the stand mixer as well as the Chef’s whisk.
3Bake for 35 minutes or until a toothpick inserted
in the centre of the cake comes out clean. Let cool
completely on a wire rack, about 3 hours. Run a thin
blade between the side of the pan and the cake
to unmould.
strawberry mousse
4Meanwhile, in a pot off the heat, whisk together
the sugar and cornstarch. Add the eggs and whisk
until smooth. Add the strawberry purée and lemon
juice. Bring to a boil over medium heat, whisking
constantly and scraping the bottom and sides
of the pot, until the mixture thickens. Simmer
for 1 minute. Pour into a bowl. Cover with plastic wrap
directly on the surface of the cream and refrigerate
for 3 hours or until completely chilled.
5In the bowl of the stand mixer fitted with the Chef’s
whisk on speed 5, whisk the 35% cream until stiff
peaks form. Whisk one-third of the whipped cream
into the chilled strawberry mixture. Gently fold in
the remaining whipped cream. Wash out the bowl
of the stand mixer as well as the Chef’s whisk.
assembly
6Cut the cake in half horizontally to get two layers.
Wash out the springform pan and place one cake
layer in the bottom. Top with the strawberry mousse.
Cover with the second cake layer. Refrigerate for
12 hours.
7In the bowl of the stand mixer fitted with the Chef’s
whisk on speed 5, whisk the 35% cream and sugar
until stiff peaks form. Transfer into a pastry bag.
8Decorate the cake with rosettes and dollops
of whipped cream, alternating a star and plain tip.
Garnish with the strawberries and thyme leaves.
|NOTE |To quickly bring your eggs to room
temperature, plunge them in a bowl of hot water
(not boiling) for 10 minutes. Room temperature eggs
whisk up more easily and will give your cake almost
50% more volume than cold eggs.
To get ¾ cup (180 ml) strawberry purée, blend 1 ½ cups
(210 g) fresh or thawed frozen strawberries in a blender
until smooth. Strain through a sieve to get rid
of the seeds.

16 17
Recipes Recipes
lemon pie cake
preparation
1 hour
cooking
1 hour
cooling
3 hours
servings
12
angel food cake
1 ¼ cups (190 g) unbleached all-purpose flour
1 ¾ cups (370 g) sugar
½ tsp salt
12 egg whites, at room temperature
1 ½ tsp cream of tartar
1 tsp (5 ml) vanilla
lemon filling
1 ¼ cups (265 g) sugar
⅓ cup (45 g) cornstarch
2 lemons, zest finely grated
1 ¼ cups (310 ml) cold water
¾ cup (180 ml) lemon juice (about 3 lemons)
3egg yolks
1 egg
½ cup (115 g) unsalted butter, melted
italian meringue
½ cup (125 ml)
35% whipping cream
1 tbsp sugar
1 cup (135 g) strawberries, cut into rounds
Thyme leaves (optional)
angel food cake
1With the rack in the lowest position, preheat
the oven to 325°F (165°C).
2In a bowl, combine the flour, ¼ cup (55 g)
of the sugar and the salt.
3In the bowl of the stand mixer fitted with the Chef’s
whisk on speed 5, beat the egg whites, cream of tartar
and vanilla until soft peaks form. Gradually add the
remaining sugar, beating until semi-stiff peaks form.
4Sift the dry ingredients over the meringue and gently
fold in with a whisk or rubber spatula as you go. Spread
the batter out in an ungreased non-stick 10-inch (25 cm)
angel food cake pan. Wash out the bowl of the stand
mixer as well as the Chef’s whisk.
5Bake for 45 to 50 minutes or until the surface
of the cake springs back when pressed.
6Remove from the oven and immediately turn
the cake pan upside down onto a wire rack. Let cool
completely, about 3 hours. Run a thin blade between
the cake and the pan to unmould.
lemon filling
7Meanwhile, in a pot off the heat, whisk together
the sugar, cornstarch, lemon zest and water. Bring
to a boil over medium heat, whisking constantly until
it thickened. Reduce the heat and cook for 1 minute.
Remove from the heat.
8In a bowl, whisk together the lemon juice, egg
yolks, egg and butter. Whisk into the cornstarch
mixture. Return to the heat and bring to a boil,
stirring constantly. Reduce the heat and cook for
1 minute. Transfer to a bowl and let cool. Cover and
refrigerate for 2 hours or until completely chilled.
italian meringue
9In the bowl of the stand mixer fitted with the
Chef’s whisk, place the egg whites, cream of tartar
and vanilla. Set aside.
10 In a pot, bring the water and sugar to a boil.
Cook until a candy thermometer reads 235°F (113°C).
Remove from the heat while whisking
the egg whites.
11 Beat the egg whites on speed 3 until soft peaks
form. Drizzle the hot syrup over the egg whites,
avoiding the whisk. Increase the speed to 5 or 6 and
continue whisking until the meringue has cooled and
stiff peaks form.
assembly
12 Slice the cake horizontally to get 4 layers.
Place one layer on a serving plate.
13 Spread one-third of the lemon filling over
the cake layer. Repeat with the remaining cake layers
and lemon filling, ending with a layer of cake.
14 Cover the cake with the Italian meringue. Using
a spatula, form decorative peaks in the meringue.
Using a small kitchen torch, brown the meringue.
Keep the cake in the refrigerator.

18 19
Recipes Recipes
chocolate mousse
preparation
15 minutes
cooking
5 minutes
servings
6
4 oz (115 g) dark chocolate, chopped
3 tbsp (40 g) unsalted butter
2 eggs, separated
1 tbsp sugar
1 ½ cups (375 ml) 35% whipping cream
½ tsp (2.5 ml) vanilla
White or dark chocolate shavings, for garnish
1
In a bowl placed over a pot of simmering water, melt
the chocolate with the butter, stirring until smooth.
Remove from the heat. Whisk in the egg yolks, whisking
until the mixture is smooth.
2
In the bowl of the stand mixer fitted with the Chef’s
whisk on speed 5, whisk the egg whites and the sugar
until stiff peaks form. Using a spatula, gently fold
the meringue into the chocolate mixture. Wash out the
bowl of the stand mixer as well as the Chef’s whisk.
3
In the clean bowl of the stand mixer, whisk the 35%
cream and vanilla on speed 4 or 5 until stiff peaks form.
Using a spatula, gently fold the whipped cream into the
chocolate mixture. Spoon the mousse into dessert cups.
Garnish with chocolate shavings. The mousse will keep
for 3 days in the refrigerator. Bring to room temperature
before serving.
butter cookies
preparation
25 minutes
chilling
1 hour
cooking
12 minutes per batch
makes
about 4 dozen, freezes well
2 cups (300 g) unbleached all-purpose flour
¼ tsp (1 ml) salt
1 cup (225 g) unsalted butter, softened
¾ cup (160 g) sugar
1 tsp (5 ml) vanilla
1 egg
1In a bowl, combine the flour and salt. Set aside.
2In the bowl of the stand mixer fitted with the flat
mixing paddle on speed 3, cream the butter, sugar
and vanilla for 2 minutes. Add the egg and beat until
smooth. With the mixer on low speed (1 or 2), add
the dry ingredients. Shape the dough into 2 discs
with your hands. Cover in plastic wrap and refrigerate
for 1 hour.
3With the rack in the middle position, preheat
the oven to 350°F (180°C). Line two baking sheets
with silicone mats or parchment paper.
4On a lightly floured work surface, roll out one disc
of dough at a time until ¼-inch (5 mm) thick. Cut out
cookies using a 2-inch (5 cm) round cookie cutter.
Arrange the cookies spread out on the baking sheets.
Reuse any dough scraps.
5Bake one sheet at a time for 12 minutes or until
golden. Let cool completely.
6Decorate with vanilla royal icing, if desired.
The cookies will keep for 3 weeks in an airtight
container at room temperature.

20 21
Recipes Recipes
chocolate marble bundt cake
preparation
30 minutes
cooking
1 hour
cooling
3 hours
servings
10
cake
3 cups (450 g) unbleached all-purpose flour
2 tsp baking powder
1 tsp baking soda
¼ tsp salt
¾ cup (180 ml) milk
½ cup (125 ml) sour cream
1 ¼ cups (280 g) unsalted butter, softened
2 cups (420 g) sugar
1 tbsp (15 ml) vanilla
5 eggs
3 tbsp cocoa powder
2 tbsp (30 ml) canola oil
ganache
4 oz (115 g) dark chocolate, coarsely chopped
⅓ cup (75 ml) 35% whipping cream
2 tbsp (30 ml) corn syrup
cake
1With the rack in the middle position, preheat
the oven to 350°F (180°C). Generously butter
and flour a 10-cup (2.5-litre) Bundt pan.
2In a bowl, combine the flour, baking powder,
baking soda and salt. Set aside.
3In another bowl, combine milk and sour cream.
Set aside.
4In a stand mixer fitted with the flat mixing paddle
attachment, cream the butter, sugar and vanilla.
Add the eggs, one at a time, and mix until smooth.
With the mixer at low speed, add the dry ingredients
alternating with the milk mixture.
5In a third bowl, whisk together the cocoa powder
and oil. Add 2 cups (500 ml) of the cake batter
and mix well to combine.
6Spread the remaining cake batter (without
the cocoa powder and oil) out in the prepared pan.
Make a deep groove in the centre of the batter by
spreading the batter up the sides of the pan. Spoon
the chocolate batter into the groove. Using a small
spoon, gently swirl the two batters together with
small circular movements to create a marbled effect.
7Bake for 55 minutes or until a toothpick inserted
in the centre of the cake comes out clean. Let cool
for 10 minutes. Unmould the cake, flipping it on
a wire rack. Let cool completely, about 3 hours.
ganache
8Place the chocolate in a bowl.
9In a small pot on the stovetop or in a bowl
in the microwave oven, bring the cream and corn
syrup to a boil. Pour over the chocolate. Let melt
for 1 minute without stirring.
10 Whisk until the ganache is smooth. Let cool
for 5 minutes. Pour over the cooled cake, letting
the ganache fall down the sides of the cake.

22 23
Recipes Recipes
honey sticky buns
preparation
40 minutes
cooking
35 minutes
waiting
2h15
makes
12
sticky buns
1 ¼ cups (310 ml) buttermilk, warm
¼ cup (60 ml) honey
2 ½ tsp instant yeast
½ tsp salt
4 ½ cups (630 g) unbleached all-purpose flour
2 eggs
½ cup (115 g) unsalted butter, softened
filling
½ cup (125 ml) creamed honey
2 tbsp unsalted butter, softened
2 tsp ground cinnamon
2 tbsp (30 ml) buttermilk
glaze
¼ cup (60 ml) creamed honey, softened
¼ cup (33 g) icing sugar
sticky buns
1
In a bowl, combine the buttermilk, honey, yeast
and salt.
2
In the bowl of the stand mixer fitted with the
dough hook on speed 2, combine the flour, eggs
and buttermilk mixture until the dough starts to form.
3
With the mixer still on speed 2, gradually add
the butter. Increase to speed 3 and knead the dough
for 5 minutes. The dough will be soft and slightly
sticky. Transfer the dough into a clean, lightly oiled
bowl. Cover with a clean, slightly damp dishcloth or
plastic wrap. Let rise in a warm, humid spot for 1 hour.
filling
4
In a bowl, combine the honey, butter
and cinnamon.
5
On a generously floured work surface, roll
the dough out to form a 20 x 14-inch (50 x 35 cm)
rectangle. Spread the filling over the entire surface
of the dough. Roll the dough up tightly, starting from
the long side of the rectangle, to create a log about
20 inches (50 cm) long. Cut into 12 slices.
6
Arrange the slices, cut side up, in a 13 x 9-inch
(33 x 23 cm) glass baking dish, making sure the buns
are not touching each other (see note). Cover with
a clean, slightly damp dishcloth and let rise in a warm
spot for 1 hour 30 minutes (see note).
7
With the rack in the middle position, preheat
the oven to 350°F (180°C).
8
Using a pastry brush, cover the buns with
the buttermilk. Bake for 30 to 35 minutes
or until golden. Let cool.
glaze
9
In a bowl, whisk together the honey and sugar.
When ready to serve, glaze the buns.
|NOTE |The sticky buns can be prepared the day
before. After you’ve placed them in the baking dish,
cover the sliced, uncooked buns with plastic wrap and
refrigerate. The next day, place the pan in a hot-water
bath to accelerate rising. Allow the buns to rise until
they are touching each other.
To test whether the dough is ready to be baked,
press it with your fingertip; if the indentation remains,
the buns are ready for the oven.

24 25
Recipes Recipes
focaccia with fresh herbs
preparation
25 minutes
rising
1 hour
serving
8 appetizers
2 cups (300 g) unbleached all-purpose flour
1 ½ tsp sugar
1 tsp instant yeast
1 tsp salt
¾ cup (180 ml) warm water
¼ cup (60 ml) olive oil
2 tbsp chopped fresh herbs (such as thyme,
rosemary, oregano)
1 garlic clove, chopped
Fleur de sel, to taste
1
In the bowl of the stand mixer fitted with the dough
hook on speed 2, combine the flour, sugar, yeast
and salt. Add the water and mix until a soft ball forms.
Knead the dough on speed 3 until smooth, about
2 minutes.
2
Spread the dough out with your fingertips
in a lightly oiled 13 x 9-inch (33 x 23 cm) rectangular
baking pan. Cover with a clean, damp dishcloth
or plastic wrap. Let rise in a warm, humid spot
for 30 minutes or until the dough has doubled
in volume.
3
Pour the oil over the dough. Spread the dough
out with your fingertips, turning it over a few times
to coat well in the oil. Make small wells in the dough
using your fingertips. Let rise for 30 minutes.
4
With the rack in the middle position, preheat
the oven to 400°F (200°C).
5
In a small bowl, combine the herbs and garlic.
Sprinkle over the dough. Generously season with salt
and pepper.
6
Bake for 25 minutes or until golden brown. Let rest
for 5 minutes before serving. Cut into squares and
serve as an appetizer.
Buffalo chicken salad
preparation
15 minutes
servings
4
dressing
2 oz (55 g) blue cheese, crumbled
½ cup (125 ml) mayonnaise
¼ cup (60 ml) sour cream
2 tbsp flat-leaf parsley, finely chopped
1 tbsp (15 ml) lemon juice
2 tsp (10 ml) honey
1 small garlic clove, finely chopped
Hot sauce, to taste (see note)
salad
4 cups (680 g) cooked chicken, cold
1 small iceberg lettuce, cut into thin wedges
2 celery stalks, thinly sliced
½ cup (75 g) frozen corn kernels, thawed
¼ cup (10 g) flat-leaf parsley, finely chopped
dressing
1
In a bowl, combine all of the ingredients. Season
with salt and pepper.
salad
2
In the bowl of the stand mixer fitted with
the dough hook on speed 2, shred the chicken
for 20 to 30 seconds.
3
Divide the chicken, lettuce, celery, corn and parsley
among four bowls. When ready to serve, drizzle
with the dressing.
|NOTE |We used Frank’s RedHot sauce, a classic
ingredient in most Buffalo chicken wing recipes. But
you can use your favourite vinegar-based hot sauce.

26 27
Recipes Recipes
guacamole
preparation
10 minutes
serving
4 to 6
4 very ripe avocados, peeled and halved
1 lime, juice only
1 green onion, finely chopped
Jalapeño chili pepper, seeded or not,
finely chopped, to taste
Cilantro, finely chopped, to taste (optional)
In the bowl of the stand mixer fitted with the Chef's
whisk attachment (for a smooth guacamole)
or the flat mixing paddle attachment (for a chunky
guacamole), crush the avocados with the lime juice.
Add the remaining ingredients. Season with salt and
pepper. Mix well. Serve with corn chips, if desired.
barbecue pulled pork
preparation
25 minutes
pressurization
10 minutes
pressure cooking
45 minutes
natural depressurization
15 minutes,
servings
8, freezes well
¾ cup (180 ml) ketchup
¼ cup (60 ml) apple cider vinegar
¼ cup (55 g) brown sugar
2 tbsp (30 ml) Dijon mustard
2 tbsp (30 ml) Worcestershire sauce
2 tbsp chili powder
2 tsp onion powder
1 tsp (5 ml) Tabasco-style sauce
½ tsp garlic powder
1 boneless, skinless pork shoulder roast,
about 3 ½ lb (1.6 kg), cut into 8 pieces
1In a pressure cooker (see note), combine all
of the ingredients except for the pork.
2Add the meat and toss to coat in the sauce.
Season with salt and pepper. Cover and select
the Meat function. Set the machine to cook
for 45 minutes.
3Let the pressure release naturally, about 15 minutes.
Once the pressure is released, remove the lid. Remove
the meat from the pressure cooker. Drain the meat.
4Select the Sauté function and let the sauce
reduce by half, about 10 to 20 minutes for a thick
and syrupy sauce.
5In the bowl of the stand mixer fitted with the flat
mixing paddle, shred the meat for 20 to 30 seconds,
adding sauce until the desired texture is reached.
Adjust the seasoning. Serve the pulled pork with
cornbread, polenta or in buns.
|NOTE |If you do not have a pressure cooker, this recipe
can be prepared in the oven. In a bowl, combine all of
the ingredients except for the pork. In a Dutch oven over
medium-high heat, brown the pieces of pork in 2 tbsp
(30 ml) vegetable oil. Add the sauce. Cover and cook
in an oven preheated 350°F (180°C) for 2 hours, stirring
the meat halfway through cooking. Add more liquid
as needed.
OR

28
Recipes
squash, apple and almond spread
preparation
15 minutes
cooking
45 minutes
makes
2 cups
2 cups (300 g) butternut squash, peeled, seeded
and cubed
1 tbsp (15 ml) olive oil, plus more for garnish
½ tsp cumin seeds, plus more for garnish
2 tbsp (30 ml) almond butter
2 tsp (10 ml) lemon juice
2 tbsp Cortland apple, unpeeled, cut into small dice
1 tbsp roasted almonds, roughly chopped (optional)
2 tsp (10 ml) maple syrup (optional)
Crackers
1With the rack in the middle position, preheat
the oven to 400°F (200°C).
2On a non-stick or parchment paper-lined baking
sheet, toss the squash with the oil. Season with salt
and pepper. Bake for 15 to 20 minutes or until tender.
3Meanwhile, in a small, dry skillet over medium heat,
toast the cumin seeds until fragrant. Using a mortar
and pestle or a spice grinder, crush the cumin seeds.
4In a stand mixer fitted with the flat mixing paddle
attachment, purée the squash with the almond butter,
lemon juice and crushed cumin seeds until smooth.
Using a spatula, scrape down the sides of the bowl as
needed.
5Transfer the mixture into a shallow serving bowl,
making decorative waves in the surface with a spoon.
Drizzle with more olive oil, to taste. Garnish with
the apple and almonds. Drizzle with the maple syrup
and sprinkle with more cumin seeds. Serve with
the crackers. The spread will keep for 1 week
in an airtight container in the refrigerator.
Table of contents
Other Ricardo Kitchen Appliance manuals