manuals.online logo
Brands
  1. Home
  2. •
  3. Brands
  4. •
  5. Ricoh
  6. •
  7. All In One Printer
  8. •
  9. Ricoh Aficio CL5000 User manual

Ricoh Aficio CL5000 User manual

Please read the Safety Information in Maintenance Guide 1 before using this machine. It
contains important information related to USER SAFETY and PREVENTING EQUIP-
MENT PROBLEMS.
QUICK INSTALLATION GUIDE
○○○○○○○○○○○○○○○○○○○○○○○○○○○○○○○○○○○○○○○○○○○○○○○○○○○○○○○○○○○○
○○○○○○○○○○○○○○○○○○○○○○○○○○○○○○○○○○○○○○○○○○○○○○○○○○
○○○○○○○○○○○○○○○○○○○○○○○○○○○○○○○○○
○○○○○○○○○○○○○○○○○○○○○○○○○○○○○○○○○○○○○○○○○○○○○○○○○
○○○○○○○○○○○○○○○○○○○○○○○○○○○○○○○○○○○○○○○○○○○○○○○○○○○○○○○○○○○○○○○○○○○○○○
○○○○○○○○○○○○○○○○○○○○○○○○○○○○○○○○○○○○○○○○○○○○○○○○○○○○○○○○○○○○○○○○○○○○○○○○○○○○○○○○○○○○○○○○○○○○
○○○○○○○○○○○○○○○○○○○○○○○○○○○○○○○○○
○○○○○○○○○○○○○○○○○○○○○
Open the left cover of the printer by pulling the
fasteners (

c

).
ZESX306E
Note
❒The two round fasteners cannot be detached.
From the top, the development units are installed in the order of
black, yellow, cyan, and magenta.
ZESX307E
Remove all of the packing materials with red tags.
Four packing materials are connected together, and there are two
of them. Remove one by one from the top of the units by holding
the packing material, not the wire.
ZESX308E
Detach the connectors from the development
units from the top to the bottom by pressing the
sides of the connectors.
ZESX410J
MANUALS FOR THIS PRINTER
Quick Installation Guide (This manual)
Maintenance Guide 1
Maintenance Guide 2
Option Setup Guide
CD-ROM “Printer Drivers and Utilities”
CD-ROM “Operating Instructions”
CD-ROM “Document Management Utility”
Development Unit Test Print
Power Cable
Ferrite Core
Fuser Oil Unit
ZESX303J
Paper Feed Unit Labels
WHERE TO PUT THE PRINTER
The printer’s location should be carefully chosen
because environmental conditions greatly affect its
performance.
Warning
•
Confirm that the wall outlet is near the machine
and freely accessible, so that in event of an
emergency, it can be unplugged easily.
•
Only connect the machine to the power source
described on this manual.
•
Avoid multi-wiring.
•
Do not damage, break or make any modifications
to the power cord. Do not place heavy objects
on it, pull it hard or bend it more than necessary.
These actions could cause an electric shock or
fire.
Caution
•
Keep the machine away from humidity and dust.
A fire or an electric shock might occur.
•
Place the machine on a strong and level surface.
Otherwise, the machine might fall and result in
an injury.
•
If you use the machine in a confined space,
confirm that there is a continuous flow of air.
Optimum Environmental Conditions
Recommended temperature and humidity
32˚C
54%
27˚C 80%10˚C 80%
32˚C 15%10˚C 15%
%RH
80
60
40
15
10 20 30 ˚C
15˚C 70%
15˚C 30% 25˚C 30%
25˚C 70%
89.6˚F
54%
80.6˚F 80%50˚F 80%
89.6˚F 15%50˚F 15%
%RH
80
60
40
15
50 60 90 ˚F
59˚F 70%
59˚F 30% 77˚F 30%
77˚F 70%
70 80
Possible operation range Recommended range
The machine must be level within 5 mm (0.2 inch) both front to
rear and left to right.
To avoid possible build-up of ozone, place this printer in a large well
ventilated room that has an air turnover of more than 30 m3(183
cubic inch)/hr/person.
If you use this printer in a cold area, leave the printer on or severe
cold might damage sensitive components inside the printer.
Depending on the temperature and humidity around the machine,
vapor might occur when printing. Thus steam can be seen when
prints come out.
Environments to Avoid
Important
❒Locations exposed to direct sunlight or strong light
❒Dusty areas
❒Areas with corrosive gases
❒Areas excessively cold, hot, or humid
❒Locations near an air conditioner or humidifier
❒Locations near other electronic equipment
❒Locations where the printer might be subjected to
frequent strong vibration
Power Connection
Connect the power cord to a power source with the following
specifications:
❒120 V, 60 Hz, 11 A or more-
Space Required for Installing the Printer
Leave enough space around the printer. This space is necessary to
operate the printer. The recommended (or minimum) space
requirement is as follows:
B
AC
D
ZESX302E
A: 10 cm (4 inch) or more
B: 10 cm (4 inch) or more
C: 55 cm (22 inch) or more
D: 75 cm (30 inch) or more
UNPACKING THE PRINTER AND
CHECKING THE CONTENTS OF THE BOX
Caution
•
To prevent an injury, this printer should be lifted
by at least two people.
Check the contents of the box according to the
following list. If one or some items are missing,
please contact your sales or service
representative.
Important
❒This package does not include an interface cable.
Please purchase one for use with your host
computer. See “Appendix” the in the Administrator
Reference.
Remove the plastic bag.
Lift the printer and move it to the place where
you want to install it.
When lifting the printer, pull out the holding handles from the sides
of the printer, and hold them with at least two people.
Important
❒When installing the printer to a low position, be
careful not to get your hand or clothes caught under
the printer.
Return the grips into the printer.
Remove adhesive tapes and packing materials
from the printer.
Put the Paper Feed Unit label for Tray 1 on the
front of Tray 1.
ZESX433E
PREPARING THE
DEVELOPMENT UNIT
Warning
•
Do not incinerate spilled toner or used toner.
Toner dust is flammable and might ignite when
exposed to an open flame.
•
Disposal should take place at an authorized
dealer or an appropriate collection site.
•
If you dispose of the used toner containers
yourself, dispose of them according to the local
regulations.
Caution
•
Do not eat or swallow toner.
•
Keep toner (used or unused) and toner
cartridges out of reach of children.
•
Our products are engineered to meet the highest
standards of quality and functionality. When
purchasing expendable supplies, we
recommend using only those provided by an
authorized dealer.
Follow steps to for each development unit
individually. Remove the development unit by
lifting it first as shown in the illustration (

c

).
ZESX411E
The illustration shows how to remove the black development unit.
The procedure is the same for all four colors.
Important
❒Be sure to hold the unit with both hands, and then
pull it slowly.
Hold the development unit, and then shake it
about 10 times.
ZESXE414J
Important
❒Hold the unit with the roller facing down.
❒Do not add shocks to the unit.
❒If you do not shake the unit well, it may take longer
for the machine to warm up when turned on.
❒Do not touch the roller or the gears shown in the
illustration.
ZESX668E
<G071-7503B>
Confirm the label for the color, and then confirm
that the unit is securely fit in the stoppers.
ZESX650J
When there is a white line showing at the stoppers, reinsert the units.
Important
❒If the development unit is not installed properly,
the printing quality may be poor.
Repeat steps to to set the rest of the
development units.
Insert the connectors to the development units
from the bottom (

) to the top (

) until they
click into place.
ZESX046E
Important
❒Be sure that all four connectors are connected to
the development units. Turning on the power
without all four connectors connected to the units
may cause a printer malfunction.
Close the left cover of the printer by pushing the
fasteners (

) while holding the cover (

).
ZESX309E
Set the development unit by aligning the guides,
pushing towards direction (

), and then
inserting slowly until it stops (

).
ZESX412E
The illustration shows how to install the black development unit.
The procedure is the same for all four colors.
Note
❒When installing the development unit, it may come
out a little. This is not a malfunction.
○○○○○○○○○○○○○○○○○○○○○○○○○○○○○○○○○○○○○○○○○○○○○
○○○○○○○○○○○○○○○○○○○○○○○○○○○○○○○○○○○○○○○○○○○○○○○○○○○○○○○○○○○○
○○○○○○○○○○○○○○○○○○○○○○○○○○○○○○○○○○○○○○○○○○○○○○○○○○○○○○○○○○○○○
○○○○○○○○○○○○○○○○○○○○○○○○○○○○○○○○○○○○○○○○○○○○○○○○○○○○○○○○○○○○○○○○○○○○○○○○○○○○○○○○○○○○
○○○○○○○○○○○○○○○○○○○○○○○○○○○○○○○○○○○○○○○○○○○○○○○○○○○○○○○○○○○○○○○○○○○○○○○○○○○○○○○○○○○○○○○○○○○○○○○○
○○○○○○○○○○○○○○○○○○○○○○○○○○○○○○○○○○○○○○○○○○○○○○○○○○○○○○○○○○○○○○○○○○○○○○○○○○○○○○○○○○○
Sheet 1/2
Go to sheet 2/2.
INSTALLING THE FUSER OIL
UNIT
Caution
•
Do not incinerate the oil bottle. This could cause
a fire or an injury.
•
Spilt oil is very slippery. If oil is spilt, wipe it up
with an alkaline cleaner. Otherwise, the oily
surfaces can create the danger of slipping and
an injury.
•
Do not pull out the fusing unit quickly. It may
cause the unit to fall, and result in an injury.
•
Do not open the front cover when the paper tray
is pulled out halfway. If you do, it might cause an
injury.
Open the front cover slowly by pulling down from
the two areas on the left and right.
ZESX400E
Remove the packing material.
Open the Bypass Tray.
ZESX318E
Open the right cover of the printer by pushing up
the handle.
ZESX319E
Remove the packing materials by holding the red
tags as shown in the illustration.
ZESX910E
Note
❒There are two of them.
The fuser oil unit is placed on the fusing unit shown in the
illustration.
ZESX300E
Release the green screw that is fastening the
fusing unit.
ZESX320E
Note
❒Use a coin (A) to release the screw.
❒The screw cannot be detached.
Holding the handle, pull the fusing unit slowly until
it stops.
ZESX301E
Take out the new fuser oil unit from the bag.
Remove the covering paper, the seals, and then
the fitting.
ARemove the seal by shaking it to pull.
ZESX804E
Note
❒If you cannot remove it easily, pull it out with a
little force.
B Remove the seal Bslowly by turning the fuser oil unit.
ZESX055E
C Remove the fitting.
ZESX805E
Note
❒Do not remove the two red fittings with the tapes
until step .
❒Be sure to remove the seals to avoid a printer
malfunction.
❒Be sure to remove the seal first, and then remove
the seal to avoid an oil leak.
❒Be sure to put the fuser oil unit in a stable and level
place to avoid an oil leak.
❒Oil is on the seals and fusing oil roller after removal.
Be careful not to get it on your hands or clothes.
Holding the green part at the center of the fuser
oil unit, align the shaft of the fuser oil unit with
the metal holder of the fusing unit (
A
), and then
set the fusing oil unit firmly by rotating it to the
direction of the arrow (
B
).
ZESX054E
Remove the two red fittings along with the tapes
from the fuser oil unit.
ZESX056E
Holding the handle, insert the fusing unit slowly
until it stops.
ZESX325E
Important
❒Do not press the fusing unit forcefully into the
printer, as it may cause a printer malfunction.
Fasten the green screw tightly using a coin (

).
ZESX326E
Close the right cover of the printer.
ZESX327E
Note
❒Press “PUSH” to close the cover firmly.
Close the Bypass Tray.
Close the front cover slowly by pushing the two
areas on the left and right.
ZESX328E
LOADING PAPER
Caution
•
The paper tray does not have a stopper. When
pulling it out, be careful not to pull it strongly. If
you do, the tray might fall and cause an injury.
The following procedure describes how to load A4/letter
K
paper.
For more information about the paper sizes that can be set
in the paper tray, see “Paper Sizes”in Maintenance Guide
2 on the CD-ROM labeled “Operating Instructions”.
For information about loading paper size other than A4/
letter, see “Loading Paper”in Maintenance Guide 2 on the
CD-ROM labeled “Operating Instructions”.
For information about loading paper on the Bypass Tray,
see “Loading Paper”in Maintenance Guide 2 on the CD-
ROM labeled “Operating Instructions”.
Pull out the paper tray slowly until it stops.
ZESX329E
Lower the base panel by pushing “Push”.
ZESX330E
Load paper into the tray with the print side up.
ZESX331E
Important
❒Make sure that the top of the stack is not higher
than the limit mark inside the tray.
❒The front and side guides should be set exactly to
the paper size to avoid paper misfeeds.
❒Do not load different kinds of paper in the tray.
Slide the paper tray completely into the printer.
Important
❒Be sure to insert the paper tray completely.
Otherwise, misfeeds might occur, or the front cover
might touch the paper tray.
CONNECTING THE POWER
CORD
Warning
•
It is dangerous to handle the plug with wet hands.
Doing this may result in receiving an electric
shock.
Caution
•
When you pull the plug out of the socket, grip
the plug, not the cord, to avoid damaging the
cord and causing a fire or an electric shock.
Important
❒Be sure to connect the power plug to the socket or
the wall outlet firmly.
❒The printer power must be off when plugging in
and out the power cord.
Confirm that the printer's power switch is off. If it
is on, turn it off.
ZESX332E
Attach the power cord to the rear of the printer,
at the lower right.
ZESX333E
Plug the other end securely into the wall outlet.
○○○○○○○○○○○○○○○○○○○○○○○○○○○○○○○○○○○○
○○○○○○○○○○○○○○○○○○○○○○○○○○○○○○○○○○○○○○○○○○○○○○○○○○○○○○○○○○○○○○○○○○○○○○○○○○○○○○○○○○○○○○○○○○○○○
○○○○○○○○○○○○○○○○○○○○○○○○○○○○○○○○○○○○○○○○○○○○○○○○○○○○○○○○○○○○○○○○○○○○○○○○○○○○○○○○○○○○○○○○○○○○○○
○○○○○○○○○○○○○○○○○○○○○○○○○○○○○○○○○○○○○○○○○○○○○○○○○○○○○○○○○○○○○○
Sheet 2/2 (From sheet 1/2)
○○○○○○○○○○○○○○○○○○○○○○○○○○○○○○○○○○○○○○○○○○○○○○○○○○○○○○○
○○○○○○○○○○○○○○○○○○○○○○○○○○○○○○○○○○○○○○○○○○○○○○○○○○○○○○○○○○
○○○○○○○○○○○○○○○○○○○○○○○○○○○○
SELECTING THE PANEL
DISPLAY LANGUAGE
Follow the procedure to select a language.
Note
❒You can select one of the following languages:
English, German, French, Italian, Dutch, Swedish,
Norwegian, Danish, Spanish, Finnish, Portuguese,
Czech, Polish or Hungarian.
❒The default setting is English.
❒If you want to use the English panel display, it is
not necessary for you to take the following
procedures.
Turn on the printer.
ZESX335E
When the power is turned on, the following message appears on the
panel display for approximately 15 minutes while the machine is
being warmed up.
Setting Up...
[ > ]
Setting Up...
[ > > ]
Setting Up...
[ > > > ]
Setting Up...
[ > > > > ]
Setting Up...
[ > > > > > ]
After the machine warms up, “Ready” appears on the panel display.
Ready
Press
{
Menu
}
.
On Line
Menu
Job Reset
Escape
#
Enter
Form Feed
Power Error Data In
ZDJS100N
The following message appears on the panel display.
Menu:
Paper Input
Press
{▲}
or
{▼}
to display “Language”.
Menu:
Language
Press
{
Enter #
}
.
The following message appears on the panel display.
Language:
*English
Press
{▲}
or
{▼}
to display the language you
want to select.
Press
{
Enter #
}
.
“Menu” appears on the panel display.
Menu:
Paper Input
Press
{
On Line
}
.
“Ready” appears on the panel display.
Ready
PRINTING THE TEST PAGE
You can check if the printer works properly by
printing a test page such as the configuration page.
However, you cannot check the connection between
the printer and the computer by printing the test
page.
Turn on the printer if it is not already on.
ZESX335E
It takes time before the machine warms up. See “SELECTING
THE PANEL DISPLAY LANGUAGE”.
After the machine warms up, “Ready” appears on the panel display.
Ready
Press
{
Menu
}
.
Menu:
Paper Input
Press
{▲}
or
{▼}
to display “List/Test Print”.
Menu:
List/Test Print
Press
{
Enter #
}
.
The following message appears on the panel display.
List/Test Print:
Config.Page
Confirm that “Config.Page”is on the display, and
then press
{
Enter #
}
.
In a short time, the test printing will start.
Printing...
Important
❒If you cannot complete the test printing correctly,
see if an error message appears on the panel display.
For more information about error messages, see
“Troubleshooting” in Maintenance Guide 2 on the
CD-ROM labeled “Operating Instructions”.
Press
{
On Line
}
.
“Ready” appears on the panel display.
Ready
Press
{
Menu
}
.
Print the sheet for checking the color condition to confirm the
development units are properly installed.
Press
{▲}
or
{▼}
to display "Maintenance"
on the panel display, and then press
{
Enter #
}
.
Menu:
Maintenance
Press
{▲}
or
{▼}
to display "Devp.Unit Check"
on the panel display, and then press
{
Enter #
}
.
Menu:
Devp.Unit Check"
The following message appears on the panel display.
Press #to test
print Devp.Unit
Press
{
Enter #
}
.
Print out the sheet for checking the color condition.
Printing...
Use the sheet to check the print quality of each
color.
If the printed sheet has no broken or blurred colors, the development
units are installed properly. Go to , "CONNECTING THE PRINTER
TO A COMPUTER".
The development sheet that comes with the machine is a sample of
correct print. If the test page's colors are blurred or broken compared
to this sheet, turn the printer off, and then reset the development
unit using the following procedure.
Open the left cover of the printer by pulling the
fasteners (
AcB
).
ZESX306E
Note
❒The two round fasteners cannot be detached.
From the top, the development units are installed in the order of
black, yellow, cyan, and magenta.
ZESX307E
Detach the connectors from the development
units from the top to the bottom by pressing the
sides of the connectors.
ZESH410J
Pull out the development unit partially
(approximately 30mm
A
) by lifting it first as
shown in the illustration.
ZESTE020E
The illustration shows how to pull out the black development unit.
The procedure is the same for all four colors.
Important
❒Be sure to hold the unit with both hands, and then
pull it slowly.
Push the development unit slowly until it stops.
ZESTE030E
Confirm the label for the color, and then confirm
that the unit is securely fit in the stoppers.
ZESX650J
When there is a white line showing at the stoppers, reinsert the units.
Insert the connectors into the development unit,
until they click into place.
Repeat steps to to print the sheet for
checking the color again and re-check the print
quality.
Important
❒After installation, prints may exhibit a grainy sheen.
However, this is not a malfunction. The sheen will
disappear after printing 10 to 20 sheets.
CONNECTING THE PRINTER TO
A COMPUTER
❖
Connecting the printer to a computer using
a network interface cable.
Check the LED is not lit, and then turn off the
printer.
ZESX332E
Loop the network interface cable and attach the
ferrite core.
Note
❒The network interface cable loop should be about
15 cm (6") () from the end of the cable (on the
end closest to the printer).
Connect the network interface cable to the
ethernet port on the back of the printer.
ZESX337E
Connect the other end of the cable to the network
such as hub.
Turn on the printer.
Confirm the LEDs on the ethernet port.
ZESX338E
is lit when 100 BASE-TX is in use and not lit when 10 BASE-T is
in use.
is lit when the printer is securely connected to the network.
Go to “CONFIGURING THE PRINTER FOR
THE NETWORK”.
KCMY YMCK
1. Check that all colors are printed on the Test Sheet with no line breaks in them.
2. Reset the Development Unit(s) for colors where line breaks have occurred.
3. Repeat the Devp. Unit Check test print, then check the sheet again.
Development Unit Test Print
Print Quality Sample
Color-01
○○○○○○○○○○○○○○○○○○○○○○○○○○○○○○○○○○○○○○○○○○○○○○○○○○○○○○○○○○○○○○○○○○○○○○○○○○○○○○○○○○○○○○○○○○○○○○○○○
○○○○○○○○○○○○○○○○○○○○○○○○○○○○○○○○○○○○○○○○○○○○○○○○○○○○○○○○○○○○○○
○○○○○○○○○○○○○○○○○○○○○○○○○○○○○○○○○○○○○○○○○○○○○○○○○○○○○○○○○○○○○○○○○○○○○○○○○○○○○○○○○○○○○○○○○○○○○○○○
○○○○○○○○○○○○○○○○○○○○○○○○○○○○○○○○○○○○○○○○○○○○○○○○○○○○
○○○○○○○○○○○○○○○○○○○○○○○○○○○○○○○○○○○○○○○○○○○○○○○○○○○○○○○○○○○○○○○○○○○○○○○○○○○○○○○○○○○○○○○○○○○○○○○○○
○○○○○○○○○○○○○○○○○○○○○○○○○○○○○○○○○○○○○○○○○○○○○○○○○○○○○○○○○○○○○○○○○○○○○○○○○○○○○○○○○○○○○○○○
Copyright © 2002 G071-7503B
Printed in China
UE USA
○○○○○○○○○○○○○○○○○○○○○
❖
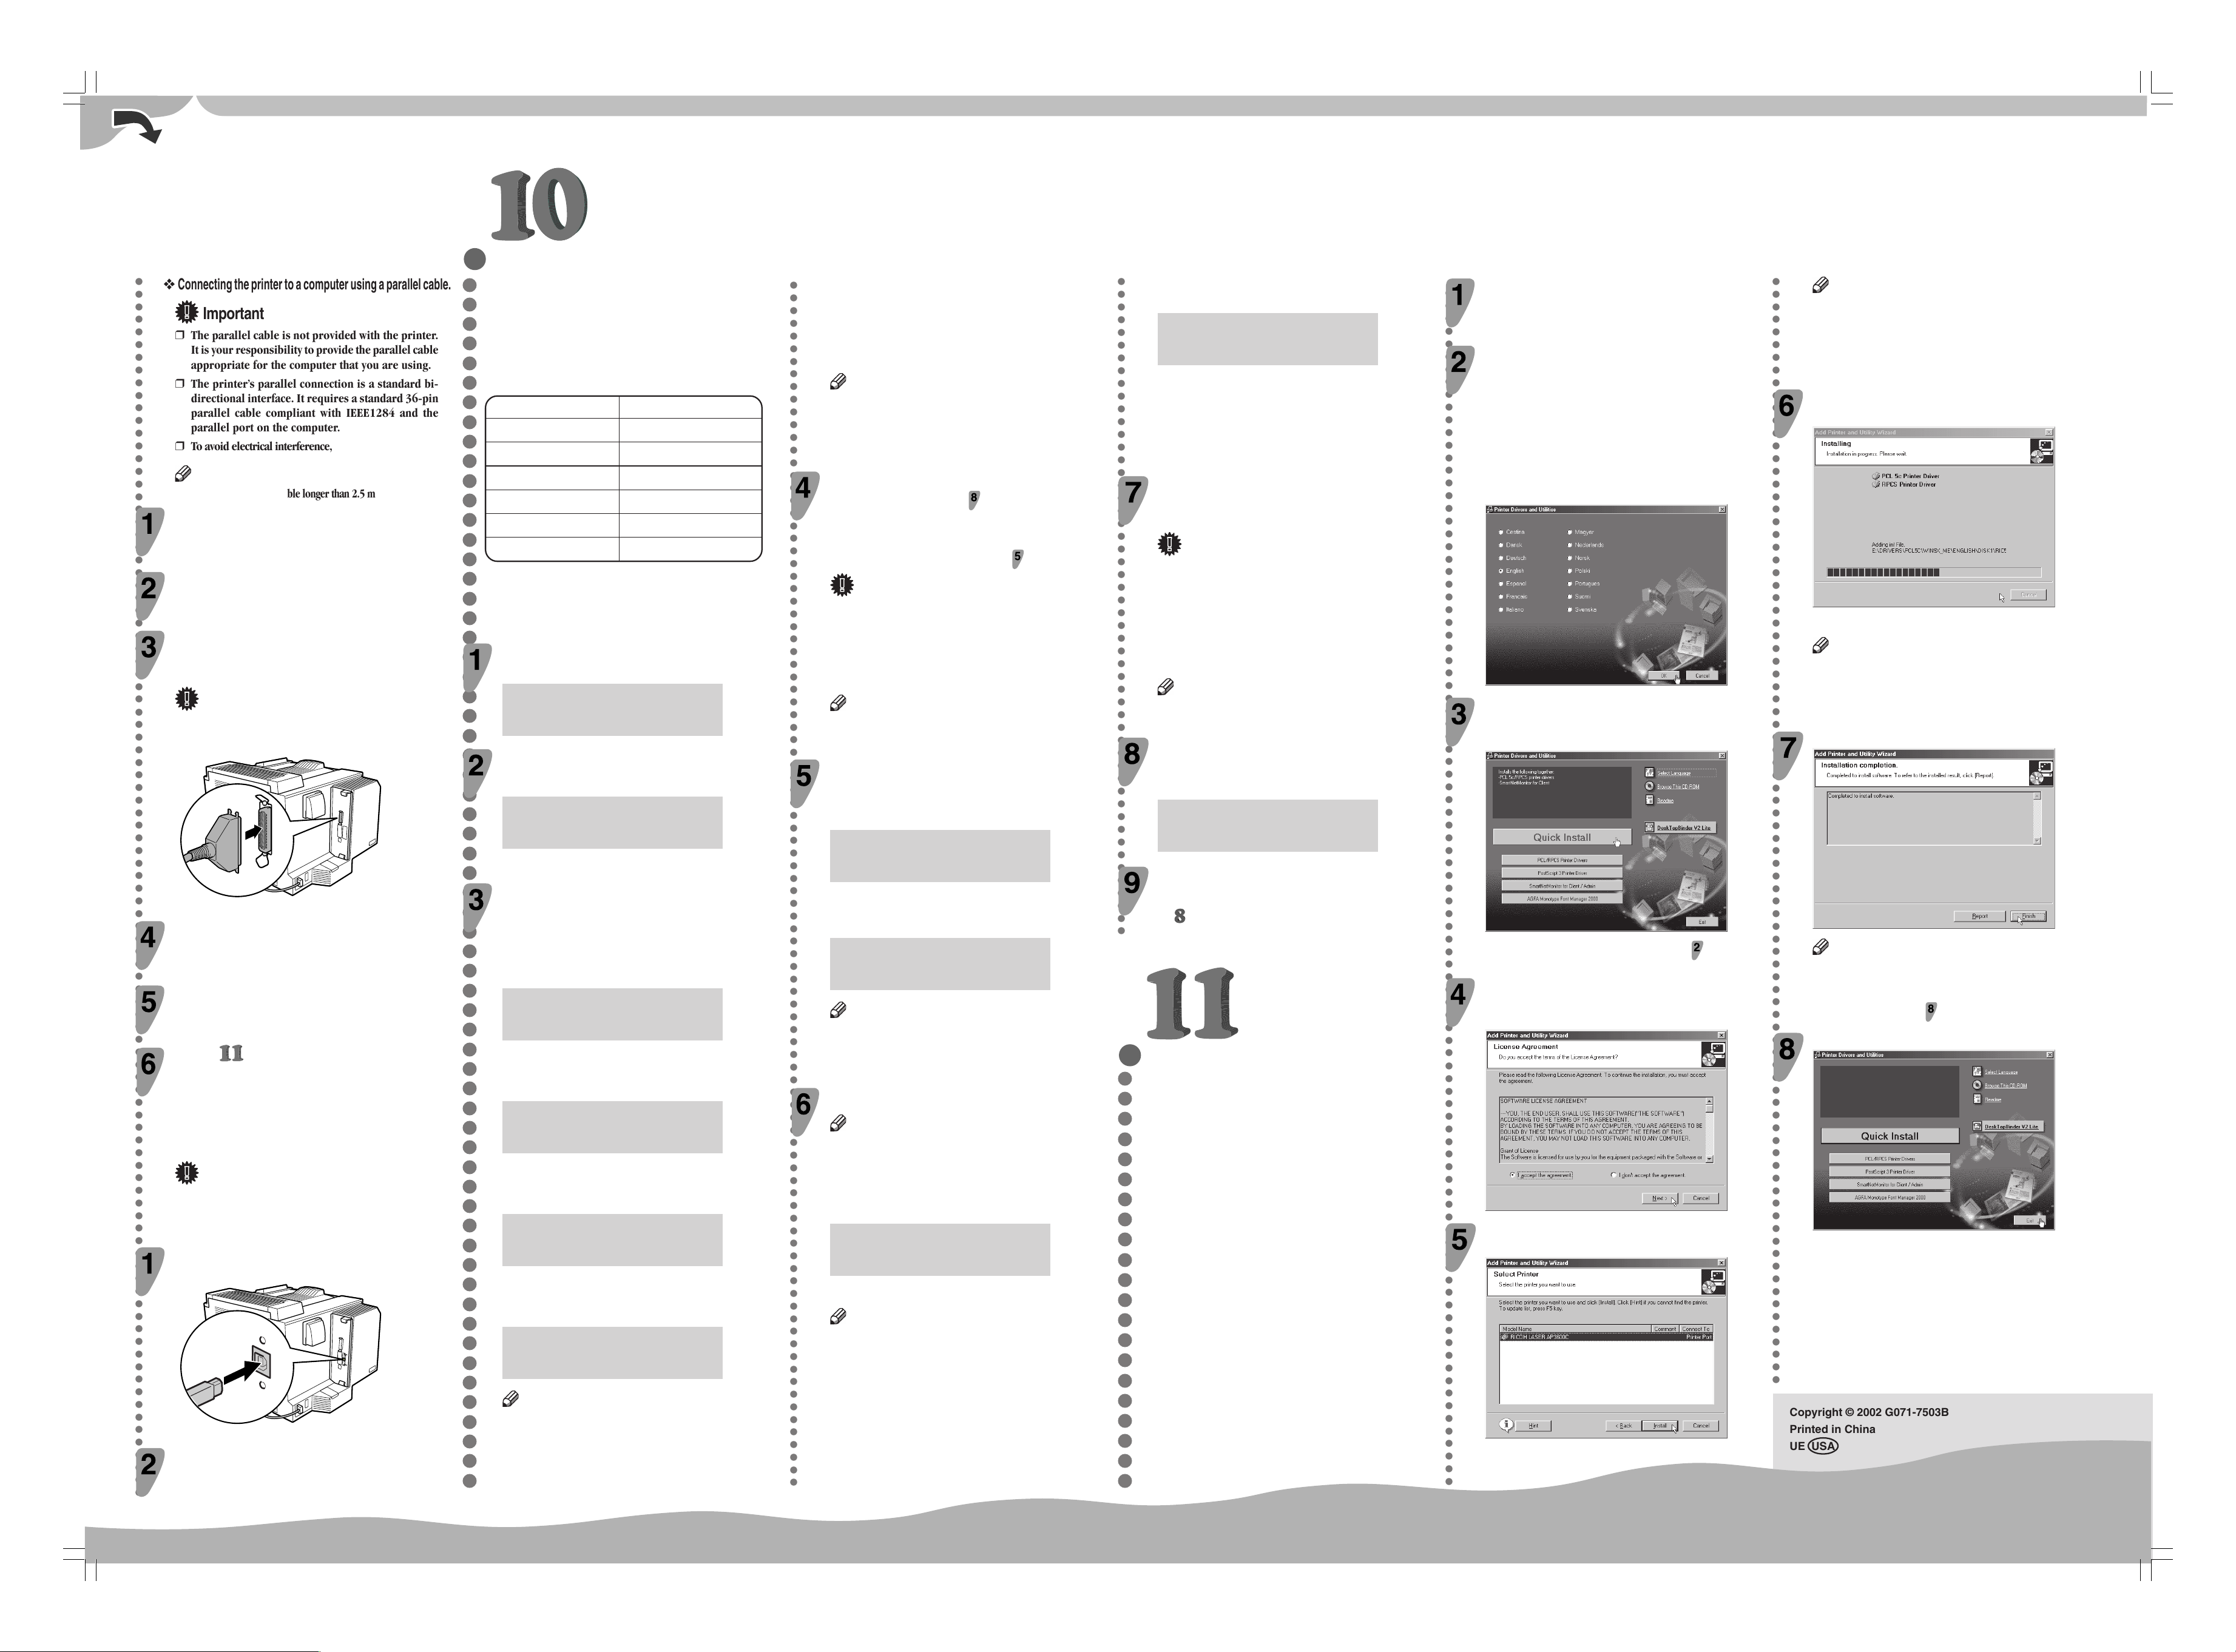
Connecting the printer to a computer using a parallel cable.
Important
❒The parallel cable is not provided with the printer.
It is your responsibility to provide the parallel cable
appropriate for the computer that you are using.
❒The printer’s parallel connection is a standard bi-
directional interface. It requires a standard 36-pin
parallel cable compliant with IEEE1284 and the
parallel port on the computer.
❒To avoid electrical interference, use a shielded cable.
Note
❒
Do not use a parallel cable longer than 2.5 meters (8.2 feet).
Confirm that the printer’s power switch is off. If it
is on, turn it off.
Turn the computer off.
Attach the parallel cable to the port of the
printer. Secure the cable with the metal fittings
as shown in the illustration.
Important
❒Rating voltage of the parallel port for the computer;
Max. DC 5V.
ZESX339E
Attach the other end of the parallel cable to the
port of the computer. Secure the cable.
Turn on the printer and the computer.
Go to “INSTALLING THE PRINTER
DRIVER”.
❖
Connecting the printer to a computer using a USB cable.
Important
❒The USB interface cable is not provided with the
printer. Make sure that the USB interface cable you
use, is appropriate for your computer.
Attach the USB interface cable to the USB interface
connector of the printer. Secure the cable.
ZESXK500E
Attach the other end of the interface cable to the
USB interface connector of the computer or the
USB Hub. Secure the cable.
CONFIGURING THE PRINTER
FOR THE NETWORK
You must configure the printer setting using the
control panel when using in a network environment.
The following list is the items you can set and their
default settings.
DHCP On
IP Address 011.022.033.044
Subnet Mask 000.000.000.000
Gateway Address 000.000.000.000
Frame Type (NW) Auto
Active Protocol TCP/IP
Ethernet Auto
The procedure below shows how to set the TCP/IP
protocol. Make the settings for the other items by
taking the same procedure.
Press
{
Menu
}
.
“Menu” appears on the panel display.
Menu:
Paper Input
Press
{▲}
or
{▼}
to display “Host Interface”,
and then press
{
Enter #
}
.
Menu:
Host Interface
The interface setiing menu appears.
Start the protocol for use.

Press
{▲}
or
{▼}
to display “Network
Setup”, and then press
{
Enter #
}
.
Host Interface:
Network Setup

Press
{▲}
or
{▼}
to display “Active
Protocol”, and then press
{
Enter #
}
.
Network Setup:
Active Protocol

Press
{▲}
or
{▼}
to display “TCP/IP”, and
then press
{
Enter #
}
.
Active Protocol:
TCP/IP

Press
{▲}
or
{▼}
to display “Active”, and
then press
{
Enter #
}
.
TCP/IP:
*Active
Note
❒* shows the current setting.
In about two seconds, the display returns to the “Active Protocol”
setting screen.

Set the rest of the protocols for use.

When all settings for the protocol are done,
press
{
Escape
}
.
The “Network Setup” setting screen appears.
Note
❒The default settings for all of the protocols are
“Active”.
❒It is recomended to set the unused protocols “Not
Active”.
When you use this machine under DHCP
environment, go to step . When you use this
machine with a fixed IP address, you must make
the setting for the required item after making the
setting for DHCP Off. Go to step .
Important
❒When DHCP is On, you cannot make the setting
for the following menus:
IP Address
Subnet Mask
Gateway Address
Note
❒Consult the network administrator for information
about how to make the setting for the network
Make the setting for DHCP Off.

Press
{▲}
or
{▼}
to display “DHCP”, and
then press
{
Enter #
}
.
Network Setup:
DHCP

Press
{▲}
or
{▼}
to display “Off”, and then
press
{
Enter #
}
.
DHCP:
*Off
Note
❒* shows the current setting.
In about two seconds, the display returns to the “Network
Setup” setting screen.
Set the IP address for the printer.
Note
❒Confirm the IP address to the network
administrator.

Press
{▲}
or
{▼}
to display “IP Address”,
and then press
{
Enter #
}
.
Network Setup:
IP Address
The currently selected IP address appears.
Note
❒When {
Enter #
}is pressed, the cursor moves to the
next field.
❒When {▲}or {▼}is kept pressed for a few
seconds, the value changes by 10.

Press
{▲}
or
{▼}
to set the value for the
field.
IP Address:
199.022.033.044

Press
{
Enter #
}
.
The cursor moves to the next field.

Repeat

and

to set the value for the
rest of the fields.
Set “Subnet Mask”and “Gateway Address”by
following the same procedure for setting the IP
address.
Important
❒The subnet mask is the mask value to use a part of
the IP address as a network address. Confirm the
value to the network administrator.
❒The gateway address is the address of the host or
router that acts as a gateway when interacting with
work stations in another network. Confirm the value
to the network administrator.
Note
❒If you are not sure of the setting addresses, leave
them as default.
When all of the settings are done, press
{
On Line
}
.
“Ready” appears on the panel display.
Ready
Print the configuration page to confirm the
settings made.
See “PRINTING THE TEST PAGE” for printing the configuration
page.
INSTALLING THE PRINTER
DRIVER
You can install the printer drivers and software easily
from the CD-ROM labeled “Printer Drivers and Utilities”.
Click [Quick Install] in the window of the CD-ROM to
install PCL5c and RPCS printer drivers. To install the
PostScript 3 printer driver, click the PostScript 3 printer
driver button. For more information about the PostScript
3 printer driver, see the Administrator Reference or the
Client Reference on the CD-ROM labeled “Operating
Instructions”depending on the environment you use in.
When the TCP/IP protocol is used, SmartNet-Monitor
for Client will be installed as well.
The supported operating systems are Windows 95/98/
Me, Windows 2000, Windows XP, and Windows NT 4.0.
When using with TCP/IP protocol, confirm the followings:
❒
The printer is connected to a network with
the ethernet cable.
❒
The TCP/IP protocol is set.
❒
The IP address is set for the printer and the
computer.
Insert the CD-ROM labeled “Printer Drivers and
Utilities”into the CD-ROM drive.
Auto Run will start the installer.
Select a language to change the interface
language, and then click [OK].
The following languages are available:
Cestina (Czech), Dansk (Danish), Deutsch (German), English
(English), Espanol (Spanish), Francais (French), Italiano (Italian),
Magyar (Hungarian), Nederlands (Dutch), Norsk (Norwegian),
Polski (Polish), Portugues (Portuguese), Suomi (Finnish), Svenska
(Swedish)
Default interface language is English.
Select [Quick Install].
The software license agreement appears in the [License Agreement]
dialog box.
This is an example when English is selected in step .
After reading through all of the contents, click [I
accept the agreement] to agree with the License
Agreement, and then click [Next].
Select the printer model you want to install in the
“Select Printer”dialog box.
Note
❒For a network connection with TCP/IP, select the
printer whose IP address is displayed in [Connect
to].
❒For parallel connection, select the printer whose
printer port is displayed in [Connect to].
Click [Install].
The following display appears while installing the printer driver.
When finished, the [Installation Completion] dialog box appears.
Note
❒With Windows 2000, the [Digital Signature Not
Found] dialog box may appear when installing the
printer driver. In this case, click [Yes] to continue
the installation.
Click [Finish].
Note
❒A message directing to restart the computer may
appear. In this case, restart your computer to
complete the installation. When no such message
appears, go to step .
Click [Exit].
The installation is now complete.

Other manuals for Aficio CL5000

5

Other Ricoh All In One Printer manuals

Ricoh Pro C651EX User manual

Ricoh

Ricoh Pro C651EX User manual

Ricoh 2020D - Aficio B/W Laser User manual

Ricoh

Ricoh 2020D - Aficio B/W Laser User manual

Ricoh B132 User manual

Ricoh

Ricoh B132 User manual

Ricoh BE-C1 D046 Quick start guide

Ricoh

Ricoh BE-C1 D046 Quick start guide

Ricoh Martini-C3.5 User manual

Ricoh

Ricoh Martini-C3.5 User manual

Ricoh Aficio MP 2500SPF User manual

Ricoh

Ricoh Aficio MP 2500SPF User manual

Ricoh 7025 User manual

Ricoh

Ricoh 7025 User manual

Ricoh PRO C9100 Instruction sheet

Ricoh

Ricoh PRO C9100 Instruction sheet

Ricoh MP 501SPF User manual

Ricoh

Ricoh MP 501SPF User manual

Ricoh SP 201n User manual

Ricoh

Ricoh SP 201n User manual

Ricoh K-C1 User manual

Ricoh

Ricoh K-C1 User manual

Ricoh Aficio MP C3500 User manual

Ricoh

Ricoh Aficio MP C3500 User manual

Ricoh Aficio SP C210 User manual

Ricoh

Ricoh Aficio SP C210 User manual

Ricoh Aficio MP 2510 User manual

Ricoh

Ricoh Aficio MP 2510 User manual

Ricoh Printer/Scanner User manual

Ricoh

Ricoh Printer/Scanner User manual

Ricoh MT-C1 User manual

Ricoh

Ricoh MT-C1 User manual

Ricoh Aficio MP C305 User manual

Ricoh

Ricoh Aficio MP C305 User manual

Ricoh VT2100 Series User manual

Ricoh

Ricoh VT2100 Series User manual

Ricoh Aficio MP C305 Installation instructions

Ricoh

Ricoh Aficio MP C305 Installation instructions

Ricoh MP C401 User manual

Ricoh

Ricoh MP C401 User manual

Ricoh Priport 1250 User manual

Ricoh

Ricoh Priport 1250 User manual

Ricoh Aficio MP 2550 User manual

Ricoh

Ricoh Aficio MP 2550 User manual

Ricoh C3828 User manual

Ricoh

Ricoh C3828 User manual

Ricoh Pro C900 User manual

Ricoh

Ricoh Pro C900 User manual

Popular All In One Printer manuals by other brands

Canon imageRunner iR2270 Service manual

Canon

Canon imageRunner iR2270 Service manual

Triumph Adler P-C2660 user manual

Triumph Adler

Triumph Adler P-C2660 user manual

Brother DCP-116C user guide

Brother

Brother DCP-116C user guide

Brother DCP-L5500DN Quick setup guide

Brother

Brother DCP-L5500DN Quick setup guide

Konica Minolta bizhub 36 user guide

Konica Minolta

Konica Minolta bizhub 36 user guide

Sharp MX-2600N Safety guide

Sharp

Sharp MX-2600N Safety guide

Toshiba e-STUDIO3511 manual

Toshiba

Toshiba e-STUDIO3511 manual

Xerox M20I - WorkCentre B/W Laser System administration guide

Xerox

Xerox M20I - WorkCentre B/W Laser System administration guide

Epson WF-C4310 Start here

Epson

Epson WF-C4310 Start here

Kyocera TASKalfa 350ci Operation guide

Kyocera

Kyocera TASKalfa 350ci Operation guide

Brother MFC-9440CN Quick setup guide

Brother

Brother MFC-9440CN Quick setup guide

Xerox DocuPrint C2255 Quick referenc guide

Xerox

Xerox DocuPrint C2255 Quick referenc guide

Samsung SF-650P Series quick start guide

Samsung

Samsung SF-650P Series quick start guide

Brother MFC-J4410DW Quick setup guide

Brother

Brother MFC-J4410DW Quick setup guide

Canon MP980 series quick start guide

Canon

Canon MP980 series quick start guide

Epson Artisan 725 quick guide

Epson

Epson Artisan 725 quick guide

FSN WUH4000 Instructions for use

FSN

FSN WUH4000 Instructions for use

Kodak Point-of-Care CR 120 System troubleshooting guide

Kodak

Kodak Point-of-Care CR 120 System troubleshooting guide

manuals.online logo
manuals.online logoBrands
  • About & Mission
  • Contact us
  • Privacy Policy
  • Terms and Conditions

Copyright 2025 Manuals.Online. All Rights Reserved.