RIDGID CM1450 User manual

23(5$725·60$18$/
WARNING: To reduce the risk of
injury, the user must read and
understand the operator’s manual
before using this product.
SAVE THIS MANUAL FOR
FUTURE REFERENCE
,1&+$%5$6,9(
&872))0$&+,1(
Part No. SP6450 Printed in China
&0

2
Table of Contents
Section Page
Table of Contents .....................................2
Safety Instructions For Abrasive Cut-Off
Machine ................................................. 2
Before Using This Tool .......................3
When Installing Or Moving This Tool .. 4
Whenever Machine Is Running ..........7
Glossary of Terms ....................................8
Motor Specifications and Electrical
Requirements ...................................... 8
Power Supply and Motor
Specifications ..................................... 8
Electrical Connections ........................8
Unpacking and Checking Contents .......10
Tools Needed ................................... 10
Getting to Know Your Abrasive Cut-Off
Machine ............................................. 11
Alignment (Adjustments) .................12
Assembly ...............................................12
Installing or Removing the Cut-Off
Wheel .............................................. 12
Safety Instructions for Basic
Operations....................................... 13
Section Page
Whenever Machine Is Running ........ 16
Basic Operations ....................................17
General Cutting Instructions ............. 17
Switch ............................................... 18
Adjusting the Stationary Vise ........... 18
Changing the Cutting Angle ............. 19
Quick Lock-Release Vise ................. 19
Workpiece Clamping ........................ 19
Using A Metallic Block ...................... 19
Recommended Cutting Capacity ...... 20
Maintenance and Lubrication .................20
Maintenance ..................................... 20
Lubrication ........................................ 21
Basic Cutter Requirements ....................21
Prohibited Accessories ..................... 21
Troubleshooting Guide ...........................22
Motor ................................................ 22
General ............................................ 22
Wiring Diagram ......................................23
Repair Parts ...........................................24
Notes ......................................................26
Safety Instructions For Abrasive Cut-Off Machine
The purpose of safety symbols is to
attract your attention to possible
dangers. The safety symbols, and the
explanations with them, deserve your
careful attention and understanding.
The safety warnings do not by
themselves eliminate any danger.
The instructions or warnings they give
are not substitutes for proper accident
prevention measures.
Safety Symbols
DANGER: indicates an imminently
hazardous situation which, if not
avoided, will result in death or serious
injury.
WARNING: indicates a potentially
hazardous situation which, if not
avoided, could result in death or seri-
ous injury.
CAUTION: indicates a potentially
hazardous situation which, if not
avoided, may result in minor or mod-
erate injury. It may also be used to
alert against unsafe practices that
may cause property damage.
NOTE: Advises you of information or
instructions vital to the operation or
maintenance of the equipment.
WARNING: Do not attempt to use the tool until you have read thorough-
ly and understand completely the operator’s manual. Pay close attention to
the safety rules, including Dangers, Warnings, and Cautions. If you use this
tool properly and only for what it is intended, you will enjoy years of safe, re-
liable service.

3
Before Using This Tool
WARNING: Some dust created
by power sanding, sawing, grind-
ing, drilling, and other construction
activities contains chemicals
known (to the State of California)
to cause cancer, birth defects or
other reproductive harm. Some
examples of these chemicals are:
• Lead from lead-bases paints,
• Crystalline silica from bricks and
cement and other masonry prod-
ucts, and
• Arsenic and chromium from
chemically-treated lumber.
Your risk from these exposures var-
ies, depending on how often you do
this type of work. To reduce your
exposure to these chemicals: work
in a well ventilated area, and work
with approved safety equipment,
such as those dust masks that are
specially designed to filter out
microscopic particles.
WARNING: To reduce the risk of
mistakes that could cause serious,
permanent injury, do not plug the
machine in until the following steps
have been satisfactorily completed.
NOTE: Do not cut masonry, stone
or ceramic. The fine dust created
when cutting these materials will
damage the motor. Failure to follow
this warning will void the warranty.
• Completely assemble and align tool.
(See “Assembly” and “Alignment”
sections within.)
• Learn the use and function of the
ON-OFF switch, upper and lower
wheel guards, arbor lock, and work-
piece clamp. (See “Getting to Know
Your Abrasive Cut-Off Machine”
section within.)
• Review and understand all safety
instructions and operating proce-
dures in this manual.
• Review the maintenance methods
for this tool. (See “Maintenance”
section within).
• Find and read the following labels
on the cut-off machine:
To prevent injury or
machine damage,
lock pin must remain
in the full left position
before operating ma-
chine. Do not push
lockpinwhilewheelis
turning.
PDFKLQH
ZLWKRXW
JXDUG
LQ
SODFH
FXWRII
ZKHHO

4
Safety Instructions For Abrasive Cut-Off Machine
(continued)
When Installing Or Moving This
Tool
• Before moving this tool, lock the
power head in the lower position.
Unplug the power cord.
• To reduce the risk of back injury, get
help when you need to lift the
machine.
•Never carry the tool by the cord or
power head trigger handle. Damage
to insulation could cause an electric
shock. Damage to wire connections
could cause a fire.
Reduce The Risk of Dangerous
Environment:
• Use the machine in a dry, indoor
place protected from rain.
• Keep work area well lighted.
• Place the machine so neither the
user nor bystanders are forced to
stand in line with the abrasive
wheel. Thrown debris could injure
people in its path.
To reduce the risk of injury from
unexpected machine movement:
• Place the tool on a firm level surface
where there is plenty of room for
handling and properly supporting
the workpiece.
• Support the tool so the table is level
and does not rock.
• Secure the tool to its support if it
tends to slip, walk, or slide during
use.
•Never Stand On Tool. Serious
injury could occur if the tool tips or
you accidentally hit the cutting tool.
Do not store anything above or near
the tool where anyone might stand
on the tool to reach them.
To reduce the risk of injury or
death from electrical shock:
Make sure your fingers do not touch
the plug’s metal prongs when plug-
ging or unplugging the cut-off
machine.
Before Each Use
Inspect your machine.
•Disconnect The Cut-Off Machine.
To reduce the risk of injury from
accidental starting, before changing
the setup, changing the cut-off
wheel or adjusting anything, unplug
the tool
• Tighten the arbor screw.
Check For Damaged Parts. Check
for:
• Proper Alignment of moving parts,
• Damaged electric cords,
• Binding of moving parts,
• Broken parts,
• Stable mounting,
• Function of arm return spring and
lower guard: Push the arm all the
way down, then let it rise up until it
stops by itself. Check the lower
guard to see if it closed. If it did not,
follow the instructions in the Trouble
Shooting section.
• Other conditions that may affect
the way the machine works.
If any part of this machine is missing,
bent, or broken in any way, or any
electrical parts don't work, turn the
tool off and unplug it. Replace dam-
aged, missing, or failed parts before
using the machine again.
Keep Guards In Place, in working
order, and in proper adjustment.

5
Maintain Tools With Care. Keep the
machine clean for best and safest
performance. Follow instructions for
lubricating.
Remove Wrench from tool before
turning it on.
To Reduce The Risk Of Injury From Jams, Slips Or Thrown Pieces
• To reduce the risk of burns or other
fire damage, never use the machine
near flammable liquids, vapors or
gases.
• Choose the right 14-inch diameter
cut-off wheel for the material and
the type of cutting you plan to do.
For example, when cutting alumi-
num, use an abrasive cut-off wheel
especially designed to be used on
aluminum.
• Make sure the cut-off wheel is
undamaged and properly aligned.
With the machine unplugged, push
the power-head all the way down.
Hand spin the cut-off wheel and
check for clearance. If the abrasive
wheel hits anything, make the
adjustments shown in the “Align-
ment” section.
• Make sure the abrasive wheel and
arbor collars are clean.
• Make sure the collars' recessed
sides are facing the abrasive cut-off
wheel.
• Using the arbor wrench supplied,
make sure the arbor screw is firmly
tightened.
• Make sure all clamps are tight and
there is no excessive play in any
parts.
•Keep Work Area Clean. Cluttered
areas and benches invite acci-
dents. Floor must not be slippery.
Plan Ahead To Protect Your Eyes, Hands, Face and Ears
Know Your Machine. Read and
understand the operator’s manual
and labels affixed to the tool. Learn its
applications and limitations as well as
the specific potential hazards peculiar
to this tool.
To reduce the risk of injury from acci-
dental contact with moving parts,
don’t do layout, assembly, or setup
work on the machine while any parts
are moving.
Reduce The Risk of Accidental
Starting. Make sure switch is “OFF”
before plugging tool into a power out-
let.
Plan your work.
Use The Right Tool. Don’t force tool
or attachment to do a job it was not
designed to do. Use a different tool
for any workpiece that can’t be held in
a solidly braced, fixed position.
WARNING: Cutting steel will
cause sparks. Do not operate in the
presence of combustible or flamma-
ble materials. Failure to heed this
warning could result in a fire or seri-
ous personal injury.
Dress for safety.
Any power tool can throw foreign
objects into the eyes. This can result
in permanent eye damage. Always
wear safety goggles, (not glasses)
complying with ANSI Z87.1 (or in
Canada CSA Z94.3-99) shown on
package. Everyday eyeglasses have
only impact resistant lenses. They are
not safety glasses. Safety goggles
are available at many local retail
stores. Glasses or goggles not in
compliance with ANSI or
CSA could seriously hurt
you when they break.

6
Safety Instructions For Abrasive Cut-Off Machine
(continued)
• For dusty operations, wear a dust
mask or respirator along with safety
goggles.
• Do not wear loose clothing, neckties
or jewelry (rings, wrist watches)
They can get caught and draw you
into moving parts.
• To avoid contact with hot metal,
wear protective gloves.
• Wear nonslip footwear.
• Tie back long hair.
• Roll long sleeves above the elbow.
• Noise levels vary widely. To reduce
the risk of possible hearing damage,
wear ear plugs or muffs.
Inspect Your Workpiece
Plan your work to reduce the risk
of thrown pieces caused when the
workpiece binds on the cut-off
wheel and is torn from your hands.
Plan the way you will hold the work-
piece from start to finish:
Reduce the risk of awkward opera-
tions and hand positions where a
sudden slip could cause fingers or
hand to move into the cut-off wheel.
Don’t Overreach. Keep good footing
and balance.
Keep your face and body to one side
of the abrasive wheel, out of line with
possible thrown sparks or dust.
Never cut Freehand:
• Always clamp workpiece.
• Clamp your workpiece solidly
against the fence and table top so it
will not rock or twist during the cut.
• Make sure there’s no debris
between the workpiece and its sup-
ports.
• Make sure no gaps between the
workpiece, fence and table will let
the workpiece shift after it is cut in
two.
• Keep the cut off piece free to move
sideways after it's cut off. Other-
wise, it could get wedged against
the cut-off wheel and thrown vio-
lently.
• Clear everything except the work-
piece and related support devices
off the table before turning the
machine on.
•Secure Work. Use the vise to hold
the work.
Use extra caution with large, very
small or awkward workpieces:
• Use extra supports (tables, saw
horses, blocks, etc.) for any work-
pieces large enough to tip when not
held down to the table top.
•Never use another person as a sub-
stitute for a table extension, or as
additional support for a workpiece
that is longer or wider than the basic
cut-off machine table or to help
feed, support or pull the workpiece.
• Do not use this tool to cut pieces too
small to let you easily hold the work
with the vise.
• When cutting irregularly shaped
workpieces, plan your work so it
will not slip, pinch the cut-off wheel
and be torn from the vise.

7
Whenever Machine Is Running
WARNING: Don’t allow familiar-
ity (gained from frequent use of
your cut-off machine) cause a care-
less mistake. A careless fraction of
a second is enough to cause a
severe injury.
• Before starting your cut, watch the
cut-off machine while it runs. If it
makes an unfamiliar noise or
vibrates a lot, stop immediately.
Turn the tool off. Unplug the
machine. Do not restart until finding
and correcting the problem.
Keep Children Away.
• Keep all visitors a safe distance
from the tool.
• Make sure bystanders are clear of
the tool and workpiece.
•Never confine the piece being cut
off. Never hold it, clamp it, touch it,
or use length stops against it while
the abrasive wheel is spinning. It
must be free to move sideways on
its own. If confined, it could get
wedged against the cut-off wheel
and be thrown violently or cause the
wheel to break.
Let the abrasive wheel reach full
speed before cutting. This will help
reduce the risk of thrown workpieces.
Don’t Force Tool.
• It will do the job better and safer at
its designed rate. Feed the abrasive
wheel into the workpiece only fast
enough to let it cut without bogging
down or binding.
• Do not step on handle to increase
feed rate, doing so will void warranty.
Before freeing jammed material:
• Turn tool “OFF” by releasing trigger
switch.
• Wait for all moving parts to stop.
• Unplug the machine.
WARNING: This cut-off machine
is only designed for dry cutting.
Failure to heed this warning could
result in serious personal injury.
After finishing a cut:
• Keep holding the power head down.
• Release the switch, and wait for all
moving parts to stop before moving
your hands.
Before Leaving The Machine
Never Leave Tool Running Unat-
tended.
• Turn power off.
• Wait for all moving parts to stop.
• Unplug.
Make Workshop Child Proof.
• Lock the shop.
• Disconnect master switches.
• Store tool away from children and
others not qualified to use the tool.
The operation of any power tool can result in foreign objects being
thrown into your eyes, which can result in severe eye damage. Before
beginning tool operation, always wear safety goggles of safety glasses
with side shields and a full face shield when needed. We recommend
Wide Vision Safety Mask for use over eyeglasses or standard safety
glasses with side shields. Always wear eye protection which is marked
to comply wtih ANSI Z87.1.
WARNING:
Look for this symbol to point out important safety precautions. It
means attention!!! Your safety is involved.
SAVE THESE INSTRUCTIONS

8
Glossary of Terms
Arbor - The shaft on which a cutting tool
is mounted.
Freehand - Performing a cut without the
use of workpiece vise, hold down or other
proper device to prevent the workpiece
from twisting during the cutting operation.
Twisting of the workpiece can cause it to
be thrown or cause the wheel to break.
Kerf - The slot produced when the mate-
rial is removed by the abrasive wheel.
Revolutions Per Minute (RPM) - The
number of turns completed by a spinning
object in one minute.
Abrasive Wheel Path - The area of the
workpiece or table top directly in line with
the travel of the abrasive wheel. This
includes the part of the workpiece which
will be, or has been, cut by the wheel.
Workpiece - The item on which the cut-
ting operation is being performed.
Motor Specifications and Electrical Requirements
Power Supply and Motor
Specifications
WARNING: To reduce the risk of
electrical hazards, fire hazards or
damage to the tool, use proper cir-
cuit protection. Your machine is
wired at the factory for operation
using the voltage shown above.
Connect tool to a power line with the
appropriate voltage and a 15-amp
branch circuit. Use a 15-amp time
delay type fuse or circuit breaker. To
reduce the risk of shock or fire, if
power cord is worn or cut, or dam-
aged in any way, have it replaced
immediately.
The AC motor used in this machine is a
universal, nonreversible type having the
following specifications:
Electrical Connections
NOTE: The plug supplied on your tool
may not fit into the outlet you are planning
to use. Your local electrical code may
require slightly different power cord plug
connections. If these differences exist
refer to and make the proper adjustments
per your local code before your tool is
plugged in and turned on.
In the event of a malfunction or break-
down, grounding provides a path of least
resistance for electric current to reduce
the risk of electric shock. This tool is
equipped with an electric cord having an
equipment grounding conductor and a
grounding plug, as shown. The plug must
be plugged into a matching outlet that is
properly installed and grounded in accor-
dance with all local codes and ordi-
nances.
Do not modify the plug provided. If it will
not fit the outlet, have the proper outlet
installed by a qualified electrician.
Voltage 110-120
Amperes 15
Hertz (Cycles) 60
Phase Single
RPM 3900
Rotation of Shaft Counterclockwise
Properly
Grounded
3-Prong Plug
Grounding
Prong
3-Prong Outlet

9
Improper connection of the equipment
grounding conductor can result in a risk of
electric shock. The conductor with insula-
tion having an outer surface that is green
with or without yellow stripes is the equip-
ment grounding conductor. If repair or
replacement of the electric cord or plug is
necessary, do not connect the equipment-
grounding conductor to a live terminal.
If power cord is worn or cut, or damaged
in any way, have it replaced immediately
by a qualified electrician.
If the grounding instructions are not com-
pletely understood, or if you are in doubt
as to whether the tool is properly
grounded check with a qualified electri-
cian or service personnel.
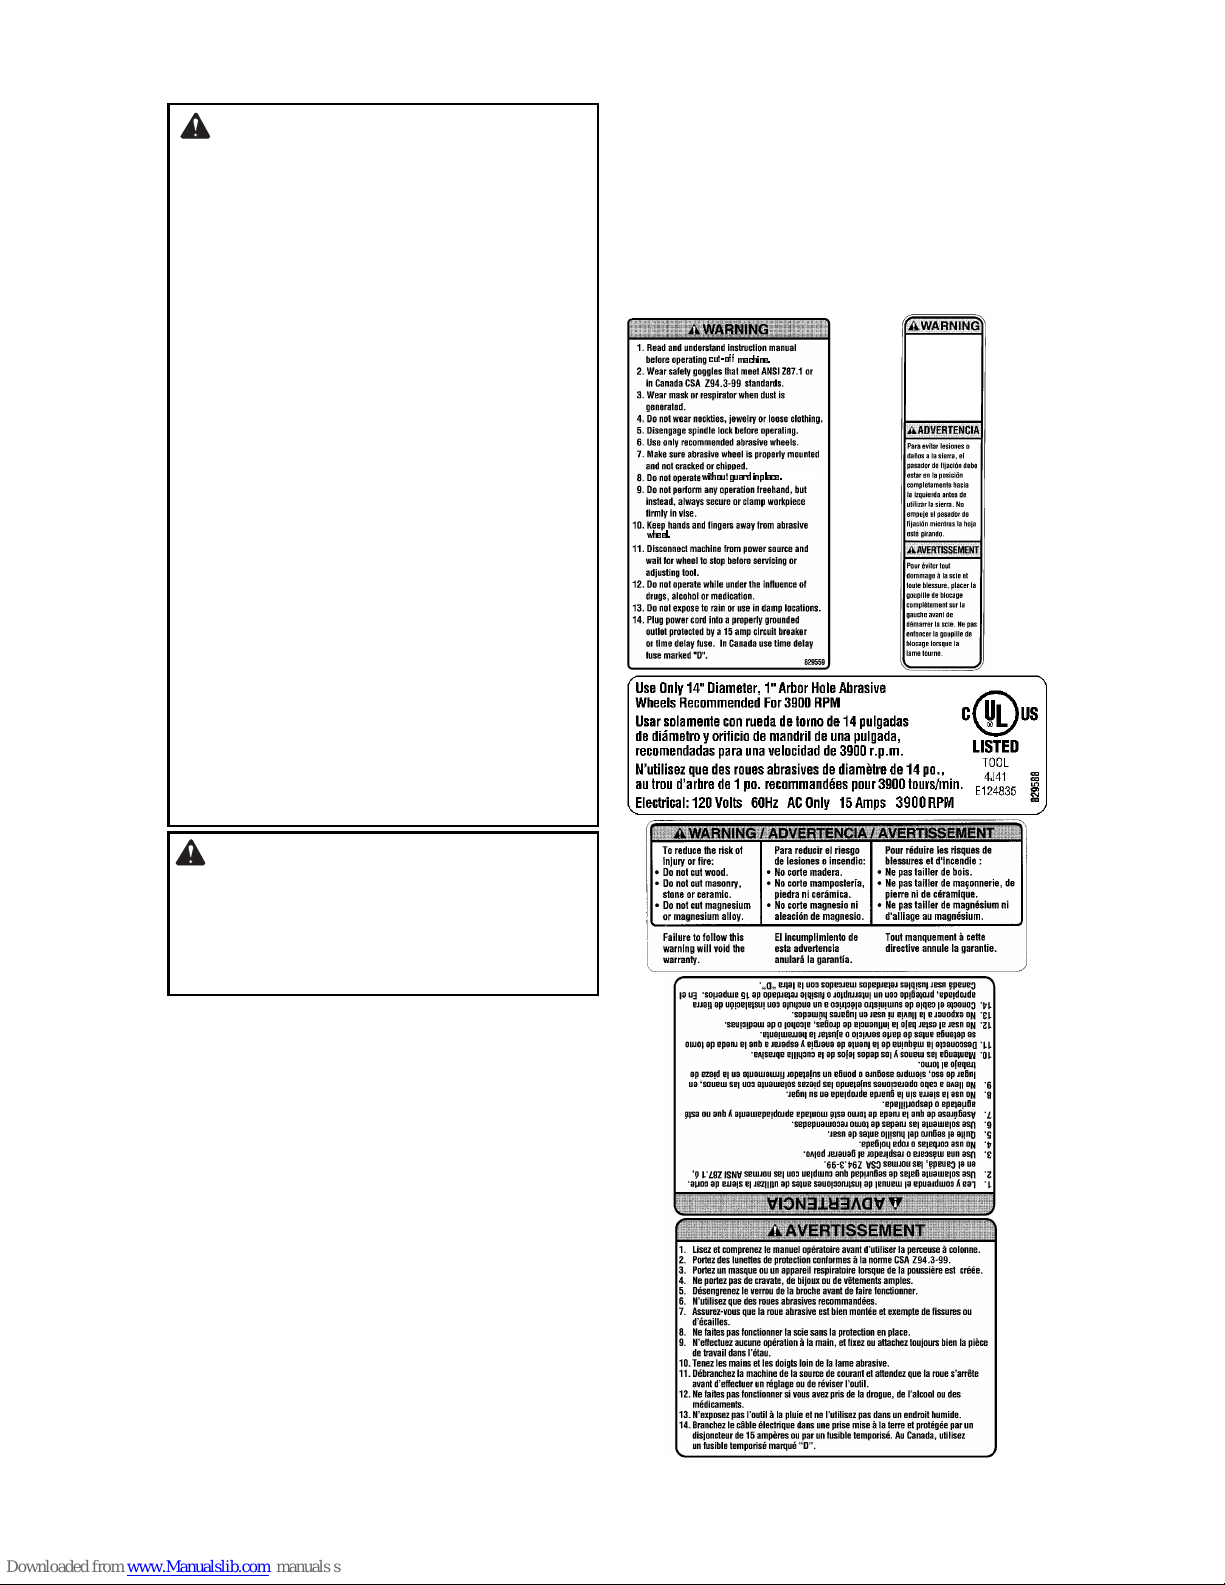
WARNING: Do not permit fin-
gers to touch the terminals of plug
when installing or removing the
plug from the outlet to avoid injury
or possible death from electrical
shock.
WARNING: If not properly
grounded, this tool can cause an
electrical shock, particularly when
used in damp locations, in proximity
to plumbing, or out of doors. If an
electrical shock occurs there is the
potential of a secondary hazard,
such as your hands contacting the
cut-off wheel.
Motor Safety Protection
IMPORTANT: To avoid motor damage,
this motor should be blown out or vacu-
umed frequently to keep dust from inter-
fering with normal motor ventilation.
1. Connect this tool to a power source
with the appropriate voltage for your
model and a 15-amp branch circuit with
a 15-amp time delay fuse or circuit
breaker. Using the wrong size fuse can
damage the motor.
2. If the motor won’t start, turn the switch
off immediately and unplug the tool.
Check the abrasive wheel to make sure
it turns freely. If the wheel is free, try to
start the motor again. If the motor still
does not start, refer to the "Motor Trou-
bleshooting Chart".
3. If the motor suddenly stalls while cut-
ting, release the trigger switch, unplug
the tool, and free the abrasive wheel
from the workpiece. The motor may
now be restarted and the cut finished.
4. Fuses may "blow" or circuit breakers may
trip frequently for the following reasons:
a. Motor Is Overloaded-Overloading can
occur if you feed too rapidly or make
too many start/stops in a short time.
b. Line voltages should not be more than
10% above or below the nameplate
voltage. For heavy loads, however, the
voltage at motor terminals must equal
the voltage specified for your model.
c. Improper or dull abrasive wheel is
used.
5. Most motor troubles may be traced to
loose or incorrect connections, overload,
low voltage (such as small size wire in
the supply circuit) or to overly long sup-
ply circuit wire. Always check the con-
nections, the load and the supply circuit
whenever motor doesn’t work well.
Check wire sizes and length with the
Wire Size Chart shown on next page.
Wire Sizes
NOTE: Make sure the proper extension
cord is used and is in good condition.
Use only 3-wire extension cords that have
3-prong grounding plugs and 3-pole
receptacles that accept the tool’s plug.
The use of any extension cord will cause
some loss of power. To keep this to a min-
imum and to prevent overheating and
motor burn-out, use the table at right to
determine the minimum wire size
(A.W.G.) extension cord.
Extension Cord
Length Gauge
(A.W.G.)
0-25
25-50
14
12

10
Unpacking and Checking Contents
Tools Needed
Unpacking
WARNING: To reduce the risk of
injury from unexpected starting or
electrical shock, do not plug the
power cord into a power source out-
let during unpacking and assembly.
This cord must remain unplugged
whenever you are working on the
tool.
Your tool is shipped complete in one box.
WARNING: Although compact,
this tool is heavy. To reduce the risk
of back injury, get help whenever
you have to lift this tool.
1. Remove the tool and all loose parts
from the carton.
2. Place all parts on a secure, stationary
work surface and look the machine
over carefully.
List of Loose Parts
The following parts are included:
NOTE: Before beginning assembly, check
that all parts are included. If you are miss-
ing any part, do not assemble the
machine. Call 1-866-539-1710 to get the
missing part. Sometimes small parts can
get lost in packaging material. Do not
throw away any packaging until tool is put
together. Check packaging for missing
parts before contacting RIDGID. A com-
plete parts list (Repair Parts) is at the end
of the manual. Use the list to identify the
number of the missing part.
Part or Assembly Qty.
A Basic Assembly ................................ 1
B Arbor Wrench (stored under base) ... 1
C Operator’s Manual ............................ 1
Arbor Wrench (Supplied)
Adjustable Wrench
Carry
Handle
A
B
C
Wrench Store
d
Under Base
WARNING: If any parts are miss-
ing do not operate your cut-off ma-
chine until the missing parts are
replaced. Failure to do so could re-
sult in possible serious injury.

11
Getting to Know Your Abrasive Cut-Off Machine
1. Quick Lock Release Vise - Turn
handle to tighten vise. Raise vise
threads and slide vise to quickly
adjust vise to the correct workpiece
size.
2. Lower Guard - This guard helps pro-
tect your hands from the cut-off
wheel in the raised position. To avoid
binding on the workpiece, it retracts
as the powerhead is lowered.
3. On/Off Trigger Switch - To start the
tool, squeeze the trigger. Release the
trigger to stop the tool. Install a pad-
lock through the hole in the trigger to
help prevent unauthorized use.
4. Upper Guard - Protects user from
abrasive wheel contact on upper por-
tion of wheel.
5. Warning Label.
6. Carrying Handle - This handle is
built into the unit to move it from one
location to another. Before attempting
to pick up the unit by the carrying
handle always lock the power head in
the down position.
7. Handle - The handle contains the
trigger switch with a padlock locking
hole to prevent unauthorized use.
The wheel is lowered into the work-
piece by pushing down on the han-
dle. The wheel will return to its
upright position when the handle is
released, unless held by the lock pin.
8. Lock Pin - Allows the user to keep
cut-off wheel from rotating while tight-
ening or loosening arbor screw.
9. Arbor Wrench - Use when replacing
cut-off wheel or when making fence
angular adjustments.
10. Stationary Adjustable Vise - Clamp
the workpiece to this vise by turning
the handle crank of vise. The station-
ary vise can be moved or the angle
adjusted to accommodate work-
pieces of many sizes.
11. Downstop - In the down (full cut)
position, the pivot arm hits an adjust-
able stop on the pivot.
12. Chain - The cut-off machine can be
locked in the lowered position for
compact storage. The chain is only
used during carrying and storage
operations.
7 Handle
5 Warning
10 Stationary
2 Lower
3 On/Off 6 Carrying
4 Upper Guard
11 Downstop
Trigger
Switch
Guard
Adjustable Vise
1
Quick Lock
Release Vise
Label
8Lock
Handle
12 Chain
9Arbor
Wrench
Pin

12
Alignment (Adjustments)
WARNING: To reduce the risk of
injury from unexpected starting,
unplug the tool whenever you are
making adjustments.
Downstop Adjustment: The downstop
should be adjusted so that maximum cut-
ting capacity is maintained and so that the
cut off wheel does not hit the tool base or
the surface which the tool is mounted to.
1. Lower cutter head until the arm hits the
downstop.
2. Turn wheel by hand to verify maximum
cutting capacity. The cut-off wheel must
not contact any part of the base.
3. If contact occurs, adjust downstop
screw and jam nut until problem is cor-
rected.
NOTE: All other adjustments are
described in the “Basic Operations” sec-
tion.
Assembly
Installing or Removing the Cut-Off
Wheel
WARNING: For your own safety,
never connect plug to power source
outlet until all assembly steps are
complete, and you have read and
understood the safety and opera-
tional instructions.
WARNING: To reduce the risk of
injury from a thrown workpiece or
thrown pieces of wheel, do not use
a new cut-off wheel larger or
smaller than 14" diameter.
WARNING: To reduce the risk of
injury from unexpected starting,
unplug the tool whenever you are
removing or installing the cut-off
wheel.
1. Get arbor wrench.
2. Lift the lower guard up and tilt the lower
guard assembly back so the arbor
screw is exposed.
3. Find the lock pin under the handle.
4. Press the lock pin and hold it in firmly
while turning the arbor wrench clock-
wise. The arbor lock will engage after
some turning of the wrench.
NOTE: The arbor screw has a right
hand thread. This helps prevent
unwanted loosening of the arbor screw
during normal operation.
5. Remove the arbor screw, lockwasher,
arbor washer and outer flange.
NOTE: Pay attention to pieces removed,
noting their position and direction they
face (see illustration). Wipe the inner and
outer flanges clean of any debris before
installing the new cut off wheel.
See cautions in “Safety Section” con-
cerning inspection, use, and selection
of abrasive wheels for this tool.
6. Install the new 14” wheel.
7. Install the outer flange, washer, lock-
washer and arbor screw. Press the lock
pin and turn the arbor wrench clock-
wise to secure the wheel. Tighten arbor
screw securely, but do not overtighten.
8. Depress the lower guard.
9. Be sure the lock pin is released so the
wheel turns freely.

13
NOTE: The arbor lock can be damaged
by improper use. If the arbor lock will not
hold, lower the wheel down on to a scrap
piece of wood positioned against the
fence. This will serve as an alternate lock-
ing means.
WARNING: Make sure the
flanges are clean and properly
arranged. Lower the wheel into the
table slot and check for any contact
with the base. If cut-off wheel con-
tacts the base, adjust the down-
stop.
Safety Instructions for Basic Operations
Before Using This Machine
WARNING: To reduce the risk of
mistakes that could cause serious,
permanent injury, do not plug the
tool in until the following steps have
been satisfactorily completed.
• Completely assemble and align tool.
(See “Assembly and Alignment”
sections within.)
• Learn the use and function of the
ON-OFF switch, upper and lower
abrasive wheel guards, lock pin,
and workpiece clamp. (See “Get-
ting to Know Your Abrasive Cut-Off
Machine” section within.)
• Review and understand all safety
instructions and operating proce-
dures in this manual.
• Review the maintenance methods
for this cut-off machine. (See “Main-
tenance” section within).
To reduce the risk of injury or
death from electrical shock:
• Make sure your fingers do not touch
the plug’s metal prongs when plug-
ging or unplugging the cut-off
machine.
Before Each Use
Inspect your Machine.
•Disconnect The Cut-Off Machine.
To reduce the risk of injury from
accidental starting, before changing
the setup, changing the cut-off
wheel or adjusting anything, unplug
the tool.
• Tighten the arbor screw.
Check Damaged Parts. Check for:
• Alignment of moving parts,
• Damaged electric cords,
• Binding of moving parts,
• Broken parts,
• Stable mounting
• Function of arm return spring and
lower guard: Push the arm all the
way down, then let it rise up until it
stops by itself. Check the lower
guard to see if it closed fully. If it did
not, follow the instructions in the
Trouble Shooting section.
• Other conditions that may affect the
way the machine works.
Arbo
r
Lock

14
Safety Instructions for Basic Operations (continued)
If any part of this machine if missing,
bent, or broken in any way, or any
electrical parts don’t work, turn the
tool off and unplug it. Replace dam-
aged, missing, or failed parts before
using the machine again.
Keep Guards In Place, in working
order, and in proper adjustment.
Maintain Tools With Care. Keep the
machine clean for best and safest
performance. Follow instructions for
lubricating.
Remove Wrench from tool before
turning it on.
To Reduce The Risk Of Injury From Jams, Slips Or Thrown
Pieces:
• To reduce the risk of burns or other
fire damage, never use the machine
near flammable liquids, vapors or
gases.
• Choose the right 14-inch diameter
cut-off wheel for the material and
the type of cutting you plan to do.
• Make sure the cut-off wheel is
undamaged and properly aligned.
With the machine unplugged, push
the power-head all the way down.
Hand spin the cut-off wheel and
check for clearance. If the abrasive
wheel hits anything, make the
adjustments shown in the “Align-
ment (Adjustments)” section.
• Make sure the abrasive wheel and
arbor collars are clean.
• Make sure the collars' recessed
sides are facing the abrasive cut-off
wheel.
• Using the arbor wrench supplied,
make sure the arbor screw is firmly
tightened.
• Make sure all clamps are tight and
there is no excessive play in any
parts.
•Keep work area clean. Cluttered
areas and benches invite acci-
dents. Floor must not be slippery.
Plan Ahead To Protect Your Eyes, Hands, Face and Ears
Know your machine. Read and
understand the operator’s manual
and labels affixed to the tool. Learn its
application and limitations as well as
the specific potential hazards peculiar
to this tool.
To reduce the risk of injury from acci-
dental contact with moving parts,
don’t do layout, assembly, or setup
work on the machine while any parts
are moving.
Reduce the Risk of Accidental
Starting. Make sure switch is “OFF”
before plugging cut-off tool into a
power outlet.
Plan your work.
Use The Right Tool. Don’t force tool
or attachment to do a job it was not
designed to do. Use a different tool
for any workpiece that can’t be held in
a solidly braced, fixed position.
WARNING: Cutting steel will
cause sparks. Do not operate in the
presence of combustible or flamma-
ble materials. Failure to heed this
warning could result in a fire or seri-
ous personal injury.

15
Dress for safety.
Any power tool can throw foreign
objects into the eyes. This can result
in permanent eye damage. Always
wear safety goggles, (not glasses)
complying with ANSI Z87.1 (or in
Canada CSA Z94.3-99) shown on
package. Everyday eyeglasses have
only impact resistant lenses. They are
not safety glasses. Safety goggles
are available at many local retail
stores. Glasses or goggles not in
compliance with ANSI or CSA could
seriously hurt you when they break.
• For dusty operations, wear a dust
mask or respirator along with safety
goggles.
• Do not wear loose clothing, neckties
or jewelry (rings, wrist watches)
They can get caught and draw you
into moving parts.
• To avoid contact with hot metal wear
protective gloves.
• Wear nonslip footwear.
• Tie back long hair.
• Roll long sleeves above the elbow.
• Noise levels vary widely. To reduce
the risk of possible hearing damage,
wear ear plugs or muffs.
Inspect Your Workpiece
Plan your work to reduce the risk
of thrown pieces caused when the
workpiece binds on the cut-off
wheel and is torn from your hands.
Plan the way you will hold the work-
piece from start to finish:
Reduce the Risk of awkward opera-
tions and hand positions where a
sudden slip could cause fingers or
hand to move into the cut-off wheel.
Don’t Overreach. Keep good footing
and balance.
Keep your face and body to one side
of the abrasive wheel, out of line with
possible thrown sparks or dust.
Never cut Freehand:
• Always clamp workpiece.
• Clamp your workpiece solidly
against the fence and table top so it
will not rock or twist during the cut.
• Make sure there’s no debris between
the workpiece and its supports.
• Make sure no gaps between the
workpiece, fence and table will let the
workpiece shift after it is cut in two.
• Keep the cut off piece free to move
sideways after it's cut off. Other-
wise, it could get wedged against
the cut-off wheel and could be
thrown violently.
• Clear everything except the work-
piece and related support devises
off the table before turning the
machine on.
•Secure Work. Use the vise to hold
the work.
Use extra caution with large, very
small or awkward workpieces:
• Use extra supports (tables, saw
horses, blocks, etc.) for any work-
pieces large enough to tip when not
held down to the table top.
•Never use another person as a sub-
stitute for a table extension, or as
additional support for a workpiece
that is longer or wider than the basic
cut-off machine table or to help
feed, support or pull the workpiece.
• Do not use this tool to cut pieces too
small to let you easily hold the work
with the vise.
• When cutting irregularly shaped
workpieces, plan your work so it will
not slip, pinch the cut-off wheel and
be torn from the vise.

16
Safety Instructions for Basic Operations (continued)
Whenever Machine Is Running
WARNING: Don’t allow familiar-
ity (gained from frequent use of
your cut-off machine) cause a care-
less mistake. A careless fraction of
a second is enough to cause a
severe injury.
Before starting your cut, watch the
cut-off machine while it runs. If it
makes an unfamiliar noise or vibrates
a lot, stop immediately. Turn the tool
off. Unplug the machine. Do not
restart until finding and correcting the
problem.
Keep Children Away.
• Keep all visitors a safe distance
from the tool.
• Make sure bystanders are clear of
the tool and workpiece.
•Never confine the piece being cut
off. Never hold it, clamp it, touch it,
or use length stops against it while
the abrasive wheel is spinning. It
must be free to move sideways on
its own. If confined, it could get
wedged against the cut-off wheel
and be thrown violently or cause the
wheel to break.
Let the abrasive wheel reach full
speed before cutting. This will help
reduce the risk of thrown work-
pieces.
Don’t Force Tool.
• It will do the job better and safer at
its designed rate. Feed the abrasive
wheel into the workpiece only fast
enough to let it cut without bogging
down or binding.
Before freeing jammed material:
• Turn tool “OFF” by releasing trigger
switch.
• Wait for all moving parts to stop.
• Unplug the cut-off machine.
WARNING: This cut-off machine
is only designed for dry cutting.
Failure to heed this warning could
result in serious personal injury.
After finishing a cut:
• Keep holding the power head down.
• Release the switch, and wait for all
moving parts to stop before moving
your hands.
Before Leaving This Tool
Never Leave Tool Running Unat-
tended.
• Turn power off.
• Wait for all moving parts to stop.
• Unplug.
Make Workshop Child-proof.
• Lock the shop.
• Disconnect master switches.
• Store tool away from children and
others not qualified to use the tool.

17
Basic Operations
General Cutting Instructions
WARNING: Always wear safety
glasses when operating the cut-off
machine. To reduce the risk of
burns from contact with hot cut off
workpieces, wear protective gloves.
WARNING:
a. Always securely fix the material
to be cut by using the vise.
b. Always disconnect the tool from
power source before making any
adjustment.
c. Do not use any type of cutting
lubricant with this tool.
Familiarize yourself with the following
functions of the RIDGID cut-off machine
before connecting it to a power source
and using it.
1. When starting this cut-off machine for
the first time or after it has been idle for
awhile, always let the machine run for
one full minute with the wheel com-
pletely recessed into the guard before
making any cuts. If there are any
unknown defects in the wheel that
could cause breakage they usually
would do so within the first minute of
operation. If the wheel wobbles or
vibrates, discard and replace immedi-
ately.
2. When beginning a cut with the tool,
care should be exercised not to bump
or slam the wheel into the work; once it
has entered, continue the cut with an
even smooth stroke. The faster a cut is
made the less heat is created in the
workpiece, preventing discoloring, and
wheel life is prolonged. Cut with a
steady force without overloading the
motor.
3. Use an outboard support when cutting
long, heavy pieces to prevent them
from tipping the machine or falling
down after they are cut.
4. When transporting the machine lock
the power head to the base to prevent
damage.
5. When cut-off wheel comes up to full
speed, push the handle to begin cut-
ting. It is important to cut with steady
and even pressure (Do Not Force) in
order to obtain a uniform cut.

18
Basic Operations (continued)
WARNING: To reduce the risk of
injury from unexpected tool move-
ment:
a. Before moving this tool, lock the
power head in the lower position.
Unplug electric cord.
b. To reduce the risk of back injury,
hold the tool close to your body
when lifting. Bend your knees so
you can lift with your legs, not
your back. Lift by using the hand-
hold areas at each side of the
bottom of the base or by the car-
rying handle.
c. Never carry tool by the power
cord or the trigger grip of the plas-
tic handle. Carrying the tool by
the power cord could cause dam-
age to the insulation or the wire
connections resulting in electric
shock or fire.
d. Place the machine so other peo-
ple cannot stand behind it.
Thrown debris could injure peo-
ple in its path.
e. Place the tool on a firm, level sur-
face where there is plenty of
room for handling and properly
supporting the workpiece.
f. Support the tool so the table is
level and does not rock.
g. Bolt or clamp the tool to its sup-
port.
Switch
On/Off Trigger Switch - To start the tool,
squeeze the trigger. To stop the tool,
release the trigger.
Repositioning the Stationary Vise
The stationary vise can be repositioned
by removing the vise adjustment bolt.
Loosen the miter lock handle and reposi-
tion the stationary vise in one of the other
two hole locations. Replace and tighten
the vise adjustment bolt.The maximum
width capacity is approximately 8-1/4" at
90° and 5” at 45°.
On/Off
Trigger
Switch
Stationar
y
Screw
Base
Vise
Adjustment
Bolt
Vise
Shaft
Miter Lock
Handle

19
Changing the Cutting Angle
The vise can be adjusted from 0° to 45°
left and right.
1. Loosen the miter lock handle by push-
ing down and rotating counterclock-
wise.
2. Reposition the vise at the desired
angle.
3. Tighten the miter lock handle.
Quick Lock-Release Vise
This tool is equipped with a lock-release
vise for easy and fast clamping of the
material. Raise lever for fast movement of
vise. Lower lever and turn crank for work-
piece clamping.
Workpiece Clamping
Position work in vise so that if jam occurs,
the wheel will not tend to move the work-
piece in the vise. Clamp it securely.
Angles should be in an inverted position
as shown.
Generally the cut-off machine will cut
most efficiently if the wheel is cutting the
thinnest section at any time.
Using A Metallic Block
When the cut-off wheel is worn and the
outer diameter is reduced, insert a metal-
lic block slightly smaller than the dimen-
sion of workpiece under the workpiece.
Do not cut the metallic block.
Vise Adjustment
Bolt
Miter Lock
Handle
Release Lever
This Not This
Dimension of
Workpiece
Being Cut Vise Jaw (B)
Metallic Block
Vise Jaw (A)
Dimension of Metallic Block
(Should Be Slightly Smaller Than
Workpiece Being Cut)

20
Basic Operations (continued)
Recommended Cutting Capacity
WARNING: Use of tool for
greater than recommended capaci-
ties may lead to motor burn-out and
possible electric shock.
NOTE: Cutting through any cross section
of material thicker than 1/2” tends to load
up the abrasive wheel, and this will cause
your tool to work harder.
Maintenance and Lubrication
Maintenance
WARNING: This cut-off machine
is only designed for dry cutting.
Failure to heed this warning could
result in serious personal injury.
WARNING: To reduce the risk of
injury from unexpected starting or
electrical shock, unplug the power
cord before working on the
machine.
Keep the tool clean. Remove accumulated
dust from working parts.
Make sure that the tool operates properly.
Periodically check screws and bolts for tight-
ness.
Feed oil at the oiling points once a month for
extending machine service life (machine oil
is suitable for the tool).
Oiling points
• Rotary part of shaft
• Rotary part of vise
• Slide way of vise
Replacing Carbon Brushes
The carbon brushes furnished will last
approximately 50 hours of running time or
10,000 on/off cycles. Replace both carbon
brushes when either has less than 1/4"
length of carbon remaining. To inspect or
replace brushes, first unplug the machine.
Then remove the black plastic cap on the
side of the motor (caution, this cap is spring
loaded by the brush assembly). Then pull
out the brush. Repeat for the other side. To
reassemble reverse the procedure. The
ears on the metal end of the brush assembly
go in the same hole the carbon part fits into.
Tighten the cap snugly but do not over-
tighten.
NOTE: To reinstall the same brushes, first
make sure the brushes go back in the way
they came out. Otherwise a break-in period
will occur that will reduce motor perfor-
mance and increase brush wear.
It is recommended that, at least once a year,
you take the tool to an Authorized Service
Center for a thorough cleaning and lubrica-
tion.
WARNING: To ensure safety
and reliability, all repairs, with the
exception of externally accessible
brushes, should be performed at an
Authorized Service Center. Use
only RIDGID replacement parts.
ApplicableWheel
Dimensions 355mm (14") Outer Diameter x Less Than 4.5mm (3/16")
Thickness x 25.4mm (1") Hole diameter
Workpiece
Configuration
(Cross-Section)
Maximum
Cutting
Capacity
“a”
1/2"
(12.7mm)
2"
(50.8mm)
Square or
Round
5"
(127mm)
4-1/2"
(114.3)
1/2"
(12.7mm)
Solid
5"
(127mm)
aaa
a
aa
5"
(127 mm)
a
1/2
a
(12.7mm)
Other manuals for CM1450
3
Table of contents
Other RIDGID Saw manuals

RIDGID
RIDGID Dry Cut Saw User manual

RIDGID
RIDGID R4518T User manual

RIDGID
RIDGID TS3660 User manual

RIDGID
RIDGID R4513 Quick setup guide

RIDGID
RIDGID R3001 User manual

RIDGID
RIDGID R3002 User manual

RIDGID
RIDGID R4090 User manual

RIDGID
RIDGID CM1450 User manual

RIDGID
RIDGID R8654 User manual

RIDGID
RIDGID MS1250 User manual

RIDGID
RIDGID MS1250LZ1 User manual

RIDGID
RIDGID R8643VN User manual

RIDGID
RIDGID MS1050 User manual

RIDGID
RIDGID R4113 User manual

RIDGID
RIDGID R4120 User manual

RIDGID
RIDGID R3203-1 User manual

RIDGID
RIDGID R4040 User manual

RIDGID
RIDGID 32V User manual

RIDGID
RIDGID R8651 User manual

RIDGID
RIDGID R48630 User manual