logo
Brands
  1. Home
  2. •
  3. Brands
  4. •
  5. RIDGID
  6. •
  7. Test Equipment
  8. •
  9. RIDGID 1460-E User manual

RIDGID 1460-E User manual

Other manuals for 1460-E

1

Other RIDGID Test Equipment manuals

RIDGID seesnake compact2 User manual

RIDGID

RIDGID seesnake compact2 User manual

RIDGID SeekTech SR-24 User manual

RIDGID

RIDGID SeekTech SR-24 User manual

Popular Test Equipment manuals by other brands

SMART KANAAD SBT XTREME 3G Series user manual

SMART

SMART KANAAD SBT XTREME 3G Series user manual

Agilent Technologies BERT Serial Getting started

Agilent Technologies

Agilent Technologies BERT Serial Getting started

Agilent Technologies N3280A user guide

Agilent Technologies

Agilent Technologies N3280A user guide

Lifeloc R.A.D.A.R. quick start guide

Lifeloc

Lifeloc R.A.D.A.R. quick start guide

Fluke T5-600 Service information

Fluke

Fluke T5-600 Service information

Mercury TSL01 user manual

Mercury

Mercury TSL01 user manual

MAHA MBT Series Original operating instructions

MAHA

MAHA MBT Series Original operating instructions

Fuji Electric P-61 instruction manual

Fuji Electric

Fuji Electric P-61 instruction manual

ETC SealerAtor user manual

ETC

ETC SealerAtor user manual

Skyfine ETHYWAY V2 user manual

Skyfine

Skyfine ETHYWAY V2 user manual

Appion G5 Twin Operation manual

Appion

Appion G5 Twin Operation manual

PCB Piezotronics 8159-0112A Installation and operating manual

PCB Piezotronics

PCB Piezotronics 8159-0112A Installation and operating manual

BW Technologies MicroDock II user manual

BW Technologies

BW Technologies MicroDock II user manual

Sun Nuclear 1027 user guide

Sun Nuclear

Sun Nuclear 1027 user guide

Biomark HPR LITE READER user manual

Biomark

Biomark HPR LITE READER user manual

Hioki 3169-20 instruction manual

Hioki

Hioki 3169-20 instruction manual

Ashcroft ATE-100 operating manual

Ashcroft

Ashcroft ATE-100 operating manual

Rohde & Schwarz RTA4000 user manual

Rohde & Schwarz

Rohde & Schwarz RTA4000 user manual

https://manuals.online logo
https://manuals.online logoBrands
  • About & Mission
  • Contact us
  • Privacy Policy
  • Terms and Conditions

Copyright 2025 Manuals.Online. All Rights Reserved.

1460-E
Ridge Tool Company 1
General Safety Information
WARNING! Read these instructions
and the accompanying safety booklet
carefully before using this equipment. If
you are uncertain about any aspect of using this
tool, contact your RIDGID distributor for more
information.
Failure to understand and follow all instructions
may result in electric shock, fire, and/or serious
personal injury.
SAVE THESE INSTRUCTIONS!
Specifications
Motor ........................................................... 230 V, 50 Hz, 1580 W
Weight .................................................................................... 20 kg
Pressure ............................................................................... 40 bar
Water flow ............................................................................. 9 l/min
Tank capacity ............................................................................. 12 l
Oil ....................................................................... SAE 30 or 15W40
IMPORTANT
Replace red transport plug with yellow breather plug supplied (see fig. 1).
Before use
Check the oil level (see fig. 2) with the pump on a level surface.
Make sure the control block is securely attached to the pump block.
OPERATING INSTRUCTIONS
1. Connect pressure hose to system to be tested.
2. Fill the container with clean water.
3. Open valve (a) and valve (b) (see fig. 3) approximately 1 turn.
Do not attempt to start the pump with the valves closed.
4. Start the pump, when the system is filled the pressure will increase by
± 3 bar.
Do not set a pressure that will damage the system being tested.
5. Add water to the container to keep the level above the suction filter.
Do not let the pump run dry to prevent damage to the pump.
6. Adjust valve (a) to give the desired pressure and close valve (b).
7. Switch off the pump and start leakage test.The control block may be
disconnected from the pump (see fig. 4).
8. When the test is completed, open valve (b) to release the pressure from
the system
GB
1460-E
Operating Instructions
Allgemeine
Sicherheitsinformationen
WARNUNG! Lesen Sie diese Anwei-
sungen und die begleitende Sicherheits-
broschüre sorgfältig, bevor Sie dieses
Gerät benutzen. Bei Unklarheiten wenden Sie sich
bitte an Ihre RIDGID Vertriebsstelle, die Sie näher
informiert.
Unkenntnis und Nichtbefolgung der Anweisungen
können zu elektrischen Schlägen, Feuer und/oder
schweren Verletzungen führen.
BEWAHREN SIE DIESE ANWEISUNGEN AUF!
Technische Daten
Motor ........................................................... 230 V, 50 Hz, 1580 W
Gewicht ................................................................................... 20 kg
Druck .................................................................................... 40 bar
Wasserfluss .......................................................................... 9 l/min
Tankinhalt .................................................................................. 12 l
Öl .................................................................... SAE 30 oder 15W40
WICHTIG
Ersetzen Sie den roten Transportstopfen durch den mitgelieferten gelben
Entlüftungsstopfen (siehe Abb. 1).
Vor Gebrauch
Prüfen Sie den Ölstand (siehe Abb. 2), wobei die Pumpe auf ebenem
Untergrund stehen muss.
Prüfen Sie, ob die Kontrollarmatur sicher am Pumpenblock befestigt ist.
BEDIENUNGSANLEITUNG
1. Schließen Sie den Druckschlauch an das zu überprüfende System an.
2. Füllen Sie den Pumpenbehälter mit sauberem Wasser.
3. Öffnen Sie Ventil (a) und Ventil (b) (siehe Abb. 3) um ca. 1 Umdrehung.
Starten Sie die Pumpe nie mit geschlossenen Ventilen.
4. Starten Sie die Pumpe, sobald das System gefüllt ist, steigt der Druck
um ± 3 bar.
Stellen Sie keinen Druck ein, der das zu prüfende System schädigt.
5. Füllen Sie Wasser in den Behälter, bis der Füllstand über dem Saugfilter
liegt.
Um Schäden zu vermeiden darf die Pumpe nicht trocken laufen.
6. Stellen Sie Ventil (a) so ein, dass der gewünschte Druck erreicht wird
und schließen Sie Ventil (b).
7. Stellen Sie die Pumpe ab und beginnen Sie mit der Dichtigkeitsprüfung.
Die Kontrollarmatur kann bei Bedarf von der Pumpe abgekoppelt
werden (siehe Abb. 4).
8. Wenn der Test beendet ist, öffnen Sie Ventil (b), um den Druck aus dem
System abzulassen.
DE
1460-E
Bedienungsanleitung
1460-E
Ridge Tool Company 11
Všeobecné informace o
bezpečnosti při práci
UPOZORNĚNÍ! Před použitím zařízení si
pečlivěpročtěte tento návod a přiloženou
brožurku o bezpečnosti při práci. Pokud v
některém případěnemáte jistotu, jak tento přístroj
používat, obraťte se pro další informace na svého
dodavatele zařízení RIDGID.
Chyba při porozumění a nedodržení všech pokynů
může zapříčinit zasažení elektrickým proudem,
požár anebo vážné zranění.
TENTO NÁVOD USCHOVEJTE!
Specifikace
Motor ........................................................... 230 V, 50 Hz, 1580 W
Hmotnost ................................................................................ 20 kg
Tlak ....................................................................................... 40 bar
Průtok vody ........................................................................... 9 l/min
Kapacita nádrže ......................................................................... 12 l
Olej ................................................................ SAE 30 nebo 15W40
DŮLEŽITÉ
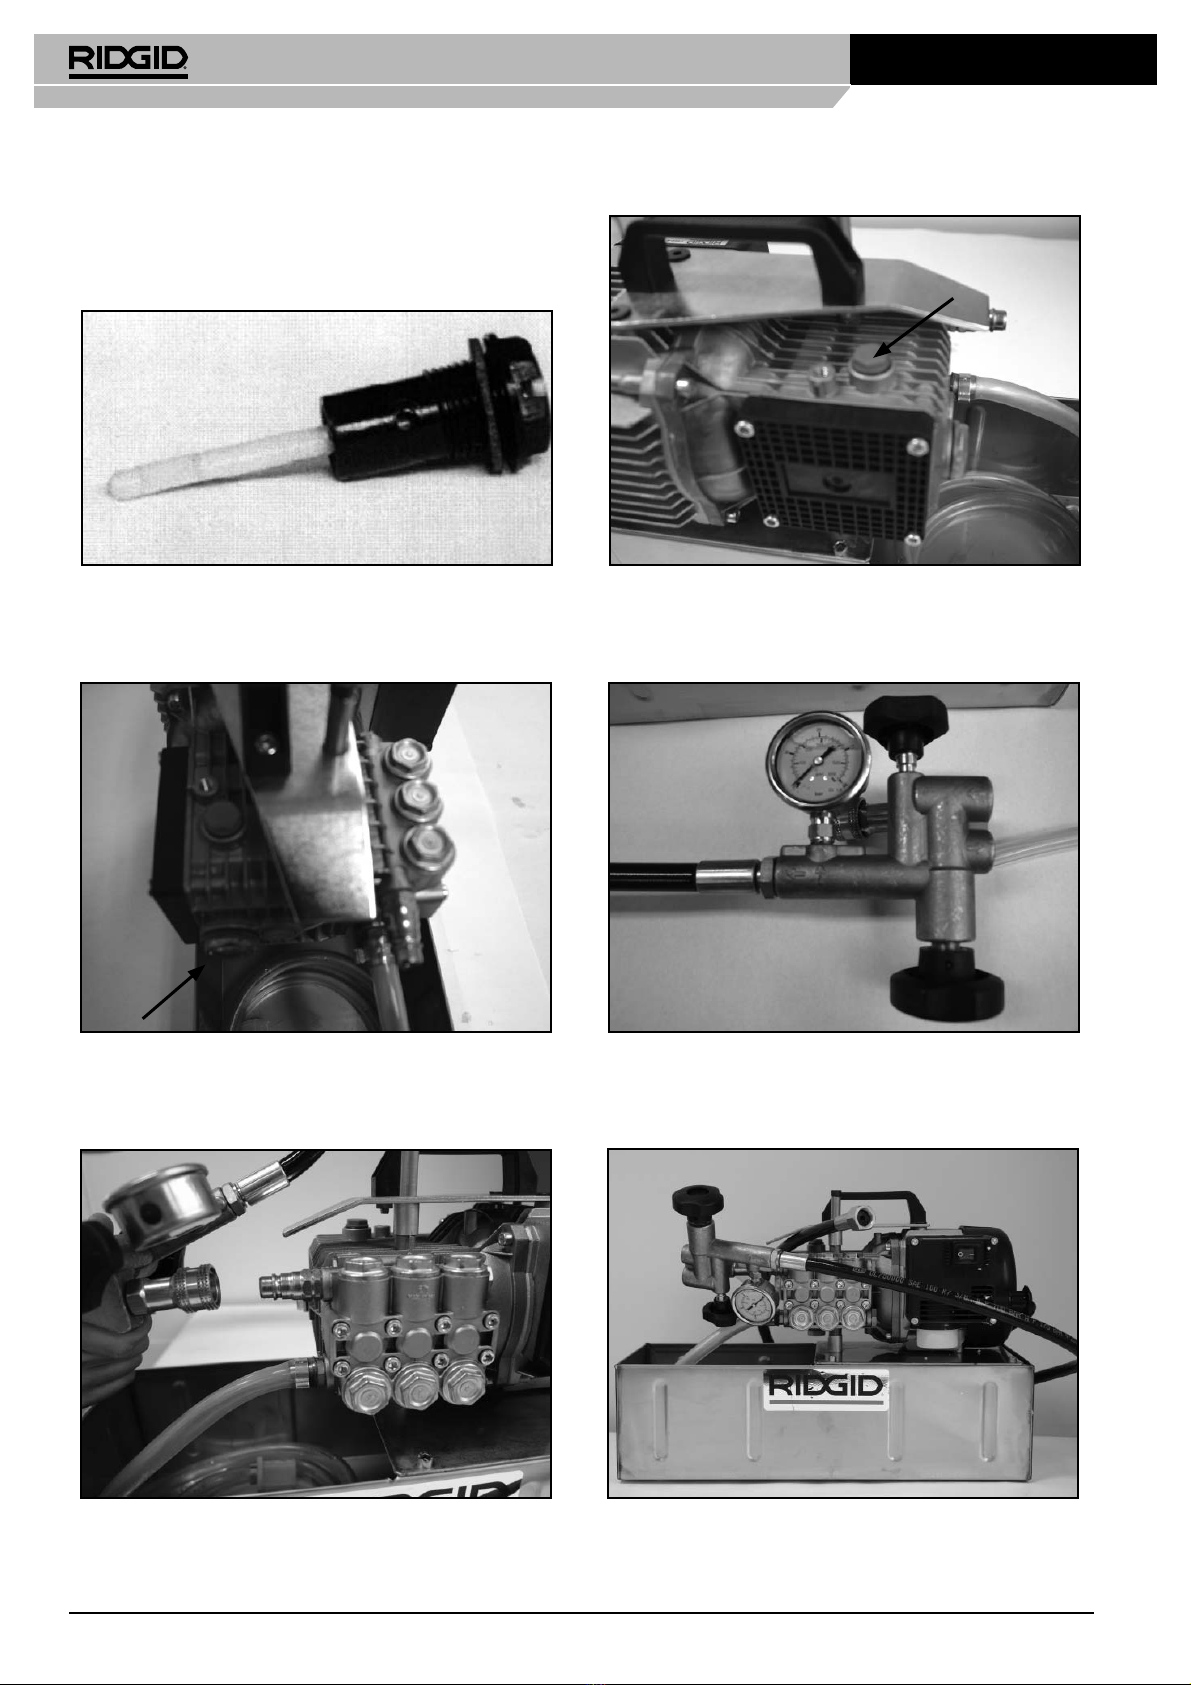
Červenou přepravní zátku vyměňte za dodanou žlutou zátku s odvzdušněním
(viz obr. 1).
Před použitím
Zkontrolujte hladinu oleje čerpadla v hledítku (viz obr. 2).
Přesvědčte se, zda je kontrolní blok správněpřipojen k čerpadlu.
NÁVOD K OBSLUZE
1. Tlakovou hadici připojte k testovanému systému.
2. Nádrž naplňte čistou vodou.
3. Otevřte ventil (a) a ventil (b) (viz obr. 3) přibližněo 1 otáčku.
Nezkoušejte čerpadlo spouštět při zavřených ventilech.
4. Spusťte čerpadlo; když je systém naplněný, tlak stoupne o ± 3 bar.
Nenastavujte tlak, který poškodí zkoušený systém.
5. Do nádrže přidejte vodu, aby se hladina udržovala nad sacím filtrem.
Čerpadlo nesmíte nechat běžet nasucho, jinak se poškodí.
6. Ventilem (a) nastavte požadovaný tlak a zavřete ventil (b).
7. Čerpadlo vypněte a zahajte zkoušku těsnosti. Kontrolní blok může být
od čerpadla odpojený (viz obr. 4).
8. Po ukončení testu otevřte pro odtlakování systému ventil (b).
CZ
1460-E
Návod k obsluze
Általános biztonsági információk
FIGYELMEZTETÉS!Figyelmesenolvassuk
el a használati útmutatót és a hozzá
tartozó biztonsági előírásokat, mielőtt a
készüléket használatba vennénk. Ha a készülék
használatával kapcsolatban valamiben nem
vagyunk biztosak, kérjünk további információt a
RIDGID kereskedőtől.
Ha elmulasztjuk az összes utasítás tudomásul
vételét és betartását, akkor ez áramütést, tüzet és/
vagy súlyos személyi sérülést okozhat.
ŐRIZZÜK MEG EZT AZ ÚTMUTATÓT!
Műszaki adatok
Motor ........................................................... 230 V, 50 Hz, 1580 W
Súly ......................................................................................... 20 kg
Nyomás ................................................................................ 40 bar
Vízáram .......................................................................... 9 liter/perc
Tartály-térfogat ...................................................................... 12 liter
Olaj ................................................................ SAE 30 vagy 15W40
FONTOS
Cseréljük ki a vörös színűszállítási dugót a készülékkel együtt szállított sárga
szellőződugóra (lásd 1. ábra).
A használat előtt
Ellenőrizzük a szivattyú olajszintjét (lásd 2. ábra), sík felületen.
Ügyeljünk arra, hogy a vezérlőblokk biztonságosan legyen csatlakoztatva a
szivattyúblokkhoz.
ÜZEMELTETÉSI UTASÍTÁS
1. Csatlakoztassuk a nyomótömlőt a vizsgálandó rendszerhez.
2. Töltsük meg a tartályt tiszta vízzel.
3. Nyissuk ki az (a) és a (b) szelepet (lásd 3. ábra) körülbelül 1 fordulattal.
Ne próbáljuk beindítani a szivattyút, ha a szelepek el vannak zárva.
4. Indítsuk be a szivattyút, amikor a rendszer fel van töltve, a nyomás
± 3 barral megnő.
Ne állítsunk be olyan nyomást, amely tönkretehetné a vizsgált
rendszert.
5. Pótoljuk a vizet a tartályban, hogy a vízszintet a szívókosár felett tartsuk.
Ne hagyjuk a szivattyút szárazra futni, nehogy tönkremenjen.
6. Állítsuk be az (a) szelepet úgy, hogy a kívánt nyomást biztosítsuk, és
zárjuk el a (b) szelepet.
7. Kapcsoljuk ki a szivattyút, és kezdjük el a szivárgási vizsgálatot.
A vezérlőblokk leválasztható a szivattyúról (lásd 4. ábra).
8. Amikor a vizsgálat befejeződött, nyissuk ki a (b) szelepet, hogy a
rendszert nyomásmentesítsük.
HU
1460-E
Használati útmutató
1460-E
Ridge Tool Company
14
Fig. 1
Fig. 2
Fig. 4 1460-E
Fig. 1
Fig. 3
B
A