Rieber Varithek 400IK-3500 User manual

CE
varithek®
varithek® ceran hob, varithek® induction hob, varithek® grill hob
Translation of the Original Operating Instructions
03.02.2017

2
Varithek ® Show cooking
1. Introduction
This user guide contains important information for the safe and correct use of the product.
IMPORTANT
Protect yourself from dangers and prevent damage to your product.
It is essential that you read the operating manual before using the
product for the first time.
Keep the manual in a safe place and pass it on to any future user.
Our customers often express the wish to have one compact guide instead of a number
of different guides for these product variants, which have similar functions.
If there are any shortcomings in your opinion, please do not hesitate to let us know. With
your help, we will try to get even better.
Contents
1. Introduction ........................................................................................................................................................... 2
2. Product Description............................................................................................................................................... 4
2.1 Brief description of devices................................................................................................................................ 4
2.2 Identification of components.............................................................................................................................. 4
2.3 Operating and display elements........................................................................................................................ 5
2.4 Product data..................................................................................................................................................... 6
2.4.1 Technical data........................................................................................................................................... 6
2.5 Accessories and their use................................................................................................................................. 6
2.5.1 varithek® table-top system modules............................................................................................................ 7
2.5.2 varithek® integration of system modules..................................................................................................... 7
2.5.3 varithek® Wok adapter and wok pan........................................................................................................... 8
2.5.4 thermoplates®............................................................................................................................................ 8
3. Purpose.................................................................................................................................................................. 9
3.1 Purpose of the varithek®.................................................................................................................................... 9
3.2 Designated purpose of the varithek ceran®........................................................................................................ 9
3.3 Designated purpose of use of the varithek induction hob.................................................................................... 9
3.4 Designated purpose of use of the varithek® grill.................................................................................................10
4. General Safety Information...................................................................................................................................10
4.1 Principles.........................................................................................................................................................10
4.2 How to use electrical devices...........................................................................................................................10
4.3 Warning information and explanation of icons...................................................................................................11
4.4 Appliance-specific safety instructions................................................................................................................12
4.4.1 Safety and monitoring devices..................................................................................................................12
4.4.2 Dangers due to electricity.........................................................................................................................12
4.4.3 Hazards from induction............................................................................................................................13
4.4.4 Risks from burning...................................................................................................................................14
4.4.5 Risks from hot surfaces, burns and explosion............................................................................................14
4.4.6 Risks from a slipper floor .........................................................................................................................14
4.4.7 Avoid damage to the appliance in transit...................................................................................................14

3
4.5 Information about regulations to be followed.....................................................................................................14
4.6 What to do in an emergency.............................................................................................................................15
5. Before using .........................................................................................................................................................15
5.1 Transport.........................................................................................................................................................15
5.1.1 Check/handle any transport damage..........................................................................................................15
5.1.2 Unpack ....................................................................................................................................................15
5.1.3 Disposing of packaging material...............................................................................................................15
5.1.4 Clean the appliance ..................................................................................................................................15
5.2 Commissioning / Recommissioning..................................................................................................................16
5.2.1 Preconditions ...........................................................................................................................................16
6. Using the varithek®...............................................................................................................................................17
6.1 Using the varithek® ceran hob...........................................................................................................................17
6.1.1 varithek® ceran hob 1/1 with 800 W..........................................................................................................17
6.1.2 varithek® ceran hob 1/1 with 2800 W and ceran hob 2/3 mit 2200 W.........................................................18
6.1.3 varithek® ceran hob 1/1 with 3400 W........................................................................................................18
6.2 Using the varithek® induction hob .....................................................................................................................18
6.2.1 varithek® induction hob 1/1 75mm high with 2 circular cooking plates......................................................18
6.2.2 varithek® induction hob 1/1 Grill- and Wok solution, full-surface..............................................................19
6.2.3 varithek® induction hob 1/1 for inserting induction surface 280.................................................................19
6.2.4 induction wok 400 with cuvette ................................................................................................................19
6.2.5 varithek® induction hob 2/3 75mm high ....................................................................................................19
6.3 Using the varithek® grill ....................................................................................................................................20
6.3.1 varithek® Grill 1/1 ....................................................................................................................................20
6.3.2 varithek® Grill 400....................................................................................................................................20
6.3.3 varithek® Grill 800....................................................................................................................................20
7. General information on using the appliance........................................................................................................21
7.1 Comply with the operational principles..............................................................................................................21
7.2 Accessories and their use................................................................................................................................22
7.3 Before use.......................................................................................................................................................22
7.4 After use..........................................................................................................................................................22
8. Cleaning and care.................................................................................................................................................22
8.1 Avoid dangers due to hot parts or areas ...........................................................................................................22
8.2 Avoid abrupt cooling of hot parts ......................................................................................................................22
8.3 Avoid dangers due to electricity........................................................................................................................22
8.4Choose the correct cleaning method...........................................................................................................23
8.5 Clean and service stainless steel parts.............................................................................................................23
8.6 Clean and service plastic parts.........................................................................................................................23
8.7 Clean grease filters..........................................................................................................................................23
8.8 Cleaning the Ceran® – glass surface.................................................................................................................23
8.9 Cleaning the ceramic cuvette...........................................................................................................................24
8.10 Keep ready for next use in dry condition.........................................................................................................24
9. Fault - What now...................................................................................................................................................24
10. Warranty and liability..........................................................................................................................................26
11. Information on observed standards, laws, guidelines.......................................................................................26

4
1.1 Revision list
Revision Change
2014-02-04 P. 10 - Equipotential bonding
2015-03-18 P. 6 - Tech. Dat., P. 12; 14 - Danger of Slipping, P2; 25 -
Operating Manual Infomation
2017-02-03 Seite 17 ergänzt
2. Product Description
2.1 Brief description of devices
This series of cooking devices for food covers a power range of 800 W to 10200 W. As
the power increases, the heating times reduce.
In a varithek® ceran hob, the Ceran® -glass surface is heated. If the marking is missing,
then the entire heating area is affected.
With the grill, the entire surface-finished metallic grill surface is heated.
In the varithek® induction hob, the base of induction-compatible pots are heated
inductively. The Ceran® -glass surface is only minimally heated in an indirect manner.
Metal objects worn by the user such as a watch or ring can get hot if they are in close
proximity to the cooking surface. Read the safety information carefully.
2.2 Identification of components
Here parts are mentioned by way of example which are then important for an easier understanding.
1 Body of chrome-nickel steel with integrated control housing, fitted with
1.1 4 adjustable feet
1.2 Rim for height-adjustable usage of varithek® system modules and gastronorm trays.
1.3 Ceran® -glass surface (with marking)
1.4 Frying surface with liquid drain
1.5 Ceramic-Cuvette
1.6 Waste plugs
1.7 Grease tray
1.8 Grease filter
1.9 Cleaning grate
1.10 Ventilation grille
2 Rating plate
varithek® ceran hob varithek®induction hob
1 1.1
2 (Underside)
1.3
1.10
1.2
7
1.8, 1.9, 4
(Underside)
5
10 11

5
varithek® grill hob induction wok with cuvette
2.3 Operating and display elements
3 Handle for easy carrying
4 Electric connector with power lead (underside)
5 Push buttons On / Off switch
5.1 Main switch ON/OFF with pilot light
6 Heating current pilot light
7 Temperature warning light (residual heat indicator)
8 Power pilot light
9 Infinitely variable power controller
10 Control light - outer cooking zone is activated
11 Operating light
Functionality reflects the expected operating logic:
the device is switched on/off at the main switch. When it is switched on the control
light is lit (green).
By turning the power controller out of the O-position, energy is supplied / provided.
Turn the power controller to the required temperature.
During the heating-up phase, i.e. the time until the set temperature is reached, the
(yellow) heating current pilot light is on. This indicator switches off once the
temperature has been reached.
Appliances with several heating circuits are labelled accordingly; see the markings on
the heating surface.
There are two heating areas for two sizes of cooking pot. You activate the larger
heating area by "overturning" the power controller to the right. By turning it back to
zero, you switch back to the smaller heating area.
1.5
8
5.1
1.4
1.6
1.7 3
9
5 6 1.8, 1.9, 4
(Underside)
1.10
11

6
2.4 Product data
2.4.1 Technical data
400IK-3500 400-IK-5000 400-IW-3500 400-IW-
5000 400-gp 4800 sp 800-gp 9600 sp
Connected value [W]3500 5000 3500 5000 4800 9600
Power generation Induction Induction Induction Induction Grill Grill
Material
Work surface Ceran ®
glass
surface
Ceran ®glass
surface Ceran ®glass
cuvette Ceran ®
glass
cuvette
SWISS-PLY ® multi-
layer material SWISS-PLY ®
multi-layer
material
Casing Stainless
steel Stainless
steel Stainless
steel Stainless
steel Stainless steel Stainless steel
External dimensions [mm]
Width 400 400 400 400 400 800
Depth 660 660 660 660 660 660
Height 135 135 195 195 195 195
Weight [kg]17,5 17,5 21 21 22 38
Ambient temperature + 5°C to + 40°C
Emitted sound pressure level Lpa <70 dB(A)
Load-bearing capacity of
installation area [kg] 40 kg
Minimum distance from walls 20 cm
Protection class IPX4 as per EN 60529 protection against splashing.
For installation outdoors a canopy or protection from penetrating moisture is required.
Rated voltage / mains
frequency 1N AC 230V
50/60 Hz
3N AC 400V
50/60 Hz
1N AC 230V
50/60 Hz
3N AC 400V
50/60 Hz
3N AC 400V
50/60 Hz
Length of connection cable: 0.8 m or 2.5 m as per the purchase order
The product data is specified on the rating plate (bottom of appliance).
Detailed specifications for measurements, order number, accessories:
See catalogue
If you have any questions, please contact your local Rieber Service.
2.5 Accessories and their use
varithek® appliances can also be used as table appliances.With the accessories, the appliances are rendered more
effective and safer; the options for using the appliances are increased.
User tip
Reliable accessories that are regularly checked by us will be even more fun to use.
We recommend the coated swiss-ply®thermoplates®and the induction-
suitable pot and pan material from the company, Demeyère

7
2.5.1 varithek® table-top system modules
For use on the table or in a placement niche.
The surface upon which you place the appliance must be horizontal. Use the 4 adjustable feet to compensate
for any unevenness.
For integrating different varithek® function elements.
The rack height can be selected by way of the beading on the inside. Positioning depends
on the depth of the gastronorm containers you're using.
2.5.2 varithek® integration of system modules
For secure integration into a specific piece of furniture.
Electrical work must be carried out by a qualified electrician.
For integrating different varithek® function elements.
The rack height can be selected by way of the beading on the inside.
Positioning depends on the depth of the gastronorm containers you're using.
8
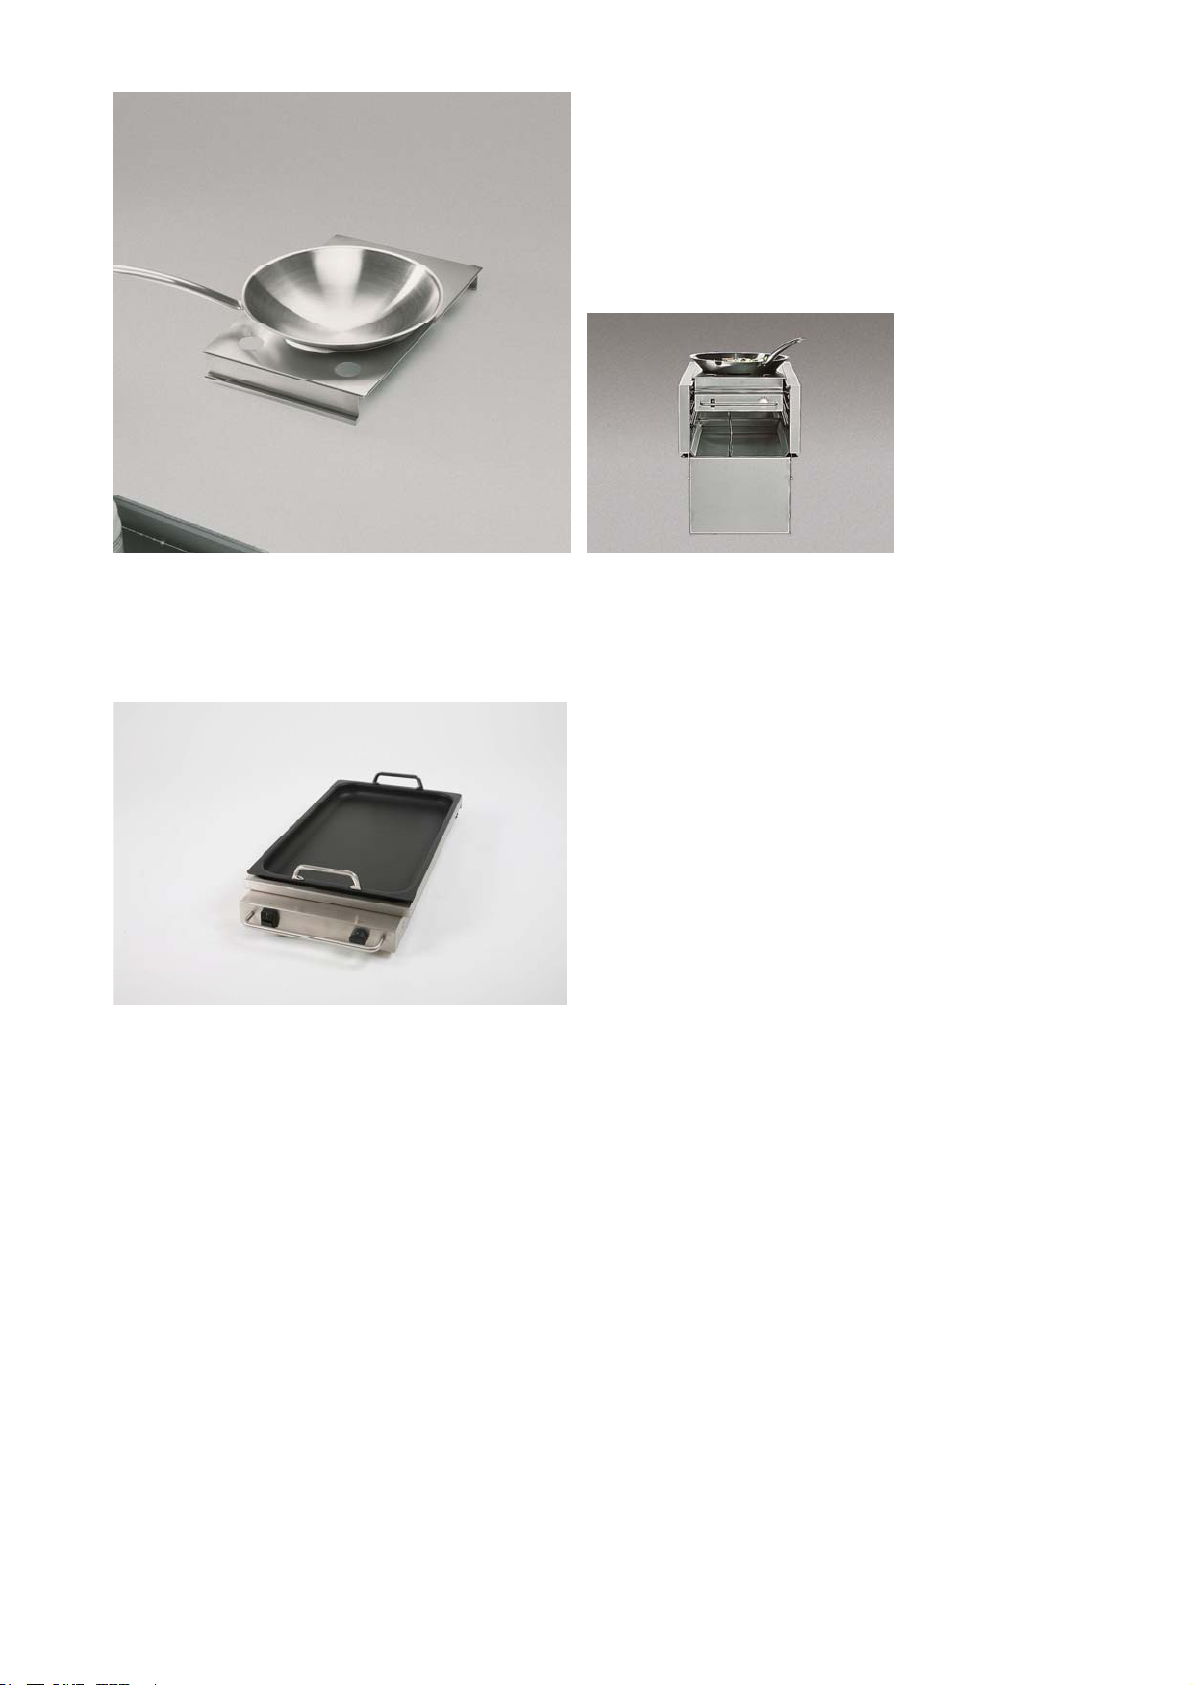
2.5.3 varithek® Wok adapter and wok pan
For using with the varithek® induction hob
The wok is placed inside the circular recess - and thus secured.
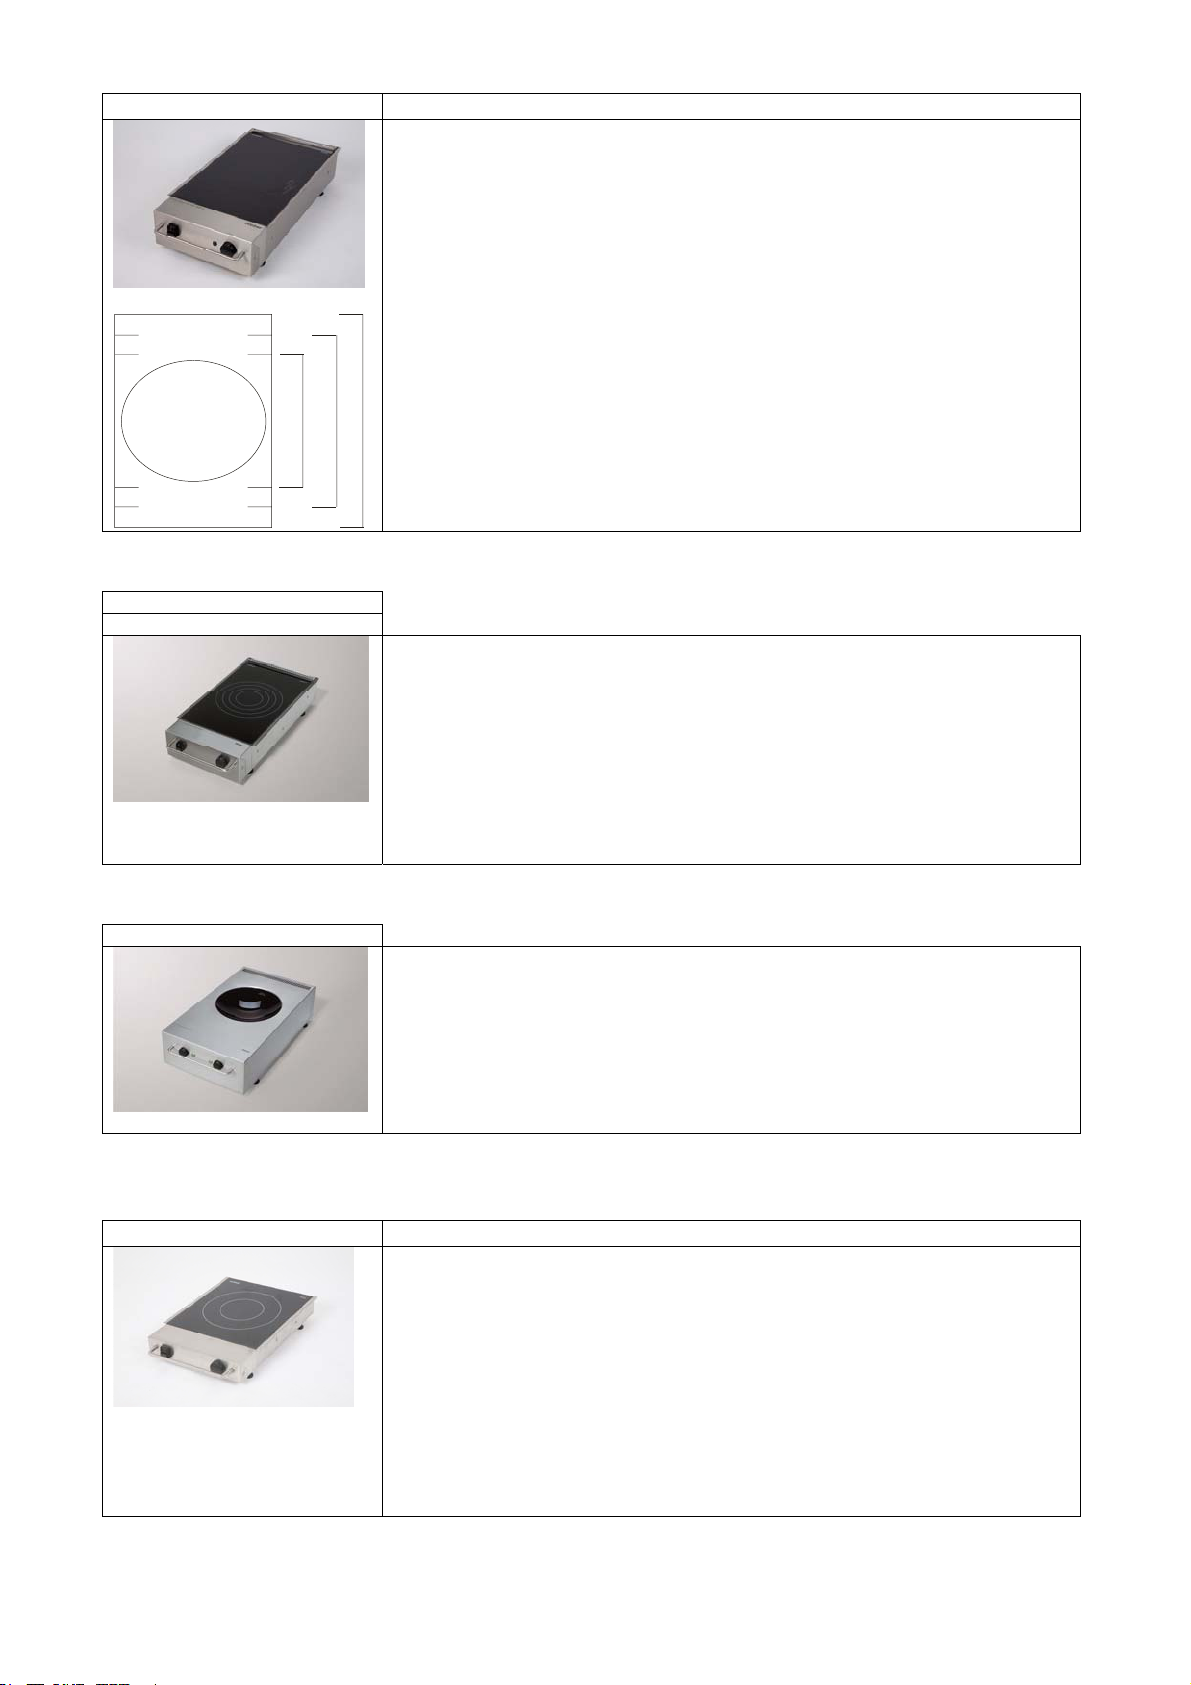
2.5.4 thermoplates®
For use in direct contact with a Ceran® or induction hob.
Always place in the middle of the job, observing the markings on the glass surface.
Risk of fire! During cooking, the upper flap on the system module has to be open, otherwise there is a risk of
overheating.

9
3. Purpose
3.1 Purpose of the varithek®
Generally intended use includes:
For mobile service in the catering, hotel, and food processing industry; also suitable for
the care and school catering sectors.
For keeping food warm and for cooking, flambeing, grilling, steaming and frying;
depending on the heating power of the appliance.
Intended for use in a varithek® table-top system module or varithek® integrated system
module.
To prevent persons from burning themselves on hot surfaces, use of the product in
public/for self-service should only be allowed under constant supervision.
Wear personnel protective equipment such as protective gloves to avoid burns to your
hands and arms when close to hot parts such as the hob, containers and food.
For use by adults only. Only permitted for instructed personnel.
Do not place aluminium foil or plastic containers on the Ceran®glass surface, as this
could cause damage.
Comply with hygiene requirements according to HACCP.
Avoid foreseeable misuse:
WARNING! Never operate the appliance unsupervised.
Not intended for private use at home.
Do not lean against or sit on the appliance.
Keep any combustible or explosive fluids away from heated appliances. Otherwise a
fire or explosion may occur.
Never operate the appliance using empty containers; this could damage the container.
WARNING! Risk of burns. Never pour oil/grease into pots or pans
that have already been heated, as there is a risk of fire or injury.
WARNING! Risk of explosion. Never quench burning grills / frying surfaces with
water, as this would create a risk of explosion.
When not using as a table-top or integrated system module it is even more important
to observe the safety requirements.
You may only heat foodstuffs.
Do not use to heat and humidify the room.
3.2 Designated purpose of the varithek ceran®
Special, proper use:
Only use the appliance with containers made of materials suitable and authorized for
use with Ceran® glass surfaces, from swiss ply®stainless steel or cast iron materials.
Place containers in the centre of the Ceran® glass surface. The area of the container
must correspond to the area of the heating area.
The minimum load-bearing capacity of the surface per appliance is 40 kg.
3.3 Designated purpose of use of the varithek induction hob
Special, proper use:
Only use the appliance with induction-compatible and approved cookware. Only use
pans from the company Demeyère, as they are regularly tested and used by us.
Mixed types of cookware materials (semi-inductive cookware) will impair the cooking
power. The efficiency is reduced considerably; the induction generator can switch off
independently.
The induction generator could be damaged.

10
Before using, ensure each time that the grease filter has been inserted below, as
otherwise grease can penetrate the inside of the appliance and damage parts.
The minimum load-bearing capacity of the surface per appliance is 40 kg.
3.4 Designated purpose of use of the varithek® grill
Special, proper use:
For frying and braising foodstuffs.
The minimum load-bearing capacity of the surface per appliance is 120 kg.
4. General Safety Information
This chapter provides information about the risks and hazards that remain when using the product as intended. We have
provided a list of all generally valid safety instructions which must be followed.
In the following section, safety information relating to a particular operation or situation is placed before the appropriate
operation step or description of the situation.
4.1 Principles
Even though this product corresponds to the state of the art and is in compliance with
the accepted technical safety rules, hazards may occur.
Only use the product in perfect condition, observing the instructions contained in this
user guide.
As far as possible, ensure that the product is safely integrated into its environment in
all phases of the product life.
Refrain from modifying and altering the product.
Equipotential bonding on the underside of the appliance. This protective measure
serves for additional safety. Standard-compliant implementation with subsequent
inspection of the system is carried out by a qualified electrician. IEC 60364-5-54:2011;
for Germany DIN VDE 0100:540:2012-06
4.2 How to use electrical devices
Work area
Keep your work area clean and tidy. A messy or unlit work area can cause
accidents.
Keep children and other people away from the area when work is being carried out.
Electrical safety
The plug on the unit must fit in the socket. Do not modify the plug in any way.
Never use an adapter in combination with earthed appliances. Using an
unmodified plug and a suitable socket will reduce the risk of an electric shock.
Avoid bodily contact with earthed surfaces such as pipes, heating units,
cookers and refrigerators. The risk of an electric shock is greater when your body is
earthed.
Keep the device away from rain or wet. Allowing water to get into an electric
appliance will increase the risk of electric shock.
Do not use the cable for anything other than the intended purpose to
disconnect the plug from the socket. Always remove whilst holding onto the
plug. Keep the cable away from heat, oil, sharp edges or the moving parts of
other appliances. Using damaged or tangled cables increases the risk of electric
shock.
When working with an electrical appliance outdoors, only use extension cables
which are permitted for outdoor use. Using an extension cable suitable for outdoor
use reduces the risk of electric shock.

11
Safety guidelines for persons
Be attentive and pay attention to what you are doing, act rationally when
working with an electrical appliance. Do not use the appliance when tired or
under the influence of drugs, alcohol or medication.
Just one moment of inattention whilst using the appliance can result in serious injury.
Make sure the appliance cannot be switched on unintentionally. Double check
that the main switch is in the "OFF" position before inserting the plug in the
socket. Connecting the appliance to the power supply while it is switched on
can cause an accident.
Careful handling and use of electrical appliances
Never use an electrical appliance with a faulty switch. An electrical appliance
which can no longer be switched on or off is dangerous and must be repaired.
Keep unused electrical devices away from children. Do not allow the appliance
to be used by persons who are not familiar with it or persons who are not
familiar with this user guide. Electrical appliances are dangerous when in the hands
of inexperienced persons.
Treat the device with care. Check that moving parts are functioning properly
and do not block; check whether parts are broken or damaged and impairing
the functioning of the device. Have any damaged parts repaired before using
the appliance. Many accidents are caused by poorly-maintained electrical
appliances.
Use electrical appliances, accessories etc in accordance with these instructions
and in a manner that is specified for this particular appliance type. When using
the appliance, please take into account the working conditions and the work
being carried out. Using electrical appliances for other uses than that intended
can lead to hazardous situations.
Service
Only have the device repaired by qualified and authorised staff. Only use
original spare parts. In this way you can ensure that the appliance remains safe.
4.3 Warning information and explanation of icons
Risk of injury in a specific situation. Injuries can be prevented by adhering to the specified rules of conduct.
The warning triangle symbol indicates a "General Danger".
DANGER!
indicates imminent danger.
Failure to follow these warning instructions will result in serious bodily injury or even death.
WARNING!
indicates a potentially hazardous situation.
Failure to follow these warning instructions may cause serious bodily injury or even death.
CAUTION!
indicates a potentially harmful situation.
Failure to follow these warnings may cause minor bodily injury.

12
Special warning symbols
Some types of hazard are indicated by special symbols.
Electric current
Risk of burning or scalding
Wear protective gloves
Risk of fire
Warning against non-
ionising, electromagnetic
voltage
Slipping hazard
CAUTION
indicates potential damage to property without any personal injury.
Failure to follow these instructions may cause damage to property.
4.4 Appliance-specific safety instructions
This chapter provides general product-specific safety information for devices from this modular series of products. In the
following section, additional safety information relating to a particular operation or situation is placed before the appropriate
operation step or description of the situation.
4.4.1 Safety and monitoring devices
The product has a safety switch-off function.
The product switches itself off automatically in the event of a fault in the
control system.
To increase your safety we recommend that you install an earth leakage
circuit breaker with a tripping current of 30 mA upstream of the appliance.
4.4.2 Dangers due to electricity
WARNING!
Potential electrical hazard in the case of incorrect electrical connection.
Starting the appliance may only be carried out by an electronically-instructed person
or a qualified electrician.
Check the mains voltage, type of current and connected load. Check that these match

13
the specifications on the type plate.
The socket outlet must be easily accessible so that the unit can be disconnected from
the power supply at any time.
The appliance must always be connected to a protective conductor. Reference is
made to the possible damage that can be caused to the appliance in the event that
the neutral conductor is interrupted.
The cable must berouted so that it cannot be squeezed or overheated.
If the power cable on the appliance is damaged, it must be replaced by the
manufacturer or their customer services or by a similarly qualified person, in order to
avoid risks.
WARNING!
Potential risk of fire due to heat build-up.
Unwind the cable from the cable drum to prevent a possible heat build-up and/or
cable fire. The coupling must have splash protection, must be made of rubber or be
rubber-coated. The cable cross-section must be an appropriate size for the power
consumption of the modules.
Before connecting the product, compare the connection data (voltage and
frequency) on the type plate with that for the power supply.
DANGER!
Danger of electric shock. Risk of death.
Before each use, inspect the product, the connecting plug and electric cable for any
visible signs of damage.
4.4.3 Hazards from induction
DANGER!
Persons with a pacemaker may experience interference or influence when handling an induction
appliance due to electromagnetic radiation.
Keep persons with a pacemaker away from the appliance initially. Identify this workplace.
Clarify with the doctor what you particular situation is and your individual tolerability.
DANGER!
Risk of burns from metal objects in the proximity of an induction device as a result of inductive
heating are possible.
Do not place metal objects such as cutlery, tins or jewellery on the hob within the cooking
zone.
Do not wear watches, rings or metal objects close to the surface of the cooking area.
CAUTION
There is a risk that magnet-sensitive parts can be damaged in close proximity to an induction device.
Keep magnetically-sensitive objects such as credit cards, phone cards, cassettes and
watches away from the area immediately around an induction appliance.

14
4.4.4 Risks from burning
DANGER!
A risk of burns is possible from flammable materials in the surroundings or from heat build-up.
When setting up the appliance close to a wall, separating wall, kitchen furniture, decorative casing, etc., we
recommend ensuring that these are not made of flammable materials; otherwise they need to be cased in
suitable, non-flammable, heat insulating materials and the fire safety regulations must be observed with
great attention.!
The minimum distance to walls must be at least 20 cm.
4.4.5 Risks from hot surfaces, burns and explosion
WARNING!
One can burn one's hands and arms on the hot surfaces around the heating and its
environment.
The Ceran® glass surface is slow to cool down after the appliance has been switched off.
Flammable materials can be explosive.
Where possible wear protective gloves.
Keep flammable materials away from the product.
Keep unauthorised persons away from the appliance.
Never operate the product unsupervised.
4.4.6 Risks from a slipper floor
WARNING!
Make sure that the floor around the appliance is kept clean and dry. Otherwise there is a risk of slipping which
can lead to injuries.
4.4.7 Avoid damage to the appliance in transit
CAUTION
The device can be damaged by incorrect transport.
Disconnect the connection cable.
Remove accessories and transport them separately.
4.5 Information about regulations to be followed
In addition to this user guide there are a range of health and safety and other
regulationsthat are relevant for the operation of this cooking station; these include
HACCP food hygiene regulations for example.

15
4.6 What to do in an emergency
First aid in the event of burns and scalding or electric shock:
Inform yourself on this before commissioning the appliance.
Store the emergency equipment, including the relevant instructions, at a readily
accessible place near the place of use.
User tip
You can find detailed information in the company's internal instructions. Please
remember the rules of conduct.
We recommend that half-yearly emergency training sessions should be carried out
5. Before using
5.1 Transport
5.1.1 Check/handle any transport damage
Inspect the appliance visually immediately after its delivery for damage from transportation.
Document any possible transportation damage while the transport company is present
and use the shipping document to do so.
Have the transport company confirm the damage with a signature.
Decide whether to: keep the appliance and complain about the damage in the shipping document
or not accept the appliance.
If you follow either of these procedures, proper claims settlement is ensured.
5.1.2 Unpack
Remove any packaging remnants. Please observe the product-specific
instructions in the package information leaflet/sticker on the appliance.
Open the transport packaging at the designated places. Do not tear or
cut.
Check the scope of the delivery based on the package information leaflet.
Remove any protective foil on the device.
5.1.3 Disposing of packaging material
Dispose of packaging material properly and in an eco-friendly manner.
5.1.4 Clean the appliance
Clean the appliance thoroughly before using for the first time.
Clean with a damp cloth and rub dry
with a clean cloth. Rinse the accessories.
See "Cleaning and Care" on page 21 et seq.

16
5.2 Commissioning / Recommissioning
5.2.1 Preconditions
The appliance has no defects or visible damage.
The appliance is at room temperature and is dry.
Keep ventilation slots, fans and filters unobstructed
CAUTION
Protective foils or heat-sensitive objects at/in the appliance might damage the appliance during heating.
Ensure that there is no protective foil on/in the appliance.
The mechanical installation conditions must be observed
The place of installation must be horizontal. The place of installation must permit a weight of
at least 40 kg; for the varithek® grill, at least 120 kg must be permitted.
The applicable fire safety regulations must be observed.
The appliance may not be installed on a flammable surface, near flammable walls or on a hot surface.
Otherwise, the area must be cased in a suitable, non-flammable, heat-insulating
material.
The minimum clearance to the walls of 20 cm must be observed.
The local building regulations must be observed
Get information from the local authorities
The applicable electrical regulations must be observed
Before starting the appliance, the voltage and type of current must be checked.
Make sure that the specifications on the type plate are observed.
The electrical regulations as per VDE (German Association for Electrical, Electronic & Information
Technologies) 0100 et seq. as well as the technical
connections conditions of the electricity supply company must be observed.
The on-site socket must be protected.
As a device of protection class 1, it must always be connected to a protective conductor.
The socket outlet must be easily accessible so that the unit can be disconnected from the power supply at
any time.
Electrical hazard! The cable must be routed so that it cannot be squeezed or
overheated.
Electrical hazard! For your own safety have electrical work carried out by the manufacturer,
their customer services or a qualified electrician.
Danger of electric shock! Risk of death! During the briefing, please make reference to all of the
possible damage
to the appliance that would be the result of a break of the neutral conductor.

17
6. Using the varithek®
General:
Gastronorm
20 mm 40 mm 65 mm 100 mm 150 mm 200 mm
1. Bead 2. Bead 3. Bead 4. Bead 5. Bead On the floor
thermoplate
®
Always insert the thermoplates® and the gastronorm containers completely.
Insert the appliances in the system modules correspondingly to the containers.
Considerable loss of energy in the event of incorrect assembly
CAUTION
Incorrectly set system module flaps can cause damage to the appliance
Close the lower system module flap, as otherwise the appliance could slip out.
Leave the upper part of the system module flap open (exception: varithek® ch 800), as otherwise the device
could overheat.
WARNING!
Risk of burns. The upper casing parts of the varithek® modules and the inside of the system module can heat up.
Wear protective gloves.
6.1 Using the varithek® ceran hob
6.1.1 varithek® ceran hob 1/1 with 800 W
V
-1/1-ch-800-
K
Push the device into the system module - insert containers
Switch on device at main switch - green LED lights up
Set the power level you want at the power controller
When you are finished, switch off the device at the main switch.
User tip: Considerable loss of energy if system module flap is open.
Close the system module flap so that the heated air can heat the
walls of the GN container evenly.

18
6.1.2 varithek® ceran hob 1/1 with 2800 W and ceran hob 2/3 with 2200 W
V
-1/1-ck-2800-QB
V
-1/1-ck-2800-Q (No
illustration)
V
-2/3-ck-2200-B (No
illustration) Push the device into the system module - insert containers
Switch on device at main switch - green LED lights up
Set the power level you want at the power controller
When you are finished, switch off the device at the main switch.
ATTENTION! Close the lower system module flap, otherwise the
device can slip out.
Leave the upper part of the system module flap open,
otherwise the device could overheat.
6.1.3 varithek® ceran hob 1/1 with 3400 W
V
-1/1-ck-3400
V
-1/1-ck-3400-B (No
illustration)
Push the device into the system module - set up cookware
Switch on device at main switch - green LED lights up
You regulate the heat for the rear cooking plate with the right dial.
The heat for the front cooking plate is regulated by the left dial.
Turn to the right to turn up the heat, and to the left to decrease the energy.
By turning the left dial as far as it goes, you activate the outer heating area of the
front cooking plate. (yellow pilot light is on)
The outer cooking plate is deactivated by turning the dial back to zero.
When you are finished, switch off the device at the main switch.
6.2 Using the varithek® induction hob
6.2.1 varithek® induction hob 1/1 75mm high with 2 circular cooking plates
V
-1/1-I
K
-3700-B
V
-1/1-I
K
-3600-B
Before using the appliance, please make sure each time that the grease filter is in
place on the underside of the device. (Only use clean, dry filters)
Push the device into the system module
Place induction-suitable cookware in the centre of the cooking plate
The use of small pots cannot be guaranteed and depends heavily on the material!
Switch on device at main switch - green LED lights up
You can set the heat you want at the power controller 2 seconds later at the earliest
When you are finished, switch off the device at the main switch.
Boost function:
The generator has a boost function to heat up quickly. When this function is
activated, the appliance operates at its maximum capacity for a limited period of time
(max. 10 minutes).
Only one cooking plate can be operated in booster mode at a time. If both cooking
plates are turned to the booster function, the last user input has priority and the other
cooking plate is automatically set to half the power.
Activation: Turn the lever in a clockwise direction to level 10, then to level 11 in the
2nd position and then back to level 10.
Deactivation: Turn the lever in an anti-clockwise direction to a new, lower level.
ATTENTION! Close the lower system module flap, otherwise the
device can slip out.
Leave the upper part of the system module open,
otherwise the device could overheat.
19
6.2.2 varithek® induction hob 1/1 Grill- and Wok solution, full-surface
V
-1/1-I
K
-3500-
Q
GN1/2
GN2/3
GN1/1
Before using the appliance, please make sure each time that the grease filter is in
place on the underside of the device. (Only use clean, dry filters)
Push the device into the system module
Place induction-suitable cookware in the centre of the cooking plate
The device is defined for operating with thermoplates 1/1, 2/3, ½ and cookware
The use of small pots cannot be guaranteed and depends heavily on the material!
Switch on device at main switch - green LED lights up
Set the power level you want at the power controller
When you are finished, switch off the device at the main switch.
ATTENTION! Close the lower system module flap, otherwise the
device can slip out.
Leave the upper part of the system module flap open,
otherwise the device could overheat.
6.2.3 varithek® induction hob 1/1 for inserting induction surface 280
V
-1/1-I
K
-3500-5000 (image)
V
-400-I
K
-3500-5000
Before using the appliance, please make sure each time that the grease filter is in
place on the underside of the device. (Only use clean, dry filters)
Push device into system module - insert container centrally
Switch on device at main switch - green LED lights up
Set the power level you want at the power controller
When you are finished, switch off the device at the main switch.
ATTENTION! Close the lower system module flap, otherwise the
device can slip out.
Leave the upper part of the system module flap open,
otherwise the device could overheat.
6.2.4 induction wok 400 with cuvette
V
-400-I
W
-3500-5000
Before using the appliance, please make sure each time that the grease filter is in
place on the underside of the device. (Only use clean, dry filters)
Place the induction-suitable cup-shaped pan in the centre of the circular recess of
the induction wok so that the bottom of the pan is heated evenly.
Switch on device at main switch - green LED lights up.
Set the desired power level at the power controller
If the pan is removed from the induction wok, the induction generator reduces the
heat itself.
When you are finished, switch off the device at the main switch.
6.2.5 varithek® induction hob 2/3 75mm high
V
-2/3-I
K
-2300-B
Before using the appliance, please make sure each time that the grease filter is in
place on the underside of the device. (Only use clean, dry filters)
Push the device into the system module
Place induction-suitable cookware in the centre of the cooking plate
The use of small cookware cannot be guaranteed and depends heavily on the type
of material!
Switch on device at main switch - green LED lights up
Set the power level you want at the power controller
When you are finished, switch off the device at the main switch.
ATTENTION! Close the lower system module flap, otherwise the
device can slip out.
Leave the upper part of the system module flap open,
otherwise the device could overheat.

20
6.3 Using the varithek® grill
6.3.1 varithek® Grill 1/1
1/1-gp-3400-sp
Before using please ensure every single time that the grease collection tray is in
place underneath the appliance.
During the initial inspection of the device in the factory, the grill surface can show
annealing colour. Please be aware that this does not impair functionality.
Push the device into the system module
Switch on device at main switch - green LED lights up
Set the desired power level at the power controller
Turn to the right - for more power and to the left - for less power
Work only with non-scratching tools.
When you are finished, switch off the device at the main switch.
ATTENTION! Close the lower system module flap, otherwise the
device can slip out.
Leave the upper part of the system module flap open,
otherwise the device could overheat.
6.3.2 varithek® Grill 400
400-gp 4800 sp
Before using please ensure every single time that the grease collection tray is in
place underneath the appliance.
During the initial inspection of the device in the factory, the grill surface can show
annealing colour. Please be aware that this does not impair functionality.
Configure device for work surface
The heating zone is divided into 3 subzones (controlled individually by sensors). This
ensures that only the energy that is actually required is used. (turndown)
Switch on device at main switch - green pilot light lights up
Set the desired power level at the power controller
Turn to the right - for more power and to the left - for less power
Work only with non-scratching tools.
When you are finished, switch off the device at the main switch.
6.3.3 varithek® Grill 800
800-gp 9600 sp (illustration)
Before using please ensure every single time that the grease collection tray is in
place underneath the appliance.
During the initial inspection of the device in the factory, the grill surface can show
annealing colour. Please be aware that this does not impair functionality.
Configure device for work surface
These appliances have 2 heating circuits, the left dial for the left half and the right
dial for the right half. The heating zone is divided into 3 subzones (controlled
individually by sensors). This ensures that only the energy that is actually required is
used. (turndown)
Switch on device at main switch - green LED lights up.
Set the desired power level at the power controller
Turnto the right - for more power andto the left - for less power
Work only with non-scratching tools.
When you are finished, switch off the device at the main switch.
This manual suits for next models
5
Table of contents
Other Rieber Commercial Food Equipment manuals


Popular Commercial Food Equipment manuals by other brands


BUBBLE HEADS
BUBBLE HEADS FLAVOUR BLASTER PRO 2 user manual

Omcan
Omcan Aurora DA-CN-0353 instruction manual

Skymsen
Skymsen AMP-400 instruction manual

Royal Catering
Royal Catering RCCC-78-WT user manual

Winston foodservice
Winston foodservice CVap HA Series owner's manual

Diamond
Diamond G9/PLA4 quick start guide


