RIESE & MUELLER Culture User manual

OWNER‘S MANUAL EBIKES
NORTH AMERICA

COPYRIGHT
Copyright 2017 RIESE & MUELLER GMBH
The information contained in this manual and/or any of its parts, sub-parts or chapters, is the
intellectual property of RIESE & MUELLER GMBH and is protected by domestic and internation-
al copyright and other intellectual property laws.
The information contained herein is provided for the operation, service and troubleshooting
of the product described herein.
Any duplication, reproduction, translation, micro filming, storage in electronic or magnetic
form, processing as electronically or magnetically stored media, copying or dissemination of
these
materials and/or the information contained herein, or any part thereof, except for the internal
use of RIESE & MUELLER GMBH or its authorized external suppliers, consultants or agents,
without the prior written consent of RIESE & MUELLER GMBH, is hereby strictly prohibited.
All rights and remedies are hereby expressly reserved.
Violators will be prosecuted.
RIESE & MUELLER GMBH shall have no liability whatsoever arising from or connected in any
way to the so prohibited use of the information contained herein by any person or entity,
wherever located, for whatever reason.
RIESE & MUELLER GMBH reserves the right to change, delete or otherwise alter or modify any
information contained herein, or the product itself, at any time and for any reason, with or
without notice.
2

3
IMPORTANT INFORMATION
This manual describes how to use your Riese & Müller E-Bike in a safe manner. It is essential that
whoever owns or uses the E-Bike has read this manual before riding the E-Bike for the first time.
This also applies to anybody who considers himself or herself to be an experienced bicycle rider.
In some aspects E-Bikes substantially dier from regular bicycles.
There is an example illustration of an E-Bike (and an E-Cargo bike respectively) on either of the
inner sides of this manual’s cover describing the vehicle’s most important components and parts.
For easier navigation and reference we do recommend to leave these inner sides open while
reading this manual.
This manual and all other included manuals for brakes, gears, suspension, electric drive and
optional accessories are an integral part of the E-Bike.
Read all the manuals carefully. Store all manuals close to where you store your E-Bike to have
them handy if questions arise.
In case this E-Bike is solwd or given to another person as a gift or even only for temporary use,
all manuals must be given as well.
This manual also describes simple do-it-yourself inspections for the E-Bike.
This manual, however, is no substitute for a complete workshop manual.
All service and repair work on any Riese&Müller E-Bike shall always be performed only by
an authorized dealer.
In case anything in this manual is not clear or if you need further information regarding a
function of the Riese&Müller E-Bike, please contact your authorized dealer or Riese&Müller
customer service (www.r-m.de, Tel. +496151-36686-0).

4
SAFETY INFORMATION
NOTICE FOR PARENTS AND
LEGAL GUARDIANS OF MINORS
Riding an E-Bike can be hazardous. Therefore, never overestimate your abilities or the
capabilities of your E-Bike when riding it.
By riding an E-Bike you assume the risk of personal injury and damage to the E-Bike.
To reduce this risk, read the “Safety” section, starting on page 9, before riding your
E-Bike for the first time.
This manual cannot possibly describe every conceivable hazardous situation that may arise
while riding an E-Bike. The person riding the E-Bike is therefore solely responsible for the
use of their E-Bike and any injuries or damage that result from such use.
The use of E-Bikes by persons under the age of 16 is strictly forbidden.
Parents and guardians of minors are fully responsible for making sure that the minor has
read and understood all of the contents of all manuals for the E-Bike.
Parents and guardians of minors are furthermore fully responsible for the results and
consequences of any use, misuse, accidents, injuries or damages caused by minors.

5
CAUTION
NOTICE
SAFETY INFORMATION
This manual uses the following signal words to alert to potential hazards. The meaning of the
signal words is listed in the table below.
Indicates a hazardous situation that, if not avoided, could result in
death or serious injury.
Indicates a hazardous situation that, if not avoided, could result in minor
or moderate injury.
Indicates information considered important, but not hazard-related
(e.g. messages related to property damage).
The symbol is used to provide other useful information or clarifications.
WARNING

6
CONTENT
1. WHAT IS AN EBIKE?
E-Bike drive system
Brakes
2. SAFETY 9
Safety Gear
Who is authorized to use the E-Bike?
Safe riding and accident prevention
Safe o-road riding
Legal requirements
Intended use
Maximum gross weight and permissible loads
Weight specifications
Lifespan of your E-Bike and its components
3. ADJUSTING YOUR EBIKE
Frame size selection
Seat position
Handlebar position
Brake levers
Suspension
4. BEFORE THE FIRST RIDE
Delivery and handover of your E-Bike
Getting familiar with your E-Bike
5. SAFETY CHECK BEFORE EVERY RIDE
Quick release levers
Saddle and seat post
Handlebar and stem
Transporting items with your E-Bike
Wheels
Brakes
Bosch battery
Lighting and reflectors
6. CHILDREN
Transporting children
Children riding E-Bikes by themselves

7
7. OPERATION
During every ride
Shifting system
Brakes
Adjustable stem
Angle adjustment
Height adjustment
Racks
Lighting
Suspension
Integrated lock
8. MAINTENANCE AND REPAIRS
Regular maintenance
Initial inspection
Maintenance you can do by yourself
Cleaning your E-Bike
Brake Inspection
Test of setting of the brake levers
Brake hoses
Brake rotor
Brake pads
Headset
Chain
Belt drive
Tires
Wheels
Suspension
Lighting
Maintenance that must be carried out by your authorized dealer
Changing and replacing components
Service and maintenance schedule
Torque Settings
Torque Settings for E-Cargo Bikes
Torque Settings for adjustable Stems
9. WARRANTY TERMS AND CONDITIONS
10. INFORMATION REGARDING PARTS THAT ARE SUBJECT TO WEAR AND TEAR
11. EBIKE PASSPORT 58
E-Bike Data
Delivery Record
Service Record
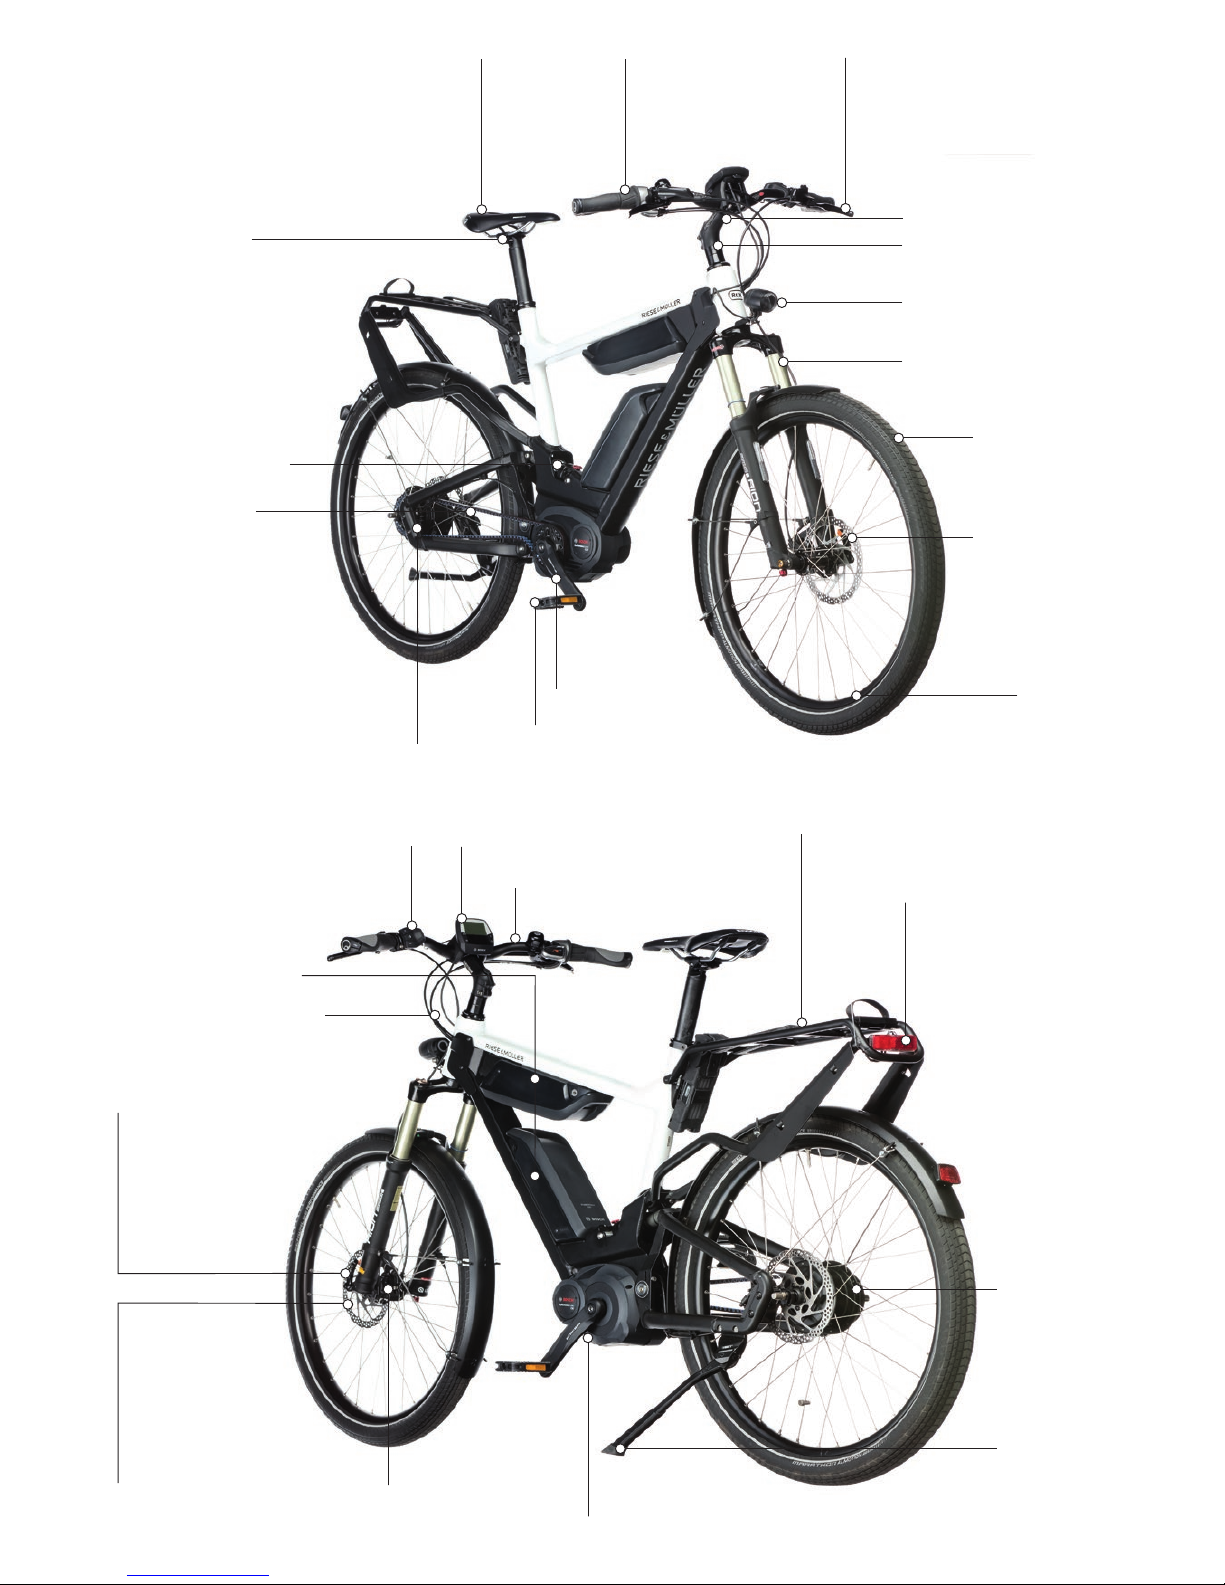
Belt drive, chain
p. 40
Rear shock absorber
p. 36– 38, 46
Quick release
wheel attachment, p. 20
Bosch batteries, p. 27
Brake and shifter cables
Disc brake, (rim brakes
not visible at this E-Bike), p. 25, 31, 42 Bosch electric drive, p. 8
Seatpost, p. 21
Shifter, p. 30Saddle, p. 21
Bosch display, p. 35
Handlebar, p. 22
Rear rack, p. 35
Tail light, p. 46
Brake levers, p. 16, 25
Stem, p. 22
Headset, p. 43
Frontlight, p. 28, 46
Suspension fork,
p. 36–38, 46
Rim, p. 45
Disc brake rotor,
p. 42
Control panel, p. 8
Crank arm
Pedal
Shifting system, p. 30
Gear hub
Kick stand
Disc brake caliper
Tires, wheels,
p. 24, 45

Belt drive, chain
p. 40
Shifting system, p. 30
Rear shock absorber
p. 36 –38
Quick release
wheel attachment
p. 20
Bosch battery, p. 27
Disc brake, p. 25, 31, 42
Bosch electric drive, p. 8
Seatpost, p. 21
Saddle, p. 21
Bosch display, p. 35 Handlebar, p. 22
Rear rack, p. 35
Tail light,
p. 46
Brake levers, p. 16, 25
Stem:
height adjustment, p. 33
angle adjustment, p. 34
Suspension fork,
p. 36–38, 46
Front rack, p. 35
Rim, p. 45
Headset, p. 43
Frontlight, p. 28, 46
Tires, wheels,
p. 24, 45
Shifter, p. 30
Control panel, p. 8
Crank arm
Pedal
Kick stand
Disc brake
caliper
Gear hub

8
1. WHAT IS AN EBIKE?
An E-Bike is a bicycle with an electric drive system that gives the rider assistance.
1.1. EBIKE DRIVE SYSTEM
All Riese & Müller E-Bikes are equipped with a Bosch drive system. The drive system consists of
an electric drive, a battery and a control panel at the handlebar.
The electric drive powers the rear wheel either with a chain or with a belt drive (dependent on
the particular E-Bike model).
The drive system automatically assists you, when you start to pedal. The assistance ends when
you stop to pedal or when you are going faster than the maximum allowed system speed
(20 mph or 28 mph).
You can adjust the assistance level via the control panel at the handlebar. You can also turn the
assistance o and ride the E-Bike like a regular bicycle.
The battery must be charged separately using the supplied charger. You cannot charge the bat-
tery by pedaling. Some E-Bikes are equipped with an optional second battery.
1.2. BRAKES
Dependent on which E-Bike model you have, your E-Bike is equipped either with disc brakes or
rim brakes. The E-Bikes shown as examples on the inner sides of the cover of this manual are
equipped and shown with disc brakes.
Make sure you use your Bosch drive and batteries correctly and don’t cause damage.
Read the separate Bosch manual supplied with your E-Bike to get familiar with all details
of the Bosch drive.
NOTICE

9
2. SAFETY
2.1. SAFETY GEAR
Wear protective clothing when riding your E-Bike. Such clothing must provide good visibility and
reflect light. Do not wear loose-fitting clothes to avoid entanglement with your E-Bike or cover-
ing the lighting system or reflectors.
Protective gear is available for each part of your body. Always wear biking gloves, sturdy shoes
and protective goggles. Riding without protective clothing and other protective gear increases
the risk of serious injury.
2.2. WHO IS AUTHORIZED TO USE THE EBIKE?
The minimum age for anybody to ride an E-Bike is 16 years.
All riders must be healthy enough as well as both physically and mentally fit to control an E-Bike.
They must be able to negotiate trac in a safe manner and in compliance with all applicable laws
and regulations.
Always wear protective clothing, safety gear and a well-fitting helmet to protect against severe
injuries in case of an accident.
Observe and follow all instructions of the helmet manufacturer.
Prior to every ride, perform a safety check.
Use your E-Bike only as intended.
Never ride under the influence of alcohol, drugs or prescription medication.
O-road riding is more hazardous and requires greater skills. Make sure to avoid serious injuries
by practicing on easy terrain first.
Be sure to be seen by other drivers and other trac when riding at night or when visibility is
bad. Do not ride unless your lighting system is switched on and fully operational.
After a fall or an accident, have the E-Bike inspected and, if necessary, repaired by
an authorized dealer to ensure safety and prevent further accidents.
WARNING

10
2. SAFETY
2.3. SAFE RIDING AND ACCIDENT PREVENTION
1. Before to every ride, perform the safety check described in the section 5 on page 18, “Safety
check before every ride”.
2. Adjust your riding style and speed to the weather and the conditions of the road.
3. Do not overestimate your abilities.
4. Avoid riding on slippery ground and when visibility is poor. Heightened attention is required in
the rain and on wet or loose ground like sand, gravel, etc. because of the increased risk of slip-
ping in curves or falling when applying the brakes.
5. Always follow all trac rules applicable in your city and state.
6. Never ride while under the influence of alcohol, drugs or prescription medication.
7. Be careful as plastic and rubber pedals
often become very slippery when wet! Your foot may slip o, causing severe injury.
8. If the pedals on your E-Bike are fitted with rubber or plastic toe cages, make yourself familiar
with the grip they provide.
2.4. SAFE OFFROAD RIDING
Riding your E-Bike o-road poses greater hazards and therefore requires greater skills and some
practice on easy terrain.
Start by riding on easy terrain and become accustomed to the way your E-Bike handles o-road.
Keep in mind that the conditions of the ground may change at any time while riding o-road. Pay
attention to animals and other people. Never ride all alone in remote areas.
2.5. LEGAL REQUIREMENTS
Make yourself familiar with the local and regional laws and regulations applicable for the
use of E-Bikes.
Be aware that dierent rules may be in place for fast E-Bikes (maximum assisted
speed = 28 mph) as opposed to slow E-Bikes (maximum assisted speed = 20 mph).
Dierent states may have dierent laws and regulations regarding the wearing of helmets, hav-
ing a driver’s license or speed limits of your E-Bike like. Even if not required by law, always wear a
well-fitting helmet.
Be aware that you may not be allowed to ride your E-Bike in all places.
It is the rider’s sole responsibility to be familiar with and comply with all applicable laws
and regulations.

11
2.6. INTENDED USE
E-Bikes from Riese & Müller are intended and suited for a wide range of applications.
The following is a description of this range of applications.
The Riese & Müller E-Bikes “Charger mountain” and “Delite mountain” are designed for
category 2. All other Riese & Müller E-Bikes are designed for category 1.
Category 1: Day-to-day use
Category 1 E-Bikes are suited for: Riding on bike lanes, paved streets and roadways.
The front and rear wheels maintain constant contact with the ground.
Not suited for: Riding o-road, riding over stairs, jumps, wheelies, competitions.
Category 2: O-road use
Category 2 E-Bikes are suited for: All applications of category 1 plus moderate o-road riding.
Skilled riders can master unpaved roadways and minor jumps o a maximum height of 12 inches
(1 foot).
Not suited for: heavy-duty o-road operation, downhill, slope style and freeride biking, competi-
tions, tricks and stunts.
WARNING
No E-Bike is suitable for all potential applications or purposes.
Choose the E-Bike that matches your intended application best.
Using your E-Bike for an unintended purpose is hazardous.

12
2. SAFETY
2.6.1 Maximum gross weight and permissible loads
Your E-Bike has a maximum permissible gross weight. The maximum permissible gross weight
must never be exceeded. If you do not stay below the maximum permissible gross weight limit
you are using your E-Bike in an improper and impermissible fashion that can lead to accidents,
injuries and severe damage to your E-Bike.
The maximum gross weight is the sum of your E-Bike’s weight plus the weight of the trailer, the
biker and the load you put on the racks.
The manufacturer assumes no liability and your warranty will be voided if you fail to use your E-
Bike as intended, if you do not adhere to the safety instructions or if you fail to have any defects
repaired properly. Furthermore, the manufacturer assumes no liability for and declines to provide
any warranty in case of installation errors, willful misuse, accidents and failure to observe the
instructions on maintenance and care.
The table 2.6.2. on page 13 shows the maximum permissible weight limits of the dierent models
of Riese & Mueller E-Bikes.
Avoid accidents, serious injuries and damage to your E-Bike.
Never overload your E-Bike.
Never exceed the permissible gross weight of your E-Bike.
WARNING

13
E-BIKE MODEL MAXIMUM
GROSS WEIGHT
WEIGHT OF
EBIKE
MAX. WEIGHT
OF RIDER
MAX. LOAD
ON REAR RACK
MAX. LOAD ON
FRONT RACK
Avenue 140 kg
308 lbs
26.6 – 27.3 kg
59 – 60 lbs
110 kg
242 lbs
20kg
44lbs ––
Culture 140 kg
308 lbs
26.7 – 27.5 kg
59 – 61 lbs
110 kg
242 lbs
20kg
44lbs ––
Delite 140 kg
308 lbs
23.0 – 28.0 kg
51 – 62 lbs
110 kg
242 lbs
20kg
44lbs ––
Delite
mountain
140 kg
308 lbs
23.0 – 26.0 kg
51 – 58 lbs
110 kg
242 lbs
20kg
44lbs ––
Homage 140 kg
308 lbs
25.7 – 26.8 kg
57 – 59 lbs
110 kg
242 lbs
20kg
44lbs ––
Kendu 140 kg
308 lbs
25.9 kg
57 lbs
100 kg
220 lbs
20kg
44lbs ––
Load 190 kg
418 lbs
32.6 – 35.1 kg
72 – 78 lbs
110 kg
242 lbs
20kg
44lbs
100kg
220lbs
Packster 200 kg
441 lbs
34.9 52.9 kg
77 – 117 lbs
110 kg
242 lbs
20kg
44lbs
100kg
220lbs
Charger 140 kg
308 lbs
19.9 – 26.6 kg
44 – 59 lbs
110 kg
242 lbs
17kg
37lbs
3kg
6lbs
Charger
mountain
140 kg
308 lbs
19.9 – 23.0 kg
44 – 51 lbs
110 kg
242 lbs
17kg
37lbs ––
Charger GH 160 kg
353 lbss
27.2 kg
60 lbs
135 kg
297 lbs
17kg
37lbs ––
Cruiser 140 kg
308 lbs
24.8 – 25.8 kg
55 – 57 lbs
110 kg
242 lbs
30kg
66lbs
3kg
6lbs
Nevo 140 kg
308 lbs
24.3 – 26.2 kg
54 – 58 lbs
110 kg
242 lbs
17kg
37lbs ––
Roadster 140 kg
308 lbs
21.9 22.5 kg
48 – 50 lbs
110 kg
242 lbs
20kg
44lbs ––
Swing 130 kg
286 lbs
24.9 26.1 kg
59 – 60 lbs
100 kg
220 lbs
25kg
55lbs
3kg
6lbs
Tinker 135 kg
297 lbs
21.9 23.8 kg
48 – 52 lbs
110 kg
242 lbs
20kg
44lbs ––
2.6.2. Weight specifications

14
2.7. LIFESPAN OF YOUR EBIKE AND ITS COMPONENTS
If subjected to moderate use, the E-Bikes from Riese & Müller have a product lifetime of 10 years
or 20,000 miles. The wear and tear of an E-Bike, however, largely depends on the load, the road
conditions and the riding style.
When exposing your E-Bike to a lot of stress (e.g. total vehicle load of 242 lbs or more, riding over
unpaved roadways or curbstones, riding in dirty and corrosive environments) on a regular basis,
you may experience that the lifetime of your E-Bike shortens to about 10,000 miles.
When your E-Bike has reached the end of its product lifetime, it is no longer roadworthy and safe.
Please note that components such as the handlebar, stem, and suspension fork or rear shock ab-
sorber have a significantly shorter product lifetime. Actual product lifetimes of these components
are also subject to the above mentioned conditions. Please consult your authorized dealer who
can determine whether and when a component has to be replaced.
2. SAFETY
WARNING
E-Bikes are subject to wear and tear.
Bring your E-Bike to your authorized dealer for regular inspections and timely
replacement of safety relevant components like handlebar, stem or suspension fork.
After reaching the end of their product lifetime, the components of your E-Bike may fail abruptly
and cause falls and serious injuries.

15
3. ADJUSTING YOUR EBIKE
Before you can go on your first ride, your authorized dealer must adjust your new E-Bike to your
height, proportions and individual requirements.
3.2. SEAT POSITION
Your authorized dealer shall explain and set the seat position that fits you best.
When adjusting the height of the saddle yourself, proceed as follows:
3.1. FRAME SIZE SELECTION
Your authorized dealer shall select the frame size that is appropriate for you. Make sure that the
standover clearance of your E-Bike fits your body and proportions. A minimum standover clear-
ance of 2” to 5“ is recommended.
• Place the E-Bike between your legs.
• Measure the distance indicated by the arrow.
• This is the standover clearance.
• Rotate one pedal to its bottommost position
• Sit down on the saddle and place your heel
on this pedal. Your leg must now be fully
extended.
• If the leg is not fully extended, the saddle is
too low.
• If the heel does not reach the pedal,
the saddle is too high.
Standover clearance
Heel on the lower pedal

16
3. ADJUSTING YOUR EBIKE
• Sit down on the saddle.
• Make sure that the tips of both of your feet
reach the ground.
• If the tips do not reach the ground or if you
feel unsafe, the saddle is too high.
• Check the seat post height.
• The seat post must not be extended too far.
Make sure that the line that indicates the
minimum insertion is not visible.
Correct: Hidden minimum insertion mark of the seat post
Wrong: Visible minimum insertion mark of the seat post
minimum
insertion mark
Wrong!
Correct!
Feet with tips on the ground

17
3.3. HANDLEBAR POSITION
Your authorized dealer shall explain and set the appropriate position of handlebar, grips and all
control elements such as brake and shift levers and the Bosch display.
On E-Bikes with an adjustable stem, the authorized dealer must adjust the stem to the position
that fits you best and explain how to use the adjusting mechanism.
Factory set-up Modified set-up (brake cables switched), if so desired
3.4. BRAKE LEVERS
Check and make sure that you can operate the front brake with the same brake lever (right of
left) in the way that is familiar to you. If you are used to having the front brake operated with the
lever on the other side, ask your authorized dealer to mount the brake cables in the appropriate
fashion so you can operate the front brake with the hand you are used to and, of course, the rear
brake with the other hand, as you are used to.
The factory set-up is that the left brake lever is operating the front brake (as shown below).
Left brake lever
= front brake
Left brake lever
= rear brake
Right brake lever
= rear brake
Right brake lever
= front brake

18
3. ADJUSTING YOUR EBIKE
3.5. SUSPENSION
Your authorized dealer shall explain and set the suspension. Review and follow the instructions
in the included manuals from the suspension manufacturer.
WARNING
A suspension setting that is too soft leads to more compression of the suspension and less dis-
tance between the pedals and the ground.
Make sure that the suspension is set accurately for the rider’s weight.
Suspension settings that are too soft may result in unexpected and hazardous ground contact of
your pedals and lead to a crash and injuries.
Suspension settings that are too hard may result in loss of traction and lead to a crash and
injuries.
This manual suits for next models
14
Table of contents


