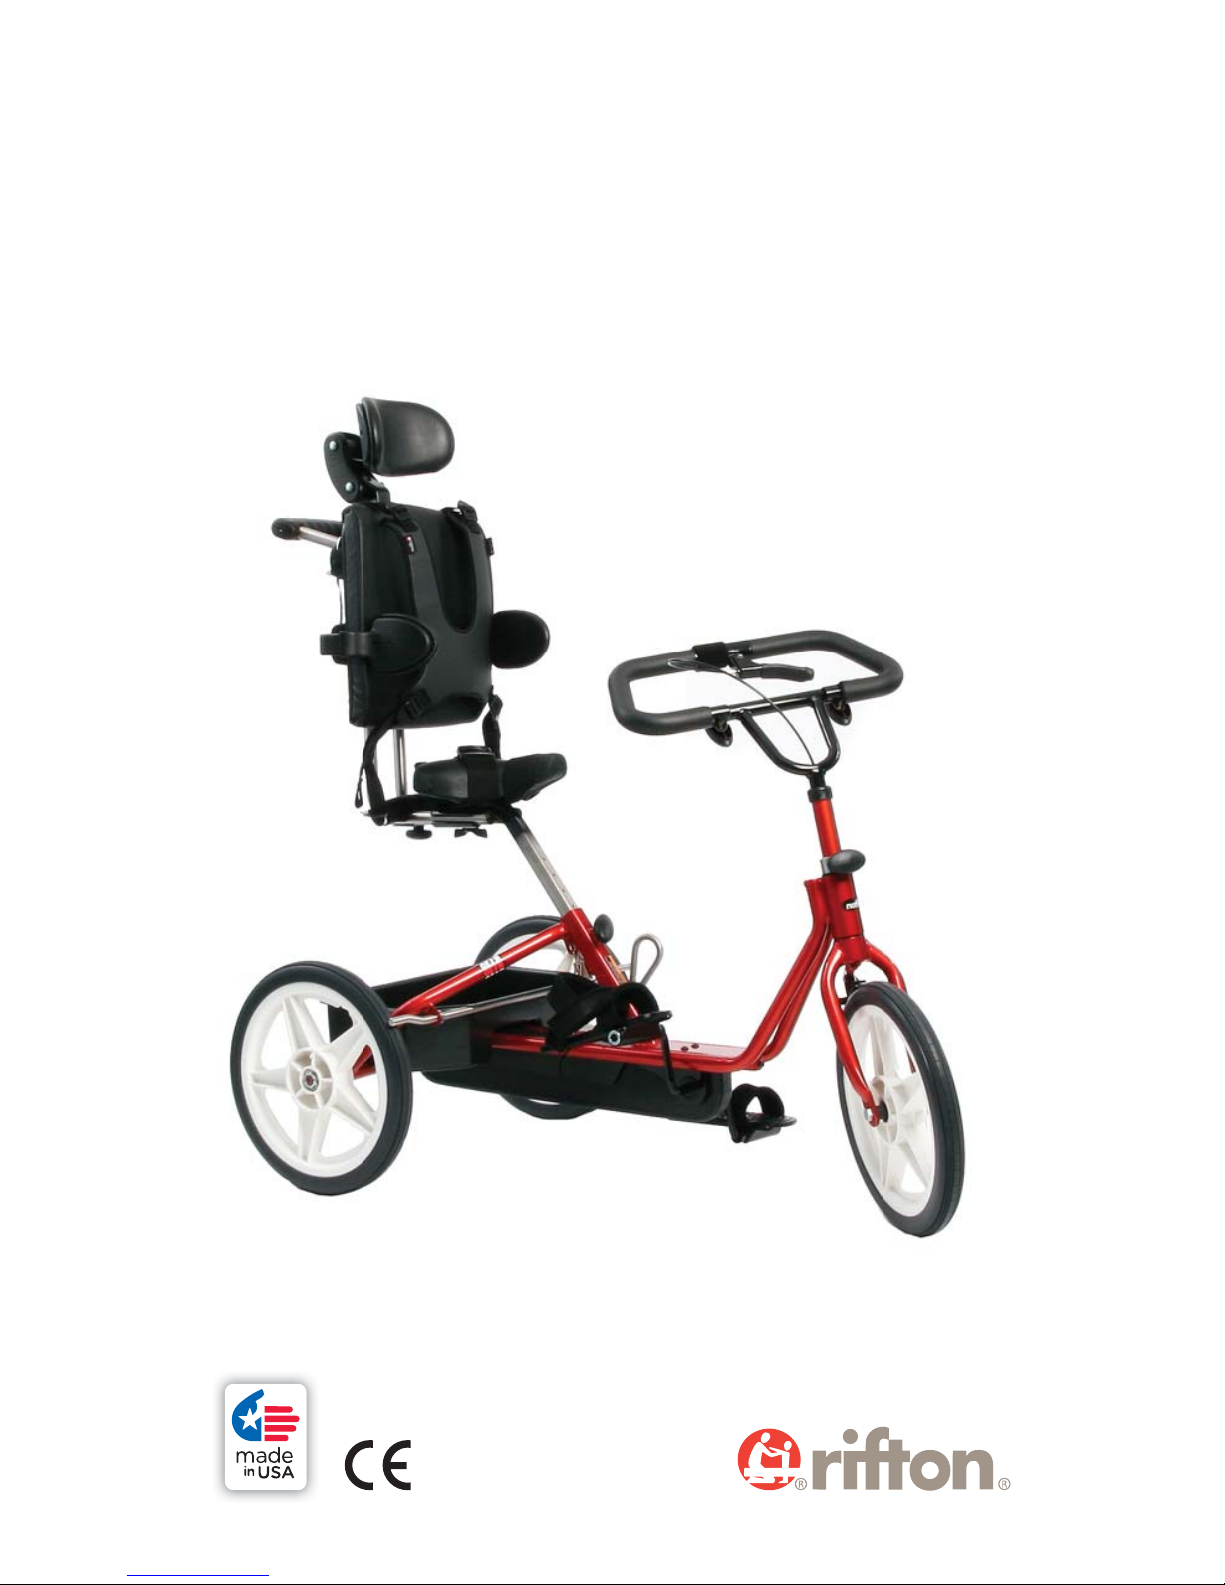
Rifton R120 User manual

Tricycle
R120, R130 & R140 Product Manual
®
R120, R130 & R140

2© 2014 Rifton Equipment
Contents
Safety messages 3
Recommended use and item dimensions 4
Important information and check your order 5
Basic components
Trunk support system 6
Backrest pad 7
Seat and parking brake 7
Handlebar and handbrake 8
Accessories
Headrest and front guide bar 9
Rear steering bar 10
Abductor and communication tray 11
Stationary stand 12
Operation 13
Maintenance and cleaning 14
Warranty, materials and user modifications 15

3
• Thoroughly read and understand the information in this product manual before
attempting to use this product. If the procedures and instructions in this product manual
are not followed, serious injury or death could occur.
• A qualified professional must assess the appropriateness and safety of all equipment for
each user.
• This product is intended for use by clients of unreliable judgment. Adult supervision is
required at all times.
• To prevent falls and injuries:
○Do not use this product on rough and uneven terrain, around swimming pools, or
near stairways.
○Ensure the appropriate use of straps and supports at all times. Straps and supports
are provided for the safety of the user and must be carefully adjusted for comfort and
security.
○Tighten all adjustment knobs before use and immediately after making any
adjustments.
○Fasten all safety belts.
○Do not use the Rifton Tricycle for clients with strong involuntary movements, poor
body balance, or limited head control
○To prevent injury, client should always wear shoes and a protective helmet.
• To prevent falls, strangulation, head entrapment or other injuries, always use seatbelt
when the butterfly harness or headrest are in use.
• Do not use this product for clients outside the height and weight limits specified in this
manual.
• To prevent structural failure, which may result in serious injury or death:
○Inspect this product and accessories regularly for loose or missing screws, metal
fatigue, cracks, broken welds, missing attachments, general instability or other signs
of excessive wear.
○Immediately remove this product from use when any condition develops that might
make operation unsafe.
○Do not use Rifton components or products for any purpose other than their intended
use.
WARNING

4
Recommended use
The Rifton Tricycle is a Class 1 medical device. It can be used for therapeutic reciprocal
exercise for maintaining of range of motion and strength, or for recreational purposes for
children and adolescents with disabilities. Chain drive from pedals to rear wheel offers the
following advantages:
• Pedaling is slightly forward of the seat instead of at front wheel as with many other
tricycles. This provides a more efficient, comfortable and natural posture.
• Steering is separate from pedaling, reducing the coordination needed to pedal and steer
the tricycle.
User and item dimensions
User dimensions – inches (cm) R120 small R130 medium R140 large
Inside leg length 17–22 (43–56) 22–28 (56–71) 25–35 (64–89)
Key user dimension: inside leg length
The extended leg should reach from seat to pedal comfortably when both feet and torso are
strapped into place.
Important: User’s weight must not exceed the maximum working load. Rifton Tricycles are not
intended for children with strong reflexes or poorly developed trunk balance and head control.
Consult your child’s therapist before ordering.
Item dimensions – inches (cm) R120 small R130 medium R140 large
Overall height 37 (94) 40 (102) 53 (135)
Overall length 45 (114) 52 (132) 65 (165)
Overall width 27 (69) 27 (69) 31 (79)
Wheel diameter 13 (33) 15 (38) 19 (48)
Seat center to extended pedal 17–22 (43– 56) 22–28 (56–71) 25–35 (64– 89)
Gear ratio (approximate) 1:1 1:1 1:1
Item weight – lbs (kg) 47 (21) 56 (25) 65 (29)
Max. working load – lbs (kg) 150 (68) 160 (73) 200 (91)
Tray dimensions – Inches (cm) small large
Inside dimensions 8½ x 12½ (22 x 32) 11½ x 13½ (29 x 34)
Max. working load – lbs (kg) 10 (5) 15 (7)

5
IMPORTANT
Please save this product manual for future reference. Additional copies are
available at www.rifton.com
Key for users
Use this key to determine which sections of this product manual apply to you.
Technical Users For professionals who order and set up Rifton products.
Home Users For care-givers who use Rifton products on a regular basis.
Maintenance Personnel For anyone who is responsible for service or
re-ordering of Rifton products and parts.
Check your order
Tricycle main frame, handlebar assembly, backrest assembly, front guide bar (if ordered),
accessories for the tricycle, and this product manual ship together. Rear steering bar (if
ordered) and stationary stand (if ordered) ship in separate cartons.
You may not have ordered all of the available accessories, but use the diagrams that follow
to confirm that your order is complete.
If your shipment is incomplete or in any way damaged on arrival,
please call Customer Service, 800.571.8198.

6
Basic components
Trunk support system
To prevent falls,
strangulation, head
entrapment or other injuries:
• Always use seatbelt and lateral
supports when butterfly harness is
in use.
• Ensure correct adjustment and
positioning of the butterfly harness at
each use (see Figure 6a).
• Ensure that the backrest tube extends
beyond the front edge of the clamp (E).
• Do not adjust seat while a rider is on
the trike.
Recommended use
The trunk support system aids users who
have difficulty remaining upright while
sitting. It can be used to correct excessive
leaning toward one side.
Attaching: (see Figure 6b)
1. Remove knob (A) and clamp channel (B)
from trunk support.
2. Place assembly on backrest tubes (C) in
the position shown, with the bolt facing
the rear.
3. Place clamp channel (B) and knob (A) on
the bolt and tighten securely.
4. Repeat procedure for lower ring
attachment bar (D).
Transfers and adjustments:
(see Figure 6b)
1. Push oval release button (F) to remove
lateral supports (G).
2. Seat the user on the tricycle, and
re-position the lateral supports using
the oval release buttons (F) to make any
WARNING
Figure 6b
C
C
A
A
B
B
D
D
Figure 6a
E
E
F
F
G
G
H
H
I
I
J
J
J
J

7
necessary adjustments to the lateral
supports (see Figure 6b).
3. If desired, clip on butterfly harness (H)
using the ring attachment points
(D and I) and adjust strap lengths
with strap adjusters (J) (see Figure 6b).
Backrest pad
Attaching:
1. Remove knob and clamp channel (A)
below seat.
2. Slide backrest tubes out.
3. Turn backrest upright (see Figure 7a) and
attach with clamp channel and knob (A)
below seat.
4. Attach additional backrest pad (B)
if needed.
Adjusting:
Backrest pad adjusts vertically 12"
(30.5 cm) above seat with knob (C),
and 3½" (9 cm) horizontally with knob (A).
Seat
Adjusting:
To adjust seat height, loosen knob (D)
move seat to desired position, then partially
tighten knob (D). Move the seat up and
down slightly to engage the pin in the
nearest seat post hole. Tighten knob (D)
securely (see Figure 7b).
Parking brake
The parking brake (E) stabilizes the tricycle
while the rider is getting on or off. It is
for use on flat surfaces only. Brake can be
operated by hand or foot (see Figure 7c).
A
C
Figure 7a
Figure 7b
D
B
E
E
Figure 7c

8
Handlebar and handbrake
Hand brake is not available on the
small tricycle.
Recommended use:
A conventional handlebar (see Figure 8a)
or loop handlebar (see Figure 8b) can be
used with your Rifton tricycle. Hand brake
(C) allows the user to slow and stop the
tricycle.
Adjusting the conventional
handlebar: (see Figure 8a)
Handlebar height adjusts 3⅝” (9.2 cm)
with knob (A).
Adjusting the loop handlebar: (see
Figure 8b)
Rotate handlebar toward or away from
rider by loosening the two oval knobs (B).
Secure in required position by tightening
both knobs.
Handlebar adjusts vertically 3⅝” (9.2 cm)
with knob (A).
Operating the hand brake:
The hand brake (C) allows the user to slow
and stop the tricycle.
For the loop handlebar ONLY: the hand
brake (C) can be positioned anywhere on
the loop handlebar using the hook and
loop strap (D) provided.
Figure 8b (Loop handlebar)
C
B
A
Figure 8a (Conventional handlebar)
A
D
C

9
Accessories
Headrest
Two headrests are available for use with
the trunk support system only. One is flat
the other contoured.
Attaching:
Press white oval button (A) and insert
metal headrest bar into slot (see Figure 9a).
Release button to engage headrest and
click into place.
Adjusting:
Press white oval button (A) and raise or
lower headrest. Release button to engage
and click into place.
To adjust depth and angle of headrest,
loosen both black knobs (B). Move
headrest to desired position and tighten
both knobs securely.
Front guide bar
Recommended use:
The front guide bar allows the caregiver to
guide and move the tricycle from the front
(see Figure 9b).
Attaching:
The clamp cannot be attached with the
handlebar in the lowest position. Once the
clamp is in place the handlebar can be fully
lowered.
1. Loosen knob (A) as far as it goes to
open clamp.
2. Attach front guide bar to handlebar
as shown.
3. Tighten knob (A).
A
A
Headrest bar
Figure 9a
B
B
A
Figure 9b

10
Rear steering bar
To prevent pinching
or crushing, ensure
adequate clearance between the
handlebar and push rod (C) during left
turns. Do not use a very low handlebar
position with a high support bar (A)
position (see Figure 10a).
Recommended use:
The rear steering bar enables the caregiver
to guide the tricycle from behind (see
Figure 10b).
Before attaching, check the size numbers
on the short tube of the rear steering bar
to ensure that the rear steering bar is the
correct size for the tricycle (R120, R130, or
R140).
Attaching: (see Figure 10b)
The clamp (F) cannot be attached with the
handlebar in its lowest position. Once the
clamp is in place the handlebar can be fully
lowered.
1. Attach the support bar (A) to the
backrest tubes. The clamp channel and
oval adjustment knob (B) should face
the rear.
2. Snap the push rod (C) into the guide
loop (D).
3. Use the clamp knob (E) to open the
clamp (F), and then place it over the
handle bar U-tube and tighten it.
Adjusting: (see Figure 10b)
To raise or lower the support bar (A) loosen
knob (B) place in desired position and
tighten knob (B) again.
CAUTION
Figure 10a
Figure 10b
A
B
B
C
C
D
E
F
A
C
C

11
Abductor
Recommended use:
The abductor is for children who require
knee separation or abduction.
Attaching:
Place abductor onto tubes with large end
of bracket facing down. Bracket fits snugly
onto slanted frame tubes (see Figure 11a).
Communication tray
To prevent falls and
injury, do not use the
tray as a body support.
Recommended use:
The communication tray provides a surface
for personal communication devices and
other activities. Communication sheets
can be placed under the false bottom and
electronic devices can be secured to the
tray. The tray is easily removed when not in
use (see Figure 11b).
Attaching and adjusting:
1. Attach tray to the handlebar by
loosening the tray knob (E) and placing
it over the handlebar in location shown.
2. Tighten knob (E) while holding the tray
at desired angle.
3. To attach a communication sheet,
push through the holes in bottom of tray
to remove cover. Insert sheet and
replace cover.
CAUTION
Figure 11a
E
Figure 11b

12
WARNING
Stationary stand
To prevent falls and
injury, the stand
should be centered laterally on the length
of the rear axle (see Figure 12a).
Recommended use
The stationary stand converts your tricycle
into a stationary trainer, for learning the
basic motions of pedaling (see Figure
12a-12c).
Attaching:
1. Place the stand on the floor in the
desired location.
2. Lift the tricycle’s rear axle into the
correct notch on the stand (see Figure
12c). Use the lowest position for the
R120 (small), the middle for the R130
(medium), and the highest for the R140
(large) Rifton Tricycle.
Figure 12a
Figure 12b
Figure 12c

13
Operation
Adjust seat height so that the distance from seat to foot pedal approximates the key
user dimension of the client’s inside leg length. The client’s extended leg should reach
comfortably from seat to pedal when both feet and torso are strapped into place.
Approximate the height of the trunk support system so it is appropriate for client’s seat
to shoulder height (or adjust backrest height if used.) Approximate the optimal position
for the handlebar, and make sure the handlebar is out of the way prior to transfer. Make
sure the straps on the foot pedals are open and ready for feet placement. Apply the
parking brake.
Assist client to transfer to a seated position on the tricycle seat, making use of the low
transfer step as needed. Secure the seatbelt immediately when client is seated.
Finalize positioning adjustments for trunk support system and handlebar. Adjust and
add further accessories as needed: ie, the support laterals and butterfly harness of the
trunk support system (or backrest pad strap if used), the headrest, the abductor, and
sandal straps.

14
Maintenance
This product is designed and tested for an expected life of 5 years when used and
maintained in accordance with this manual. At all times, users must ensure that the
product remains in a safe and useable condition, including regular maintenance and
inspections as specified in this manual.
To prevent structural failure, which may result in serious injury or death:
• Inspect this product and accessories regularly for loose or missing screws, metal
fatigue, cracks, broken welds, missing attachments, general instability or other signs of
excessive wear.
• Immediately remove this product from use when any condition develops that might
make operation unsafe.
• Do not use Rifton components or products for any purpose other than their intended
use.
• Replace or repair components or products that are damaged or appear to be unstable.
• Use only Rifton authorized replacement parts. Order information for replacement parts
is provided on the back of this product manual.
Chain is oiled in the factory. If maintenance to chain is required, remove pan by
pulling upward on the back of the pan, then remove screw from the side of the chain
guard. Retain the screw. Remove chain guard by pulling upward to release from axle. After
servicing the chain, the chain guard and screw must be replaced. Snap pan back into place.
Chain tension is factory set. Should it
need tightening, do the following:
1. Slightly loosen the two cap screws (A)
on top of crank case using a hex head
wrench.
2. Use the same size wrench to tighten the
cap screw (B) at the front of the plate
until slack is removed from chain. Do
NOT overtighten.
3. Retighten the two cap screws on top of
crank case.
Cleaning
As needed, clean Trike with disinfectant wipes or a solution of up to 10% bleach. Do not
use excessive amounts of water.
The straps with hook and loop closures may be laundered. Engage the closures before
washing. Do not iron.
A
B

15
Warranty Statement
If a Rifton product breaks or fails in service during the first year, we will replace it
free of charge.
Materials
• Steel hardware items (nuts, bolts, screws, etc) are typically zinc or nickel plated, or
stainless steel.
• Upholstery items (pads, support blocks, padded prompts, etc) are typically
polyurethane foam with a fire-retardant cover made from expanded vinyl.
• Frames are typically steel or aluminum tubing, welded together, and coated with a
baked-on paint finish. Some frame components may also be stainless steel.
• Tires are tubeless, filled with polyurethane foam, and do not require inflation.
• Straps are typically made of polypropylene or nylon webbing.
• Plastic components are typically injection molded from a variety of
industrial resins.
All materials are latex, lead and phthalates free.
User modifications
To prevent serious injury or death, do not modify or alter Rifton
products or components, or use Rifton products or components
in conjunction with products from other manufacturers. Rifton does not accept
responsibility for any modifications or alterations made to our components or products
after they leave our premises. Customers modifying or altering our components or
products, or using them in conjunction with products from other manufacturers, do so
at their own risk.
WARNING

16
Rifton Contact Information
Mail
Rifton Equipment
PO Box 260
Rifton NY 12471–0260
Fax
800.865.4674
Phone
800.571.8198
9–5 EST
Online
www.Rifton.com
To order replacement parts
1. Locate the ID number of the product on the small white label.
2. Have this number available when you call 800.571.8198 for your
customer service representative.
Use only replacement parts supplied by Rifton Equipment.
We are glad to supply replacement parts. Although Rifton makes every effort to
supply correct parts and instructions for repairing or refurbishing your equipment,
you are responsible to make sure that the repairs or modifications are correctly and
safely completed.
@
Email
Sales@Rifton.com
YN52 ECO N/A Revision T
Find letters of medical necessity
and informative articles at:
www.rifton.com/trike
Other manuals for R120
2
This manual suits for next models
2
Table of contents