Rigeback Scoot User manual

For every Ridgeback sold, a donation is made to organisations promoting the
use of bicycles. Bikes and riding preserve our environment. By making cycling
our first choice transport, we can all help to ensure our planet is still a great
place to ride in the years to come.
www.ridgeback.co.uk
The easy way to learn to ride
Simple transition from walking to freewheeling
Balance and confidence come naturally

Seat post
Seat boltRear brake
Handlebar stem
Headset
Before they ride Sizing and Fitting Guarantee Limited warranty for bicycles
All Ridgeback bicycles are warranted to the original retail purchaser to be free from defects in material and workmanship.
Time period
Except for the specific models noted below, warranty
coverage on the bicycle frame extends for the life
of the bicycle, while owned by the original retail
purchaser. Warranty coverage on bicycle components
(including non-suspension forks but excluding tires,
tubes and cables) extends for one year from date of
purchase while owned by the original retail purchaser.
Warranty coverage of front suspension forks, rear
shocks and some components will be covered by the
warranty stated by their original manufacturers.
This warranty does not cover:
1 Normal wear and tear.
2 Any damage, failure or loss caused by accident,
misuse, neglect, abuse, failure to follow
instructions or warnings in this owner’s manual or
manuals supplied with the bike referring to original
equipment fitted.
3 Any damage, failure or loss caused by use of
bicycles for stunt riding, acrobatics or other similar
activities, or in any other manner for which they
were not designed. Bending of frames, forks,
handlebars, seat posts, or wheel rims can be a
sign of misuse or abuse.
4 Any damage, failure or loss caused by the use
of bicycles not intended for such use as, power
driven vehicles.
5 The original owner shall pay all labour charges
connected with the repair or replacement of all
parts. Under no circumstances does this limited
warranty include the cost of shipment
or transportation to or from an authorised
Ridgeback dealer or the distributor.
Useful product life cycle
Every Ridgeback bicycle and frame set has a useful
life cycle. This useful life cycle is not the same as the
warranty period. The warranty identifies the period
of time that Ridgeback will replace the product if
this becomes necessary. When Ridgeback provides
a lifetime warranty, this does not guarantee that the
product will last forever. The length of the useful life
cycle will vary depending on the type of bike, riding
conditions and care the bike receives. Any non-
standard use can substantially shorten the useful
product life cycle of a Ridgeback bicycle or frame
set. All Ridgeback bicycles and frame sets should be
annually checked by an authorised Ridgeback stockist
for indications of potential failures including cracks,
corrosion, dents, deformation, paint peeling and any
other indications of potential problems, inappropriate
use or abuse. These are important safety checks and
very important to help prevent accidents, bodily injury
to the rider and shortened useful product life cycle of a
Ridgeback bicycle frame set.
Limitations
Proof of purchase from an authorised Ridgeback
stockist is required for any limited warranty
replacement or repair. The foregoing warranties
are in lieu of and exclude all other warranties not
expressly set forth herein, whether express or implied
by operation of law or otherwise, including but not
limited to any warranties of merchantability or fitness
for a particular purpose. Ridgeback shall in no event
be liable for incidental or consequential losses,
damages or expenses in connection with its bicycle
products. Ridgeback’s liability hereunder is expressly
limited to the replacement of goods not complying
with this warranty or, at Ridgeback’s election, to
the repayment of an amount equal to the purchase
price of the product in question. Liability is not
limited or excluded for any bodily injury or death
caused by the negligence of Madison Cycles or any
of its employees.
Procedures
• Warranty service will be per formed by Ridgeback
or a Ridgeback authorised dealer. Proof of
purchase must be provided. Transportation to
and from the Ridgeback authorised dealer is the
responsibility of the purchaser.
• Ridgeback will have the option of either repair
or replacement at no charge for any defective
product, or repayment of an amount equal to the
purchase price of the product.
• In the event Ridgeback elects to replace a
defective frame, a new frame of equal or greater
value will be provided. The new frame may not
be the exact model purchased. Ridgeback is
not responsible for dealer labour charges for
component changeovers when a frame is
replaced after one year from the date of original
retail purchase.
• If you elect to repair a defective product yourself
or use the services of someone other than a
Ridgeback authorised dealer, Ridgeback will not be
liable for any damage, failure or loss caused by the
use of such unauthorised service or parts.
Effective July 1, 2007.

A Scoot beginner bike encourages the learning of
balance on two wheels by allowing a child to ride
confidently without the added distraction of pedalling.
Children riding a Scoot beginner bike in their early
days of cycling learn faster, ride more confidently and
are far less likely to experience any ‘taking off the
stabilizers’ wobbles.
The child sits on the saddle with their feet
comfortably on the floor. The transition between
walking and freewheeling / steering is simple and the
balance required to ride a bike is learned quickly.
When a child can confidently build up speed, steer
to maintain balance or negotiate a corner, often
within only a few hours of use, they have learned the
balance technique required. From here it is a small
step to move onto a bike with pedals, without the
need for stabilizers.
The first step is to set the saddle to a height
that allows the child to comfortably walk or push
themselves along whilst seated.
1
Scoot: Silver Scoot: Lime Scoot: Electric BlueScoot: Baby Pink

2
3
Saddle height and starting to ride
A saddle that is too high or too low will make
riding uncomfortable and unstable. Saddle height
is adjusted by using a Quick-Release clamp – for
safety reasons ensure that you know how to operate
this Quick Release lever properly by following the
instruction shown in ‘Things to check every time they
ride – quick releases’.
To find the optimum saddle height, raise or lower
the saddle to offer an approximately-correct position
that allows the child to be seated sit upright ensuring
their feet are flat or almost flat on the floor. If the
saddle height is not correct, re-adjust by a half
inch / 15 mm or so and try again. The child’s feet
should not be on extended tip-toes as this will not
offer stability required. With the saddle at the correct
height, they should be able to walk along and steer
whilst seated comfortably.
Walking is the first step. The child will naturally start
to push themselves along at a brisk speed that then
allows feet-up freewheeling as their confidence grows.
All Scoot beginner bikes are supplied with
an additional, longer seat post (270mm)
to allow for growing room and a wider fit
range. Consult your Ridgeback stockist if
you need to swap the seat post as incorrect
fitting could cause slippage which is
potentially dangerous.
Handlebar Stem
The stem of a Scoot beginner bike is adjustable for
height aand the shape of the handlebars allows
further position adjustment when rotated back or
forth in the stem clamp b . Both of which can easily
be adjusted if required using a 6mm allen key. The
handlebar should be positioned to allow the child to
sit upright in a comfortable and confident position
with easy access to the brake lever.
A loose stem or handlebar can cause a
serious accident – ensure that any loose
bolts are tightened before the bike is ridden
by physically checking the bar and stem
security. Consult your Ridgeback stockist
before riding if there is any doubt that the
stem is done up correctly.
Before they ride Sizing and Fitting
Maximum adjustments
When adjusting the saddle and stem
height bike, for safety reasons ensure
that maximum height / extension markers
(indicated below) are not exceeded.
The Scoot stem a and seat post b have
markers to indicate the maximum height
/ extension level. Do not exceed these
markers – if the marker is visible it means
the stem or saddle is too high.
Pre-Delivery Inspection
Your dealer will have given the bike a thorough Pre-
Delivery Inspection so that you can let your child ride
right away, safe in the knowledge that everything
has been newly adjusted and tightened. Although
unnecessary upon collection, we do recommend that
a Scoot beginner bike is regularly checked before
riding. Mechanical adjustments made in time can
also save repairs in the future.
Before riding Things to check every time they ride
Tightening the stem height bolt
a
Tightening handlebar clamp bolt
b
Seat post maximum height adjustment mark
b
Maximum stem height marker
a

4
5
Quick Release Levers
Saddle Adjustment
Always double check that quick release
levers are done up tightly.
NOTE that a quick release is NOT a nut and
bolt mechanism - it is a cam action device.
As the lever rotates to a closed position,
tension is applied to the clamp band. The
amount of clamping force is controlled by
the tension adjusting nut. Having undone
the cam lever, turning the tension adjusting
nut (on the other end of the quick release
skewer) clockwise whilst keeping the cam
lever from rotating increases the clamping
force when the cam lever is closed. Turning
it anticlockwise reduces the clamping force.
Less than half a turn of the adjusting nut
can make the difference between safe and
unsafe clamping force – as a guide, if the
adjusting nut is finger tight when the lever
is half-closed, the tension when fully closed
will be correct.
If you are at all unsure about the use of
quick release mechanisms, please ask your
Ridgeback Ridgeback stockistto show you
the correct method. It is simple once the
correct method of use is understood.
Failure to use a quick-release lever
correctly can result in saddle slippage
and loss of stability.
Before riding Things to check every time they ride
Bars and stem
Check the security of the bars and stem with a sharp
pull or twist. If they’re loose, tighten them carefully.
If you notice the bars moving in relation to the stem,
stop using your Scoot beginner bike immediately and
tighten them. Riding with a loose handlebar or stem
may cause an accident.
Brakes
Give the brakes a quick squeeze before use. It’s easy
to forget to reconnect brake cables after repairing a
flat tyre. Make sure that the brake blocks aren’t worn
and that they contact the rim properly. If in doubt,
ask your Ridgeback stockist for reassurance.
Wheels
Spin the wheels and make sure they’re not binding
on the brake blocks and that the brake blocks fully
clear the tyre at all times. A brake block rubbing
on the tyre sidewall will cause a sudden jamming
or a blow-out if not corrected. Sometimes this can
be fixed by adjusting the brake balance, but any
interference between rim, tyre and the brake blocks
needs to be fixed by an experienced mechanic.
Tyres
Give your tyres a squeeze to check the pressure (or
use a tyre gauge if you have one). For general use,
tyres should be pumped up to the pressure written on
the sidewalls, around 30-35 psi for the tyres fitted.
For use on rougher ground such as a woodland trail
or cycle path, a lower pressure of around 25-30 psi
may aid control and comfort but increase the risk of
punctures if under-inflated. Always be guided by the
recommended figures on the tyre sidewall and check
them before use.
Helmet and gloves
Although wearing a helmet won’t make anyone
invincible, it can dramatically reduce damage to
your head in event of a fall. Children’s helmets are
available in a vast array of styles and colours and
we recommend that your child wears a helmet when
riding any bike– just as you might wear a seat belt
while driving. While learning to ride should not be
dangerous, tumbles are inevitable and wearing a
helmet is good practice as well as a good habit to get
into for future cycling years.
Gloves are always a good idea as hands naturally
go out to break a fall and mitts or gloves will protect
against gravel rash.
Before riding Things to check every time they ride
Ridgeback recommends that you always wear a helmet while cycling.
Adjust saddle height
Open Quick-release lever. ONLY if required
– loosen / tighten tension adjusting nut
Close lever. Ensure lever requires force to
close fully

6
7
Headset
Although the bearings of a headset don’t rotate
as frequently as the other bearings on a bike, they
are among the most important, as they control the
accurate steering of a bike. A loose headset can
quickly damage a bike making it harder to control.
Check the headset regularly for smooth rotation. To
check headset tightness, rock the bike back and forth
or raise the front wheel a little then drop it down.
If you feel a knocking or looseness, the headset
or stem is probably loose. There are two types of
headset – a Scoot beginner bike uses a conventional
headset, adjusted with headset spanners.
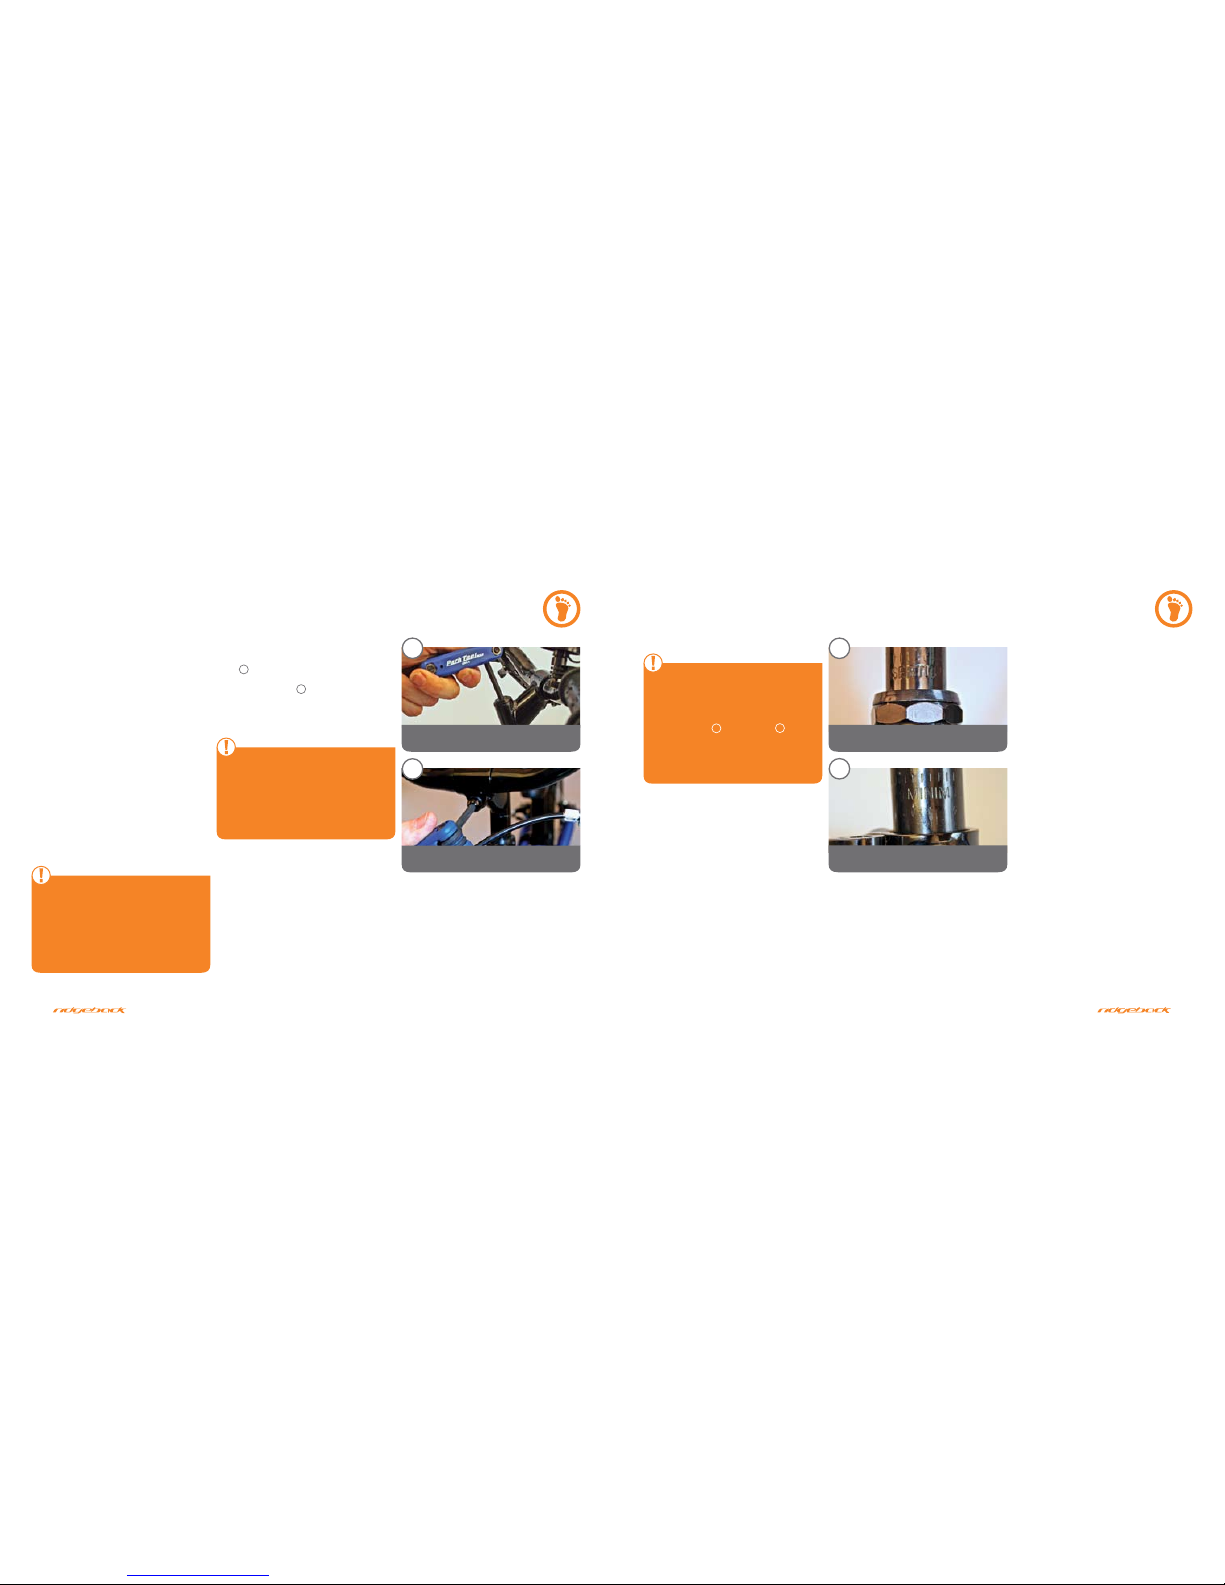
Adjustment of the headset
Conventional headsets have two threaded nuts that
tighten and lock the headset bearings. The handlebar
stem, which fits inside the fork (and headset) is
totally separate component and is not involved in the
headset adjustment procedure.
Headset adjustment needs special headset spanners.
When set correctly, the headset should remain
adjusted for some time and given the relatively high
cost of the spanners, you might want to leave this
job to your dealer. However if you intend to be fully
equipped, it is best to get the Ridgeback stockist to
show you the correct way of adjusting the headset
when you buy the spanners. The idea is to tighten the
lower nut so that the play in the bearings is taken up,
but not so tight that the fork will not turn freely. The
top locknut is then tightened onto the lower one to
keep it in place.
Handlebar Stem
The stem of a Scoot beginner bike is adjustable for
height and the shape of the handlebars allows further
position adjustment when rotated back or forth in the
stem clamp. Both of which can easily be adjusted
if required using a 6mm allen key. The handlebar
should be positioned to allow the child to sit upright
in a comfortable and confident position with easy
access to the brake lever.
A loose stem can cause a serious accident
– ensure that any looseness here is resolved
before the bike is ridden, and consult a
Ridgeback stockist before riding if there is
any doubt that the stem is done up correctly.
A loose headset will cause damage during
use however it is not safety-critical.
How things work Simple maintenance
V-Brakes
A Scoot beginner bike is equipped with ‘direct pull’ or
‘V’ brakes. Small hands cannot provide much braking
power but learning to operate a brake is a vital safety
skill, and the braking power provided will quickly slow
a young rider down.
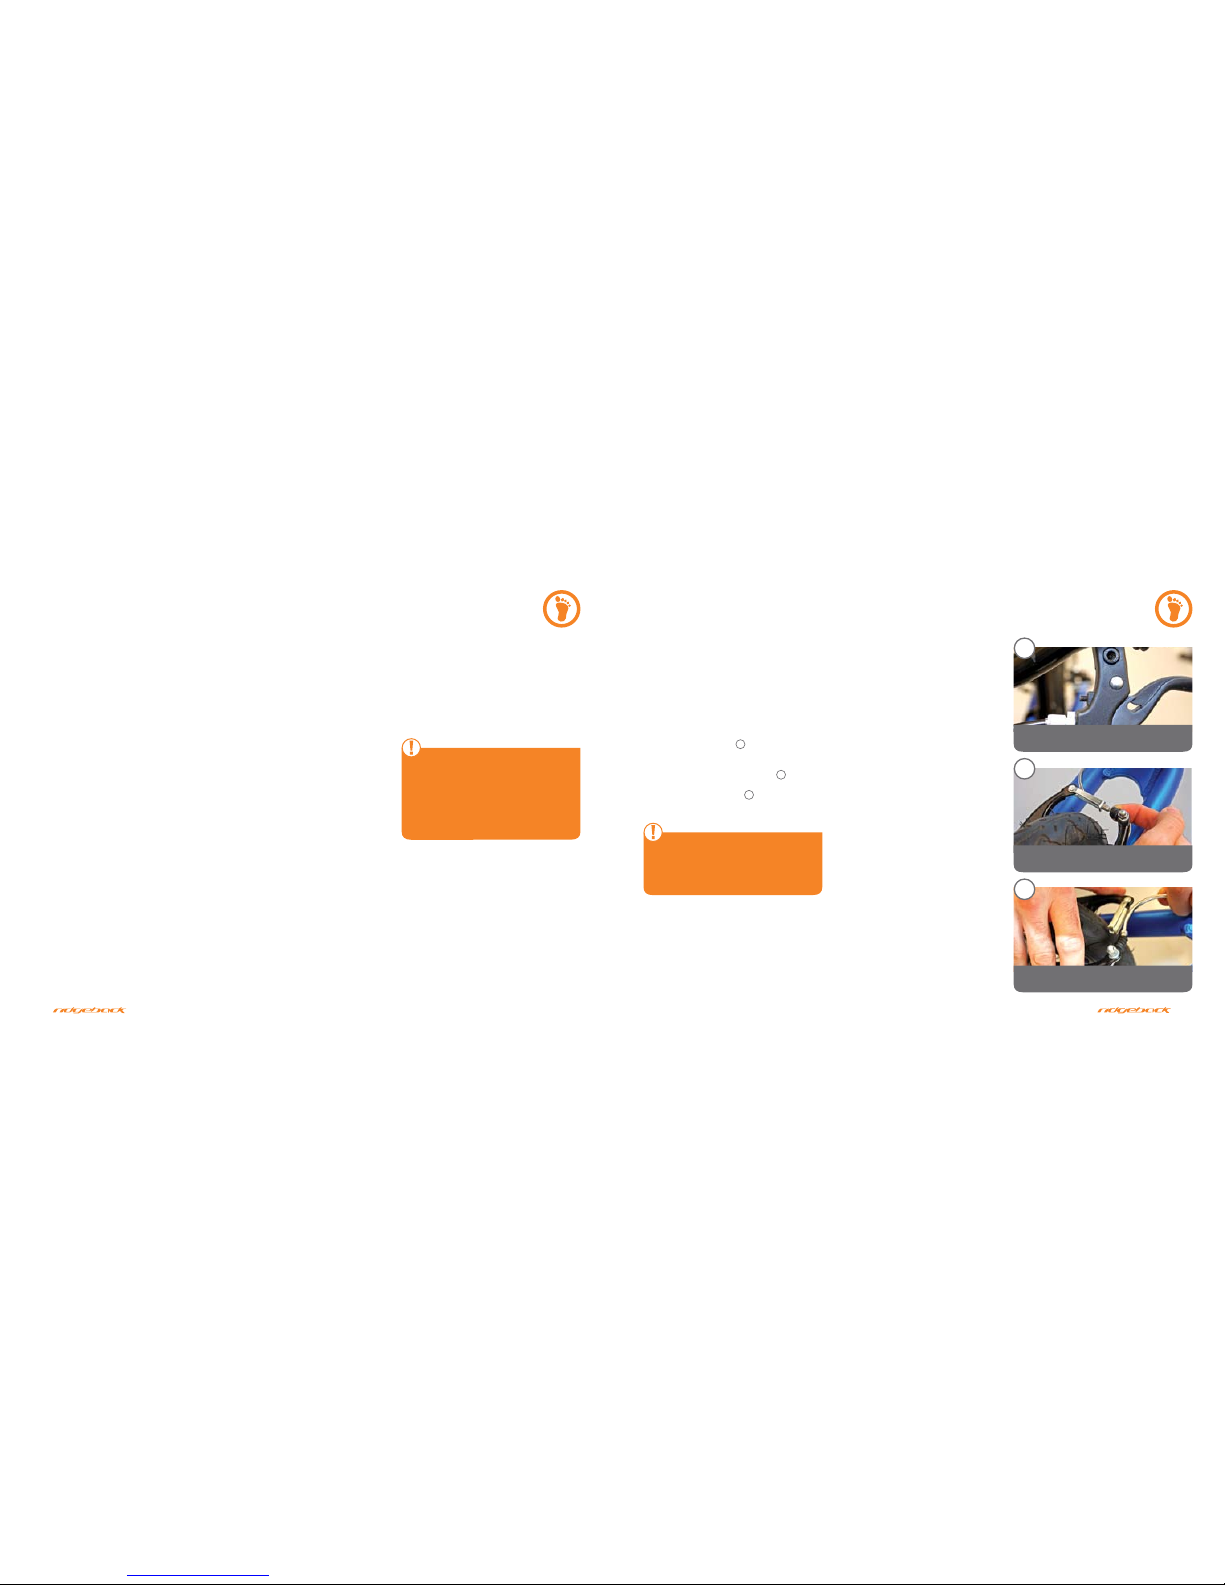
To disconnect the brakes (to remove a wheel for
example), you need to release the curved metal tube
(the lead pipe or noodle) from the slotted retainer
connected to the brake arm b. Grab both brake
arms with one hand and squeeze the brakes on to the
rim. There should now be enough slack in the cable
to unhook the lead pipe from its retainer callowing
the brake arms to move apart for easy wheel removal
- if not, use the barrel adjuster aon the brake lever
to add a little slack, but remember to take up this
slack at the barrel adjuster before riding.
A fully functioning and safe braking system
is vital to safety – please ensure you read
this section and if in doubt consult your
local dealer.
The brake pads on V brakes have grooves in them
to clear water from the rim. The pads must be
replaced before the pad is worn to the bottom of
these grooves. Most pads can simply be unbolted
and replaced. When unbolting pads to replace them,
be sure to keep the many washers and shims in the
correct order. Slip these on to the post of the new
pad. Hold the pad flat against the rim and tighten
up the allen bolt. Double check the pad hits the rim
squarely without overlapping the edge of the rim and
give the allen key fixing bolt one final turn or partial
turn to ensure pad is totally secure.
To reconnect the brake, squeeze the brakes against
the rim and hook the lead pipe back into the retainer.
Make sure that the lead pipe is correctly located and
that the outer cable is properly seated in the brake
lever (the outer cable can often ‘pop out’ of the brake
lever during the disconnecting of the cable at the
brake arm end of the system).
The brake pads on a Scoor beginner bike will have a
far longer lifespan than those used on an adult’s bike.
As the pads wear, you can take up additional cable
slack with the barrel adjuster on the brake lever.
Keep an eye on the pads though, make sure they’re
not too worn and that they still hit the rim squarely.
Uneven pad wear may create ridges that can cause
the pad to stick or jam against the rim - it only takes
a moment to correct it and it may avoid problems
later. Use quality brake pads for replacement.
How things work Simple maintenance
Sliding the dust cover away from lead pipe
b
Brake cable barrel adjuster (below)
and reach adjustment screw (above)
a
Unhooking the lead pipe from its slotted
retainer
c

8
Brake levers
A Scoot beginner bike has a reach-adjustable brake
lever suitable for small hands. It can be adjusted to
reduce the reach if required. This is done with a small
screw indicated below a. The barrel adjuster is for
adding or removing cable tension (moving the pads
closer to or further from the rim) to ensure correct
operation of the brake.
It is vital that the brake pads come into
contact with the rim with some force before
the lever travel is stopped by the handlebar
grip – try the brake yourself and remember
small hands aren’t very strong!
Tyres / Punctures
Always keep the tyres inflated to the correct pressure.
Check the tyre periodically for cuts, cracks and
embedded thorns and debris. Should you have
a puncture out on the trail, the simplest thing to
do is to replace it with a spare tube, repairing the
punctured tube at home. In all cases, whether
trailside or back home, always follow the instructions
on the puncture kit and never rush the job. ‘Glueless’
puncture kits are common these days and the
simple to use self-adhesive patches make puncture
repairs a much easier job than ever before. If using
a conventional repair kit always allow the glue to dry
fully before applying the patch.
Free 30-Day Check-up
This is offered on all Ridgeback bikes, and though
there is little to check on a Scoot beginner bike, it
is advisable to have it checked over after 30 days
normal use. Please call to pre-book a time to drop
in to your local Ridgeback stockist who will carry out
a quick inspection (and adjustments if necessary) to
ensure optimum safety and correct set-up.
Your Ridgeback stockist may carry out the inspection
whilst you wait if you request this when booking the
bike in, however circumstances at your Ridgeback
stockist may require you to leave your bike and return
later. This check is limited to the original purchaser
and is only available from the Ridgeback stockist
where the bike was bought. Proof of purchase may
be required.
Should any replacement parts be required, your
Ridgeback stockist will advise you accordingly.
Replacement parts and any additional labour to fit
replacement parts will be charged for.
Ridgeback’s first check-up service is not an
alternative to regular mechanical attention.
Please refer to the advice above. Do not
attempt maintenance you are unfamiliar with
as a poorly maintained or adjusted cycle
could cause damage or injury. If in doubt
consult an authorised Ridgeback dealer.
How things work Simple maintenance
Brake cable barrel adjuster (below) and
reach adjustment screw (above)
a
Table of contents