Rilu E-Glider 7D User manual

P a g e | 1
1800 MY RILU www.rilu-e-bike.com.au
USER MANUAL
E-Glider 7D
Unit 2 - #2 Caulson Close
Maribyrnong 3032
Melbourne, Victoria
Australia
1800 MY RILU
Rev.09082019.E7D-UM
P a g e | 2
1800 MY RILU www.rilu-e-bike.com.au
Introduction
Product Description Page 4
Riding Range Page 5
Weight Page 5
Product Summary Page 6
General Usage Summary Page 7
Display
Turning E-Glider 7D (ON & OFF)
Page 8
LCD will not power on?
Page 8
Default Motor Assistance Level
Page 9
Turn “ON” LCD Backlight & Bike Lights Page 9
PAS Level Settings Page 9
Easy Start Page 10
Display - Error Codes Page 11
Stem
Adjusting Stem Page 12
Gearing
Adjusting - Gear Quick Adjustment Page 13
Gearing Adjustment - Uneven Shifting / Slipping
Page 14
Gear Alignment –
Gear #7
Page 15
Gear Alignment
– Gear #1
Page 16

P a g e | 3
1800 MY RILU www.rilu-e-bike.com.au
Motor
Motor
–
Changing Tire Page 17
Motor
–
Service Notes Page 17
Battery
Battery – Safety Notes Page 18
Battery – Locking Page 18
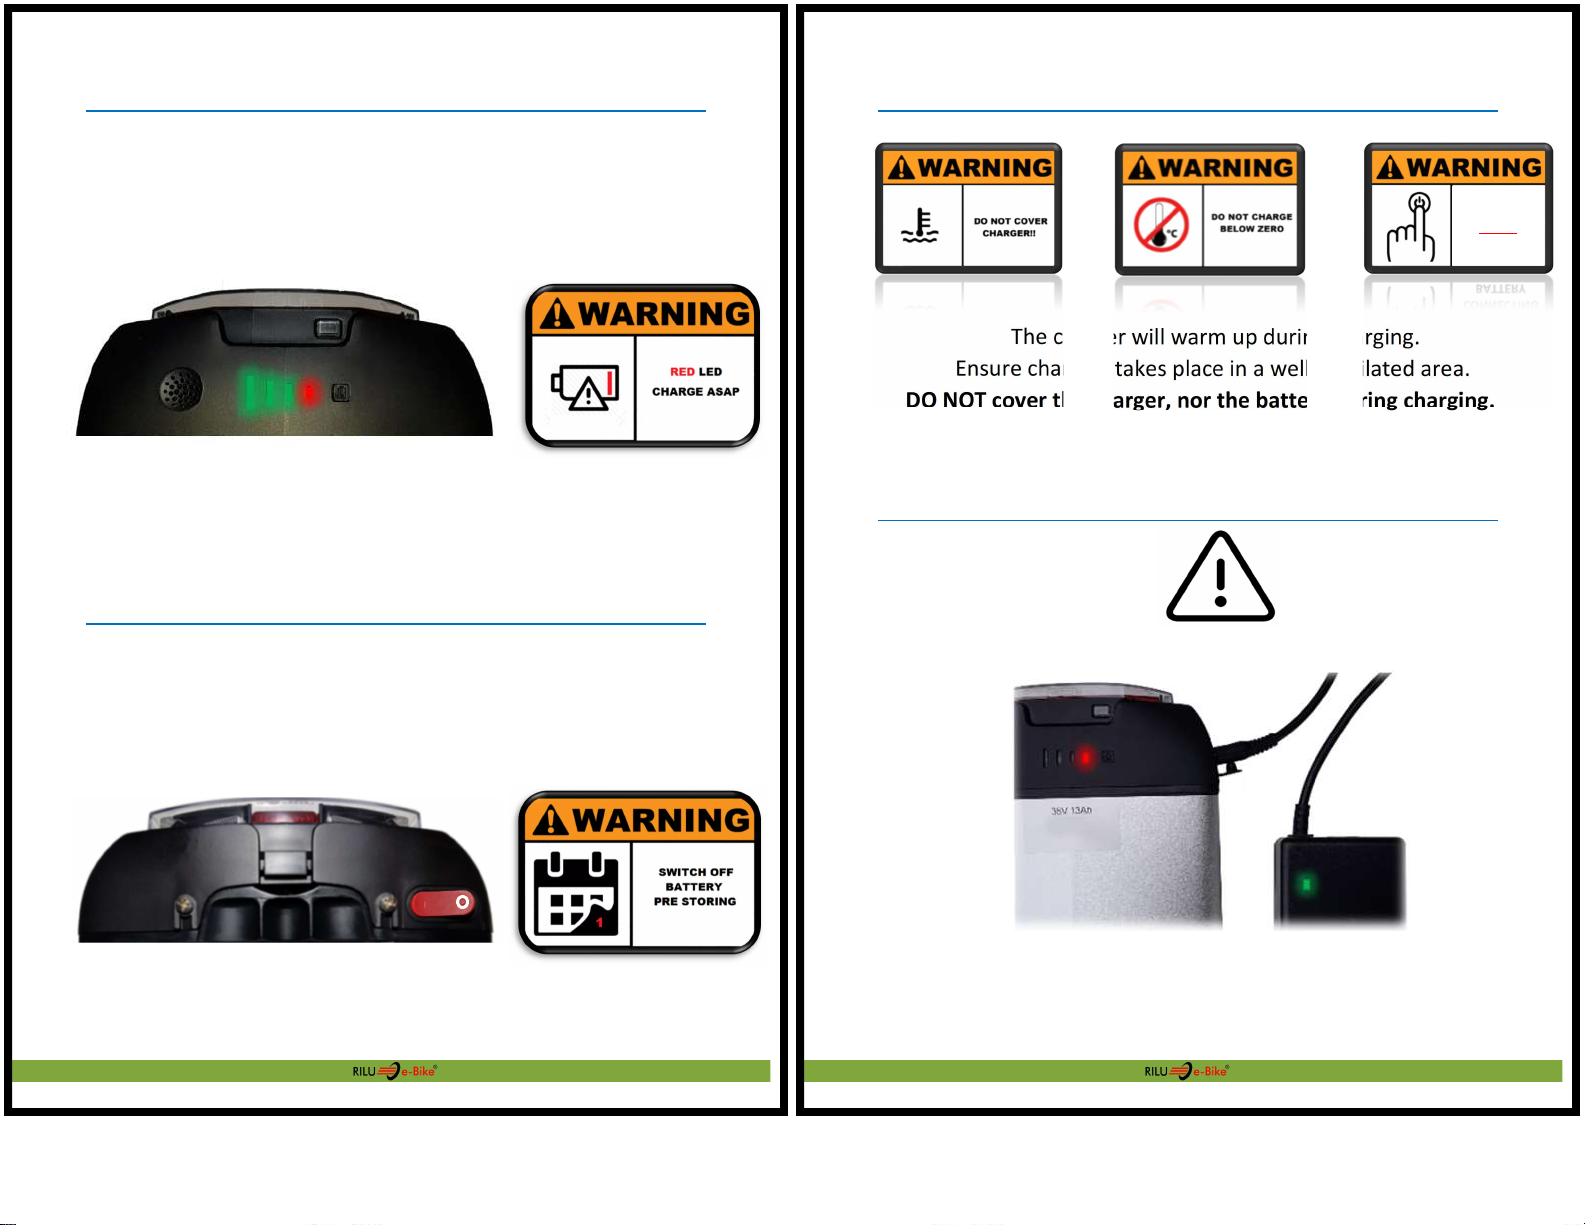
Battery – Capacity Bar Page 19
Battery – Storage Page 19
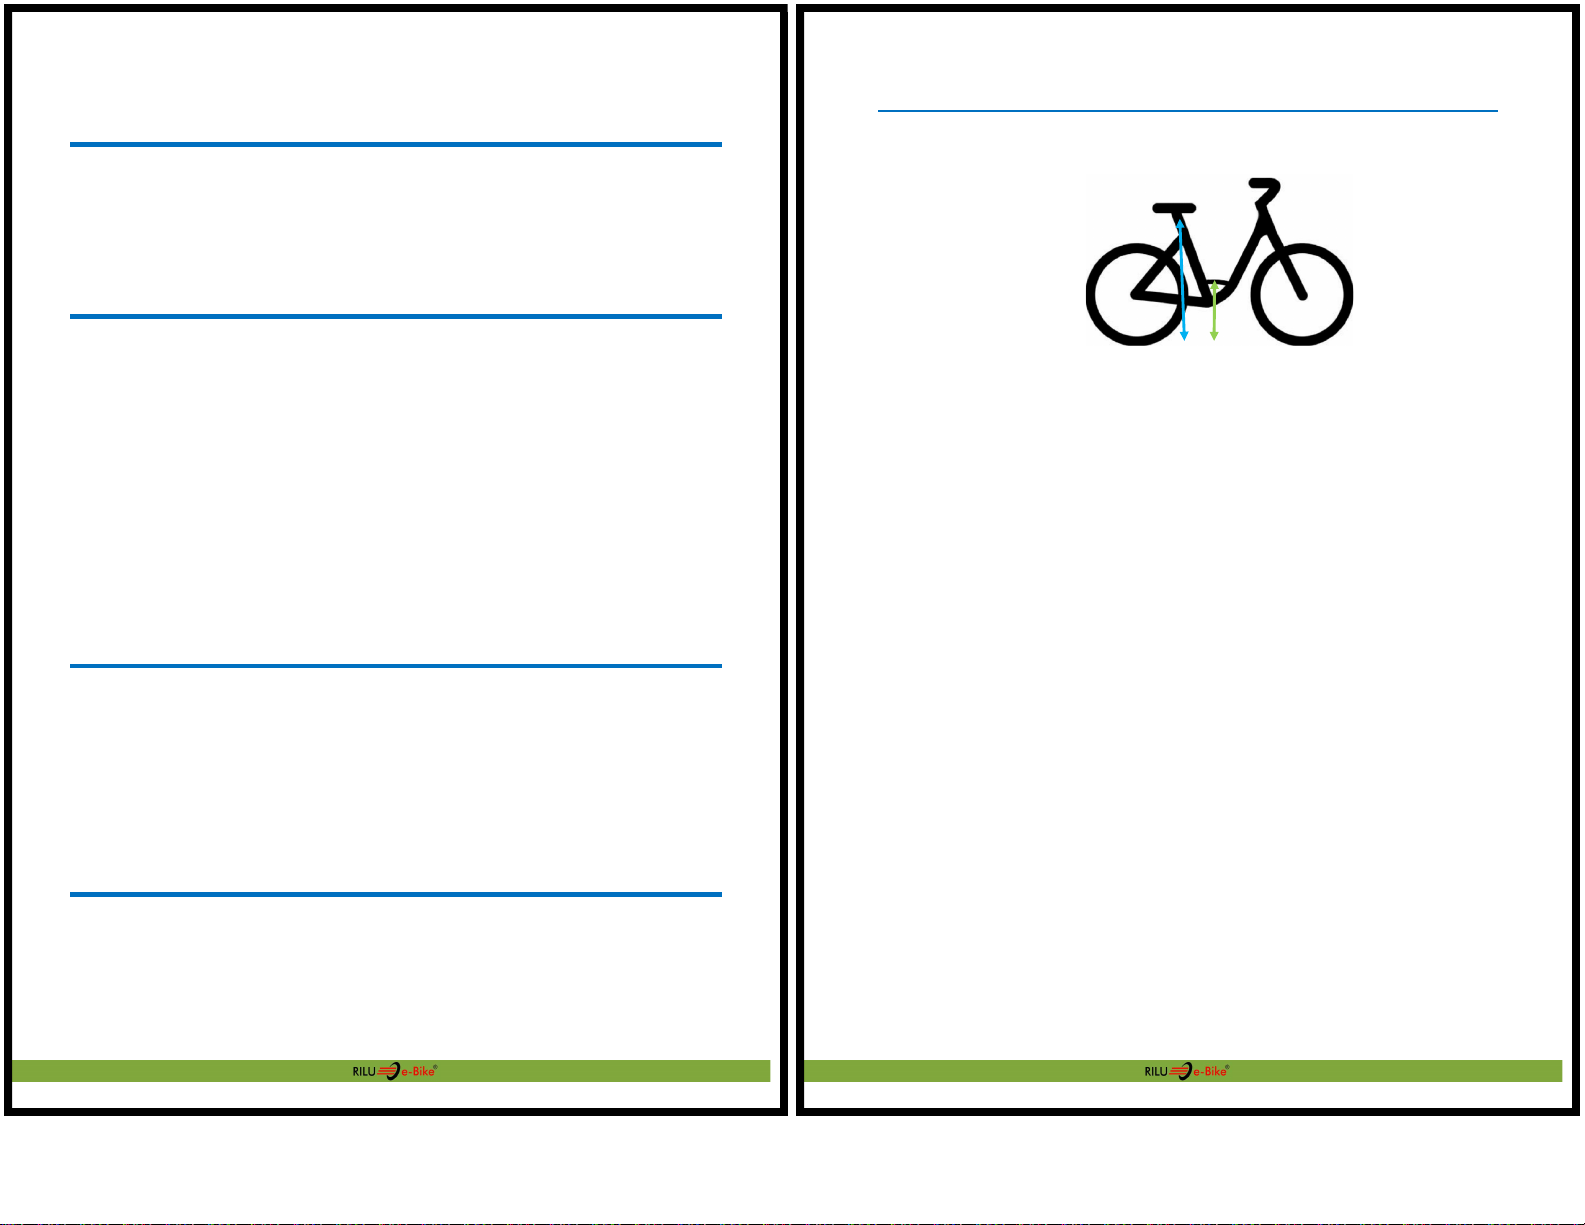
Battery – Charger Warnings Page 20
Battery – Charging Error Page 20
Sensors
Pedal Sensor – No Motor Power Page 21
Diagnosing – Faulty PAS Sensor Page 21
Replacing – Faulty PAS Sensor Page 22
Warranty
Logbook – Year 1 Page 23
Warranty Coverage Page 25
Warranty Certificate Page 28
P a g e | 4
1800 MY RILU www.rilu-e-bike.com.au
Product Description
Frame: 6061 Aluminium Alloy
43cm Seat
Height
39cm Step over
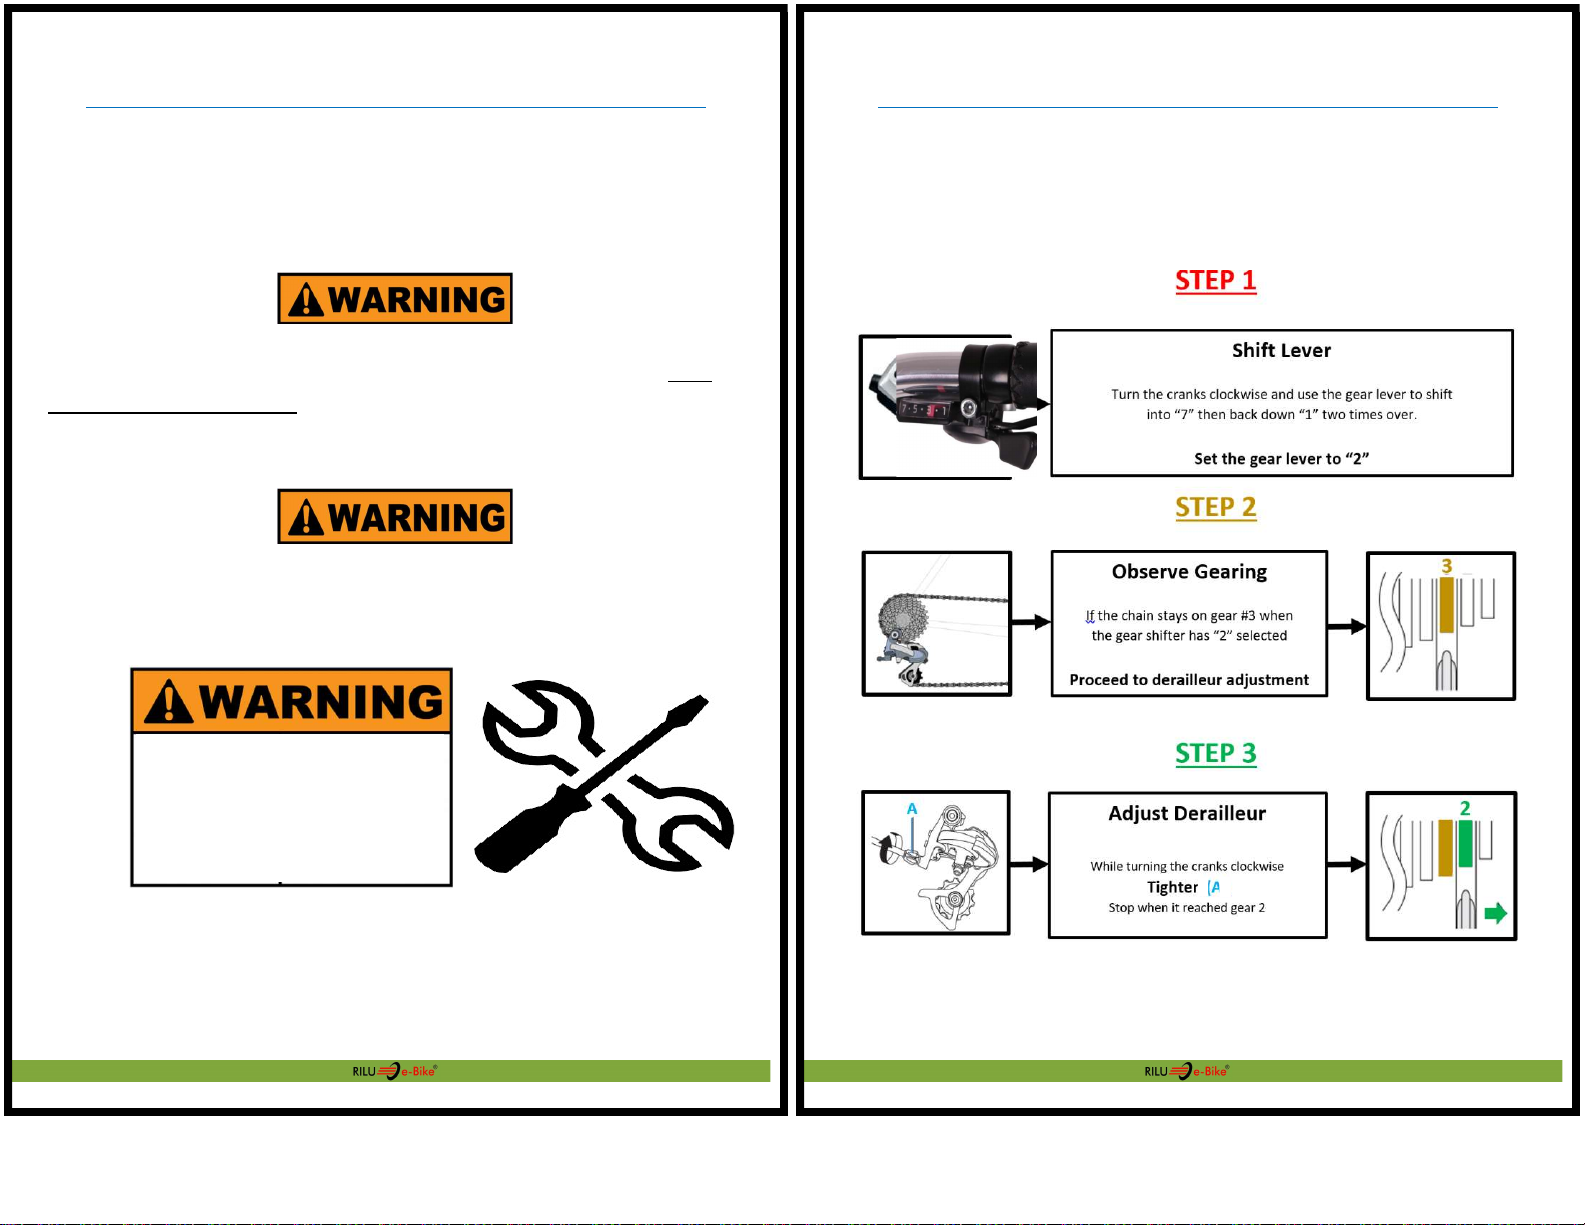
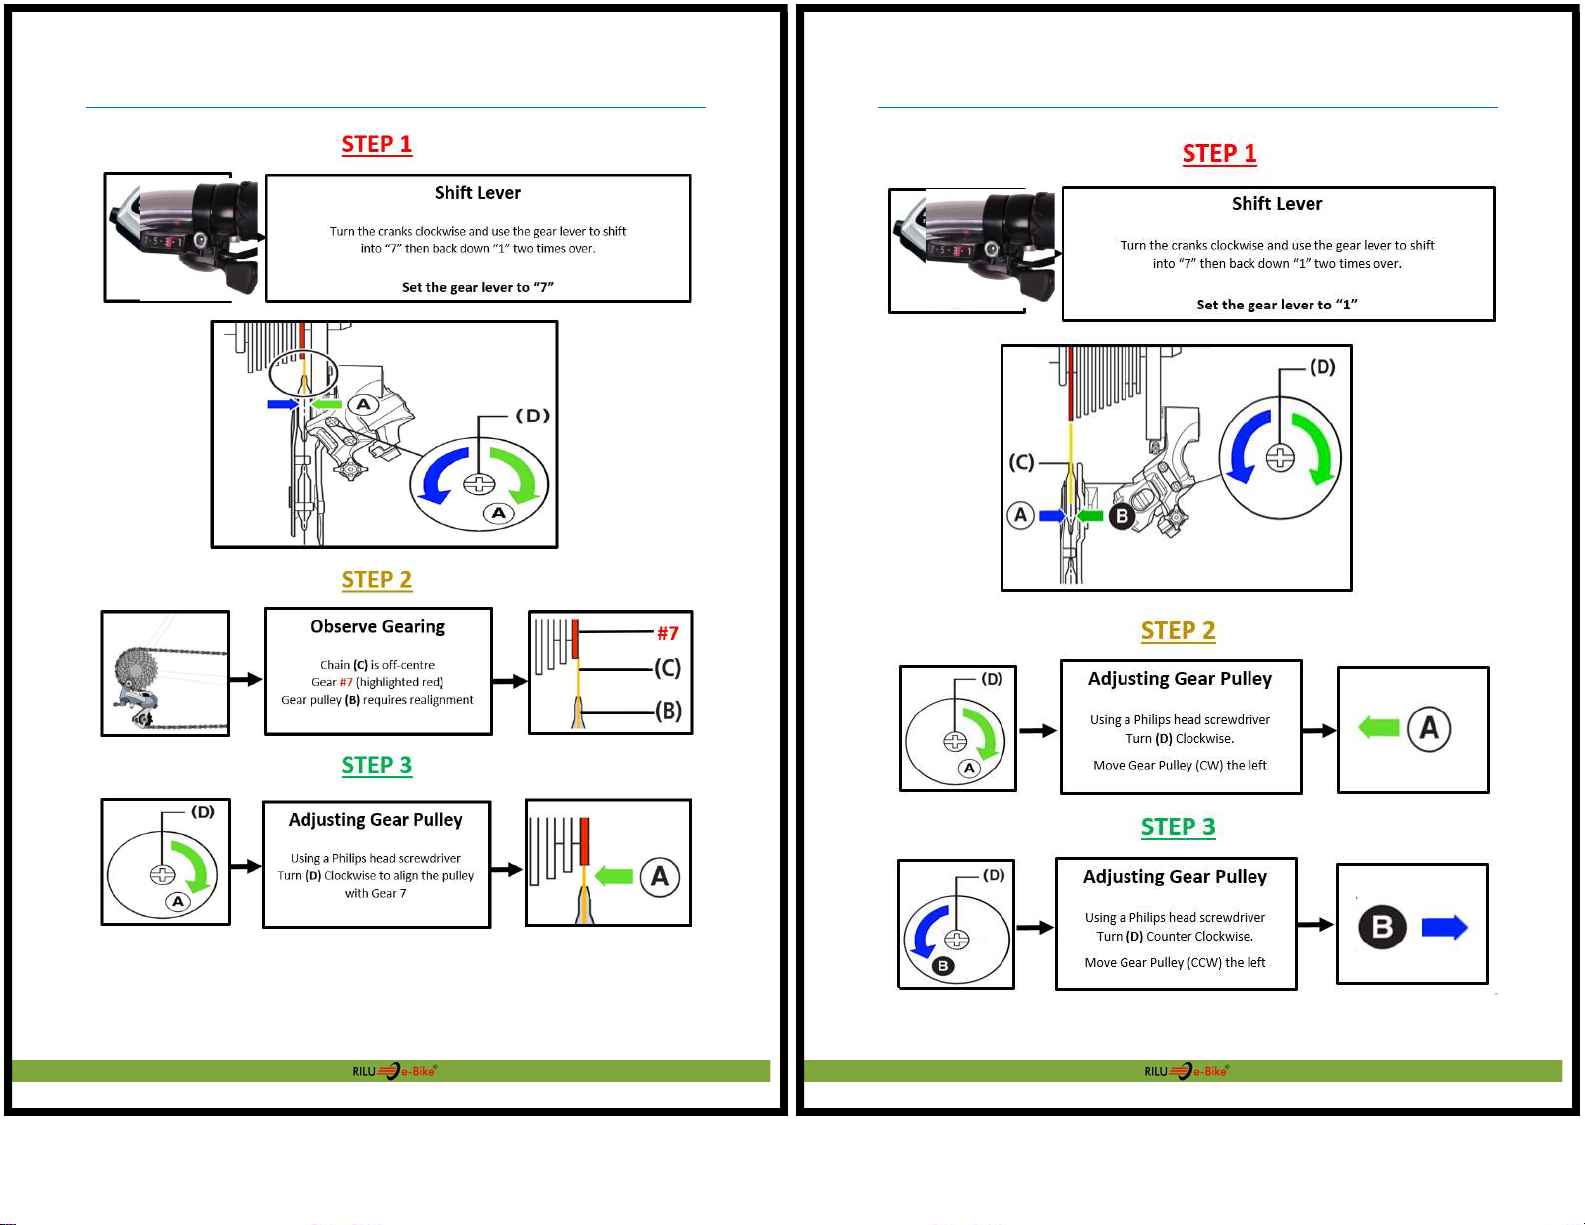
Gears: Altus 7 Speed – Shimano
Brakes: Front and Rear Disc – Shimano
Stem: Adjustable Stem – Aluminium Alloy - Zoom
Front Fork: Suspension Fork – Aluminium Alloy - Zoom
Rim & Tire 26” x 13G x 36H alloy
2.125” CST City Tire
Seat Post: Promax Suspension Seat
Saddle: KNUS Soft Feel
Motor: 36V / 250 W (High Torque)
Throttle: Thumb Start (6Kmh – Easy Start)
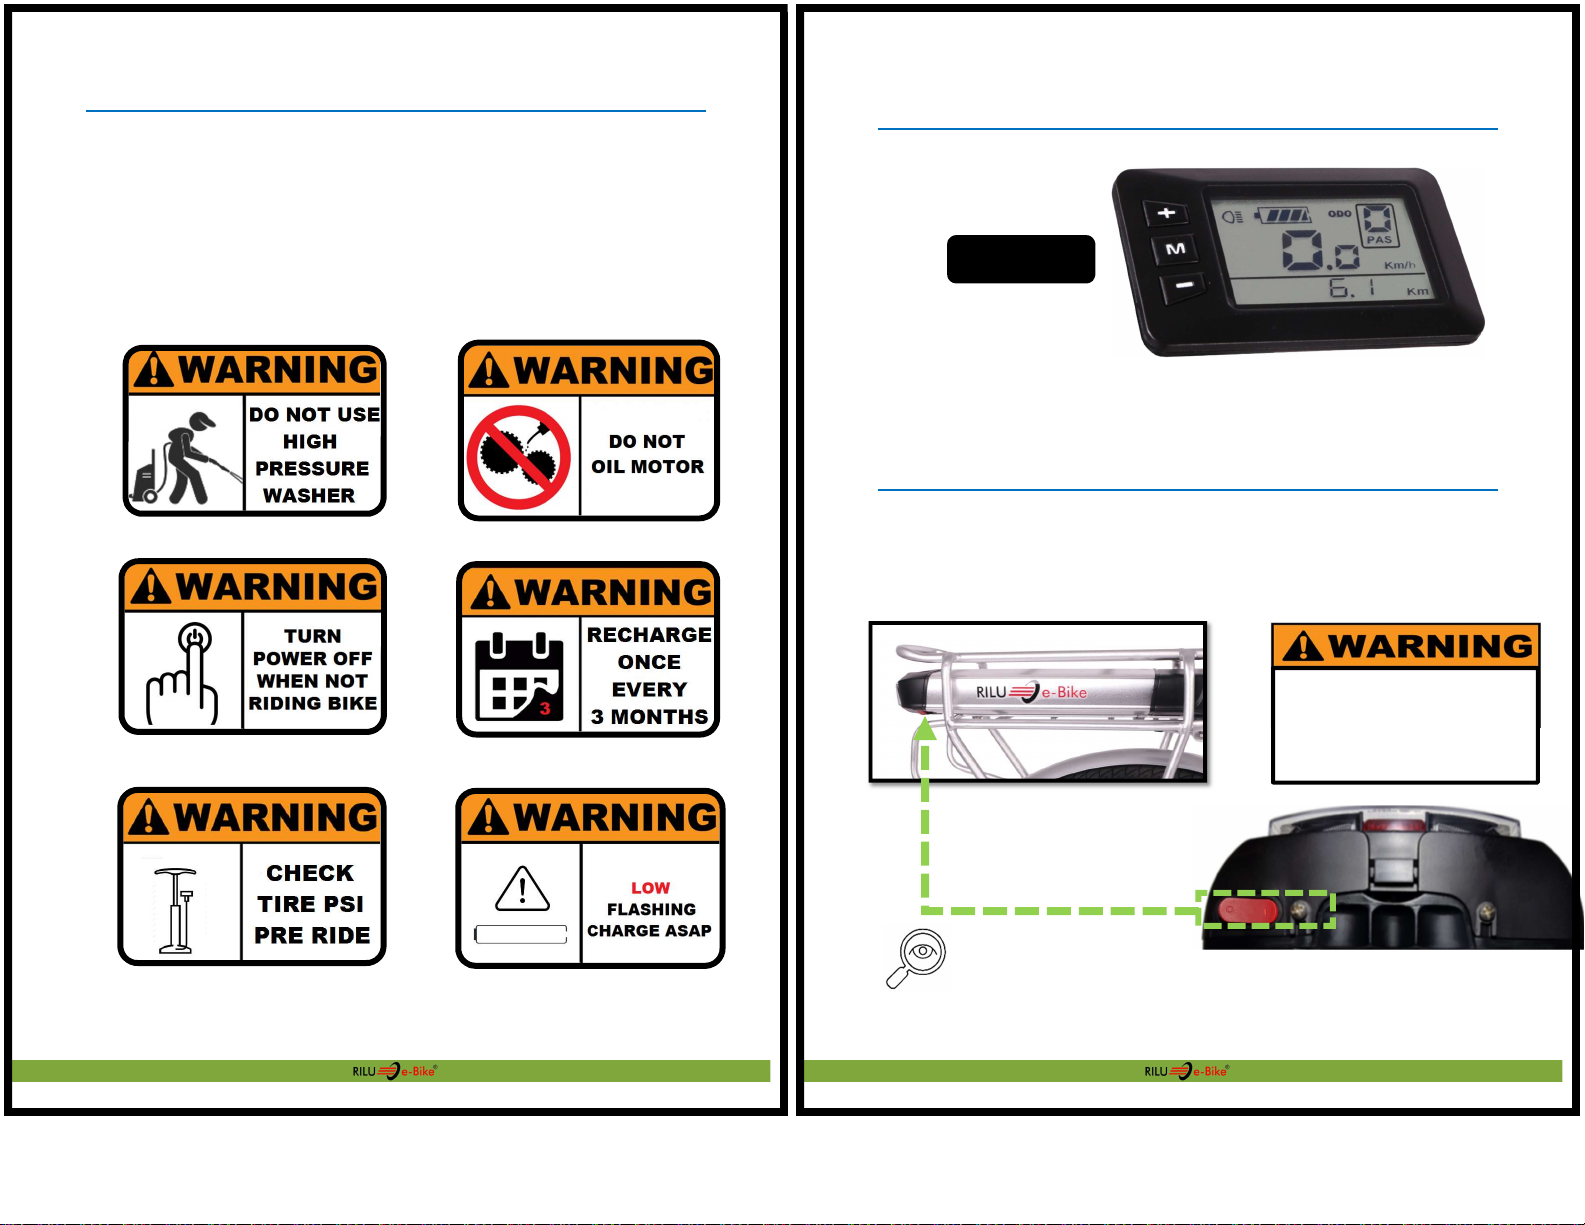
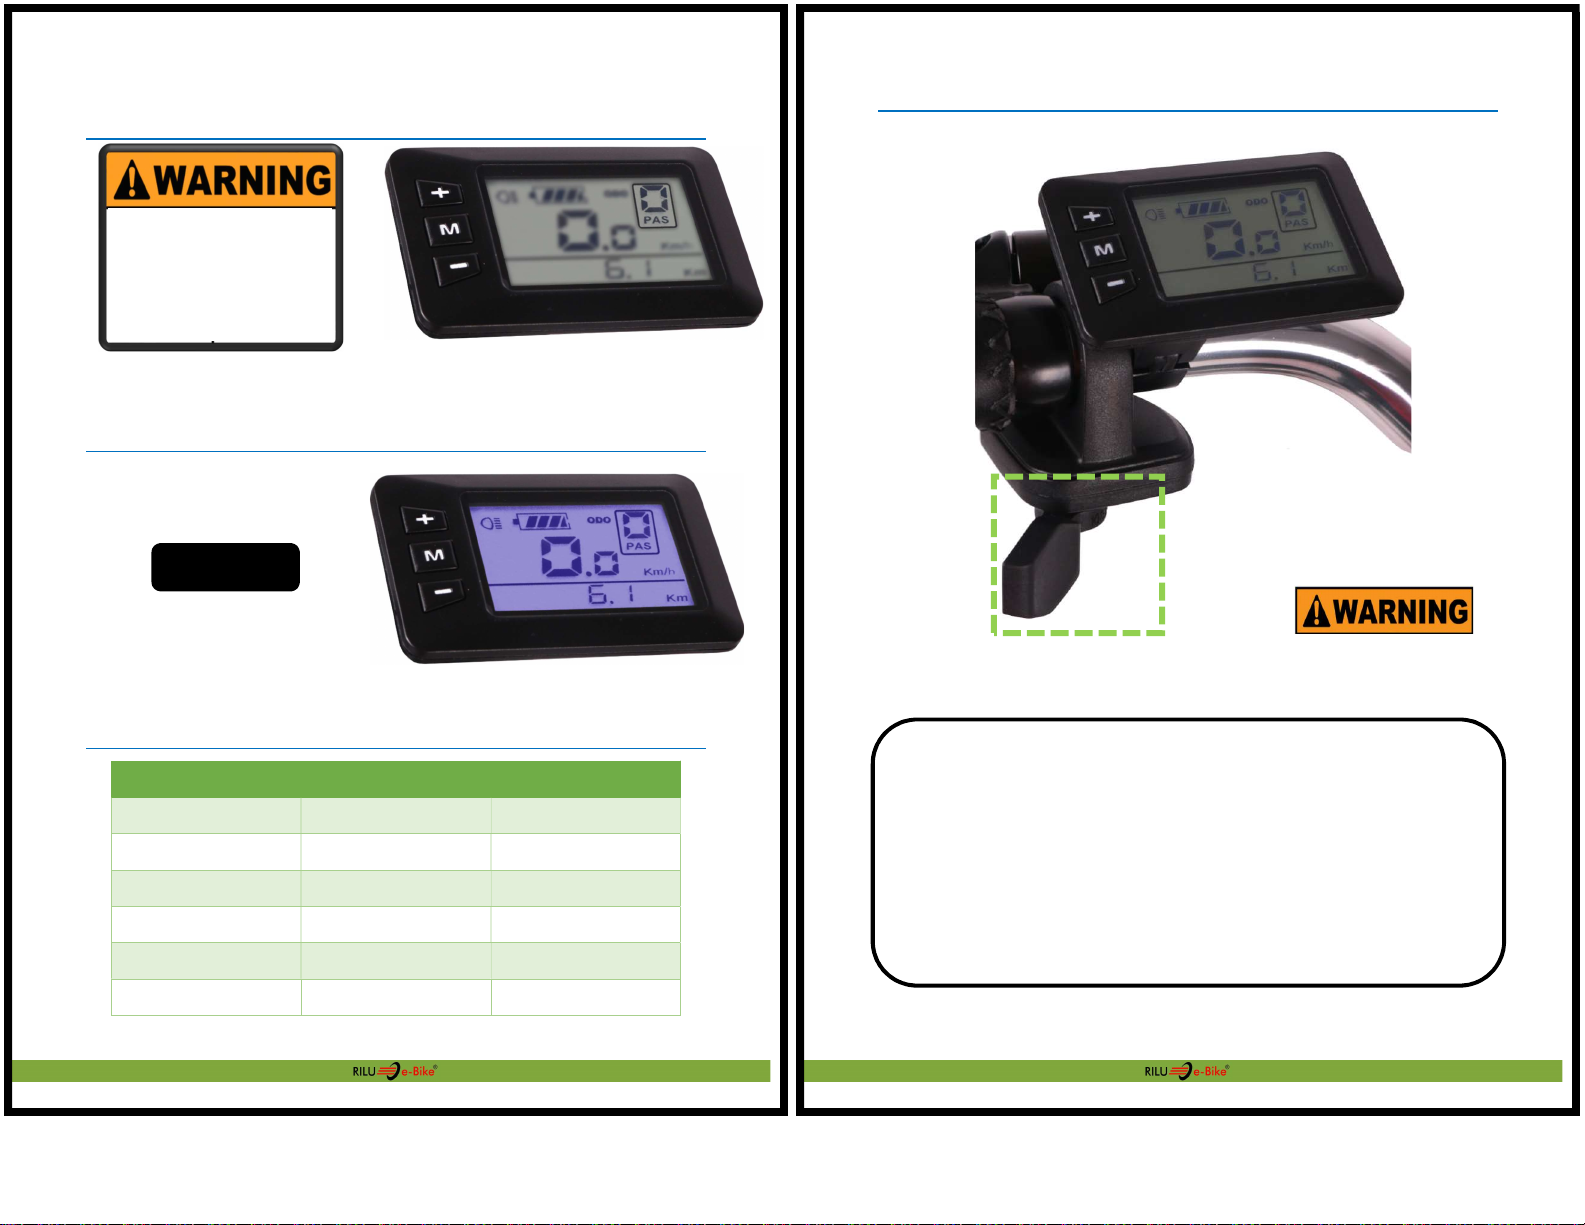
Display: LCD / 5 Modes (Motor Power )
Battery: 36 V / 13AH (Lithium Ion LG )
Charger: 36V / 2A (Smart charger)
Lights: Front & Rear (Front eBike battery power)
39cm

P a g e | 5
1800 MY RILU www.rilu-e-bike.com.au
Riding Range & Charge Time
Range depending on:
Rider, terrain, weather & Assist level.
PAS 40Km – 100km
Battery charge time is 5-6 hours
Weight
20.5 Kg (Bike) net weight
23 Kg (Battery Installed)
eGlider 7D Rated Load weight is 125Kg
P a g e | 6
1800 MY RILU www.rilu-e-bike.com.au
Product Summary
Congratulation on your purchase of a RILU E-Glider 7D low
step electric bicycle.
Your new electric bicycle has two different ways of
activating motor power.
Easy Start Throttle
Located on the left hand side of the handlebar is a thumb
triggered throttle which enables you to control the speed
of the motor up to 6km/h without the need for pedalling.
PAS
Built into your E-Glider 7D is a “Pedal Assistance Sensor”.
This automatically detect the speed at which you pedal
and moderates the ‘motors speed’ while riding.
By selecting from PAS 0 – 5 on the LCD display you are
able to adjust the amount of ‘motor output power that is
automatically given when pedalling is detected by the
PAS.

P a g e | 7
1800 MY RILU www.rilu-e-bike.com.au
General Usage Summary
RILU recommends you first ride the bike without using
any electrical assistance to familiarize yourself with the
mechanical gearing and breaking system of your E-Glider
7D.
P a g e | 8
1800 MY RILU www.rilu-e-bike.com.au
Turning E-Glider 7D (ON & OFF)
LCD will not power on?
Hold
“
M
”
CHECK
Battery Power Switch
underneath rack battery
|

P a g e | 9
1800 MY RILU www.rilu-e-bike.com.au
Default Motor Assistance Level
Turn “ON” LCD Backlight & Bike Lights
PAS Level Settings
PAS Speed Easy Start
0
0 km/h
0 km/h
1 9 km/h
6 km/h
2
12 km/h
6 km/h
3 15 km/h
6 km/h
4
20 km/h
6 km/h
5 25 km/h
6 km/h
Ensure ‘PAS 0’ is selected
when moving/pushing
your E-Glider 7D to avoid
any sudden unexpected
movement.
Hold
“ + ”
P a g e | 10
1800 MY RILU www.rilu-e-bike.com.au
Easy Start
Easy Start
6Km/h
PAS 1-5 must be selected to activate Easy
Start
Easy start is designed to get you going on those hard starts.
For example, when you find yourself stopped at
traffic lights in 7th gear you can engage easy start.
Easy Start is not a full speed throttle, it is a ‘walk assist’
replacement function that conforms to EN15194

P a g e | 11
1800 MY RILU www.rilu-e-bike.com.au
Display - Error Codes
Please take note of the number below
the ERR flashing warning on your LCD.
Cross check it with the error code table
and contact your dealer if you are unable
to resolve the error.
Display - RESET TRIP
Error code # Fault
21 CONTROLLER DAMAGED - REPLACE
22 Throttle – Unplug Throttle cable
23
M
otor
phase
–
CHECK MOTOR CABLE
24 Motor Hall – CHECK MOTOR CABLE
25 eABS Sensor ON – CHECK BRAKE CABLE
30 DISPLAY COMM ERROR – CHECK CABLES
Hold
“
+ &
-
”
Press “ + ”
Changes “ tC – Y ”
Hold “ M ”
Save & Exit
P a g e | 12
1800 MY RILU www.rilu-e-bike.com.au
Adjusting - Stem
When adjusting height
RAISE BELL
check you
DO NOT EXCEED
the line marked
|||||||||
-10⁰ - +50⁰
Adjustable range

P a g e | 13
1800 MY RILU www.rilu-e-bike.com.au
Adjusting - Gear Quick Adjustment
RILU advises using a bike service stand when performing gearing and
breaking adjustments.
It will be easier when the bike is raised off the ground.
Electric bicycles are heavier than regular bicycles please ensure your
bike stands weight rating meets the 25Kg requirement of your E-Glider
7D
TURN OFF electric system when working on gearing and breaking to
avoid any unexpected motor power.
TURN OFF electric
system when working
on E-Glider 7D
P a g e | 14
1800 MY RILU www.rilu-e-bike.com.au
Gearing Adjustment - Uneven Shifting / Slipping
If you experience uneven shifts or slippage in the lower gears, where
the chain jumps from gear #2 to gear #3 unintentionally. Try to adjust
the derailleur using the following method to improve shifting.

P a g e | 15
1800 MY RILU www.rilu-e-bike.com.au
Gearing Adjustment – Gear #7 Pulley Alignment
P a g e | 16
1800 MY RILU www.rilu-e-bike.com.au
Gearing Adjustment – Gear #1 Pulley Alignment

P a g e | 17
1800 MY RILU www.rilu-e-bike.com.au
Motor - Change Tire Notes
Unplug Motor Cable
18mm Spanner
Disc Brake Side
Gearing Side
Motor – Service Notes
P a g e | 18
1800 MY RILU www.rilu-e-bike.com.au
Battery – Safety Notes
Battery – Locking

P a g e | 19
1800 MY RILU www.rilu-e-bike.com.au
Battery – Capacity Bar
There are 4 LED indicating charge state of the battery, hold the button to check
the battery capacity, with each LED equating to approximately 25%
If only the red LED is illuminated, charge the battery within 24 hours.
Battery – Removal
Battery – Storage
For regular riding usage it is OK to keep the Battery Power Switch ON (I)
For long term storage ( > 1 Month ), ensure the Battery Power Switch is set
OFF, the (O) position
P a g e | 20
1800 MY RILU www.rilu-e-bike.com.au
Battery - Charger Warnings
The charger will warm up during charging.
Ensure charging takes place in a well-ventilated area.
DO NOT cover the charger, nor the battery during charging.
Battery – Charging Error
Contact your dealer for support if you experience the above issue
(battery not receiving charge)
Battery (RED) & Charger (GREEN)
POWER E-Glider
7D CHARGER
BEFORE
CONNECTING
BATTERY

P a g e | 21
1800 MY RILU www.rilu-e-bike.com.au
Pedal Sensor – No Motor Power
PAS Sensor – Error Gap
If the sensor becomes misaligned it is possible that your pedal motion
may not be detectible. This will cause interment (or no motor power)
output to occur.
Diagnosing - Faulty PAS Sensor
If you are riding the bike in Level 1 – 5 and do not experience any motor power.
Step 1 - Stop riding the bike
Step 2 - Step of the bike and stand beside it
Step 3 - Hold the
–
(Down) button on the Display to activate 6Km/h walk function
Step 4 - If the motor only works using 6km/h please contact dealer for servicing.
Step 5 - If the motor does not turn using either 6km/h walk assist or Level 1 – 5
when pedalling please check motor cable is connected correctly and tightly
A
A
NO GAP
Between sensor and the frame.
B
NO MOVEMENT
Sensor must remain firm when twisted.
A
B
P a g e | 22
1800 MY RILU www.rilu-e-bike.com.au
Replacing - Faulty PAS Sensor
Step 1 - Remove the axle bolt using an 8mm Allen key
Step 2 - Use a crank puller to remove the crank
Step 3 - Remove the pedal
Step 5 - Gently use a flat head screw driver to
wedge and pry the PAS sensor (be very gently)
Step 6 - Fully remove the PAS from the axle by wiggling by hand
Step 7 - Inspect the PAS sensor teeth for damage
All teeth must be in good condition, (A) No damage to teeth
Step 8 - (B) Align teeth and re-install the PAS sensor onto the axle
(C) The sensor cable must be at the base, towards the ground
Step 9 - Check the PAS sensor is snugly fit with no play.
(D) No gaps, between sensor and frame.
(E) No movement, sensor remains firm when twisted.
Step 10 - Re-install the crank arm and tighten the 8mm
B
C
A
B
D
E

P a g e | 23
1800 MY RILU www.rilu-e-bike.com.au
Front Light - Faulty Connection
If you experience any problems with the front light not working,
check the wiring cable as illustrated below
P a g e | 24
1800 MY RILU www.rilu-e-bike.com.au

P a g e | 25
1800 MY RILU www.rilu-e-bike.com.au
P a g e | 26
1800 MY RILU www.rilu-e-bike.com.au

P a g e | 27
1800 MY RILU www.rilu-e-bike.com.au
c
Table of contents
Other Rilu Scooter manuals
Popular Scooter manuals by other brands

KYMCO
KYMCO 125 AGILITY CITY - Specifications

VOLTION
VOLTION EVO500 user manual

KYMCO
KYMCO 125 MOVIE S INJECTION Technical specifications

Prodigy
Prodigy S5 owner's manual

GLOBAL FITNESS & LEISURE
GLOBAL FITNESS & LEISURE EVOLT User instructions

WHEELS FOR FEET
WHEELS FOR FEET GO GO ELITE INSTRUCTIONS AND GUIDELINES

E-Lux
E-Lux Sierra Classic owner's manual

GB Evolution
GB Evolution F1 Pocket Bike Service manual for use and maintenance

Sunrise Medical
Sunrise Medical Sterling Little Gem owner's manual

Razor
Razor E200 Series owner's manual

DEPOT 2 U
DEPOT 2 U 99073 Quick operation guide

Panterra
Panterra Fusion Service manual