manuals.online logo
Brands
  1. Home
  2. •
  3. Brands
  4. •
  5. Rilu
  6. •
  7. Scooter
  8. •
  9. Rilu POGO 7D User manual

Rilu POGO 7D User manual

(03) 8395 2616
www.rilu-e-bike.com.au
USER MANUAL
PO
GO 7-D
POGO 7D
Unit 2, No 2 Caulson Close
Maribyrnong 3032
Melbourne, Victoria
Australia
(03) 8395 2616
[email protected].au
Rev.1001019.POGO7D-UM2
RILU Trading Ptd
(03) 8395 2616 www.rilu-e-bike.com.au
Product Description
Frame: 6061 Aluminium alloy
Lightweight Folding Frame
Gears: Acera 7 Speed – Shimano
Brakes: Front and Rear Disc Brake
Stem: Height Adjustable – Aluminium Alloy.
Front Fork: High Strength – Aluminium alloy
Rim & Tire 20” x 13G x 36H alloy
Double wall with wide 4” Kenda tires
Seat Post: Quick Adjust Clamp
Saddle: VELO Wide Saddle
Motor: 36V / 250 W (Thumb + PAS)
Display: LED / 5 Modes (Motor Power)
Throttle: Thumb Start (6Kmh – Easy Start)
Battery: 36 V / 14 AH (Lithium Ion)
Charger: 36V / 2A (Smart charger)
Lights: Front & Rear (Independent powered)
(03) 8395 2616 www.rilu-e-bike.com.au
Riding Range & Charge Time
Range depending on:
Rider weight, riding terrain, weather & level of assistance.
Level 2 Motor Assist: 60 - 70 Km
Level 5 Motor Assist: 40 - 50 Km
Battery charge time is 5-6 Hours
Weight
20 Kg (Bike) net weight
24Kg (Battery Installed)
POGO Rated Load weight is 120Kg
(03) 8395 2616 www.rilu-e-bike.com.au
Product Summary
Congratulation on your purchase of a RILU POGO 7D
Folding electric bicycle.
Your new electric bicycle has two different ways of
activating motor power.
Throttle
Easy start is designed to get you going on hard starts.
For example, when you find yourself stopped at
traffic lights in 7th gear you can engage easy start.
Easy Start is not a full speed throttle, it is a ‘walk assist’
replacement function that conforms to EN15194
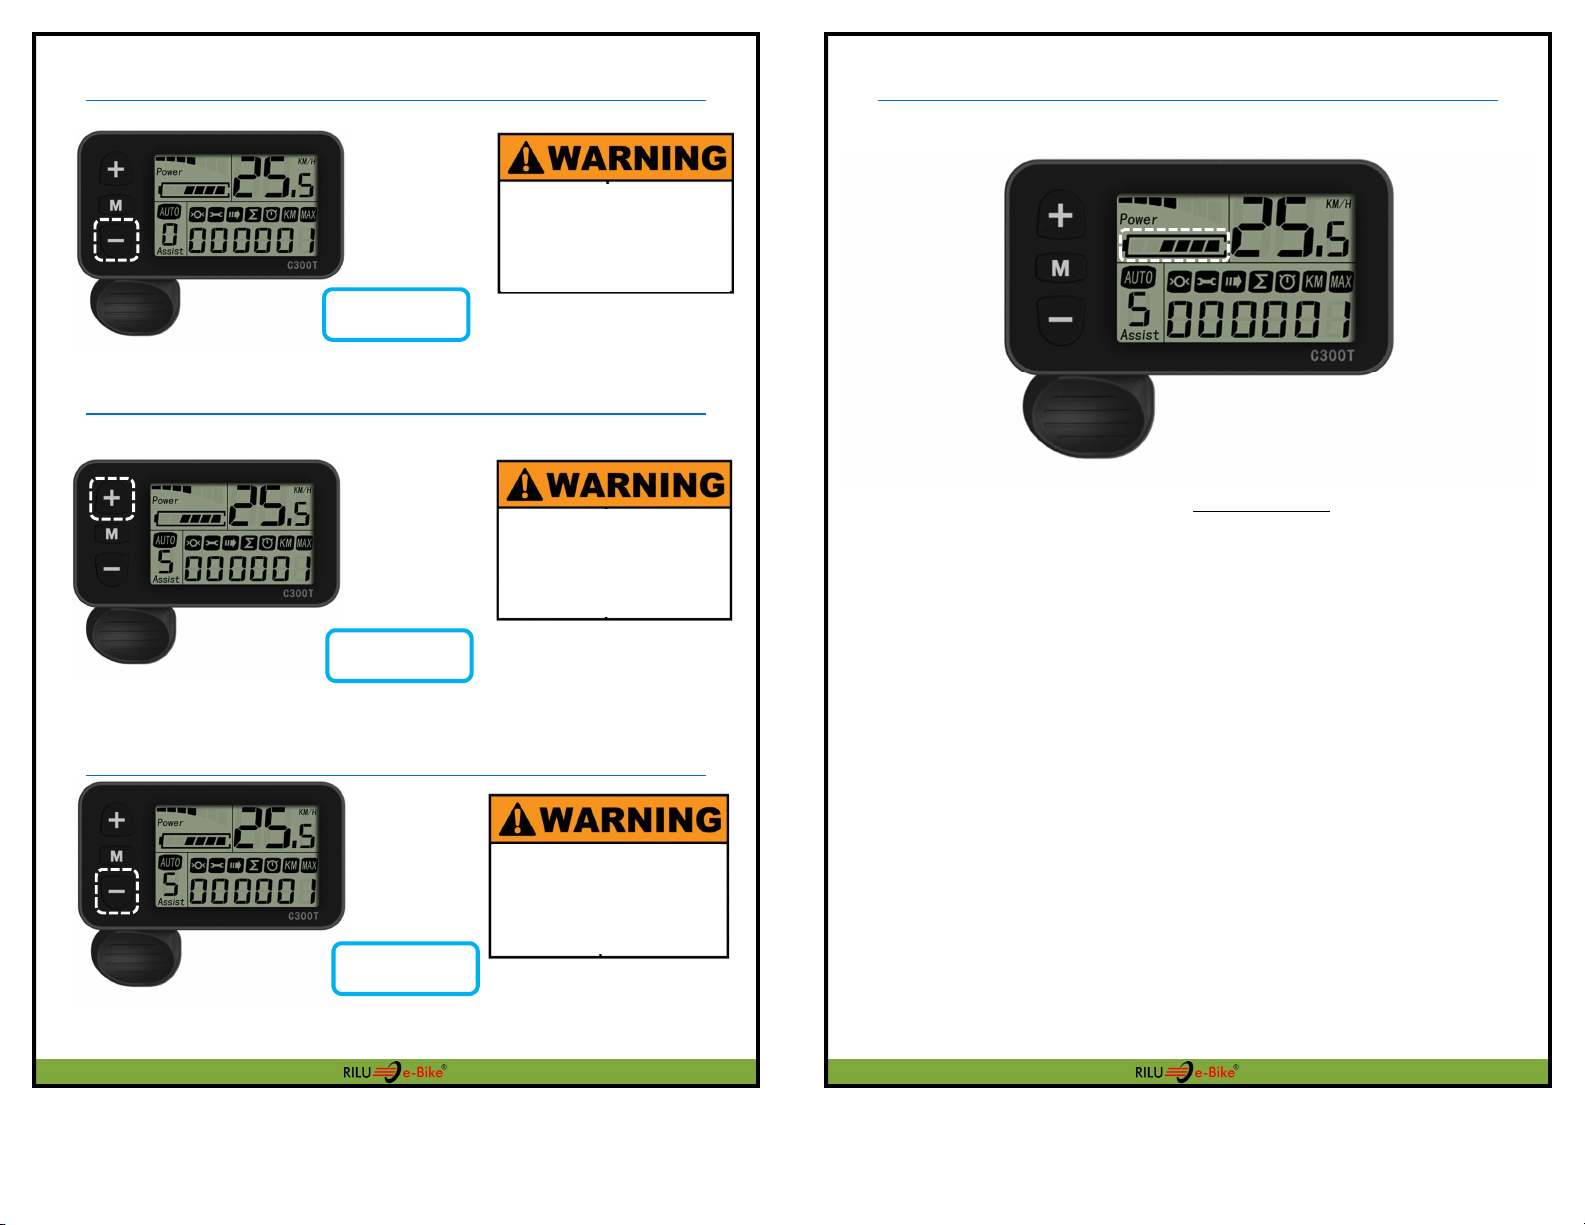
PAS (Assist)
Built into your POGO is a “Pedal Assistance Sensor”.
This automatically detect the speed at which you pedal and will
automatically moderate the ‘motors speed’ while riding.
By selecting from PAS 0 – 5 on the LCD display you are able to
adjust the amount of ‘motor output power that is automatically
given when pedalling is detected by the PAS.
(03) 8395 2616 www.rilu-e-bike.com.au
General Usage Summary
RILU recommends you first ride the bike without using any
electrical assistance to familiarize yourself with the mechanical
gearing and breaking system of your POGO.
ONLY
USE
BIKE PUMP
(03) 8395 2616 www.rilu-e-bike.com.au
Turning POGO (ON & OFF)
Default Motor Assistance Level
Turn “ON” LCD backlight
HOLD
“+“
Default PAS MODE
“low”
Hold
“
M
”
Reduce Assist to ‘0’ while
moving/pushing your pogo
to avoid any sudden
unexpected movement.
(03) 8395 2616
www.rilu-e-bike.com.au
LCD Summary Function
Reset - Trip Meter
Hold “ + & M ”
(03) 8395 2616
www.rilu-e-bike.com.au
PAS & Throttle OFF – Mode O
Set PAS Motor Assistance to MAX (5)
6Km/h – Walk Assist Function
Only use Assist ‘5’
once you are confident
with riding your POGO.
Only use ‘Walk Assist’
when you are walking the
bike up and incline, do not
use while sitting on the
bike.
Press “ + ”
Hold “ - ”
Press “ - ”
Set ‘0 Assist’ while
moving/pushing your pogo
to avoid any sudden
unexpected movement.
(03) 8395 2616
www.rilu-e-bike.com.au
Understanding Battery Capacity Meter
The battery capacity gauge is an approximate estimation of
battery capacity based on a real-time voltage reading of the
battery pack.
There are several factors that may affect the accuracy of the
reading such as cold weather, steep inclines or rough terrain.
When the motor is under heavy load the battery gauge will ‘sag’
showing an underestimated capacity reading.
The gauge will correct itself after the heavy load is lifted.
(03) 8395 2616
www.rilu-e-bike.com.au
Battery Low – Flashing Warning
When battery LED is Flashing
Battery charge level is <10%.
It is critical that you recharge within 24 hours
to avoid any damage to the battery.
(03) 8395 2616
www.rilu-e-bike.com.au
Error Codes – Diagnostic
Please take note of the number flashing when the ‘Service – Error’
warning. Cross check it with the error code table and contact your
dealer if you are unable to resolve the error.
ERROR CODE #
FAULT
1 CONTROLLER DAMAGED
REPLACE CONTOLLER
3
MOTOR
PHASE
CHECK MOTOR CABLE
4 MOTOR HALL
CHECK MOTOR CABLE
5 EABS SENSOR ON
CHECK BRAKE CABLE
6 BATTERY LOW
RECHARGE BATTERY
7 MOTOR STALL
CHECK MOTOR / BRRAKES
8 CONTROLLER COMMUNICATION ERROR
CHECK CABLES
9
DISPLAY
COMMUNICATION
ERROR
CHECK CABLES
(03) 8395 2616 www.rilu-e-bike.com.au
Folding Guide
Step 1 - Fold pedals Down
Reduces risk of damaged during transport and storage
Step 2 - Align the pedals
Chain ring – Pointing to the front of the bike.
HOLD “ - ”
(03) 8395 2616 www.rilu-e-bike.com.au
Step 3 - Unlock ‘Folding Safety Latch’
Step 4 - Pull ‘Folding Lever’ forward
(03) 8395 2616 www.rilu-e-bike.com.au
Step 5 - Fold handlebar stem
● TWIST (RIGHT) (Stem lock)
● Fold (DOWN) (Stem latch)
Step 6 - Folded POGO
(03) 8395 2616
www.rilu-e-bike.com.au
Adjusting - Folding Clamp
Over time you may need to adjust the folding clamp if you are unable
to fully close the clamp before riding or if the folding lock is loose and
doesn’t grip the frame.
v
TIGHTEN
LOOSEN
(03) 8395 2616 www.rilu-e-bike.com.au
Adjusting - Gear Quick Adjustment
RILU advises using a bike service stand when performing gearing and
breaking adjustments as it will be easier when the bike is raised off the
ground.
Electric bicycles are heavier than regular bicycles please ensure your
bike stands weight rating meets the 25Kg requirement of your POGO
TURN OFF electric system when working on gearing and breaking to
avoid any unexpected motor power.
TURN OFF
electric
system when working
on POGO
(03) 8395 2616 www.rilu-e-bike.com.au
Gearing Adjustment - Uneven Shifting / Slipping
If you experience uneven shifts or slippage in the lower gears, where
the chain jumps from gear #2 to gear #3 unintentionally. Try to adjust
the derailleur using the following method to improve shifting.
(03) 8395 2616 www.rilu-e-bike.com.au
Gearing Adjustment – Gear #7 Pulley Alignment
(03) 8395 2616 www.rilu-e-bike.com.au
Gearing Adjustment – Gear #1 Pulley Alignment
(03) 8395 2616
www.rilu-e-bike.com.au
Motor - Change Tire
Step 1 Step 2
Cut - Cable Tie Unplug - Motor Cable
Step 3
Step 4
18mm Spanner Pull back derailleur
Step 5
Wheel nut arrangement
(03) 8395 2616 www.rilu-e-bike.com.au
Motor – Service Notes
(03) 8395 2616
www.rilu-e-bike.com.au
Battery - Charger Warnings
The charger will warm up during charging.
Ensure charging takes place in a well-ventilated area.
DO NOT cover the charger, nor the battery during charging.
Battery – Charging Error
Contact your dealer for support if you experience the above issue
if battery not receiving charge.
Battery – Storage Guide
(03) 8395 2616
www.rilu-e-bike.com.au
Pedal Assist Sensor (PAS) – Location & Diagnostic
PAS - Location
The pedal sensor is a one-piece unit which is located on the left side of the
bottom bracket.
PAS - Diagnostic
If you are riding the bike in Level 1 – 5 and do not experience any motor power.
Step 1 - Stop riding the bike
Step 2 - Step off the bike and stand beside and lift the rear wheel off the ground.
Step 3 - Hold the
+
(UP) button on the Display to activate 6Km/h walk function
Step 4 - If the motor works using 6km/h but does not when pedalling in PAS 1 – 5
you may have a damaged pedal assist sensor.
(03) 8395 2616
www.rilu-e-bike.com.au
Step 5 - Check the pedal assist cable is not damaged from impact.
Step 6 - Check the pedal assist sensor LED flashes
The LED is located at the base of the sensor.
It will flash RED 12 times when you rotate the pedal 360 clock-wise
Step 7 - Check the O-Ring spacers are correctly installed and check that there is
NO GAP between the PAS sensor and the crank
12
X
(03) 8395 2616
www.rilu-e-bike.com.au
Thumb Throttle – Location & Function
RILU advises riders to avoid ‘hard starts’ that involve applying full throttle while
on an incline. RILU recommends having the bike in motion before engaging the
throttle to prolong the life of the motor.
s
Thumb Throttle – Loose
If you find the throttle loose, please tighten the a 4mm Allen screw located at
the base of the LCD.
4mm
(03) 8395 2616 www.rilu-e-bike.com.au

Other Rilu Scooter manuals

Rilu E-Glider 7D User manual

Rilu

Rilu E-Glider 7D User manual

Rilu BOLT User manual

Rilu

Rilu BOLT User manual

Rilu Roadie 7D User manual

Rilu

Rilu Roadie 7D User manual

Popular Scooter manuals by other brands

Sterling Ruby owner's manual

Sterling

Sterling Ruby owner's manual

Beeper FX8-G2-6 Installation & use manual

Beeper

Beeper FX8-G2-6 Installation & use manual

FREERIDER Luggie Classic User instruction manual

FREERIDER

FREERIDER Luggie Classic User instruction manual

Zizito FURRY manual

Zizito

Zizito FURRY manual

Dash Zero 9 user manual

Dash

Dash Zero 9 user manual

E-Balance EBS-V5350 owner's manual

E-Balance

E-Balance EBS-V5350 owner's manual

Motobecane 40 Repair Operations

Motobecane

Motobecane 40 Repair Operations

AC autokraft TR-560 Handbook

AC

AC autokraft TR-560 Handbook

Sunrise Medical EMERALD Workshop manual

Sunrise Medical

Sunrise Medical EMERALD Workshop manual

Yamaha Vino YJ50RN Service manual

Yamaha

Yamaha Vino YJ50RN Service manual

Xplore CHEROKEE L2 manual

Xplore

Xplore CHEROKEE L2 manual

Pride Mobility Ranger owner's manual

Pride Mobility

Pride Mobility Ranger owner's manual

GPX GS26B user guide

GPX

GPX GS26B user guide

Qlink Achille 150 user manual

Qlink

Qlink Achille 150 user manual

Master 26-20 user manual

Master

Master 26-20 user manual

KYMCO PEOPLE 125 manual

KYMCO

KYMCO PEOPLE 125 manual

Twodots Onekick Pro instruction manual

Twodots

Twodots Onekick Pro instruction manual

TurboWheel Lightning user manual

TurboWheel

TurboWheel Lightning user manual

manuals.online logo
manuals.online logoBrands
  • About & Mission
  • Contact us
  • Privacy Policy
  • Terms and Conditions

Copyright 2025 Manuals.Online. All Rights Reserved.