Rilu Roadie 7D User manual

1800 MY RILU www.rilu-e-bike.com.au
Product Description
Frame: 6061 Aluminium alloy
Lightweight Folding Frame
Gears: Acera 7 Speed –Shimano
Brakes: Front and Rear Hydraulic Disc Brake
Stem: Height Adjustable –Aluminium Alloy.
Front Fork: High Strength –Aluminium alloy
Rim & Tire 20” x 13G x 36H alloy
Double wall with wide 3” Innova Road Tires
Seat Post: Quick Adjust Clamp
Saddle: VELO Wide Saddle
Motor: 36V / 250 W (Thumb + PAS)
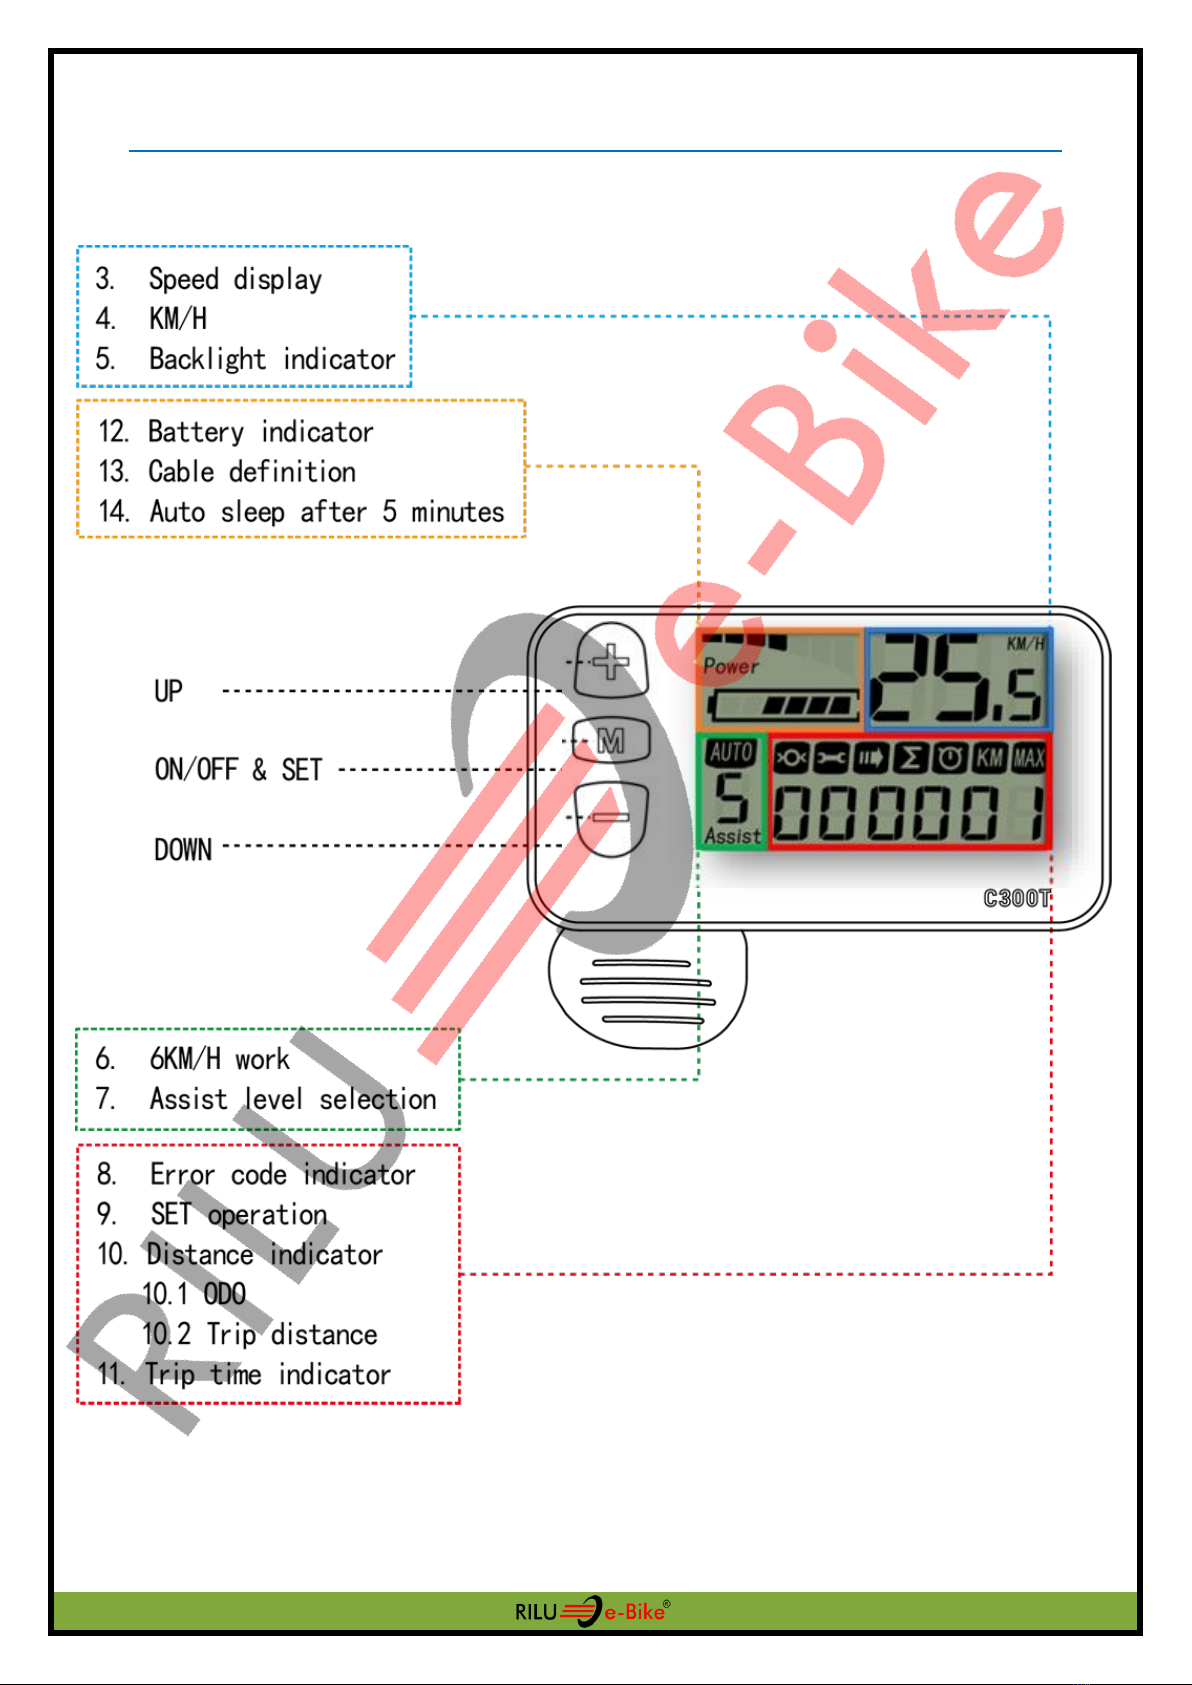
Display: LED / 5 Modes (Motor Power)
Throttle: Thumb Start (6Kmh –Easy Start)
Battery-1: 36 V / 14 AH (Lithium Ion)
Battery-2: 36 V / 11.6 AH (Lithium Ion)
Charger: 36V / 2A (Smart charger)
Lights: Front & Rear (Independent powered)

1800 MY RILU www.rilu-e-bike.com.au
Riding Range & Charge Time
Range depending on:
Rider weight, riding terrain, weather & level of assistance.
Level 2 Motor Assist: 75 - 120 Km
Level 5 Motor Assist: 70 - 100 Km
Total Battery charge time is 5-6 Hours
Both batteries can be charged at the same time
on or off the bike, using independent chargers
Weight
20 Kg (Bike) net weight
27Kg (2xBattery Installed)
ROADIE Rated Load weight is 120Kg

1800 MY RILU www.rilu-e-bike.com.au
Product Summary
Congratulation on your purchase of a RILU ROADIE 7D
Folding electric bicycle.
Your new electric bicycle has two different ways of
activating motor power.
Throttle
Easy start is designed to get you going on hard starts.
For example, when you find yourself stopped at
traffic lights in 7th gear you can engage easy start.
Easy Start is not a full speed throttle, it is a ‘walk assist’ replacement
function that conforms to EN15194
PAS (Assist)
Built into your ROADIE is a “Pedal Assistance Sensor”.
This automatically detect the speed at which you pedal and will
automatically moderate the ‘motors speed’ while riding.
By selecting from PAS 0 –5 on the LCD display you are able to
adjust the amount of ‘motor output power that is automatically
given when pedalling is detected by the PAS.

1800 MY RILU www.rilu-e-bike.com.au
General Usage Summary
RILU recommends you first ride the bike without using any
electrical assistance to familiarize yourself with the mechanical
gearing and breaking system of your ROADIE.
ONLY
USE
BIKE PUMP

1800 MY RILU www.rilu-e-bike.com.au
Turning ROADIE (ON & OFF)
Default Motor Assistance Level
Turn “ON” LCD backlight
HOLD “+“
UPDATED
DISPLAY
Hold “ M ”
Reduce Assist to ‘0’ while
moving/pushing your
Roadie to avoid any
sudden unexpected
movement.

1800 MY RILU www.rilu-e-bike.com.au
LCD Summary Function

1800 MY RILU www.rilu-e-bike.com.au
PAS & Throttle OFF –Mode O
Set PAS Motor Assistance to MAX (5)
6Km/h –Walk Assist Function
Only use Assist ‘5’
once you are confident
with riding your ROADIE.
Only use ‘Walk Assist’
when you are walking the
bike up and incline, do not
use while sitting on the
bike.
Press “ + ”
Hold “ - ”
Press “ - ”
Set ‘0 Assist’ while
moving/pushing your
Roadie to avoid any
sudden unexpected
movement.

1800 MY RILU www.rilu-e-bike.com.au
Understanding Battery Capacity Meter
The battery capacity gauge is an approximate estimation of
battery capacity based on a real-time voltage reading of the
battery pack.
There are several factors that may affect the accuracy of the
reading such as cold weather, steep inclines or rough terrain.
When the motor is under heavy load the battery gauge will ‘sag’
showing an underestimated capacity reading.
The gauge will correct itself after the heavy load is lifted.

1800 MY RILU www.rilu-e-bike.com.au
Battery Low –Flashing Warning
When battery LED is Flashing
Battery charge level is <10%.
It is critical that you recharge within 24 hours
to avoid any damage to the battery.

1800 MY RILU www.rilu-e-bike.com.au
Error Codes –Diagnostic
Please take note of the number flashing when the ‘Service – Error’
warning. Cross check it with the error code table and contact your
dealer if you are unable to resolve the error.
ERROR CODE #
FAULT
1
CONTROLLER DAMAGED
REPLACE CONTOLLER
3
MOTOR PHASE
CHECK MOTOR CABLE
4
MOTOR HALL
CHECK MOTOR CABLE
5
EABS SENSOR ON
CHECK BRAKE CABLE
6
BATTERY LOW
RECHARGE BATTERY
7
MOTOR STALL
CHECK MOTOR / BRRAKES
8
CONTROLLER COMMUNICATION ERROR
CHECK CABLES
9
DISPLAY COMMUNICATION ERROR
CHECK CABLES

1800 MY RILU www.rilu-e-bike.com.au
Folding Guide
Step 1 -Fold pedals Down
Reduces risk of damaged during transport and storage
Step 2 -Align the pedals
Chain ring –Pointing to the front of the bike.
HOLD “ - ”

1800 MY RILU www.rilu-e-bike.com.au
Step 3 -Unlock ‘Folding Safety Latch’
Step 4 -Pull ‘Folding Lever’ forward

1800 MY RILU www.rilu-e-bike.com.au
Step 5 -Fold handlebar stem
●TWIST (RIGHT) (Stem lock)
●Fold (DOWN) (Stem latch)
Step 6 - Folded ROADIE

1800 MY RILU www.rilu-e-bike.com.au
Adjusting - Folding Clamp
Over time you may need to adjust the folding clamp if you are unable
to fully close the clamp before riding or if the folding lock is loose and
doesn’t grip the frame.
v
TIGHTEN
LOOSEN

1800 MY RILU www.rilu-e-bike.com.au
Adjusting - Gear Quick Adjustment
RILU advises using a bike service stand when performing gearing and
breaking adjustments as it will be easier when the bike is raised off the
ground.
Electric bicycles are heavier than regular bicycles please ensure your
bike stands weight rating meets the 30Kg requirement of your ROADIE
TURN OFF electric system when working on gearing and breaking to
avoid any unexpected motor power.
TURN OFF electric
system when working
on ROADIE

1800 MY RILU www.rilu-e-bike.com.au
Gearing Adjustment - Uneven Shifting / Slipping
If you experience uneven shifts or slippage in the lower gears, where
the chain jumps from gear #2 to gear #3 unintentionally. Try to adjust
the derailleur using the following method to improve shifting.

1800 MY RILU www.rilu-e-bike.com.au
Gearing Adjustment –Gear #7 Pulley Alignment

1800 MY RILU www.rilu-e-bike.com.au
Gearing Adjustment –Gear #1 Pulley Alignment

1800 MY RILU www.rilu-e-bike.com.au
Motor - Change Tire
Step 1 Step 2
Cut - Cable Tie Unplug - Motor Cable
Step 3
Step 4
18mm Spanner Pull back derailleur
Step 5
Wheel nut arrangement
Table of contents
Other Rilu Scooter manuals