ring TRADE PRO User manual

1
SAFEGUARD YOUR JOURNEY
TRADE PRO
DASH CAM
USER GUIDE: RVEP1 RVEP2

2
WARNING
The Dash Cam must not be fitted in a position which obscures the driver’s view of the road
ahead. Depending on the country of use, recordings made with this device may be subject to
Data Protection Laws. Ensure these are complied with.
If the dash cam is to be used in a commercial environment e.g. taxi or truck, then CCTV
Regulations may apply. Playback of video which is visible to the driver whilst the vehicle is in
motion is prohibited in some countries.
Only use the supplied power adaptor, otherwise damage may occur to the dash cam.
Take care when cleaning the dash cam lens and only use a suitable lens cleaner and a soft
cloth. Do NOT expose this product to rain, moisture or water under any circumstances; doing
so may result in the risk of electric shock or fire.
Do NOT perform servicing other than that contained in the instruction manual, unless you
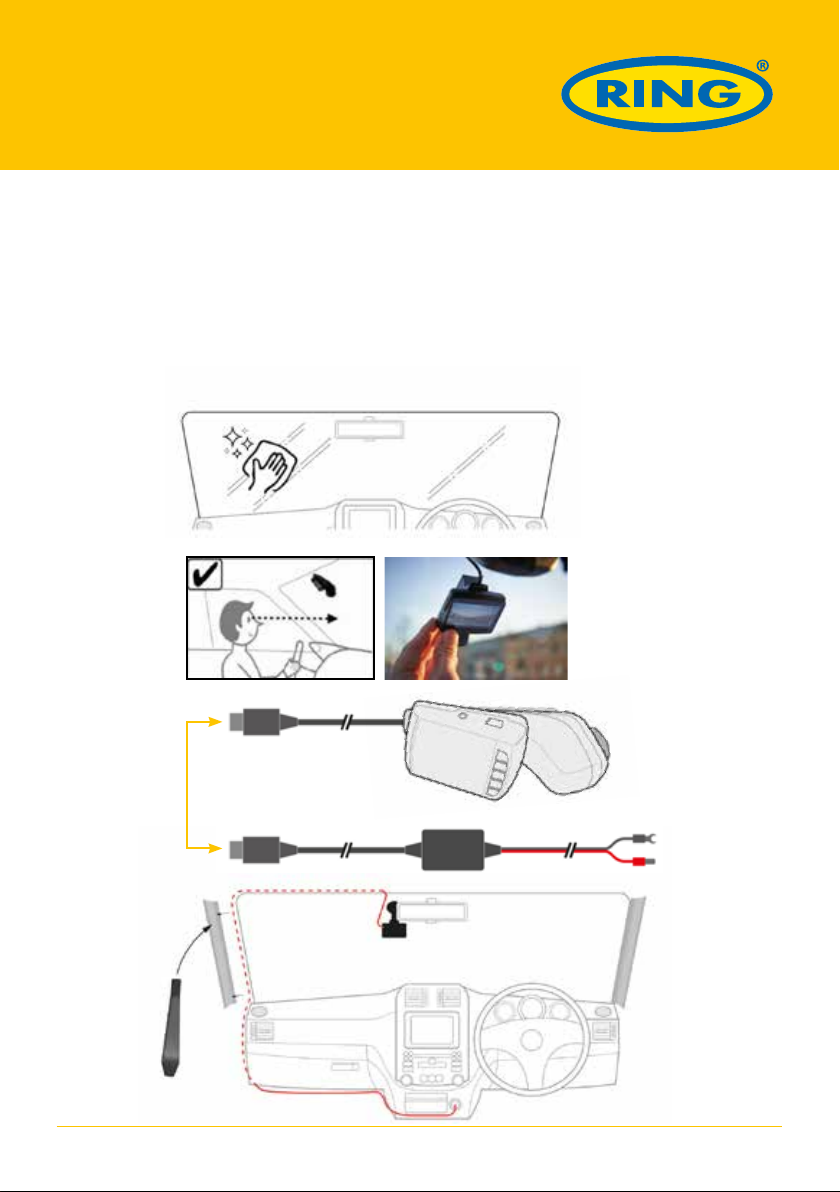
are qualified to do so. When installing in a vehicle, always place the device securely against
the windscreen and where possible conceal the power cable under the vehicles interior
trim. Make sure that the power cable doesn’t interfere with the driver’s controls such as the
steering wheel, pedals or gear lever.
Do NOT mount the dash cam in front of an airbag deployment area or in a position to obscure
any interior mirrors.
Do NOT operate whilst driving and only adjust settings or review recordings whilst stationary.

3
TABLE OF CONTENTS
Package Contents 4
Product Specification 5
Getting Started 6
Installation 7-8
Settings 9-10
Reformatting SD Card 11
Passwords 12
Reviewing Recordings 13-15

4
PACKAGE CONTENTS
CONFIGURATION
Dash Camera
Interior Camera (only with RVEP2)
Quick Start Guide
Window sticker
Trim removal tool
Hard wired power supply (fuse box)
Tool to remove lockable SD card hex screw
3M adhesive mount (+1 replacement 3M pad)
Lockable Micro SD slot
ON/OFF button
Record
Down
Up
Menu
Mode

5
DELIVERING THE TRUTH
Record vital evidence in the event of an incident. Protect yourself from insurance fraud, and in
some cases even lower your insurance costs.
Exceptional low light performance means Trade Pro dash cameras can provide vital evidence
even when driving at night.
Hassle free to install and use, they automatically switch on when you start the engine – so you
never miss a thing – and turn off once you park up – meaning no risk of draining your battery.
Loop recording will automatically save over old footage you no longer need: you don’t have to
clear or buy new SD cards. Important files can be locked to save them for later viewing.
The lockable MicroSD slot is designed to prevent tampering and password protected
software prevents alteration of captured footage.
*Once there is no external power input dash cam will no longer be powered
Specifications
Product Code RVEP1 RVEP2
Video Resolution (max) 720p @30fps 1080p @30fps
Display Size 2.4” 2.4”
Viewing Angle 110° 120°
Storage Card (included) 32GB 64GB
GPS function – 4
Password protection – 4
Audio Recording 4 4
Shock Sensor 4 4
Loop Recording 4 4
Auto Start/Stop 4 4

6
GETTING STARTED
To capture video and photos, requires the MicroSD card (pre-installed)
MicroSD Card
We recommend the use of the included MicroSD card for optimum performance.
Minimum Class 10 U1 16GB/32GB (Class 10 U3 for Optimum Performance)
SD CARD ERROR – SEE TROUBLESHOOTING GUIDE
If the above error is shown on your dash cam screen please see troubleshooting guide
(Page 9)
Helpful Information
This section helps you to eliminate problems the device may have under normal operation.
Failure to photograph/record video:
Check if there is enough free space on the micro SD card
Spontaneous stop at recording:
Too many video files stored. Only use at least class 10 U1 high-speed micro SD cards by
proven manufacturers.
When you try to view a photo/play a video file, the “wrong file” message appears:
File writing failure due to micro SD card file system error. Format the micro SD card.
Blurred image:
Ensure removal of lens sticker. Check for dirt on the lens. If there is any, wipe the lens with a
soft cloth before use (it is recommended to use special care products for the optics in order
not to damage the surface of the lens).

7
INSTALLING INTO VEHICLE
1. Ensure windscreen is clean of any moisture, dust and oils.
2. Position dash camera in a central location out of the line of sight of driver position
3. Connect hardwire kit to dash camera
4. Run hardwire kit through the trim directly to the fuse box on the vehicle
1.
2.
3.
4.

8
HARDWIRING INTO VEHICLE
1. Remove a fuse from an auxiliary power point in the fuse box
2. Insert the fuse into the end of the hardwire kit
3. Insert hardwire kit into fuse box in the slot vacated by the fuse removed in step 1
4. Connect fork section of hardwire kit to vehicle ground connection point
5. For Trade Pro2, connect interior camera to dash cam and situate on windscreen in front
of the driver position that is also out of the line of sight of the driver
6. Start Ignition to power dash cam
6.
4.
5.
3.
1.
2.
+

9
SETTINGS
Resolution
Set the resolution for the dash cam to record footage at. The higher resolution provides
clearer image (recommended) the lower resolution creates smaller recording file sizes.
Loop Recording
The dash cam has the option to save recordings on a loop of 3 or 5 minutes. The dash
cam will overwrite the oldest files saved to the MicroSD card to remove the requirement to
manually clear the memory space.
Date Stamp
The video recording can have the date and time at the point of filming stamped on the bottom
of the recording.
G-Sensor
G Sensor sensitivity can be adjusted. This is what detects forces which will automatically
protect the current recording in a collision.
The default setting for this will be set to medium sensitivity.
Parking Mode
During the case of a bump or knock whilst vehicle is parked, the dash cam can turn itself on
for 30 seconds to record the incident if this setting is activated in the settings (default OFF).
License Plate
The video recording can have licence plate stamped on the bottom of the recording.
To enable this enter the registration of the vehicle in the dash cam settings.
Protect File
Saved recordings can be locked manually to prevent them being over written by the loop
recording by using the Protect File setting.
Screen Saver
This setting allows you to switch the screen off when not required (default 30 Second timer).
Device Sounds
Buttons presses cause and sound to activate confirming the actuation. This be turned off in
the settings to make operation silent.
Language
The default language for the dash cam is English but can be changed to 10 others found in
the language settings.

10
SETTINGS
GPS (RVEP2)
The GPS tracks the coordinates and speed of the dash cam during recording that is stamped
on the bottom of the video recording. This can be set for metric, imperial or OFF.
Date/Time
Set the date & time on the dash cam by using the up and down buttons to change the
options.
Format SD Card
For optimum performance we recommend formatting your card on first
time use. Formatting erases all of your content, so be sure to download your photos and
videos first.
Default Settings
To return dash cam to original factory default settings select Menu (Setup) > Default Settings
Version
The dash cam’s current firmware version can be viewed in the settings menu.

11
REFORMATTING SD CARD (TRADE PRO 2)
When installing a new Micro SD card larger than 32GB capacity into
Trade Pro 2 dash cam, the card will need to be reformatted using the dash camera.
This function is located in the setup menu.
Once powered on a ‘Card
error’ message will pop up
on screen temporarily
Press the menu button
You will be brought to this
screen
Press the menu button
You will be brought to this
screen
Keep scrolling down until
you get to ‘Format SD Card’
Scroll down to ‘OK’ and press ‘Rec’
button to confirm the reformatting
A password is required to
access the menu using the
arrows to enter numbers and the
menu button to confirm each one
Default Password is:
‘1 1 1 1 1 1’.
Press ‘Rec’ to confirm
Press the ‘Rec’ button

12
CHANGE PASSWORD (TRADE PRO 2)
1. Remove security cover with removal tool
2. Remove Micro SD card
3. Insert Micro SD card into computer
4. Open ‘SDHC’ folder on the ‘This PC’ location
5. Open the file named ‘Password’
6. The Notepad should open as shown
7. Edit the password to have your own 6 digit number as shown.
8. Close the notepad and click save.
1.
4.
6. 7.
8.
2. 3.
5.

13
VIEWING RECORDINGS ON COMPUTER
1. Remove security cover with removal tool
2. Remove Micro SD card
3. Insert Micro SD card into computer
4. Open ‘SDHC’ folder on the ‘This PC’ location
5. Open the folder named ‘CARDV’
6. The folder should open as shown
EMR
Secure files that have been locked
by the camera’s G-Sensor
MOVIE
Video files that have not been locked
and will be overwritten via loop
recording
PHOTO
Image files that have been taken
using the picture mode
1.
4.
6.
2. 3.
5.

14
Press the ‘Mode’ button
twice
VIEWING RECORDINGS ON TRADE PRO 1
Press the ‘Rec’ button
Press the menu button
To Delete or Lock
a Video File
Press ‘Rec’ to play video
recordings
This menu allows you to
save or delete the recorded
files

15
VIEWING RECORDINGS ON TRADE PRO 2
Press the ‘Rec’ button
Press the ‘Mode’ button
twice
Press the menu button
A password is required to
access the menu using the
arrows to enter numbers and the
menu button to confirm each one
A password is required to
access the playback menu
This menu allows you to save or
delete the recorded files
Default Password is:
‘1 1 1 1 1 1’.
Press ‘Rec’ to confirm.
Press ‘Rec’ to play video
recordings
Default Password is:
‘1 1 1 1 1 1’.
Press ‘Rec’ to confirm
To Delete or Lock
a Video File

16
OTHER INFORMATION
Information on Waste Disposal for Consumers of Electrical & Electronic Equipment
This mark on a product and/or accompanying documents indicates that when it is
to be disposed of, it must be treated as Waste Electrical & Electronic Equipment
(WEEE).
Any WEEE marked waste products must not be mixed with general household waste, but
kept separate for the treatment, recovery and recycling of the materials used.
For proper treatment, recovery and recycling; please take all WEEE marked waste to your
Local Authority Civic waste site, where it will be accepted free of charge.
If all consumers dispose of Waste Electrical & Electronic Equipment correctly, they will be
helping to save valuable resources and preventing any potential negative effects upon human
health and the environment, of any hazardous materials that the waste may contain.
Please Recycle Your Spent Batteries
Batteries should not be disposed of in unsorted municipal waste, but separately collected to
facilitate the correct treatment and recycling of the substances they contain. The recycling of
batteries ensures the recovery of these valuable materials and prevents any potentially harmful
effects upon both the environment and human health.
Please contribute to battery recycling by segregating all spent batteries and actively
participating in their collection and recycling. Various battery collection schemes will be in
operation in different areas of the country. However, battery collection bins will be available at
retail stores that sell batteries as well as at schools, libraries and other public buildings.

17
SAFEGUARD YOUR JOURNEY
TRADE PRO
DASH CAM
In line with our policy of continuous product development, Ring Automotive Limited reserve the right to alter specification without notice. Whilst
every care has been taken in compiling the information in this catalogue, Ring Automotive Limited cannot accept legal liability for any errors or
omissions. Manufacturers’ names and part numbers are for reference only. Illustrations are intended only to be representative of the parts offered,
sizes quoted are nominal. © Copyright 2020 Ring Automotive Limited.
Ring Automotive Limited . Gelderd Road, Leeds, LS12 6NA United Kingdom
Telephone +44 (0)113 213 2000 . Fax +44 (0)113 231 0266
/ringautomotive
Suitable for:
Hard-wired power
12/24V
Fully adjustable lens
MicroSD card
Image quality
720
Hard-wired power
12/24V
Fully adjustable lens
MicroSD card
Image quality
720
This manual suits for next models
4
Table of contents
Other ring Dashcam manuals

ring
ring RBGDC200 User manual

ring
ring Ring Dash Cam 1000 User manual

ring
ring RDC10 User manual

ring
ring 4000 User manual

ring
ring RBGDC10 User manual

ring
ring RDC10 User manual

ring
ring Smart Dash Cam 3000 User manual

ring
ring RSDCR1000 User manual

ring
ring RBGDC50 User manual

ring
ring Smart Dash Cam 2000 User manual