manuals.online logo
Brands
  1. Home
  2. •
  3. Brands
  4. •
  5. Rinnai
  6. •
  7. Water System
  8. •
  9. Rinnai INFINITY 26 User manual

Rinnai INFINITY 26 User manual

Rinnai 1 HW_CF_PC_IM
PIPE COVER INSTALLATION MANUAL
GENERAL INFORMATION
When a pipe cover is installed it will conceal 400mm of pipework. For longer pipe runs, pipe covers can be joined to
one another, with each additional pipe cover extending the amount of concealment by a further 400mm.
The pipe covers in this manual are designed to t specic Rinnai Continuous Flow Water Heater models. Ensure the
correct pipe cover is being installed by conrming the model number against that found on the appliance data plate.
PC 11 / PC11D *PCV01
Innity 26 REU-VR2626WG †Innity 26i REU-VRM2632FFUG
Innity 20 REU-VR2024WG †HD 200i REU-VRM2632FFUC #
Innity 16 REU-VR1620WG †HD200e REU-VRM2632WC #
Innity 26 REU-VRM2626WG †PCV02
Innity 20 REU-VRM2024WG †Innity 32 REU-VR3237WG
Innity 16 REU-VRM1620WG †Innity 32 REU-VRM3237WG
B26 REU-A2626WB & REU-VR2626WB *HD 250e REU-VRM3237WC #
B20 REU-A2024WB & REU-VR2024WB *Innity 26 Smartstart REU-V2626WGP
B16 REU-A1620WB & REU-VR1620WB *Innity 26 Smartstart REU-VR2626WGP
S26 REU-A2626WS & REU-VR2426WS *PCK01
S20 REU-A1620WS & REU-VR1620WS *ENVIROSMART REU-K2430WG
NOTE
*PC11D = Dune colour, all other water heater models are white.
#Pipe cover is not available in the HD water heater model colour.
†Installations may require additional drilling and xings.
INSTALLATION METHOD
1. Install water heater and connections, then remove screws (A) from the lower side panels of the water heater.
NOTE
For models where the casing screws are not tted, refer to "Installation Method - Installer
Supplied Casing Screws" on page 2.
2. With the pipe cover held in the installed position, mark the location of the wall bracket securing holes (B).
3. Secure the wall bracket with suitable xings at the location marked in step 2.
4. Secure pipe cover to water heater with the screws (A) removed in step 2
5. Secure pipe cover to wall bracket (C) with screws provided, use elongated holes to keep components square.
6. Fit the front panel to complete the installation.
A
C
A
B
Australia Pty. Ltd.
ABN 74 005 138 769
100 Atlantic Drive, Keysborough, Victoria 3173
P.O. Box 460, Braeside, Victoria 3195
AU45204
Rinnai has a Service and Spare Parts network with personnel who are fully trained and
equipped to give the best service on your Rinnai appliance. If your appliance requires
service, please call our National Help Line. Rinnai recommends that this appliance be
serviced every 1 year.
With our policy of continuous improvement, we reserve the right to change, or
discontinue at any time, specifications or designs without notice.
Product Sales & Service
National Help Line
Tel: 1300 555 545*
*Monday to Friday,
8.00am to 5.00pm EST
Fax: 1300 555 655
For further information visit
www.rinnai.com.au
or email enquir[email protected]
Rinnai 2 HW_CF_PC_IM Issue 5 - Oct 2018
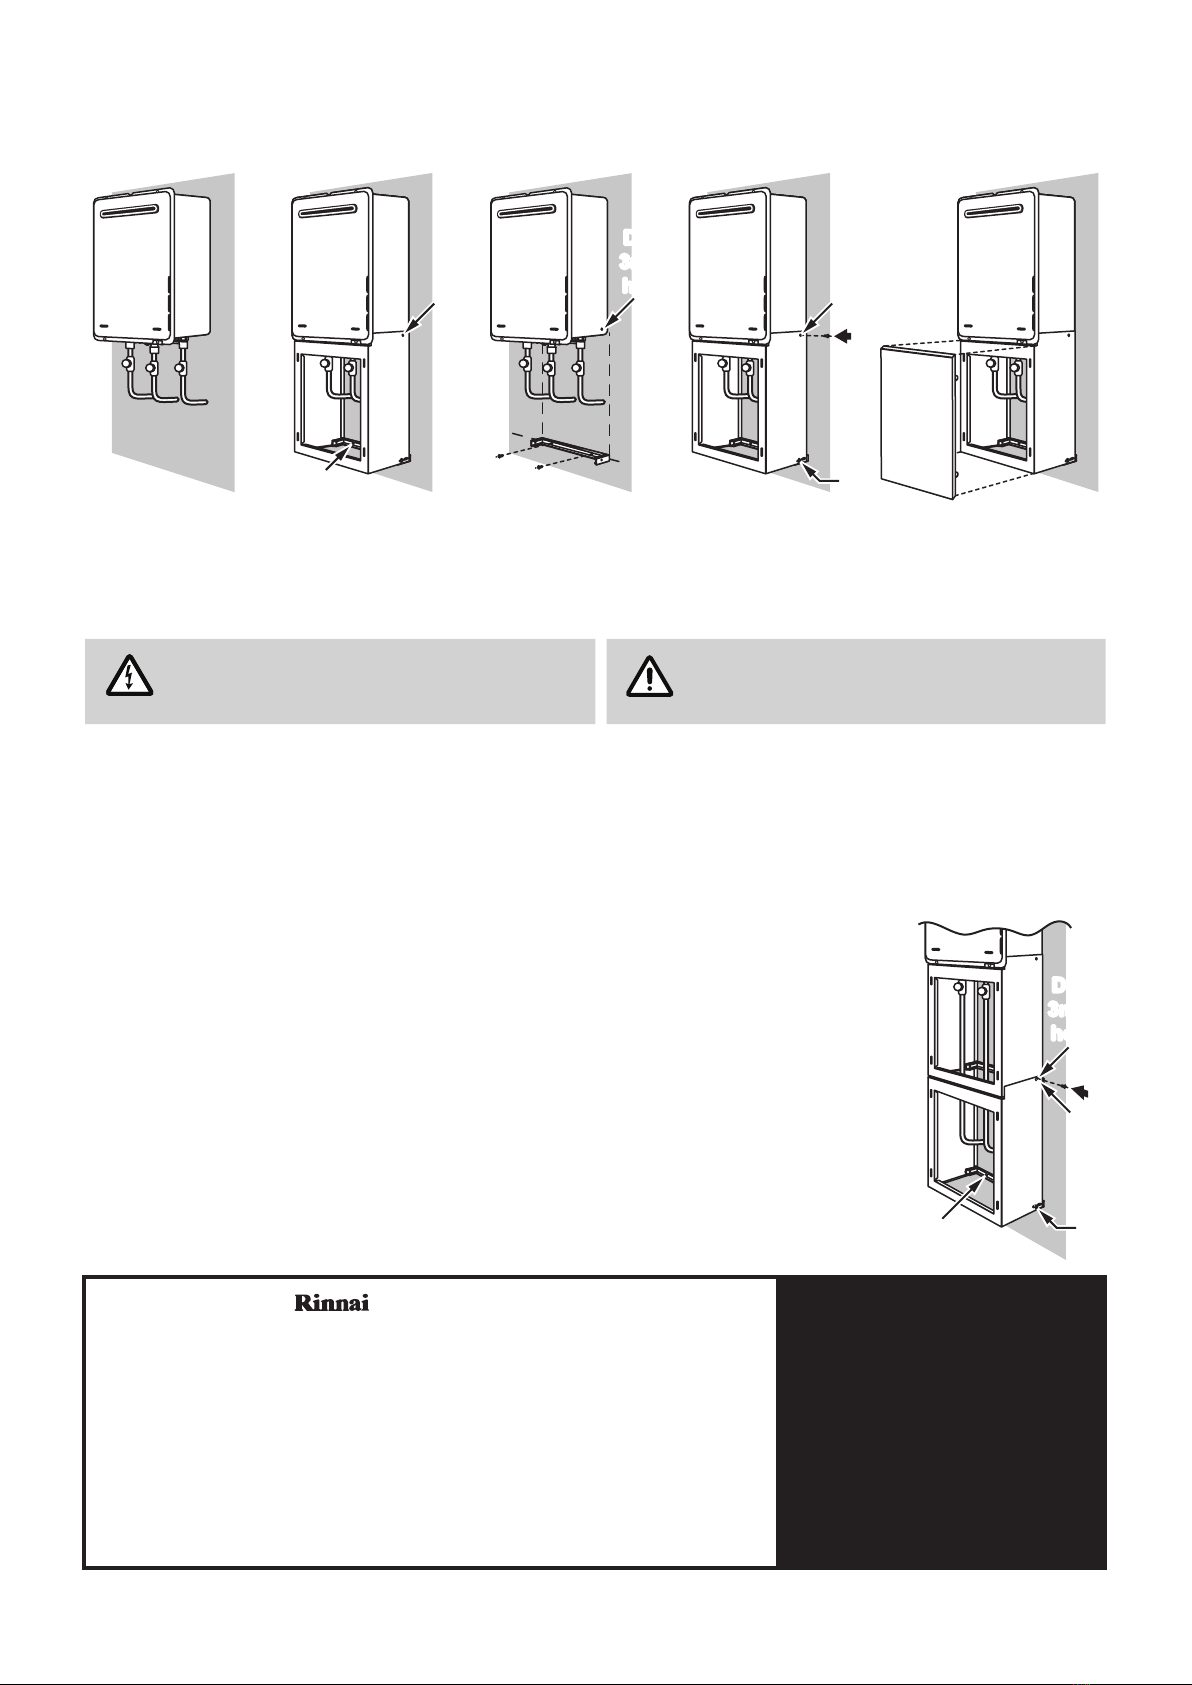
INSTALLATION METHOD -INSTALLER SUPPLIED CASING SCREWS
For models REU-VR/VRM2626WG, REU-VR/VRM2024WG and REU-VR/VRM1620WG it may be necessary to drill
pipe cover mounting holes into the water heater casing. If so do the following:
1. Install water heater and connections.
2. With the pipe cover held in the installed position, mark the location of the upper screw holes (A) onto the sides
of the water heater, also mark the location of the wall bracket securing holes (B).
3. Secure the wall bracket with suitable xings at the location marked in step 2.
WARNING
ENSURE THAT THE POWER SUPPLY
IS ISOLATED BEFORE ATTEMPTING
TO DRILL INTO APPLIANCE CASING.
CAUTION
Remove appliance cover to observe that
the holes being drilled do not damage
any components inside the water heater.
4. Carefully drill 3mm holes into the water heater at the locations marked in step 2.
5. Secure pipe cover to the water heater with two installer supplied short self-tapping screws (A).
6. Secure pipe cover to wall bracket (C) with screws provided, use elongated holes to keep components square.
7. Fit the front panel to complete the installation.
INSTALLATION OF ADDITIONAL PIPE COVERS
1. Install the rst pipe cover, as per the installation methods described on pages 1 or 2.
2. With the second pipe cover held in the installed position, mark the location of the upper
screw holes (A) onto the rst pipe cover, also mark the location of the wall bracket securing
holes (B) of the second pipe cover.
3. Secure the second wall bracket with suitable xings at the location marked in step 2.
4. Carefully drill 3mm holes into the rst pipe cover at the locations marked in step 2.
5. Secure both pipe covers together with two installer supplied short self-tapping screws (A).
6. Secure second pipe cover to wall bracket (C) with the screws provided, use elongated
holes to keep components square.
7. Fit the front panels to complete the installation.
Repeat this method as required for each additional pipe cover to be installed.
Drill
3mm
hole
Drill
3mm
hole A
C
A
B
C
Drill
3mm
hole
Drill
3mm
hole
A
B

Other manuals for INFINITY 26

1

This manual suits for next models

17

Other Rinnai Water System manuals

Rinnai Enduro SP200A User manual

Rinnai

Rinnai Enduro SP200A User manual

Rinnai EHPS215VM User manual

Rinnai

Rinnai EHPS215VM User manual

Rinnai Circ-Logic Series User manual

Rinnai

Rinnai Circ-Logic Series User manual

Rinnai Infinity Series User manual

Rinnai

Rinnai Infinity Series User manual

Rinnai PRESTIGE User manual

Rinnai

Rinnai PRESTIGE User manual

Rinnai Enduro XL SP250B User manual

Rinnai

Rinnai Enduro XL SP250B User manual

Rinnai Sunmaster SG175 User manual

Rinnai

Rinnai Sunmaster SG175 User manual

Rinnai HD210i User manual

Rinnai

Rinnai HD210i User manual

Rinnai SG2152HP User manual

Rinnai

Rinnai SG2152HP User manual

Rinnai PRESTIGE User manual

Rinnai

Rinnai PRESTIGE User manual

Rinnai E-Frost User manual

Rinnai

Rinnai E-Frost User manual

Rinnai Prestige Close Coupled Systems User manual

Rinnai

Rinnai Prestige Close Coupled Systems User manual

Rinnai PRESTIGE User manual

Rinnai

Rinnai PRESTIGE User manual

Rinnai REU-V2632FFUG User manual

Rinnai

Rinnai REU-V2632FFUG User manual

Rinnai EHPA250VMAH User manual

Rinnai

Rinnai EHPA250VMAH User manual

Rinnai REU-VR3237WG User manual

Rinnai

Rinnai REU-VR3237WG User manual

Popular Water System manuals by other brands

Armstrong AGE4 Installation and operating instructions

Armstrong

Armstrong AGE4 Installation and operating instructions

AL-KO HW 5000 FMS Premium Original instructions for use

AL-KO

AL-KO HW 5000 FMS Premium Original instructions for use

AdEdge Residential Drinking Water System Installation instructions operations manual

AdEdge

AdEdge Residential Drinking Water System Installation instructions operations manual

evenes EASYFLOW 4I installation manual

evenes

evenes EASYFLOW 4I installation manual

Taco 00-VS instruction sheet

Taco

Taco 00-VS instruction sheet

Spectra Watermakers Ventura 150T MPC Installation and operating manual

Spectra Watermakers

Spectra Watermakers Ventura 150T MPC Installation and operating manual

Wayne Jet Pump Water Systems Shallow Well Operating instructions and parts manual

Wayne

Wayne Jet Pump Water Systems Shallow Well Operating instructions and parts manual

CRANE PUMPS & SYSTEMS Barnes PGPT Series user guide

CRANE PUMPS & SYSTEMS

CRANE PUMPS & SYSTEMS Barnes PGPT Series user guide

Yamato Neocool CF302L-A instruction manual

Yamato

Yamato Neocool CF302L-A instruction manual

Conergy TS Owners & installation manual

Conergy

Conergy TS Owners & installation manual

Albion ART 26 Installation & operating manual

Albion

Albion ART 26 Installation & operating manual

salmson THERMO'CLOCK Installation and starting instructions

salmson

salmson THERMO'CLOCK Installation and starting instructions

Marco MIX UC3 maintenance

Marco

Marco MIX UC3 maintenance

Novasun 150L Instruction & installation manual

Novasun

Novasun 150L Instruction & installation manual

Kenmore 625.384450 owner's manual

Kenmore

Kenmore 625.384450 owner's manual

Aquaporin A2O Pure manual

Aquaporin

Aquaporin A2O Pure manual

Tuxhorn tubra eTherm P Assembly and operating instructions

Tuxhorn

Tuxhorn tubra eTherm P Assembly and operating instructions

Thermal Care TWC Series Operation, installation, and maintenance manual

Thermal Care

Thermal Care TWC Series Operation, installation, and maintenance manual

manuals.online logo
manuals.online logoBrands
  • About & Mission
  • Contact us
  • Privacy Policy
  • Terms and Conditions

Copyright 2025 Manuals.Online. All Rights Reserved.