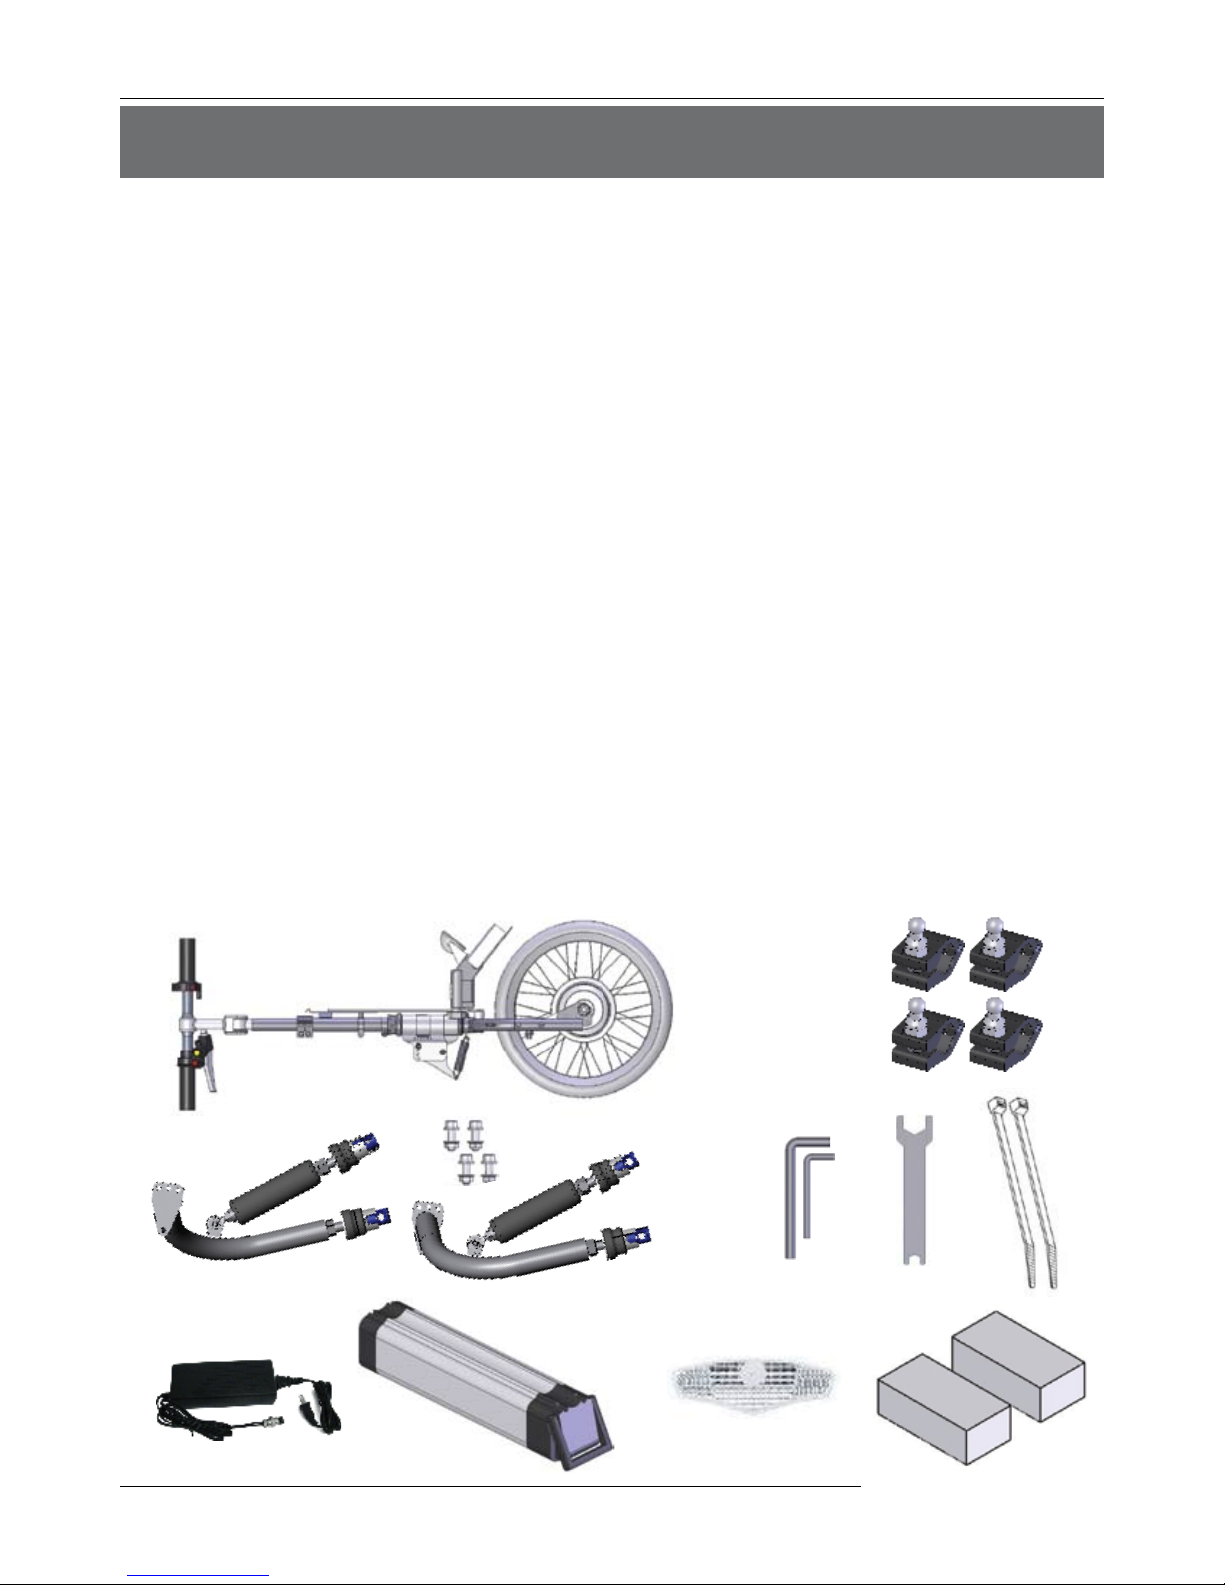
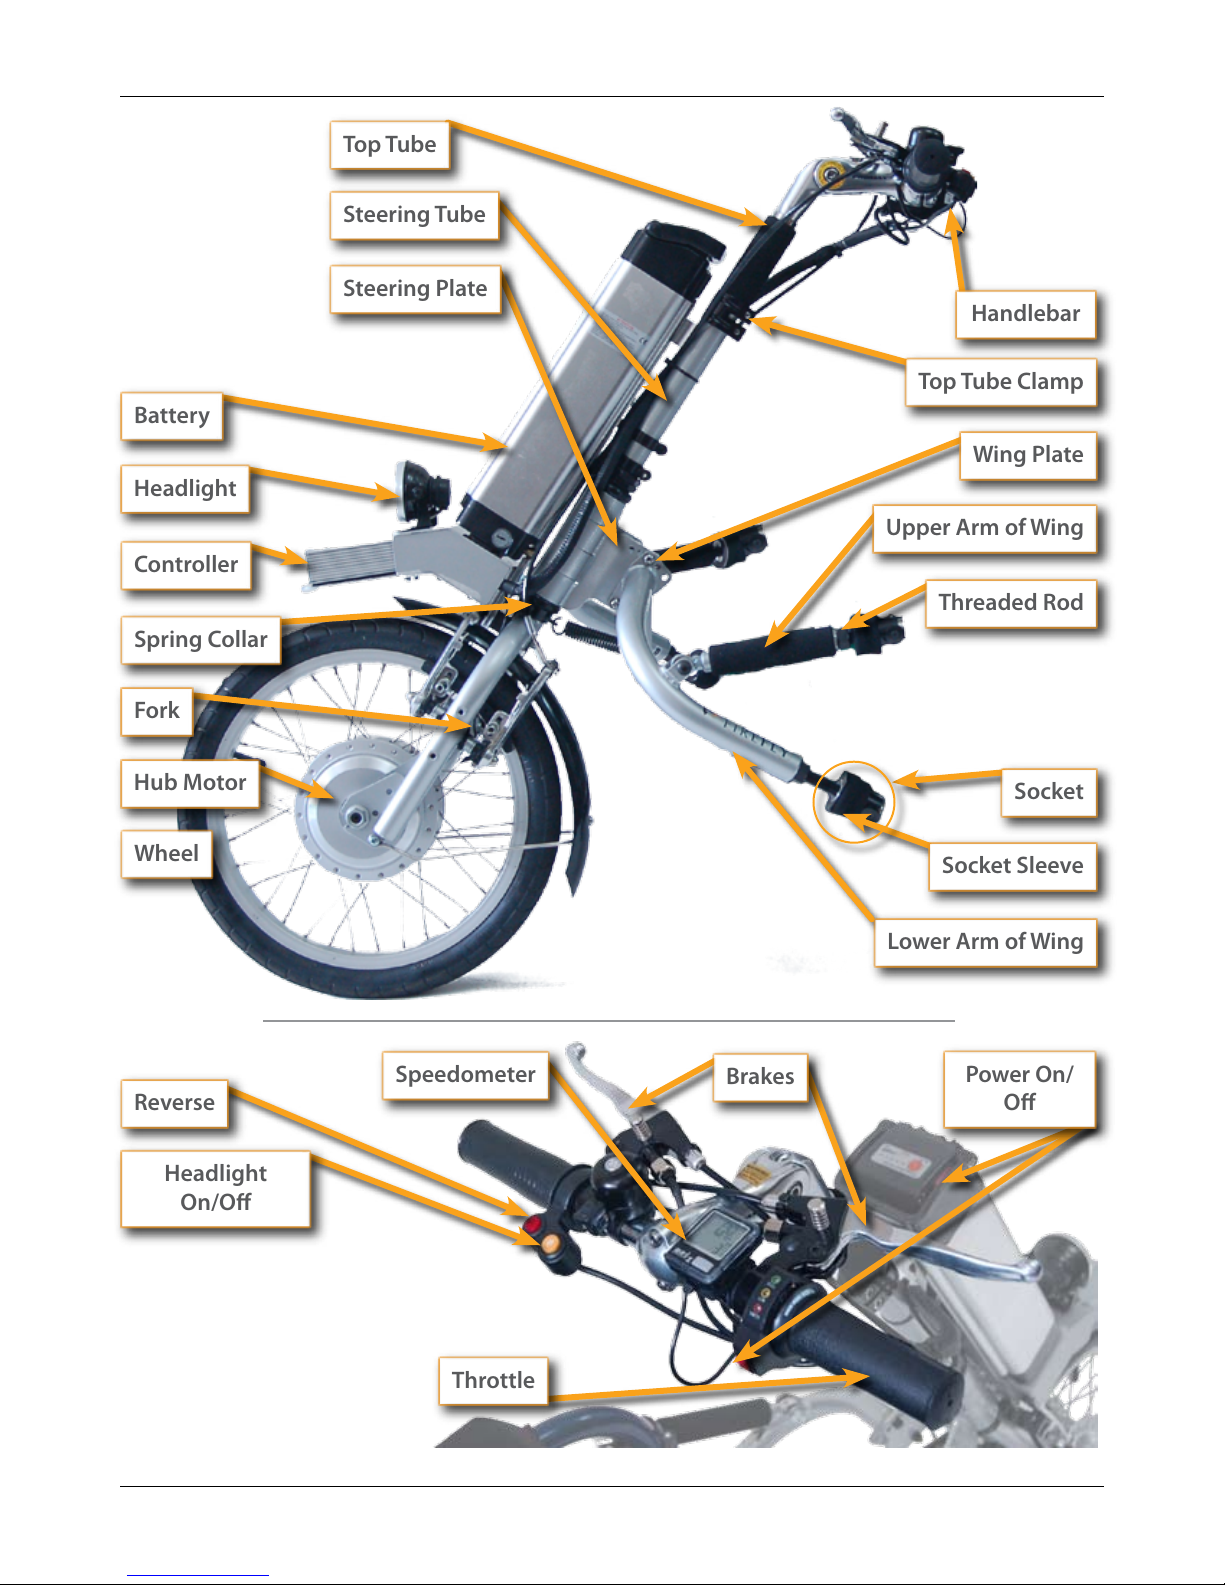
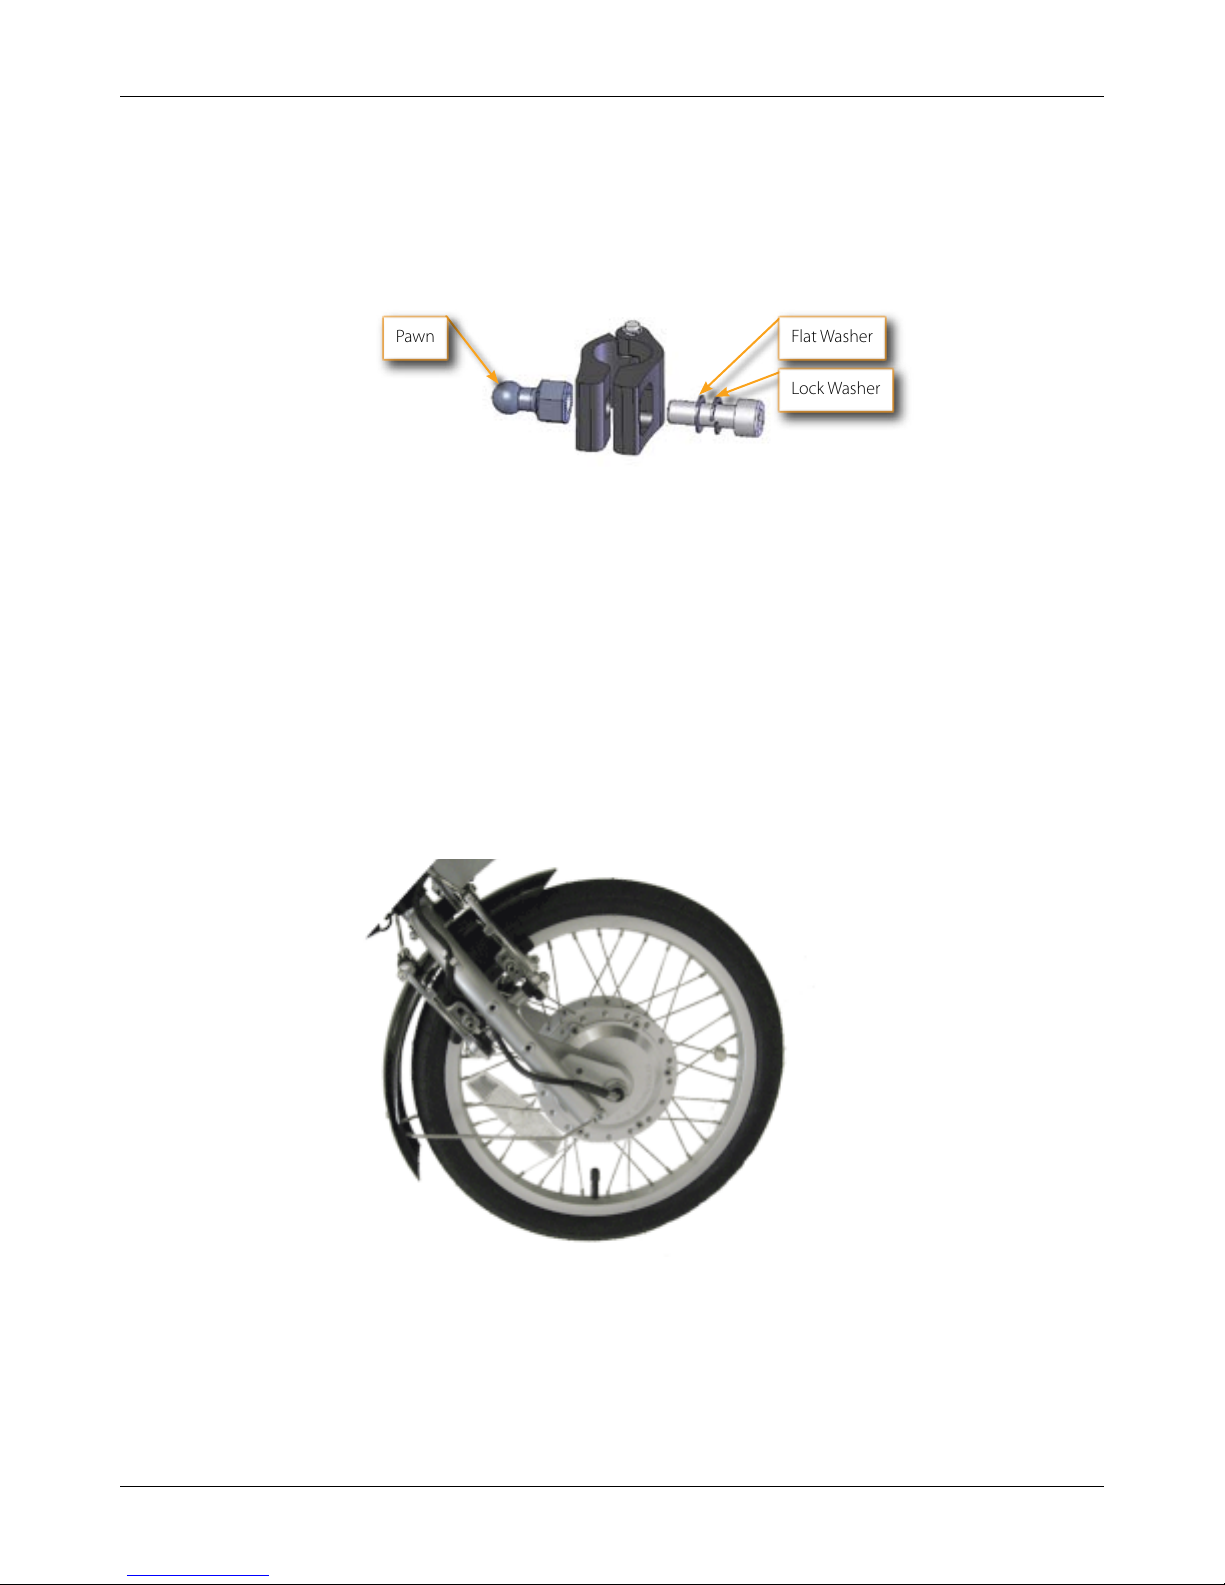
Rio Mobility Firefly User manual

Electric Handcycle
User Manual

The FireyTM from Rio Mobility transforms your wheelchair into a high
performance machine that can increase your mobility.
Consult with your dealer or health care professional to determine if the FireyTM is
appropriate for you.
Dealer: You must give this manual to the
FireyTM handcycle user
User: Before using the FireyTM handcycle, read this
manual and save it for future reference.
Questions or concerns? Contact us:
sales@riomobility.com
(888) 559-6225
(415) 278-9662
Rio Mobility
56 Tehama Street
San Francisco, CA 94105
Rio Mobility, a Daedalus Wings, Inc. company, is a designer and retailer of
innovative products that maximize options and increase mobility for wheelchair
users.
We would like to acknowledge the National Science Foundation for their support of
the development of the FireyTM handcycle.
Part Number 301
Rev B, 02/2010
© 2010 Daedalus Wings, Inc.

FireyTM User Manual
www.riomobility.com i
Table of Contents
1. Safety Warnings 1
2. Wheelchair Requirements 2
3. The FireyTM Components 4
4. FireyTM Specications 6
5. Installing Your FireyTM 6
6. Battery Care & Operation 13
7. Attaching the FireyTM 14
8. FireyTM Controls 15
9. Safety 16
10. FireyTM Customization 18
11. Maintenance Instructions 19
12. Troubleshooting Guide 21
13. Limited Warranty 22
14. Product Registration / Warranty Form 24
Table of Contents

FireyTM User Manual
www.riomobility.com 1
1. Safety Warnings
WARNING
DO NOT OPERATE THIS EQUIPMENT WITHOUT FIRST
READING AND UNDERSTANDING THIS MANUAL.
If you are unable to understand the warnings, cautions, or instructions, contact sales@riomobility.
com, your health professional, dealer, or technical personnel before attempting to use this
equipment, otherwise injury or damage may result.
IT IS RECOMMENDED THAT INITIAL SETUP OF THIS
HANDCYCLE BE PERFORMED BY A QUALIFIED TECHNICIAN,
SUCH AS A WHEELCHAIR OR BICYCLE MECHANIC.
The FireyTM will increase the performance of your wheelchair. Follow the recommendations in
your wheelchair manual. Additional information, recommendations, and warnings are included in
this manual.
As with any three-wheeled vehicle, side-to-side stability is decreased compare to a
wheelchair alone, so use caution when turning at high speeds.
YOUR ANTI-TIP DEVICES MUST BE INSTALLED ON YOUR
WHEELCHAIR TO ENSURE A SAFE RIDE.
The FireyTM is not intended as an exclusive means of mobility. In most states, the use of
wheelchairs on public roads is prohibited. Required operating conditions are on dry paved
surfaces during daylight hours. The use of reectors and a ag or tall marker is recommended for
maximum visibility. Do not operate handcycle during low visibility conditions.
Operating in or around a handcycle involves a certain level of risk and inherent danger of serious
bodily injury. These possible risks include, but are not limited to, permanent disability, neck and
head trauma, limb dismemberment and in extreme cases, even death. It is recommended to wear
a helmet during operation.
Users must ride the FireyTM with the utmost care, caution, and safety. It is recommended that you
inspect your chair and handcycle carefully before each ride.
Rio Mobility is not responsible for any injuries resulting
from misuse.

FireyTM User Manual
www.riomobility.com2
Wheelchair Requirements
2. Wheelchair Requirements
The FireyTM is compatible with almost all wheelchairs without the need for any special adapters.
Wheelchair
Frame
Conguration
The front tubes of your chair must be similar to one of the three shown
on the next page, specically where the Clamps are installed. For a
complete listing of compatible wheelchairs, visit riomobility.com. If
your wheelchair is not listed, please contact customer service at sales@
riomobility.com.
The FireyTM can accommodate chairs of seat width 14”to 20”(35.5cm to
50cm). If your chair is outside this range, contact customer service.
Wheelchair
Frame Tube
Diameter
The frame tube diameter must be either:
1 inch (25.4mm)
11
/8inch (28.6mm)
1.2 inch (30.5mm)
1¼ inch (31.8mm)
The FireyTM ships with a set of 4 Clamps suitable for 1” (25.4mm) tubing.
If your tubing is a dierent diameter, you may order a suitable set of
Clamps on riomobility.com
If you do not know the diameter of your tubing, cut out the ruler
printed below to measure. Wrap it around your tubing and note where
the markings line up. The tube must be straight for the width of the
ruler.
Anti-Tips and
Seatbelts
If the chair is set up such that tipping backwards is easy, it may be
unstable while attaching or detaching the handcycle. To ensure your
safety, anti-tip devices MUST be installed on your wheelchair. A seat
belt is also strongly recommended.
Wheel Locks Wheelchair must have Wheel Locks installed.
Weight Combined wheelchair and user weight must be less than 280lb (130kg).
START HERE
1”
1 1/8”
1.2”
1 1/4”
RULER MUST BE PRINTED AT 100%
NO SCALING - RULER IS 6” (152mm) LONG
CUT ALONG DASHED LINE
AND WRAP AROUND TUBE
FRAME MUST BE STRAIGHT
FOR WIDTH OF RULER

FireyTM User Manual
www.riomobility.com 3
Wheelchair Requirements
Frame with swing-away footrests
(Pawns facing inward)
Frame with horizontal bottom tube
available
(Pawns facing outward)
Frame with no horizontal bottom tube
available
(Pawns facing outward)

FireyTM User Manual
www.riomobility.com4
Firey Components
3. The FireyTM Components
Required tools:
Adjustable Wrench
Pliers
Torque Wrench
Tire Pressure Gauge
Bicycle Pump
Remove the handcycle parts from the box and unpack the components. The contents include:
Handcycle Assembly
Left and Right Wings, including 4 Screws, Lock Washers, Flat Washers, and Nuts
Lithium Battery and Charger
4 Clamps for 1”(25.4mm) tubing size, including 4 Screws, Lock Washers, Flat
Washers, and Pawns
5mm and 8mm Hex Wrench
10/19mm Wrench
2 Cable Ties to secure brake and shift cables, if necessary
1 Reector to attach to the spokes
2 blocks to lift the front wheels during installation
If you are missing any of these items, please contact customer service at sales@riomobility.com
1 Handcycle
2 Wings
3 Battery & Charger
4 Clamps
5 6 7
8 9
1.
2.
3.
4.
5.
1.
2.
3.
4.
5.
6.
7.
8.
9.

FireyTM User Manual
www.riomobility.com 5
Firey Components
Socket
Threaded Rod
Lower Arm of Wing
Upper Arm of Wing
Top Tube Clamp
Top Tube
Socket Sleeve
Spring Collar
Steering Tube
Wheel
Fork
Wing Plate
Steering Plate
Battery
Headlight
Controller
Hub Motor
Brakes
Reverse
Headlight
On/O
Speedometer
Power On/
O
Throttle
Handlebar
Detail for Handlebar :

FireyTM User Manual
www.riomobility.com6
Installing Your Firey
4. FireyTM Specications
Gearbox 24V, 220W geared brushless hub motor
Battery 24V 10Ah Lithium Polymer battery, 5lbs (2.2kg)
Construction All alloy steel construction for strength and reliability
Brakes Dual Promax lockable V-brakes
Color Silver metallic
Weight Total weight is 33lb (15kg) with battery
Tire 16” x 1½” (40 x 305) KendaQuest all-tread tire
5. Installing Your FireyTM
Notes on Installation
Since the FireyTM is a highly customizable product, it is recommended that initial installation be
performed by two people. Once it is congured for your wheelchair, no additional assistance is
usually necessary.
If you are not comfortable adjusting your wheelchair, or with tasks such as assembly, tightening
nuts and bolts, or gripping a wrench, it is recommended that a qualied technician perform the
initial installation. A wheelchair or bicycle mechanic is suggested.
There are ve installation steps:
Charge the Battery
Install the Clamps
Prepare the FireyTM
Position the Wheel and Handlebar
Adjust the Upper and Lower Arms
Install the Battery
Familiarize yourself with the component names in the previous section. During the installation
you will need to locate and/or identify these components.
Charge the Battery
The Battery may not arrive to you fully charged. Plug in the Charger and charge during the rest of
this installation process, or until fully charged (up to ve hours).
▫
▫
▫
▫
▫
▫

FireyTM User Manual
www.riomobility.com 7
Installing Your Firey
Installing the Clamps
Measure the diameter of your tubing using the ruler printed on page 5 and
ensure that you have the proper Clamps.
Determine the appropriate clamp placement for your frame using the gures on
page 6. If you need assistance, please contact sales@riomobility.com. Make sure
that the Washers are between the Clamp and the head of the Screw as shown.
Flat Washer
Lock Washer
Pawn
Requirements for clamp location include :
- Separate the Clamps as far as possible vertically, at least 3” (80mm)
- Clamps MUST be installed on straight sections of tubing ONLY. They must be at
least 1/8” (3mm) away from any bend or weld in the tube
- DO NOT install Clamps on removable or swing-away footrests
Tighten the Clamps using the 8mm Hex wrench to a tightness of 10ft-lbs
(13.6Nm). This is a force of 20lbs 6” away from the screw (90N at 15cm away)
Preparing the FireyTM
Install the Reectors
Your FireyTM handcycle comes with one Reector to be mounted to your spokes.
Attach the Wings
Attach the right Wing to the handcycle using the supplied Screws, Washers and
Nuts. Insert the Screw through the bottom holes of the Wing Plate and the
Steering Plate, with the Washers inserted as shown below. Tighten the Nut then
back o one turn so that the Wing may rotate. Do not install the Screw in the top
hole yet.
1.
2.
3.
1.
1.

FireyTM User Manual
www.riomobility.com8
Installing Your Firey
Bottom Hole
Flat Washer
Wing Plate
Steering Plate
Repeat for the left Wing.
Inate your Tire
Inate the Tire according to the pressure range printed on the sidewall (40 - 65psi
[2.8 - 4.6 Barr, 280 - 460 kPa]). A pressure on the lower end of that range will result
in greater traction and a smoother ride.
Positioning the Wheel and Handlebar
Position the Wheel
Set the Parking Brake on the handcycle by grasping the Brake Lever and
depressing the Brake Pin. You may set one or both brakes as needed.
SET YOUR WHEELCHAIR WHEEL LOCKS. Place the 2 ½”(64mm) Blocks under the
front caster wheels as shown below. For added safety against tipping, install your
anti-tips. You may also back your chair against a wall.
Each Arm has a Socket on the end - retract the Socket Sleeves on all four arms
until they click and are latched in the open position. Rotate the Upper Arms
away from you (toward the Wheel).
Seated in your wheelchair, pull the handcycle toward you with the Wings
extended toward your legs. Center the Wheel in front of you.
2.
1.
1.
2.
3.
4.

FireyTM User Manual
www.riomobility.com 9
Installing Your Firey
Place the Wheel at least 2” (50mm) away from the front of your shoes or from the
front edge of your footrest, whichever extends farthest.
Sit in your wheelchair in a comfortable position, with your back at against the
backrest. Keeping the Wheel in place, lift the Handlebar until there is at least 2”
(50mm) of clearance between the Handlebar and your thigh.
2” (50mm) Minimum Clearance
2” [recommended] - 6” [maximum]
(50mm - 150mm) Clearance
Position the Handlebar
If the Handlebar is too close, push it away until it lines up with your forearm.
If you can’t get the Handlebar in a comfortable position, loosen the Top Tube
Clamp and slide the Top Tube further into or out of the Steering Tube. Re-tighten
the Top Tube Clamp to a tightness of 8ft-lbs. (10.8Nm). This is approximately a
force of 16lb at 6” away from the screw (70N at 15cm away).
5.
6.
1.

FireyTM User Manual
www.riomobility.com10
Installing Your Firey
Adjusting the Upper and Lower Arms
Attach the Lower Arms
Attach the Lower Arms to the lower set of Pawns installed on your chair. The
Lower Arm can be lengthened or shortened using the Threaded Rod. Loosen the
Jam Nut to do this. DO NOT unscrew the Threaded Rod beyond the red zone on
the threads. Make sure both Arms are the same length so that your handcycle is
centered.
Threaded Rod
Socket Sleeve
Jam Nut
- If the Threaded Rod is fully inserted and the Lower Arm is still too long, push
the Wheel out until the Socket can attach to the Pawn.
- If the Threaded Rod is fully extended and the Lower Arm Sockets can’t reach the
Pawns, even with the Wheel only 2” (50mm) away from your feet, move the
Clamps forward. If this is not possible, please contact customer service.
Line up one of the lower Sockets with the Pawn and lock it into place. The Socket
Sleeve will automatically slide to cover the Socket and you will hear a click.
Repeat for the other side.
1.
2.
3.

FireyTM User Manual
www.riomobility.com 11
Installing Your Firey
Position the Wing Plate
Rotate the handcycle back and forth slightly until one of the three holes at the
top of the Wing Plate lines up with one of the four holes on the Steering Plate.
Insert the 6 mm Screws, with Washers on each side of the plates, and tighten the
Nuts to 8ft-lbs (10.8Nm). Tighten the bottom Screws and Nuts to the same 8ft-lbs.
(10.8Nm) tightness.
Attach the Upper Arms
Bring the Upper Arms toward you and twist the Threaded Rod until the Sockets
line up with the upper Pawns. You may have to loosen the Jam Nuts to do this,
using two wrenches as shown on the next page. The Arms should be of equal
length. DO NOT unscrew the Threaded Rod beyond the red zone on the threads.
- If the Upper Arm has been shortened as much as possible, yet still extends past
the pawn, then the Wheel has to be moved away from you by lengthening the
Lower Arms.
If the Sockets are not already latched in the open position, pull back on the
Socket Sleeves until you hear a click and they remain open. Press rmly over
one of the upper Pawns. The Socket Sleeve will automatically slide into place and
cover the Socket and you will hear a click. Line up the other Socket and Pawn,
and click it into place.
1.
2.
1.
2.

FireyTM User Manual
www.riomobility.com12
Installing Your Firey
Tighten the Jam Nut on each of the four Arms to a torque of 10ft-lbs. (13.5Nm)
using the included wrenches, as shown below.
MAKE SURE THAT ALL NUTS HAVE BEEN TIGHTENED, including the Wings’ Nuts
and Screws, Upper and Lower Arm Jam Nuts, and all Clamp Screws. Remove the
Blocks from under the front casters. Your handcycle is now installed, and the front
casters should be approximately 2”(50mm) above the ground.
If the Wheel pulls to the left or right, loosen the screws in the Spring Collar.
Center the Wheel, let the Spring Collar rotate into its neutral position, then re-
tighten the screws.
Install the Battery
Once the Battery is fully charged, slide it down the rail until the electrical plugs are
engaged. If desired, you may lock the battery in place with the included keys to
prevent removal.
Turn on both Power switches.
You may wish to further adjust the FireyTM after you’ve become accustomed to it, but be sure to
check that all hardware have been tightened after any adjustment, and take your handcycle for a
short test ride after each change.
Your FireyTM is ready to drive!
3.
4.
5.
1.
2.

FireyTM User Manual
www.riomobility.com 13
Battery Care
6. Battery Care & Operation
The FireyTM is shipped with a custom hi-power lithium polymer battery for optimal performance.
More eecient and lighter weight than traditional lead acid batteries, these Li-Ion units have an
energy density ve times greater than that of SLA batteries. They also have an average cycle life of
over 500 charges, whereas lead acid batteries last fewer than 200 charges.
Operation
Installation and Removal
To install the Battery on the FireyTM, slide the battery over the rail on the front of the frame. Press
down to ensure that the electrical contacts are fully seated. You may lock the Battery in place to
prevent unauthorized removal using the included keys. To lock, turn the key until the silver rod
protrudes through the rail.
To remove the Battery, pull back on the two “ears”of the metal tab while pulling up on the Battery.
Battery Level Indicator
To see the current level of the Battery, press and hold the orange button on the top of the casing.
A number of LEDs will light up, corresponding to the level of charge.
Supplying Power to the FireyTM
To power the FireyTM, there are two power switches to turn ON. The rst is the red switch located
on the Battery, which must be toggled so that the ‘ I ‘ is depressed. The other switch is located on
the Handlebar. Toggle that red switch up, toward the lightbulb symbol, to turn on.
Safety & Maintenance
Only use the included smart charger when charging your Battery. If you need a replacement
charger, contact customer service at sales@riomobility.com.
You must recharge the Battery at least every two months if it is not being used or risk a permanent
decrease in capacity. Charging time for an empty battery is up to ve hours.
Operation temperatures must not exceed 0o- 100oF (-20o- 40oC). Exposure to temperatures above
120oF (500C) will diminish the charging capacity permanently.

FireyTM User Manual
www.riomobility.com14
Attaching the Firey
7. Attaching the FireyTM
Attachment
Before attaching your handcycle, ALWAYS ENGAGE YOUR WHEEL LOCKS.
Pull back all four Socket Sleeves so that they click and hold in the open position.
Swing the Upper Arms away from you (toward the Wheel).
Holding onto the Top Tube, pull one of the Lower Arms toward you and latch the
Socket on to the lower Pawn. Repeat for the other side.
Lift the front casters o the ground by pushing the Top Tube away from your body
using one hand. With the other hand, swing one of the Upper Arms toward you
and click the Socket into place. Repeat for the other side.
Detachment
Before removing your handcycle, ALWAYS ENGAGE YOUR WHEEL LOCKS.
Push the Top Tube away from your body to relieve the weight from the Upper
Arms, and pull back the Socket Sleeve from one of the Upper Arms.
Move the Top Tube back and forth gently with one hand and pull the Upper Arm
away until it releases the Pawn. Swing it forward toward the Wheel.
Repeat for the other Upper Arm. As soon as it releases, all the weight of the
wheelchair is held up by your arm holding the Top Tube. Slowly lower the chair
until the front casters contact the ground. Swing the second Upper Arm away.
Holding on to the Top Tube with one hand, pull back the Socket Sleeve on one of
the Lower Arms and pull the Wing away from the Pawn. Repeat for the other side.
The handcycle is now completely detached from your wheelchair.
1.
2.
3.
4.
1.
2.
3.
4.
5.
6.

FireyTM User Manual
www.riomobility.com 15
Firey Controls
8. FireyTM Controls
Refer to the diagram on page 5 for part names and locations.
Power
To operate the FireyTM, the power must be
turned on in two locations. The rst is a red
switch on the right side of the Battery. The
other is a red switch on the indicator, next to the
Speedometer on the Handlebar. Both switches
must be in the ON position for the FireyTM to
function.
Brakes
There are two lever Brakes, one on each side of the Handlebar. Each Brake acts both
mechanically -- via bicycle-standard caliper brakes at the wheel -- and electrically -- by turning o
the power to the Hub Motor. NOTE: when travelling uphill, you must fully release the Brakes to
allow the Hub Motor to engage.
Each brake also oers the functionality of a Parking Brake to hold the Brake in the engaged
position. This is operated as shown on page 8.
Drive
To drive the FireyTM, place both hands on the Handlebar, ngers within easy reach of the Brakes.
Twist the Throttle with your right hand. The amount of twist will control your speed. Steer by
pushing left or right on the Handlebar according to the direction intended.
The FireyTM includes a Speedometer display on the Handlebar to record speed and distance
traveled. A separate user manual is included.
Reverse
To enhance maneuverability, the FireyTM may be driven in reverse. To engage, you MUST rst come
to a complete stop. Then press and hold the red Reverse button on the left side of the handle
while twisting the Throttle. Use caution and ensure that there is a clear path before moving. To
travel in the forward direction again, you MUST rst come to a complete stop. If you do not stop
rst, the FireyTM will continue to travel in the same direction, even though the button has been
released.
Headlight
It is recommended to use the Headlight in low-light conditions to improve your visibilty, both of
your environment and to others. To turn the Headlight on, press the yellow button next to the
Reverse button. To turn it o, press the yellow button again.

FireyTM User Manual
www.riomobility.com16
Safety
9. Safety
Safety Checklist
The handcycle transforms your chair into a highly maneuverable device, so
ALWAYS WEAR A HELMET.
Make sure reectors are installed, oriented properly, and clean.
The use of safety belts is recommended when operating your handcycle.
ALWAYS engage the Wheel Locks on your wheelchair before attaching or
detaching the handcycle.
ALWAYS check to make sure that all FOUR Pawn sockets attachments are fully
engaged before operating your handcycle.
Check to make sure all nuts and bolts are tight and all latches are secured.
Make sure the hand brakes work properly before riding your handcycle.
Do not add any parts or accessories not authorized by Rio Mobility to your
handcycle, or you will void your warranty.
Before You Ride
Make sure that your FireyTM is installed, adjusted, and maintained properly. Do not use the FireyTM
until you and your health care professional determine that you have enough experience to use it in
an uncontrolled environment.
Use your wheelchair as described in your wheelchair manual and use the FireyTM in the same
safe manner that you would your wheelchair with pushrims. Follow all additional warnings and
instructions for the FireyTM in this manual.
Outdoor Use
Always watch out for trac and pedestrians when riding on the road and sidewalk – follow trac
regulations. Follow any and all local regulations for this vehicle.
Turning
Always mind your speed, especially when turning. You should have full control of your wheelchair
at all times. Do not exceed the maximum allowable speed recommended by your wheelchair
manufacturer.
Three wheeled vehicles are inherently unstable in turns, so be careful to keep all three wheels on
the ground and moderate your speed when approaching curves.
Be very careful when reaching and leaning left or right from your wheelchair with your handcycle
attached – the longer wheelbase makes it less stable in sideways leans than your normal
wheelchair. Narrow wheelchairs are less stable, so be extra careful if your wheelchair is particularly
narrow.
▫
▫
▫
▫
▫
▫
▫
▫

FireyTM User Manual
www.riomobility.com 17
Safety
Obstacles
Be very careful going over bumps and curbs over 2” (50mm) high. Your front casters may contact
theses surfaces, causing a loss of control. Use your pushrims to get over these bumps, NOT the
handcycle. You should approach bumps and curbs straight on and at very low speeds to avoid
damage to your wheelchair and injury to you – your return spring should keep the front Wheel
straight, freeing up your hands for the pushrims. Be aware of road surfaces, especially on inclines
or declines. Watch out for water, ice, and oil lms.
Hill Climbing
If you lose traction, lean toward the Handlebar, if possible, to move your center of gravity forward.
Transferring
DO NOT attempt to transfer into or out of your chair with the FireyTM attached. You MUST detach
the handcycle before transferring.
General Notes & Precautions
Mind your ngers and hands when using your handcycle.
Keep children away from your handcycle to avoid possible
injury to both you and the child.
Do not carry anything that obstructs your view or interferes
with the hand Handlebar operation.
Do not put weight on the Wings – this includes weight due
to objects and people.
This handcycle is meant for everyday use and is not
intended for use in competition.
Rio Mobility is not responsible for any damage or injury due
to misuse of your handcycle.
Other manuals for Firefly
1
Table of contents
Other Rio Mobility Wheelchair manuals