Riverbed SteelConnect SDI-130W Manual

SteelConnect
™
Gateway Hardware Installation
Guide (SDI-130, SDI-330, SDI-1030)
April 2018

Riverbed Technology
680 Folsom Street
San Francisco, CA 94107
www.riverbed.com Part Number
712-00295-01
© 2018 Riverbed Technology, Inc. All rights reserved.
Riverbed and any Riverbed product or service name or logo used herein are trademarks of Riverbed. All other trademarks used
herein belong to their respective owners. The trademarks and logos displayed herein cannot be used without the prior written
consent of Riverbed or their respective owners.
Akamai® and the Akamai wave logo are registered trademarks of Akamai Technologies, Inc. SureRoute is a service mark of
Akamai. Apple and Mac are registered trademarks of Apple, Incorporated in the United States and in other countries. Cisco
is a registered trademark of Cisco Systems, Inc. and its affiliates in the United States and in other countries. EMC, Symmetrix,
and SRDF are registered trademarks of EMC Corporation and its affiliates in the United States and in other countries. IBM,
iSeries, and AS/400 are registered trademarks of IBM Corporation and its affiliates in the United States and in other
countries. Juniper Networks and Junos are registered trademarks of Juniper Networks, Incorporated in the United States and
other countries. Linux is a trademark of Linus Torvalds in the United States and in other countries. Microsoft, Windows, Vista,
Outlook, and Internet Explorer are trademarks or registered trademarks of Microsoft Corporation in the United States and in
other countries. Oracle and JInitiator are trademarks or registered trademarks of Oracle Corporation in the United States and
in other countries. UNIX is a registered trademark in the United States and in other countries, exclusively licensed through X/
Open Company, Ltd. VMware, ESX, ESXi are trademarks or registered trademarks of VMware, Inc. in the United States and in
other countries.
This product includes Windows Azure Linux Agent developed by the Microsoft Corporation (http://www.microsoft.com/).
Copyright 2016 Microsoft Corporation.
This product includes software developed by the University of California, Berkeley (and its contributors), EMC, and Comtech
AHA Corporation. This product is derived from the RSA Data Security, Inc. MD5 Message-Digest Algorithm.
The SteelHead Mobile Controller (virtual edition) includes VMware Tools. Portions Copyright © 1998-2016 VMware, Inc. All
Rights Reserved.
NetApp Manageability Software Development Kit (NM SDK), including any third-party software available for review with such
SDK which can be found at http://communities.netapp.com/docs/DOC-1152, and are included in a NOTICES file included
within the downloaded files.
For a list of open source software (including libraries) used in the development of this software along with associated
copyright and license agreements, see the Riverbed Support site at https//support.riverbed.com.
This documentation is furnished “AS IS” and is subject to change without notice and should not be construed as a
commitment by Riverbed. This documentation may not be copied, modified or distributed without the express authorization
of Riverbed and may be used only in connection with Riverbed products and services. Use, duplication, reproduction, release,
modification, disclosure or transfer of this documentation is restricted in accordance with the Federal Acquisition
Regulations as applied to civilian agencies and the Defense Federal Acquisition Regulation Supplement as applied to military
agencies. This documentation qualifies as “commercial computer software documentation” and any use by the government
shall be governed solely by these terms. All other use is prohibited. Riverbed assumes no responsibility or liability for any
errors or inaccuracies that may appear in this documentation.

SteelConnect Gateway Hardware Installation Guide (SDI-130, SDI-330, SDI-1030) 3
Contents
Welcome .............................................................................................................................................. 5
About this guide ...................................................................................................................... 5
Documentation and release notes ........................................................................................... 5
Contacting Riverbed ................................................................................................................ 5
1 - SteelConnect Overview................................................................................................................... 7
Branch gateway interfaces per model ..................................................................................... 7
SteelConnect SDI-130 gateways ............................................................................................. 8
SteelConnect SDI-130 and SDI-130W gateway LEDs ......................................................... 8
SteelConnect SDI-330 gateway ............................................................................................... 9
SteelConnect SDI-330 gateway LEDs ................................................................................ 9
SteelConnect SDI-1030 gateway ........................................................................................... 10
SteelConnect SDI-1030 gateway LEDs ............................................................................ 11
2 - Installing the SteelConnect Gateways.......................................................................................... 13
Site preparations or considerations ...................................................................................... 13
Safety information .......................................................................................................... 13
Environmental considerations......................................................................................... 14
Required tools and equipment .............................................................................................. 14
Mounting the SDI-130 and SDI-130W gateways..................................................................... 14
Rack mounting the SDI-330 gateway ..................................................................................... 15
Rack mounting the SDI-1030 gateway ................................................................................... 16
Powering the gateways.......................................................................................................... 17
Replacing the power supplies in the SDI-1030 ...................................................................... 18
Removing the power supplies.......................................................................................... 18
Installing the power supplies .......................................................................................... 18
A - SteelConnect Gateway Specifications ......................................................................................... 21
SteelConnect SDI-130 and SDI-130W specifications............................................................. 21
SteelConnect SDI-330 specifications .................................................................................... 22
SteelConnect SDI-1030 specifications .................................................................................. 23

4 SteelConnect Gateway Hardware Installation Guide (SDI-130, SDI-330, SDI-1030)
Contents

SteelConnect Gateway Hardware Installation Guide (SDI-130, SDI-330, SDI-1030) 5
Welcome
About this guide
This guide describes the SteelConnect gateways and provides information you need to install the
hardware.
This guide is written for administrators responsible for SteelConnect hardware installation and
includes information relevant to the following products:
SteelConnect SDI-130
SteelConnect SDI-130W
SteelConnect SDI-330
SteelConnect SDI-1030
Documentation and release notes
To obtain the most current version of all Riverbed documentation, go to the Riverbed Support site at
https://support.riverbed.com.
If you need more information, see the Riverbed Knowledge Base for any known issues, how-to
documents, system requirements, and common error messages. You can browse titles or search for
keywords and strings. To access the Riverbed Knowledge Base, log in to the Riverbed Support site at
https://support.riverbed.com.
Each software release includes release notes.The release notes identify new features in the software
as well as known and fixed problems. To obtain the most current version of the release notes, go to the
Software and Documentation section of the Riverbed Support site at https://support.riverbed.com.
Examine the release notes before you begin the installation and configuration process.
Contacting Riverbed
This section describes how to contact departments within Riverbed.
Technical support - If you have problems installing, using, or replacing Riverbed products, contact
Riverbed Support or your channel partner who provides support. To contact Riverbed Support,
open a trouble ticket by calling 1-888-RVBD-TAC (1-888-782-3822) in the United States and
Canada or +1 415-247-7381 outside the United States. You can also go to
https://support.riverbed.com.

6 SteelConnect Gateway Hardware Installation Guide (SDI-130, SDI-330, SDI-1030)
Welcome Contacting Riverbed
Professional services - Riverbed has a staff of professionals who can help you with installation,
provisioning, network redesign, project management, custom designs, consolidation project
design, and custom coded solutions. To contact Riverbed Professional Services, email
proserve@riverbed.com or go to http://www.riverbed.com/services/index.html.
Documentation - The Riverbed Technical Publications team continually strives to improve the
quality and usability of Riverbed documentation. Riverbed appreciates any suggestions you might
have about its online documentation or printed materials. Send documentation comments to
techpubs@riverbed.com.

SteelConnect Gateway Hardware Installation Guide (SDI-130, SDI-330, SDI-1030) 7
1
SteelConnect Overview
The SteelConnect gateways offer the benefits of software-defined networking (SDN) automation
coupled with the ability for customers to protect their privacy by storing their network configuration
locally. The gateways allow you to easily set up a secure connection between local area networks, data
centers, and home offices. Uplink balancing can be used for backup or load balancing purposes.The
Next Generation Firewall provides user-based and application-based firewalling.
This overview provides a description of the SteelConnect gateway appliances and includes the following
sections:
“Branch gateway interfaces per model” on page 7
“SteelConnect SDI-130 gateways” on page 8
“SteelConnect SDI-330 gateway” on page 9
“SteelConnect SDI-1030 gateway” on page 10
Branch gateway interfaces per model
The number of physical interfaces supported for each branch gateway model are:
SDI-130 - 2
SDI-330 - 2
SDI-1030 -12
The 130 and 330 gateway models have two physical interfaces.
Note:After attaching a modem to one of the interfaces on a 130 or 330 gateway, you can only support two WANs on
that device. For example, MPLS on interface 1 and internet through a LTE modem on interface 2.
On the 1030 gateway model, you can configure all 12 ports as uplink interfaces, or as zone/multizone
interfaces. Although 12 uplinks are technically supported, realistically you need to use a port for at least
one LAN connection.
8 SteelConnect Gateway Hardware Installation Guide (SDI-130, SDI-330, SDI-1030)
SteelConnect Overview SteelConnect SDI-130 gateways
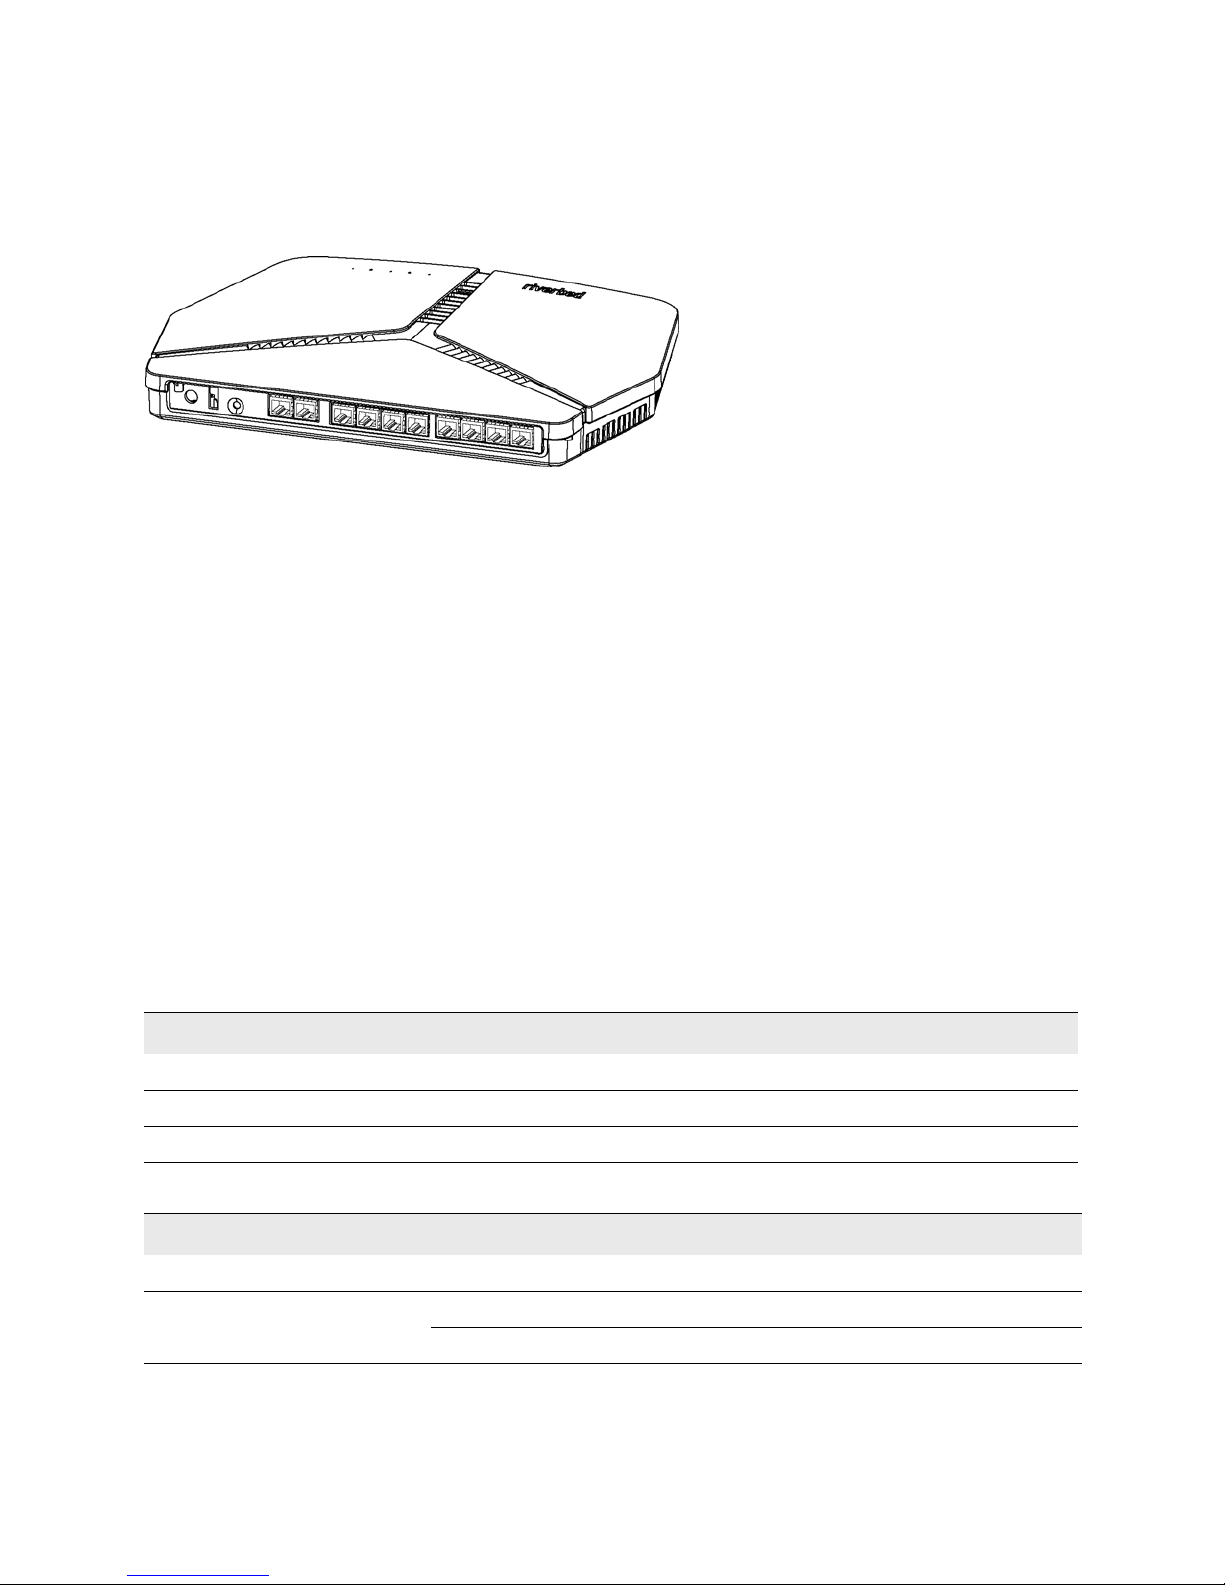
SteelConnect SDI-130 gateways
The SDI-130 and wireless SDI-130W gateways are recommended for small branch or retail offices.
Figure 1-1. SteelConnect SDI-130 and SDI-130W
The following features can be found on the SDI-130 gateways:
DC inlet
One USB 2.0 port
A reset button
Press the reset button to reboot the appliance.
Hold the reset button for 10 seconds to reset the appliance to the factory default state. The
LEDs will blink when a reset is in progress.
10 GbE ports (RJ45)
Eight LAN (switched) ports on the SDI-130 and SDI-130W
Two WAN ports on the SDI-130
Two WLAN ports on the SDI-130W
SteelConnect SDI-130 and SDI-130W gateway LEDs
State of the LED Description
Off Connection to the SteelConnect Controller established.
Solid green Trying to establish a connection to the SteelConnect Controller.
Blinking Factory reset in progress.
Ethernet Copper Port LEDs State Definition
Top left orange Blinking Activity
Top right green On Link is up
Off Link is down
SteelConnect Gateway Hardware Installation Guide (SDI-130, SDI-330, SDI-1030)
9
SteelConnect SDI-330 gateway SteelConnectOverview
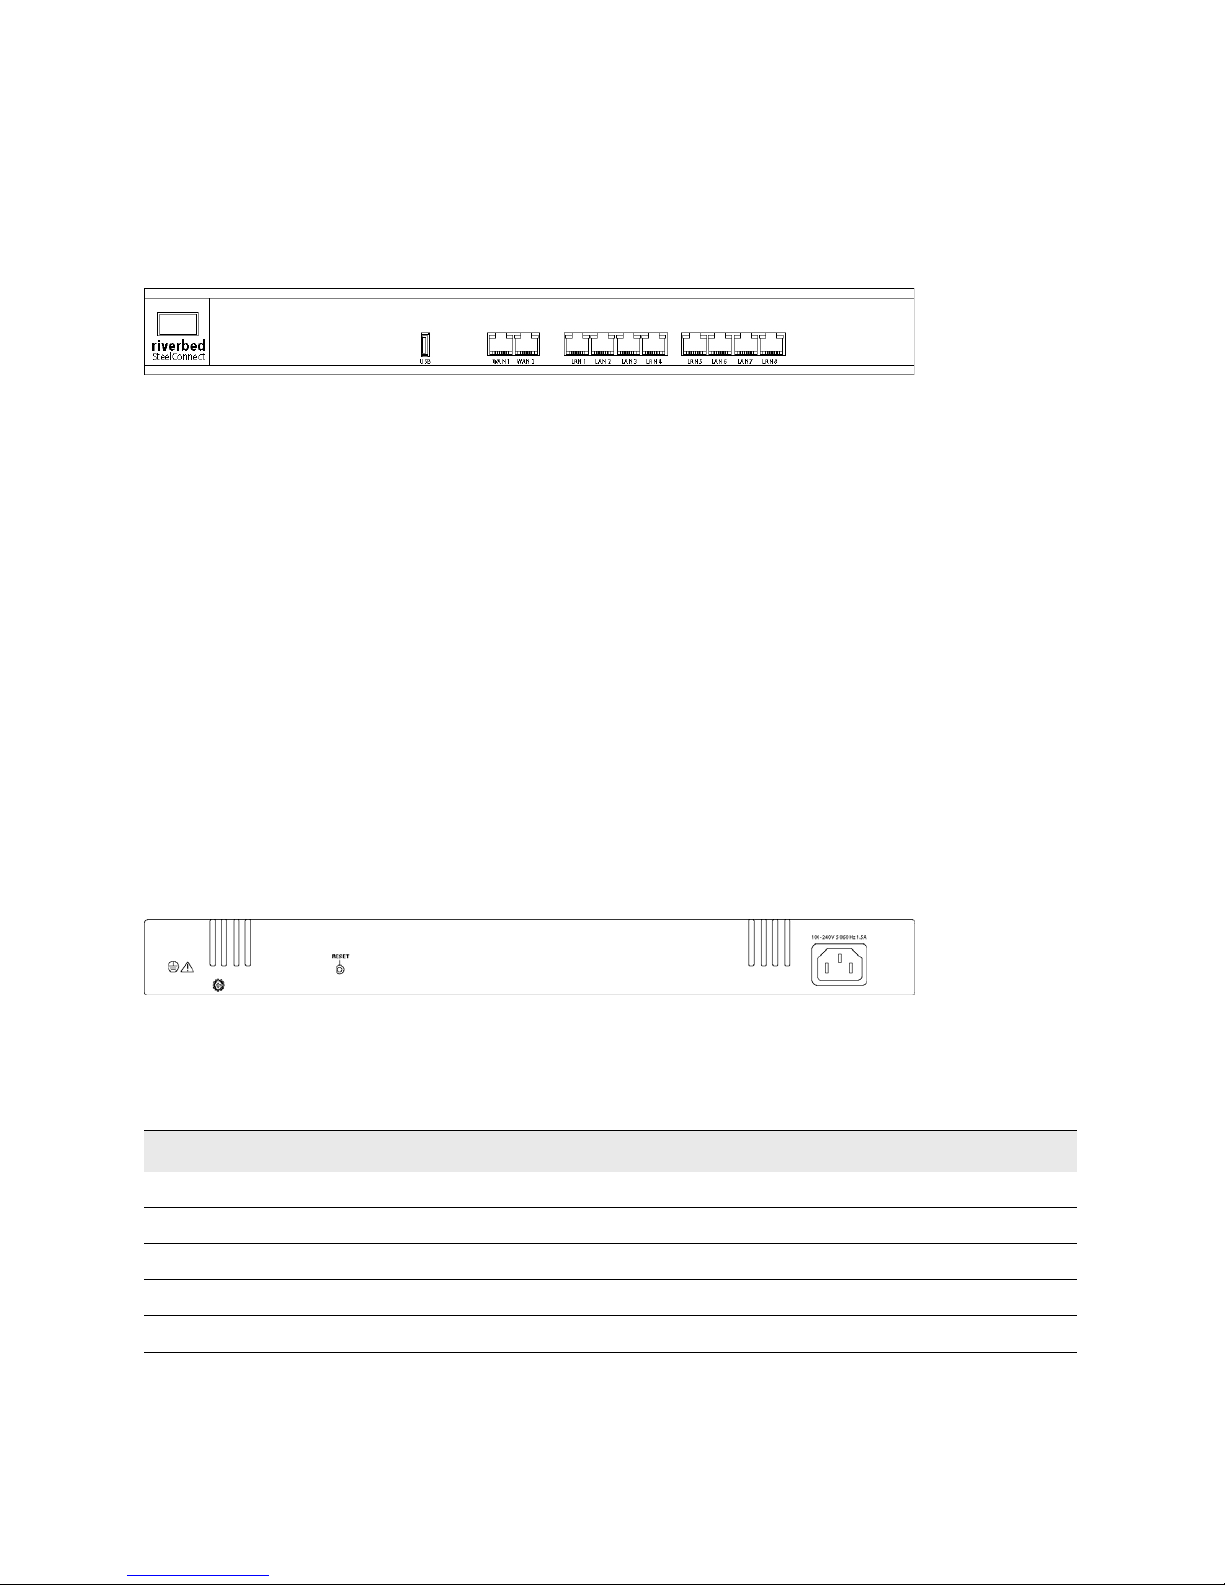
SteelConnect SDI-330 gateway
The SDI-330 is a 1U gateway recommended for medium branch offices.
The virtual gateway interfaces are labeled as LAN on the Ports page.
Figure 1-2. SDI-330 front panel
The following features can be found on the front panel of the SDI-330 gateway:
An organic LED (OLED) screen
USB 2.0 port
10 GbE ports (RJ45)
Eight LAN (switched) ports
Two WAN ports
The following features can be found on the back panel of the SDI-330 gateway:
AC power supply inlet
Grounding screw
A reset button
Press the reset button to reboot the appliance.
Hold the reset button for 10 seconds to reset the appliance to the factory default state. The
LEDs will blink when a reset is in progress.
Figure 1-3. SDI-330 back panel
SteelConnect SDI-330 gateway LEDs
OLED text Definition
Connected! Connection to the SteelConnect Controller established.
Connecting Trying to establish a connection to the SteelConnect Manager.
Booting The appliance is booting.
Rebooting The appliance is preparing to reboot.
Factory reset Factory reset is in progress.
10 SteelConnect Gateway Hardware Installation Guide (SDI-130, SDI-330, SDI-1030)
SteelConnect Overview SteelConnect SDI-1030 gateway
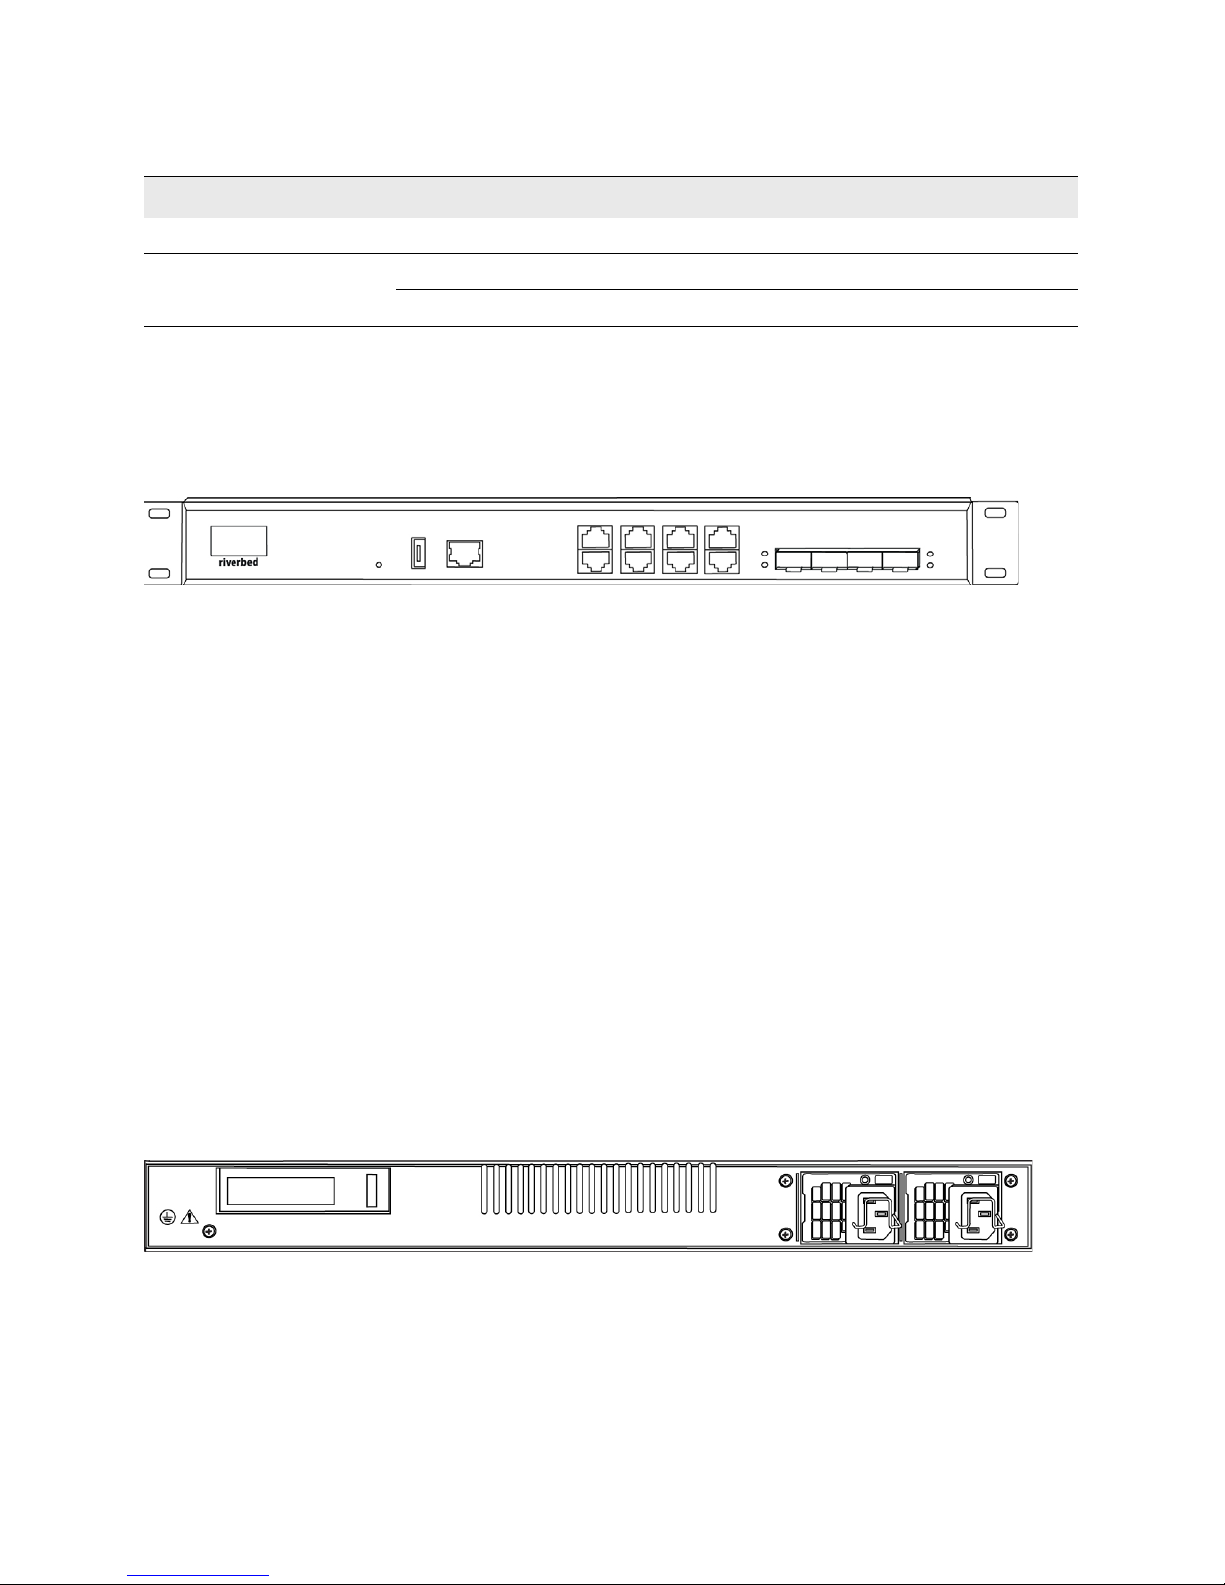
SteelConnect SDI-1030 gateway
The SDI-1030 is a 1U gateway recommended for medium to large branch offices.
Figure 1-4. SDI-1030 Front panel
The following features can be found on the front panel of the SDI-1030 gateway:
Organic LED (OLED) screen
Reset button
Press the reset button to reboot the appliance.
Hold the reset button for 10 seconds to reset the appliance to the factory default state. The
LEDs will blink when a reset is in progress.
USB 2.0 port
Serial console port
8 GbE ports (RJ45)
4 10GbE SFP+ ports
The following features can be found on the back panel of the SDI-1030 gateway:
AC power supply inlet
Grounding screw
PCIE slot (not supported)
Figure 1-5. SDI-1030 rear panel
Ethernet Copper Port LEDs State Definition
Top left orange Blinking Activity
Top right green On Link is up
Off Link is down

SteelConnect Gateway Hardware Installation Guide (SDI-130, SDI-330, SDI-1030)
11
SteelConnect SDI-1030 gateway SteelConnectOverview
SteelConnect SDI-1030 gateway LEDs
OLED text Definition
Connected! Connection to the SteelConnect Controller established.
Connecting Trying to establish a connection to the SteelConnect Controller.
Booting The appliance is booting.
Rebooting The appliance is preparing to reboot.
Factory reset Factory reset in progress.
Ethernet copper port LEDs State Definition
Top left orange On Link is up.
Blinking Activity.
Top right green On Link is up.
Off Link is down.
SFP+ port LEDs Definition
Green Link is up.
Off Link is down.

12 SteelConnect Gateway Hardware Installation Guide (SDI-130, SDI-330, SDI-1030)
SteelConnect Overview SteelConnect SDI-1030 gateway

SteelConnect Gateway Hardware Installation Guide (SDI-130, SDI-330, SDI-1030) 13
2
Installing the SteelConnect Gateways
This chapter describes how to install or mount the SteelConnect gateway appliances and discusses the
following topics:
“Site preparations or considerations” on page 13
“Required tools and equipment” on page 14
“Mounting the SDI-130 and SDI-130W gateways” on page 14
“Rack mounting the SDI-330 gateway” on page 15
“Rack mounting the SDI-1030 gateway” on page 16
“Powering the gateways” on page 17
“Replacing the power supplies in the SDI-1030” on page 18
Site preparations or considerations
“Safety information” on page 13
“Environmental considerations” on page 14
Safety information
Do not attempt to service the appliance. This sealed unit contains no user-serviceable parts or
adjustments. Do not open or tamper with the power supply.
Carefully inspect the work area in which the appliance will be located to ensure against hazards
such as damp floors, ungrounded power extension cords, and missing ground connections.
Before you connect the appliance to power, locate the power OFF switch on the appliance and
locate the main circuit breaker for the room in which the appliance is installed. If an electrical
accident occurs, turn power OFF immediately.
Before operating the appliance, ensure that external power sources comply with the requirements.
Ensure that the ampere rating of all equipment plugged into wall outlets does not exceed the
capacity of the outlet.
If you require an extension cord, ensure that the ampere rating of all equipment plugged into the
extension cord does not exceed the cord’s ampere rating.
If the appliance is exposed to moisture or condensation, disconnect it from the power source
immediately and obtain service assistance.

14 SteelConnect Gateway Hardware Installation Guide (SDI-130, SDI-330, SDI-1030)
Installing the SteelConnect Gateways Required tools and equipment
If the appliance exhibits unexpected behavior, such as smoking or becoming extremely hot,
disconnect it from the power source immediately and then obtain service assistance.
Environmental considerations
The following is a list of environmental considerations that will ensure safe and efficient operations of
the appliance:
Ensure that the appliance has at least 12 inches of clearance on all sides to allow for proper
ventilation. The appliance generates heat and requires adequate circulation to maintain proper
operating temperatures. Never cover or obstruct the appliance ventilation slots.
Do not position the appliance near high-powered radio transmitters or electrical equipment, such
as electrical motors or air conditioners. Interference from electrical equipment can cause
intermittent failures.
Do not install the appliance in areas where condensation, water, or other liquids may be present.
These may cause safety hazards and equipment failure.
Required tools and equipment
You need the following tools and equipment to mount the SteelConnect SDI-130 and SDI-130W:
A power drill
The mounting kit that ships with your gateway
You need the following tools and equipment to mount the SteelConnect SDI-330 and SDI-1030 in a rack:
A standard server-type rack
A standard Phillips screwdriver
The rack-mount kit that ships with your gateway
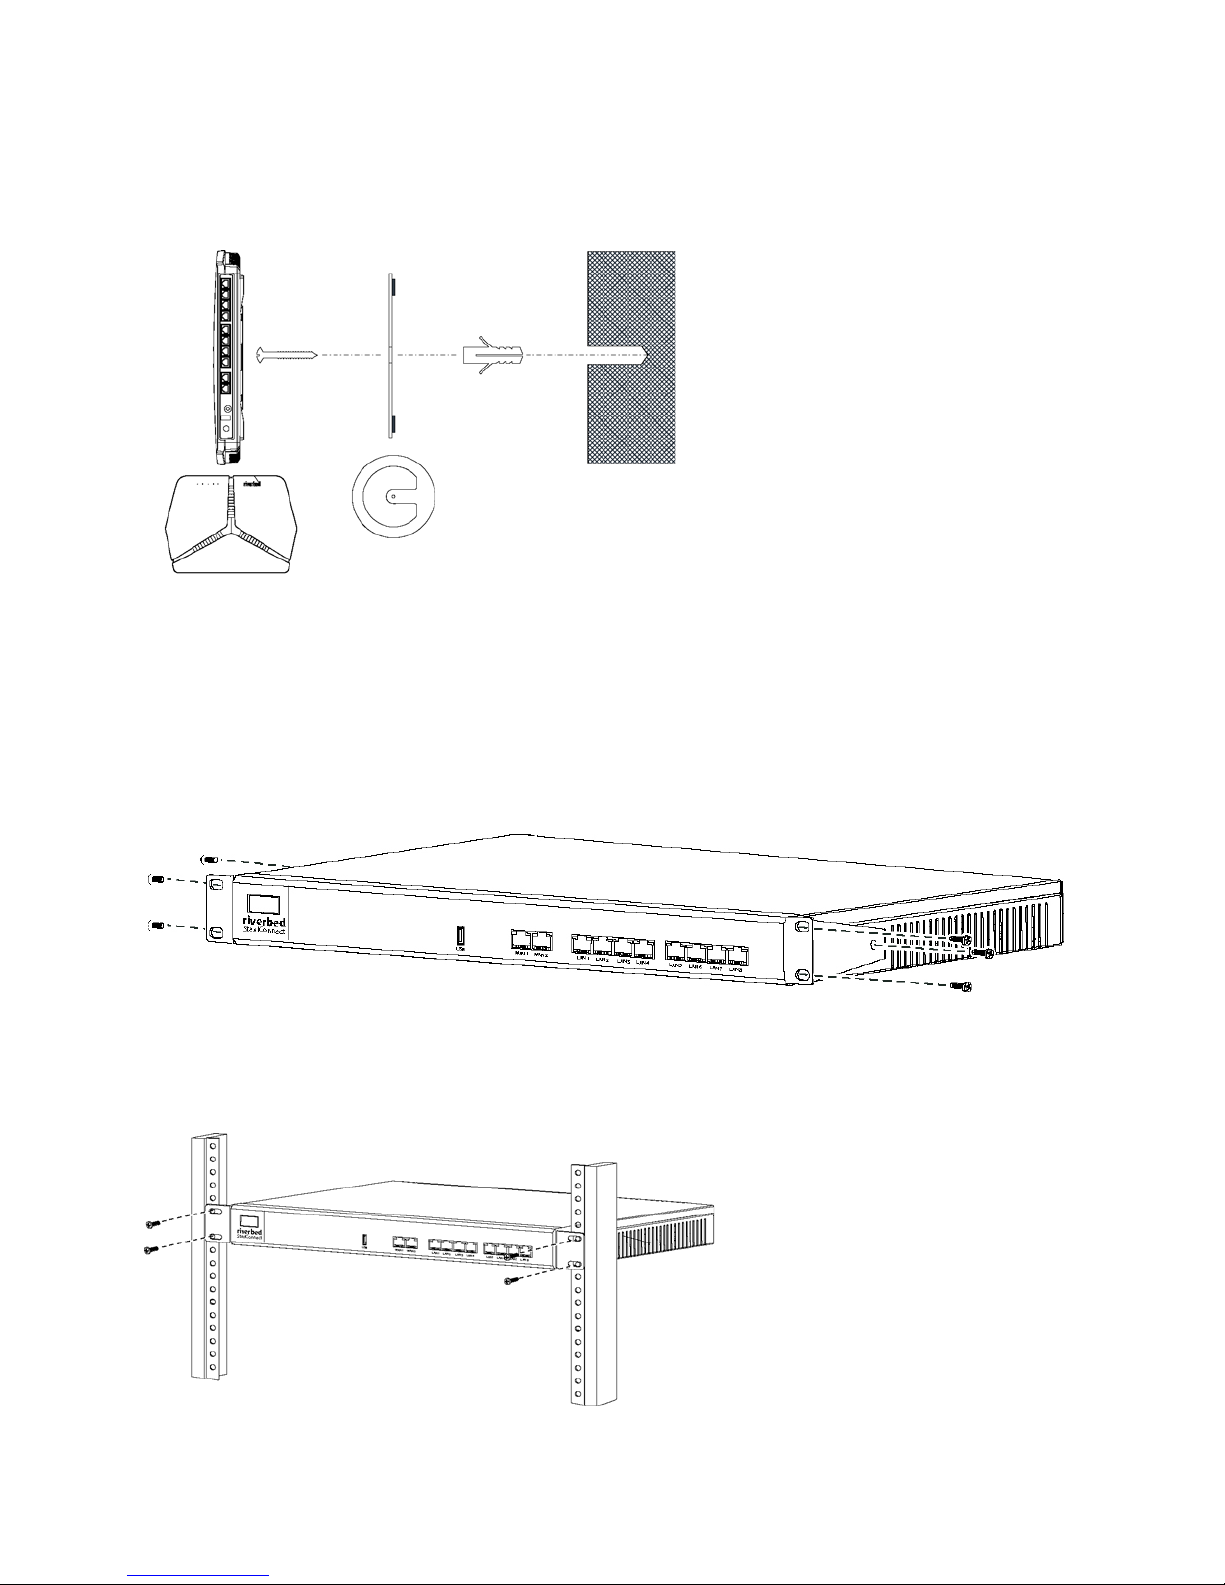
Mounting the SDI-130 and SDI-130W gateways
The SDI-130 and SDI-130W gateways can be mounted to a wall or ceiling using the snap disk. If a solid
mount is not required, the gateways can be used as a tabletop unit. Distance from the gateway to the
power supply source should be considered before mounting.
The gateway ships with a snap disk,screw, and drywall anchor. Supply the gateway with power by either
using the power supply or a Power over Ethernet (PoE). Attach the power to the gateway before
mounting it.
To mount the SDI-130 and SDI-130W gateways to a wall or ceiling
1. Use a power drill to drill pilot holes for the dry wall anchor. Insert the drywall anchor into the pilot
hole.
2. Place the snap disk over the drywall anchor. Secure the snap disk to the wall by driving the screw
into the drywall anchor.
SteelConnect Gateway Hardware Installation Guide (SDI-130, SDI-330, SDI-1030)
15
Rack mounting the SDI-330 gateway Installing the SteelConnect Gateways
3. Place the gateway over the snap disk and snap it into place.
4. Plug in the power supply to power up the gateway.
Figure 2-1. Mounting the SDI-130 and SDI-130W
Rack mounting the SDI-330 gateway
The SDI-330 gateway ships with hardware for rack mounting and rubber feet to attach to the appliance
for desktop placement.
1. Attach the rack mount ears to the appliance with the included screws.
Figure 2-2. Attaching the rack mount ears
2. Position the gateway in the rack and attach the rack mount ears to the rack with the included
screws.
Figure 2-3. Rack mounting the SDI-330
16 SteelConnect Gateway Hardware Installation Guide (SDI-130, SDI-330, SDI-1030)
Installing the SteelConnect Gateways Rack mounting the SDI-1030 gateway
Rack mounting the SDI-1030 gateway
The SDI-1030 gateway ships with the hardware for rack mounting and the rubber feet to attach to the
appliance for desktop placement.
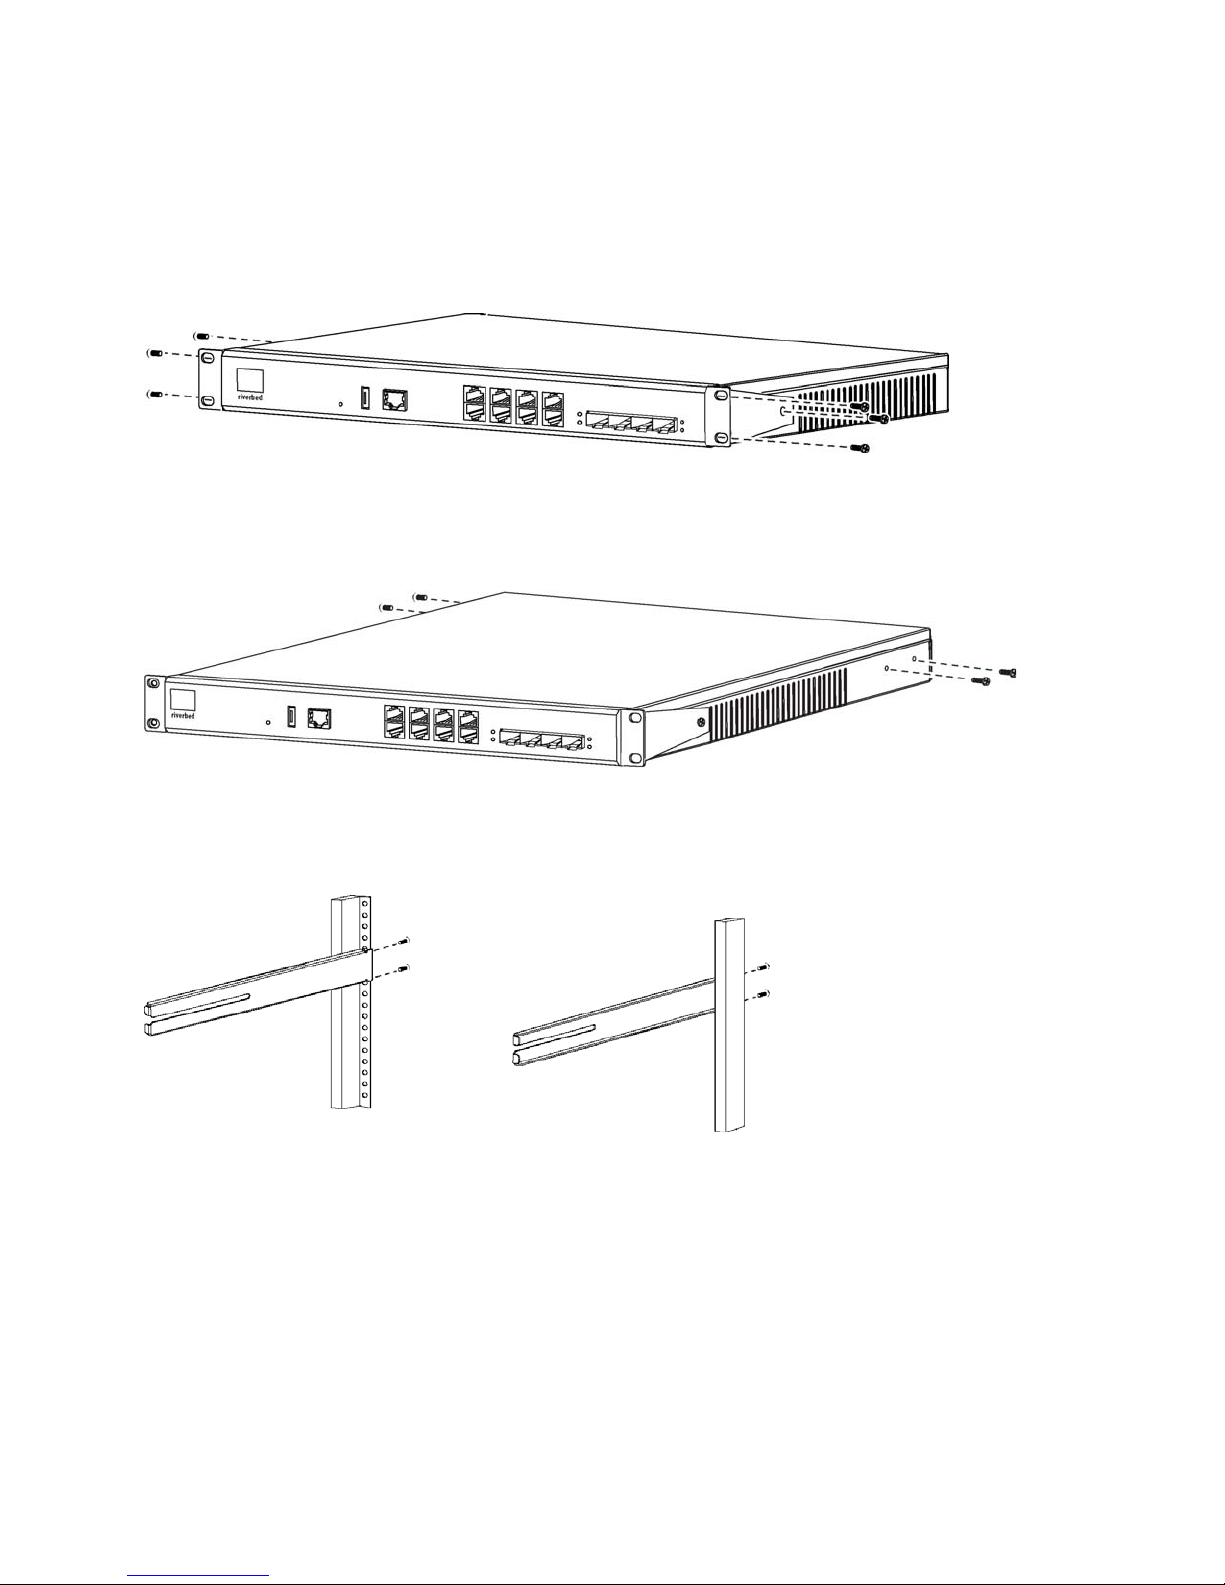
1. Attach the rack mount ears to the appliance with the included screws.
Figure 2-4. Attaching the rack mount ears
2. Loosely install the four screws, two on each side, along the back sides of the switch.You will tighten
the screws when the switch is placed in the rack. Set the appliance aside.
Figure 2-5. Attaching the rear rail screws
3. Determine the placement in the rack and then use the screws that ship with the rack-mount kit to
attach the rails to the rack.
Figure 2-6. Attaching the rails to the rack

SteelConnect Gateway Hardware Installation Guide (SDI-130, SDI-330, SDI-1030)
17
Powering the gateways Installing the SteelConnect Gateways
4. Insert the appliance into the rack and line the screws up to the rails so that you can insert the screws
and slide the appliance into the rack.
Figure 2-7. Installing the appliance into the rack
5. Use screws to secure the front of the appliance to the rack. Then tighten the screws along the back
of the appliance to secure the rail to it. This secures the rear of the appliance to the rack.
Figure 2-8. Securing the appliance to the rack
Powering the gateways
Caution: In European electrical environments you must ground (earth) the Green/Yellow tab on the power cord to
avoid electrical shock.
1. If your system has a master power switch, ensure that the master power switch is in the off position
on the rear of the appliance.
18 SteelConnect Gateway Hardware Installation Guide (SDI-130, SDI-330, SDI-1030)
Installing the SteelConnect Gateways Replacing the power supplies in the SDI-1030
2. Plug the AC power cord into the power source.
Figure 2-9. Connecting the AC power
3. Plug the AC power cord into an uninterrupted AC power source.
4. Press the system power switch on. If the appliance doesn’t immediately power on, press the power
switch off, and then press the power switch on again.
5. Check the status lights on the appliance.
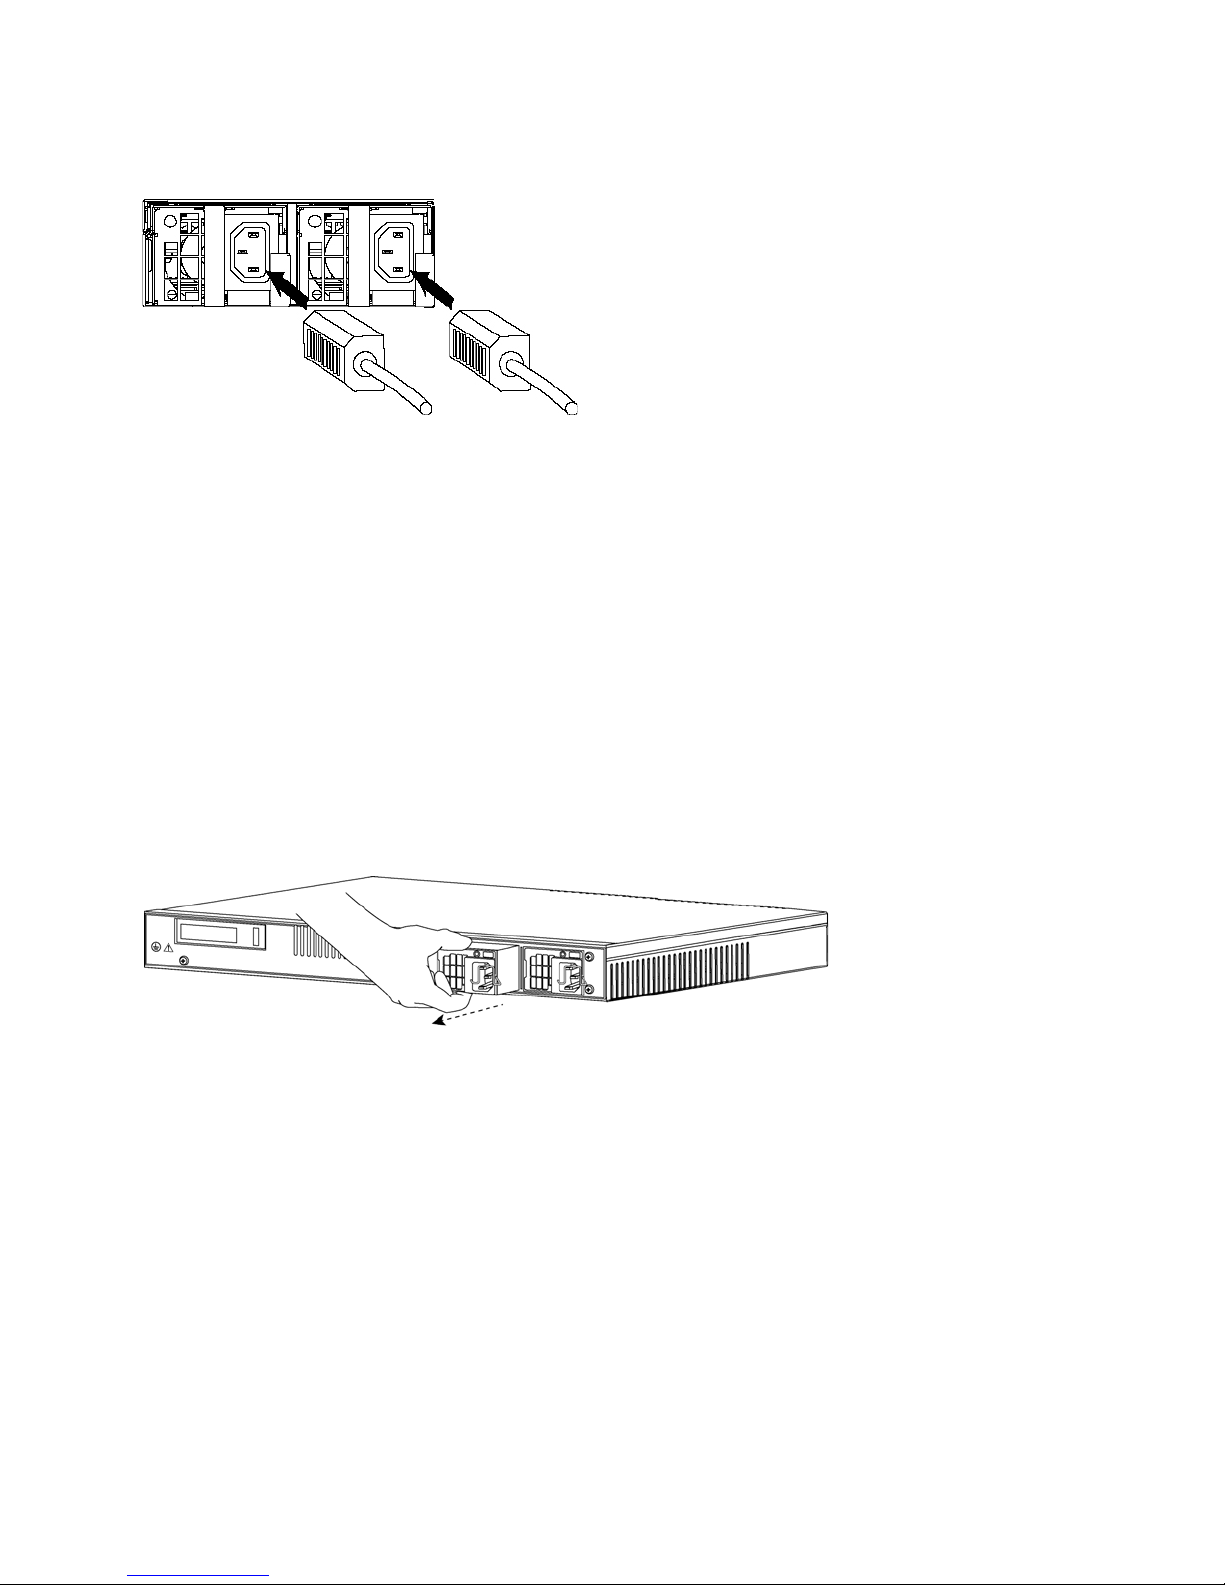
Replacing the power supplies in the SDI-1030
The SDI-1030 ships with two power supplies that can be replaced.
Removing the power supplies
1. Grasp the handle on the failed power supply and pull the power supply out of the bay.
Figure 2-10. Removing the power supply
2. If you are installing a new power supply, see “Installing the power supplies” on page 18 for
instructions.
3. If you are leaving the bay empty, place the power supply bay cover over the opening. Use a
screwdriver to tighten the screws and secure the cover over the opening.
Installing the power supplies
1. Remove the new power supply from its packaging and position it into the power supply bay.

SteelConnect Gateway Hardware Installation Guide (SDI-130, SDI-330, SDI-1030)
19
Replacing the power supplies in the SDI-1030 Installing the SteelConnect Gateways
2. Push the power supply into the bay until it is fully seated.
Figure 2-11. Installing the power supply
3. Repeat this process for the second power supply.

20 SteelConnect Gateway Hardware Installation Guide (SDI-130, SDI-330, SDI-1030)
Installing the SteelConnect Gateways Replacing the power supplies in the SDI-1030
This manual suits for next models
3
Table of contents
Other Riverbed Gateway manuals

Riverbed
Riverbed SteelCentral SCFG-02270 User manual

Riverbed
Riverbed SteelConnect SDI-5030 Manual

Riverbed
Riverbed SteelConnect SDI-130 Installation instructions

Riverbed
Riverbed SteelConnect SDI-130 User manual

Riverbed
Riverbed SteelConnect SDI-330 User manual

Riverbed
Riverbed Whitewater User manual

Riverbed
Riverbed SteelConnect SDI-2030 Manual
Popular Gateway manuals by other brands


Solwise
Solwise WAS-150 quick start guide

VegaStream
VegaStream Vega 50 8 FXS + 2 FXO Initial configuration guide

Allied Telesis
Allied Telesis AT-iMG664A Specifications

D-Link
D-Link Airspot DSA-3100 owner's manual

Digium
Digium series G11 Administrator's manual

ZyXEL Communications
ZyXEL Communications Prestige 314 PLUS user guide


