RIVERSMITH River Quiver User manual

ROOFTOP FLY ROD HOLDER. LOCKED. LOADED. READY TO FISH.
WWW.RIVERSMITH.COM
RIVERSMITHUSA
Patent Pending
INSTALLATION GUIDE WITH
QUICK RELEASE MOUNTS

CONTENTS
INCLUDED PARTS
TOOLS NEEDED
STEP 1 PREPARE VEHICLE
STEP 2 INSTALL QUICK RELEASE MOUNTING
BRACKETS
STEP 5 TIGHTEN QUICK RELEASE MOUNTING BRACKETS
STEP 6 TIGHTEN TENSION STRAPS
STEP 3 JOIN THE HALVES
SAFETY INFORMATION
MAINTENANCE
STEP 4 PLACE ON YOUR VEHICLE
DRIVING
CONTENTS
1
2
3
4
7
8
5
9
11
6
10
13
12
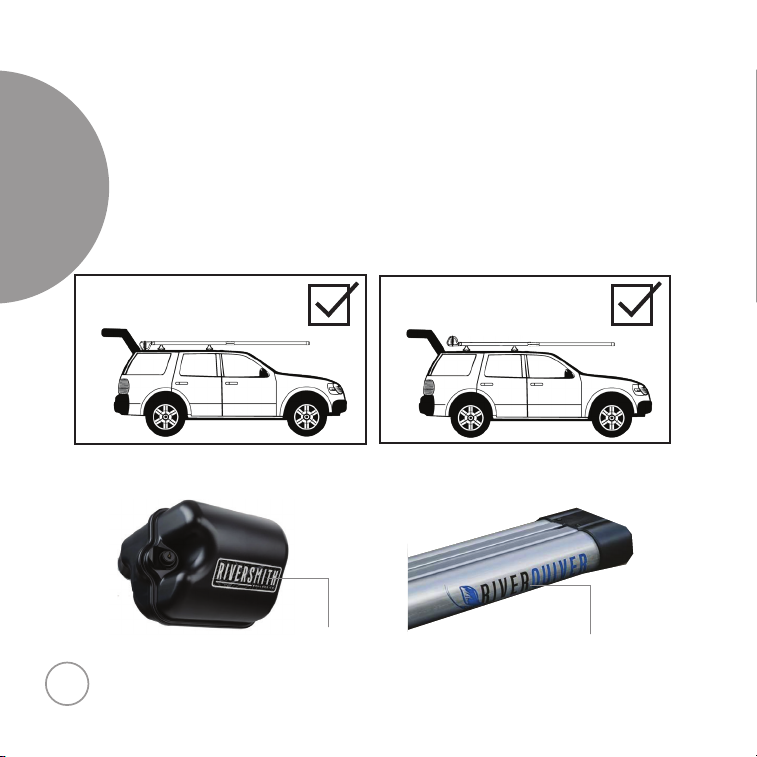
MOUNT ASSEMBLY
FLIPPING OVER RIVER QUIVER

4BANGER
2BANGER
Nose Cone
INCLUDED PARTS
Accessories Available
See full lineup of Accessories at www.riversmith.com
PARTS
Coupler
Coupler
Quick Release Mounts
Quick Release
Mount
Nose Cone
6mm Coupler Bolts
6mm Coupler
Bolts
1
• Rod Chairs
• Reel Box Pads
Reel Box
Reel
Box
The River Quiver is built and tested to the highest possible standards to securely
transport and protect your gear, however it is not meant as a long term storage solution.
Quick Release Mounts
Quick Release
Mount

TOOLS
TOOLS NEEDED
10mm
Nut Driver
4mm
Hex Wrench
2
Marking
Utensil
Measuring
Tape
LOCK
OR
(DUMMY LOCK)

STRAP TENSION
ADJUSTMENT BOLT
T-STUD
QUICK RELEASE MOUNT ASSEMBLY
LOCK
OR
(DUMMY LOCK)
TENSION
STRAP
LATCH TAB
NOTE: Each set comes
with one locking mount
and the other mount
has a “dummy lock”
3
MOUNT ASSEMBLY
NOTE: LP T-Track Mounts are lower profile than Standard
Mounts, which may require flipping the River Quiver
upside down to avoid the Reel Box hitting the roof of your
vehicle. If flipping is required, you can remove and reapply
the Riversmith dome tag located on the reel box so it
reads right side up. In Step 3 ensure River Quiver stickers
on front half of the extrusions read right side up.
STANDARD INSTALLATION FLIPPED INSTALLATION
Dome Tag River Quiver
Sticker
FLIPPING
RIVER QUIVER
4
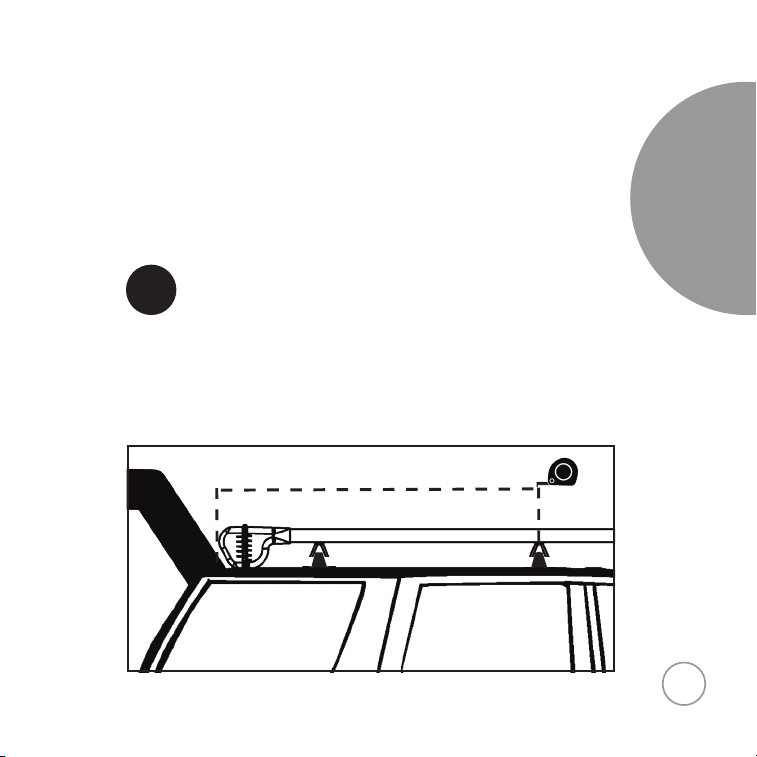
STEP 1
Prepare Vehicle - DO NOT ASSEMBLE RIVER
QUIVER HALVES UNTIL STEP 3
STEP 1
1Measure from center of front crossbar to estimated
location of the River Quiver reel box. Generally it is
best to spread vehicle crossbars as far as possible.
• If 65” or less both Quick Release Mounts will go
on the reel box side of the coupler.
• If more than 65” one Quick Release Mount
will go on each half of the river quiver. This
installation is preferred when possible.
5
NOTE: Quick Release Mounts are lower-profile than
Standard Mounts and may require flipping the River Quiver
upside down to avoid the Reel Box hitting the roof of your
vehicle.
Flip unit upside down if Reel Box
is touching the vehicle’s roof
Reel Box
4BANGER 2BANGER
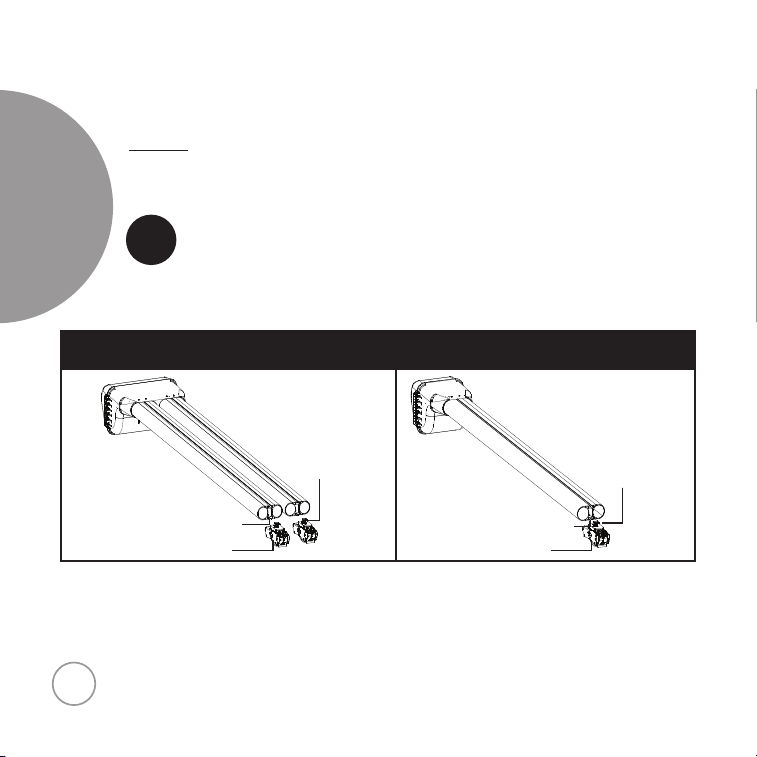
STEP 2
Install Quick Release Mounts to River Quiver
STEP 2
2Insert Quick Release Mounts into appropriate side of
River Quiver by placing T-Stud of Quick Release Mounts
into T-Slot of River Quiver body.
6
Quick Release Mount
T-Slot
T-Stud
T-Slot
T-Stud
Quick Release Mount

STEP 3
STEP 3
4BANGER 2BANGER
Join the Halves
3Place River Quiver on flat surface and join halves
using upper and lower coupler and coupler bolts.
Tighten all bolts evenly back and forth using 4mm
hex wrench to equalize tension on collar.
• DO NOT OVERTIGHTEN OR DAMAGE
WILL OCCUR
7
!
Coupler
6mm
Coupler
Bolts
Coupler
6mm
Coupler
Bolts
STEP 4
STEP 4
Placing River Quiver on Your Vehicle
4Place River Quiver on vehicle, optimizing side to side
and front to back location. Monitor interference of rear
hatches or doors.
• Mark River Quiver where Quick Release
Mounts should be positioned to attach to vehicle
crossbars.
8

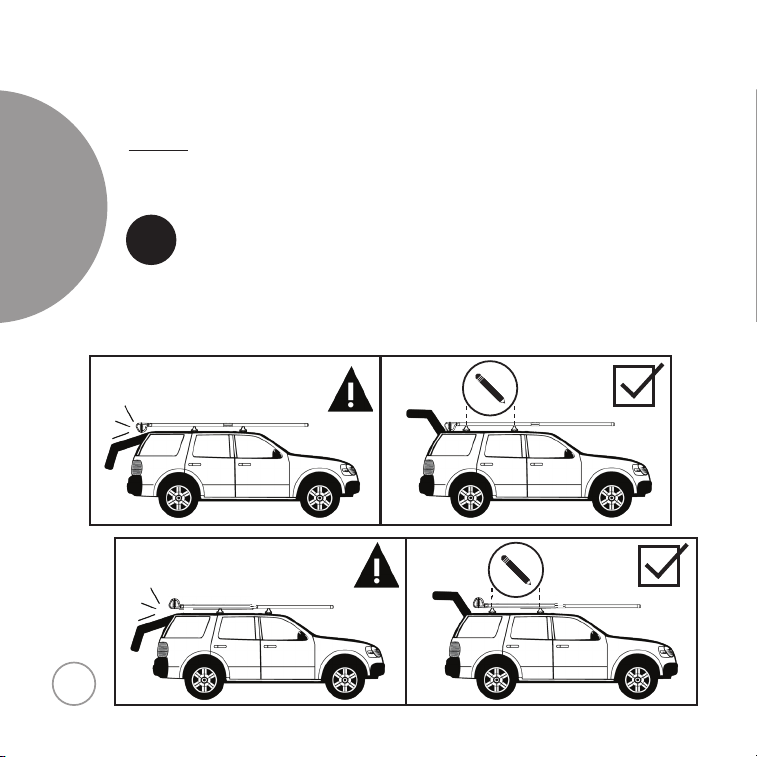
STEP 5
STEP 5
9
Tighten Mounts
5Remove from vehicle and rotate the entire Quick
Release Mount clockwise until secure and parallel with
the extrusion. Ensure each mount aligns with marks
made previously. Repeat for each mount.
• DO NOT OVERTIGHTEN OR DAMAGE
MAY OCCUR
!
ROTATE CLOCKWISE TO TIGHTEN
(view shown from underside)
CORRECT SECURE ALIGNMENT

STEP 6
STEP 6
10
Tighten Tension Strap
6
Place River Quiver back on vehicle aligning each Quick
Release Mount with the cross bars. Adjust the tension
bolt for each tension strap with 4mm hex wrench until
you are able to turn down each latch tab with secure
tension around the cross bars. After fully securing each
Quick Release Mount tension strap, lock the locking
mounts with key provided.
Once installed check for security and
function of River Quiver.
• DO NOT OVERTIGHTEN OR DAMAGE
WILL OCCUR
!
TIGHTEN QUICK RELEASE MOUNT TENSION STRAP
Latch Tab

SAFETY
SAFETY INFORMATION
• Improperly secured loads and incorrectly mounted
racks or accessories can come loose causing damage to
property, serious injury, or death.
• Always place crossbars as far apart as possible before
mounting River Quiver.
• Check all rack and accessory hardware:
• Before any trips
• After a short drive following initial install
• At regular intervals during use
• Anytime rough terrain is encountered
• Do not exceed maximum vehicle roof loads or roof
rack capacities.
• Do not attach unauthorized accessories to River Quiver
• Record overall vehicle height with River Quiver in place.
11
VEHICLE HEIGHT
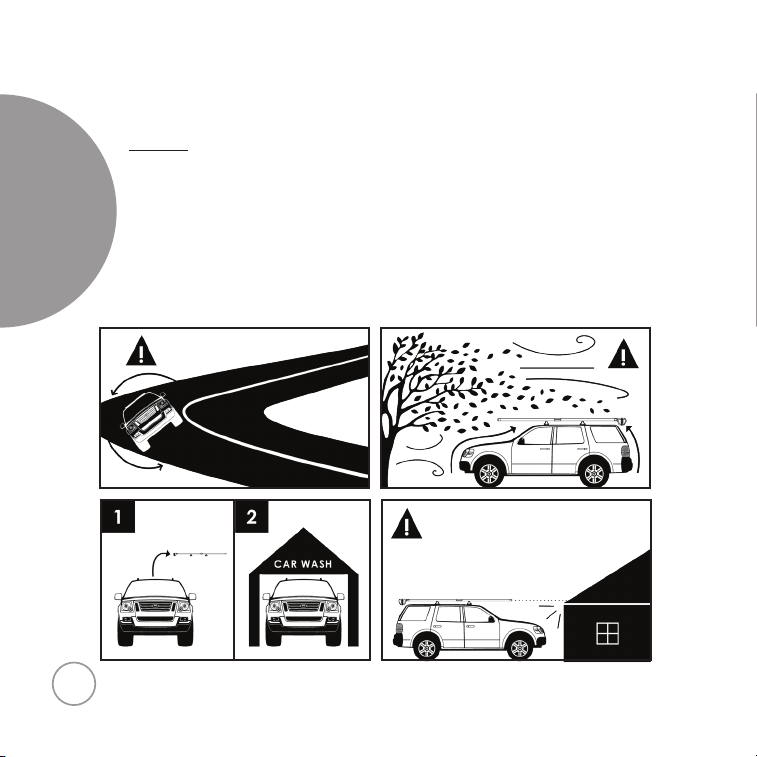
DRIVING
• Do not exceed posted speed limits or speeds
appropriate for the terrain and conditions.
• Off road driving is not recommended and could result
in damage to vehicles, accessories, or gear.
• Closely monitor overhead clearances.
• Adjust speed for curves.
• Monitor wind conditions and adjust driving accordingly.
DRIVING
12

MAINTENANCE
MAINTENANCE AND USE
• River Quiver should be cleaned regularly with mild
soap and water for maximum longevity.
• Always travel with rod fully rigged in River Quiver.
• Periodically inspect River Quiver and vehicle rack for
damage. Replace lost, damaged, or worn parts with
original replacement parts from Riversmith.
• Any modifications made to the River Quiver or repairs
made with parts other than those supplied by the
manufacturer will void warranty and liability.
• To replace lost or damaged keys, record key/lock
number and register product online at www.riversmith.com
13
KEY NUMBER
Note: View Warranty, Register Product, and Watch Installation
Tutorial at: www.riversmith.com

RIVER QUIVER LOCKED & LOADED
LIMITED LIFETIME WARRANTY
Riversmith takes pride in the products we manufacture and will warrant that all River Quiver
Rooftop Fly Rod Holders will be free from defects in workmanship and materials for the life of the
product to the original purchaser (“you”), subject to the below conditions:
• River Quiver was purchased from a Riversmith authorized dealer;
• You can provide proof of purchase from the Riversmith authorized dealer;
• The product was used only as intended and in accordance with the River Quiver installation guide.
If a defect occurs during intended use (according to the installation guide), we will replace, at our
discretion, the defective product or part. The warranty does not cover defects caused by misuse,
overloading, modications, or improper assembly. Cosmetic damage, loss, theft, normal wear and
tear, and the natural breakdown of colors and materials over time and use are not warranted. If
damage is deemed outside of the scope of this warranty, replacement parts will be available at
discounted prices.
Warranty Disclaimer:
UNDER NO CIRCUMSTANCES, WHETHER FOR BREACH OF WARRANTY, BREACH OF CONTRACT,
NEGLIGENCE, OR OTHER TORT, OR ANY STRICT LIABILITY THEORY, WILL RIVERSMITH BE LIABLE
FOR ANY INCIDENTAL OR CONSEQUENTIAL DAMAGES TO NON-RIVER QUIVER PRODUCTS USED
IN CONJUNCTION WITH RIVER QUIVER PRODUCTS.
The warranty is only available in the United States. No Riversmith reseller, agent, or employee is
authorized to make any modication, extension, or addition to this warranty.
RIVER QUIVER IS A PRODUCT BY
Table of contents
Other RIVERSMITH Automobile Accessories manuals


Popular Automobile Accessories manuals by other brands


ULTIMATE SPEED
ULTIMATE SPEED 279746 Assembly and Safety Advice

SSV Works
SSV Works DF-F65 manual

ULTIMATE SPEED
ULTIMATE SPEED CARBON Assembly and Safety Advice

Witter
Witter F174 Fitting instructions

WeatherTech
WeatherTech No-Drill installation instructions

TAUBENREUTHER
TAUBENREUTHER 1-336050 Installation instruction