RIVERSMITH RIVEROUIVER SHORTCUT User manual

ROOFTOP FLY ROD HOLDER. LOCKED. LOADED. READY TO FISH.
WWW.RIVERSMITH.COM
RIVERSMITHUSA
Patent Pending
INSTALLATION GUIDE
SHORTCUT

CONTENTS
INCLUDED PARTS
TOOLS NEEDED & MOUNT ASSEMBLIES
STEP 1 PREPARE VEHICLE
STEP 2 PLACE ON YOUR VEHICLE
STEP 3 A,B,C POSITION MOUNTING BRACKET
SAFETY INFORMATION
MAINTENANCE
STEP 4 A,B,C SECURE MOUNTING BRACKET
DRIVING
CONTENTS
1
2
3
4
57
11
13
810
12
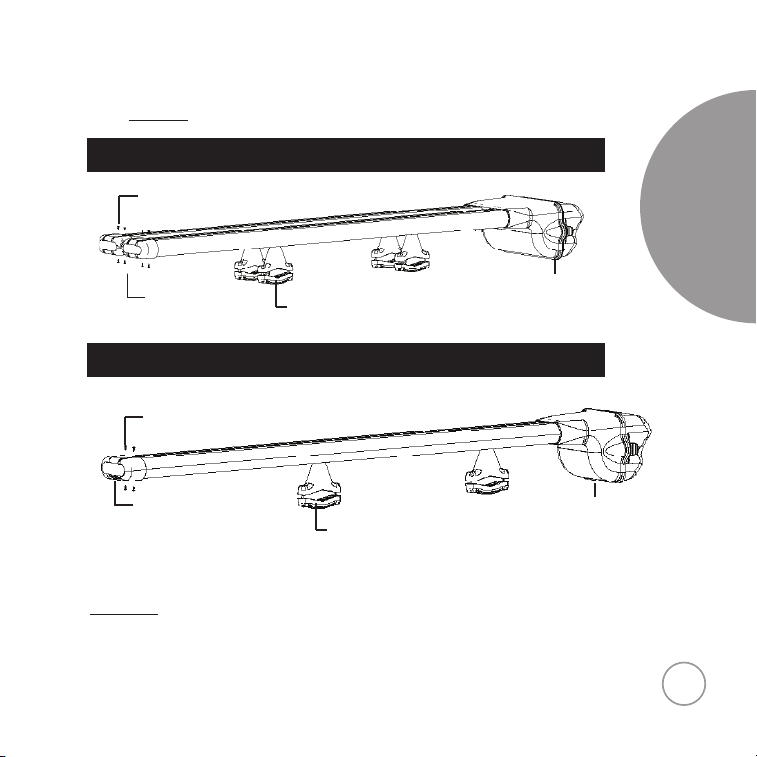
4BANGER
2BANGER
INCLUDED PARTS
Accessories Available
See full lineup of Accessories at www.riversmith.com
PARTS
Reusable Rivets
Nose Cone
1
• Rod Chairs
• Reel Box Pads
Reel Box
The ShortCut RQ is built and tested to the highest possible standards to securely transport and protect
your gear, however it is not meant as a long term storage solution.
Mounting Brackets
(Standard Brackets shown
here)
Reusable Rivets
Nose Cone Reel Box
Mounting Brackets
(Standard Brackets shown
here)

TOOLS
TOOLS NEEDED
2
MOUNT ASSEMBLIES
STRAP TENSION
ADJUSTMENT BOLT
T-STUD
LOCK
OR (DUMMY LOCK)
TENSION STRAP
LATCH TAB
NOTE: Each set comes with one locking mount and
the other mount has a “dummy lock”
RISER
T-STUD
5MM MOUNTING
BOLTS
10MM HEX NUT (Inside
Riser)
BOTTOM BRACKET
LP T-Track Mount
T-STUD
FLANGE BOLT
SLOT NUT
Security Cap
10MM HEX NUT
QUICK RELEASE MOUNTSTANDARD MOUNT
2Banger Mount Shown
LP T-TRACK MOUNT

STEP 1
Prepare Vehicle - DO NOT TIGHTEN MOUNTING BRACKETS
UNTIL STEP 3
STEP 1
1Measure from center of front crossbar to estimated
location of the ShortCut RQ reel box. Generally it is
best to spread vehicle crossbars as far as possible.
• If 62” or less front crossbar needs to shift
forward to be more than 62” from Reel Box.
• If Reel Box touches roof of vehicle with mounts
installed then the ShortCut RQ needs to be flipped
upside down.
3
62"
Reel Box
NOTE: Quick Release and LP T-Track Mounts are lower-
profile than Standard Mounts and may require flipping the
ShortCut RQ upside down to avoid the Reel Box hitting the
roof of your vehicle.
QUICK RELEASE MOUNT
Other RIVERSMITH Automobile Accessories manuals


Popular Automobile Accessories manuals by other brands


ULTIMATE SPEED
ULTIMATE SPEED 279746 Assembly and Safety Advice

SSV Works
SSV Works DF-F65 manual

ULTIMATE SPEED
ULTIMATE SPEED CARBON Assembly and Safety Advice

Witter
Witter F174 Fitting instructions

WeatherTech
WeatherTech No-Drill installation instructions

TAUBENREUTHER
TAUBENREUTHER 1-336050 Installation instruction