RM STKD 11 User manual
EXTRACTOR
HOODS
1015-22
STKD 11, STKD S 11
www.rmgastro.com
INSTRUCTION FOR INSTALLATION AND USE
NÁVOD K OBSLUZE A INSTALACI
INSTRUKCJE MONTAŻU I OBSŁUGI


2023-08-24
CONTENT
General and safety warnings
Instruction for use
Cleaning and maintenance
7
9
10
OBSAH
Všeobecná a bezpečnostní upozornění
Návod k použití
Čistění a údržba
17
19
20
TREŚĆ
Ostrzeżenia ogólne i dotyczące bezpieczeństwa
Instrukcja obsługi
Czyszczenie i konserwacja
27
29
30


5
INSTRUCTION FOR INSTALLATION AND USE

6
Dear Customer,
Thank you for purchasing
one of our products.
This oven is part of a series of electrical
equipment designed for the food sector.
Our ovens are easy to use, ergonomic
and enable cooking control, while boasting
a pleasant and modern design.
The oven has a 12-month warranty
that covers any manufacturing defects
from the date indicated on the Bill
of Sale. The warranty covers normal
operation of the oven and does not
include consumables (lamps, seals etc.)
and damage caused by incorrect installation,
wear, maintenance, repair, incorrect cleaning
and descaling, tampering and improper use.

7
• Read this manual carefully before installing and using
the appliance since it gives important instructions
regarding its safe installation, use and maintenance.
• Keep the manual in a location that can be easily
accessed by the operators for further consultation.
• Always include the manual if the appliance
is transferred; if necessary, request a new copy
from the authorised dealer or directly from the
manufacturer.
• As soon as the packaging is removed, make sure
the appliance is in good condition and there is no
damage caused during transportation. Never install
or use a damaged appliance; if in doubt, contact the
after-sales technical assistance or your local dealer
immediately.
• As the packaging material is potentially dangerous,
it must be kept out of the reach of children or animals
and disposed of correctly in compliance with local
regulations.
• Before installing the equipment, check that the
systems are compliant with the regulations in force
in the country of use and with that stated on the
information plate.
• Installation or maintenance dierent to those
indicated in the manual can cause damage, injury
or fatal accidents.
• Installation, extraordinary maintenance and repair
operations on the equipment must only be performed
by professionally qualied personnel and following
the manufacturer‘s instructions.
• During assembly of the equipment, the transit or
permanence of sta not assigned to installation is not
permitted in the work area.
• The appliance must only be used by personnel who
have been appropriately trained in its use. To avoid
the risk of accidents or damage to the equipment,
it is essential that the sta is constantly trained with
regard to safe operation.
• The appliance must not be used by persons with
reduced physical, sensory or mental capacities or by
those who do not have the necessary experience or
knowledge unless they are supervised or instructed
in the use of the equipment by a person who is
responsible for their safety.
• The appliance must be placed in a suitably ventilated
room to prevent the excessive accumulation
of harmful substances in the air.
• Children must be supervised to ensure they neither
play with nor use the appliance.
• During operation, it is necessary to pay attention to
the hot areas of the external surface of the appliance.
• The use of hearing protection is not necessary
as the sound pressure level of the oven is lower than
70 dB(A).
• In the event of failure or malfunctioning, the
equipment must be deactivated; any repairs
must only be performed by an assistance centre
authorised by the manufacturer and original spare
parts must be used.
• Disconnect the appliance from the electric
power supply before performing any installation
or maintenance intervention.
• Interventions, tampering or modications not
expressly authorised, which do not respect that
stated in this manual, will make the warranty null and
void.
• Do not deposit or use ammable substances
near the equipment.
• In the event of prolonged lack of use, the electricity
must be turned o.
• Before commissioning the appliance, make sure
that all parts of the packaging have been removed,
making sure they are disposed of in compliance
with current legislation.
• Any changes to appliance installation that become
necessary must be approved and performed by
authorised technicians.
• The appliance is intended for professional use only.
• No changes of any kind are permitted to the wiring
of the equipment.
• Failure to comply with the previous warnings
can compromise both your safety and the safety
of the equipment.
• The information plate provides important technical
information: these are essential if interventions
must be requested for maintenance or repairs
of the appliance; therefore, it must not be removed,
damaged or modied.
• The equipment complies with the essential
requirements of the Machinery Directive 2006/42/EC.
• The equipment complies with the essential
requirements of the Electromagnetic Compatibility
Directive 2014/30/EC.
• The equipment complies with the essential
requirements of the Low Voltage Directive
2014/35/EC.
General and safety warnings
INSTALLATION
8
Positioning
• The new condensation extractor for Steambox and
Kompatto ovens is easy to install: it requires only an
electrical connection and a connection to a drain for
„white water“.
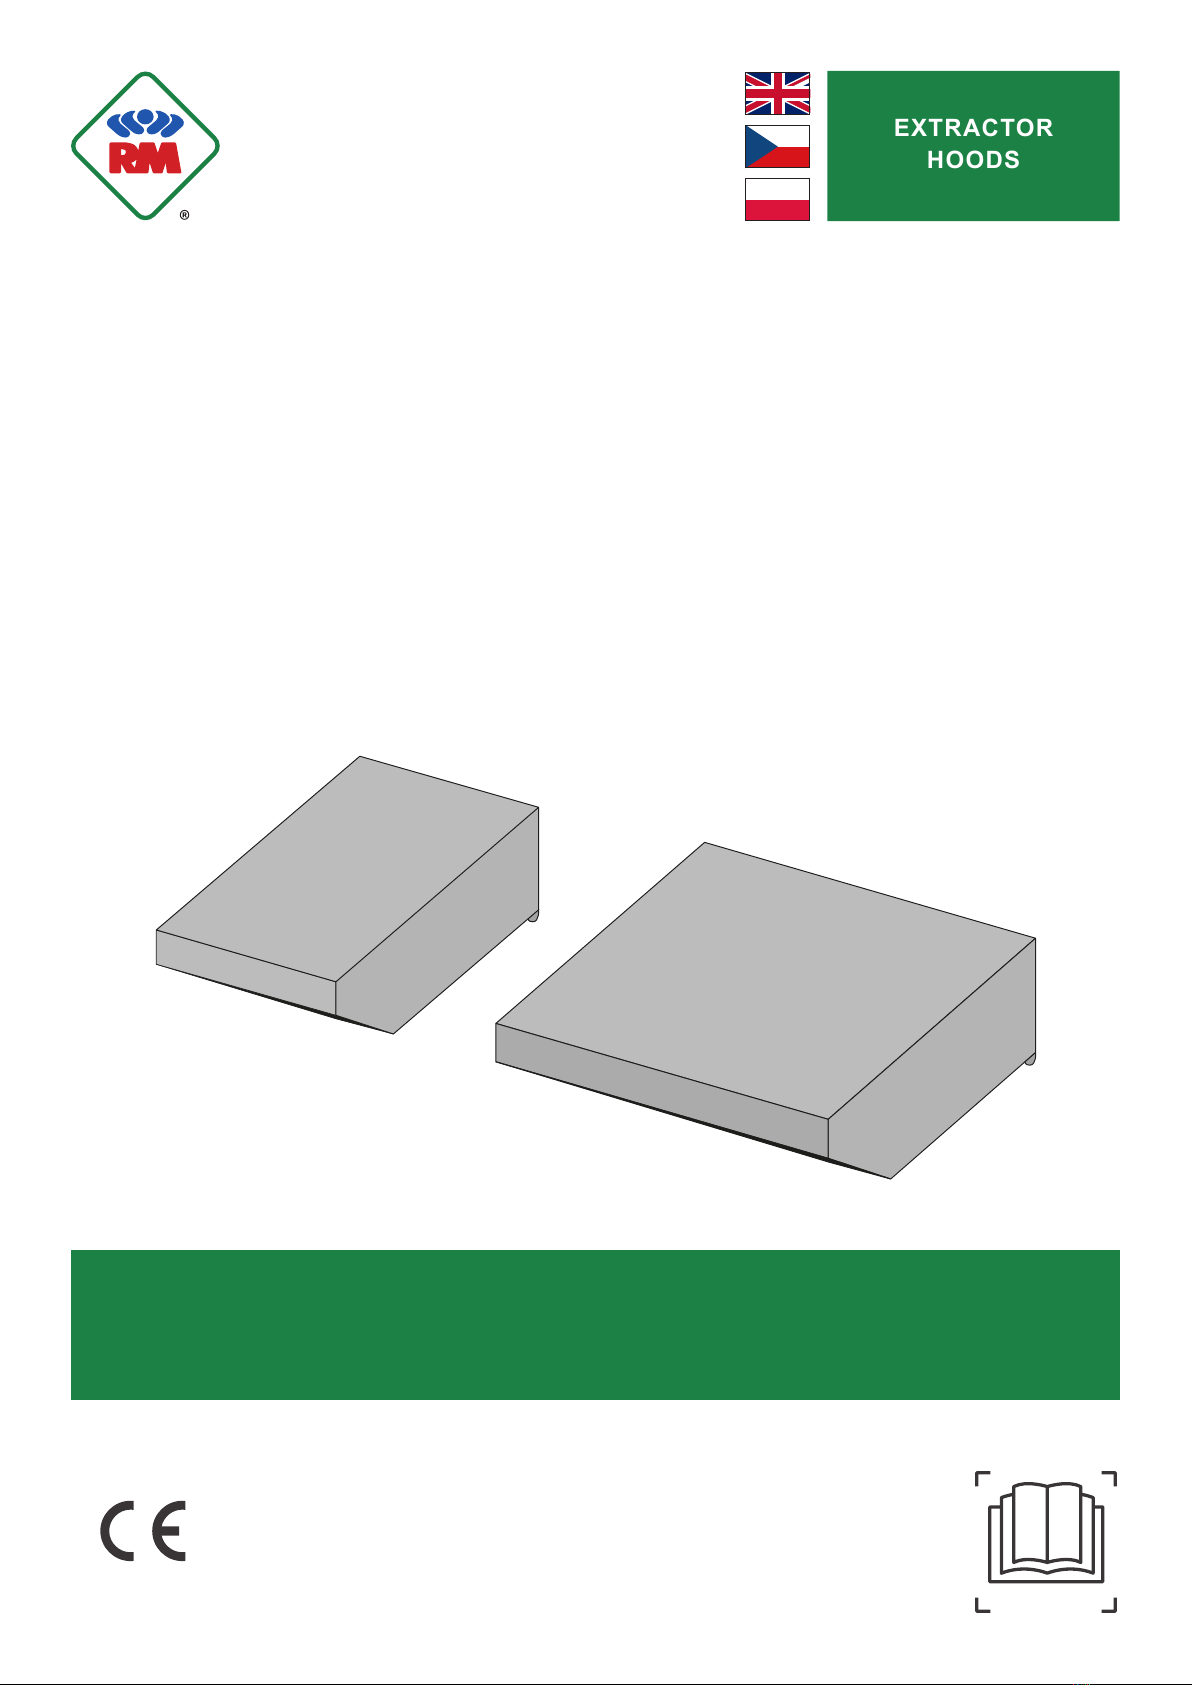
• The extractor must be placed on the oven cover and
it must be secured with two brackets to the back
of the oven itself (by drilling a hole in the back and
inserting two self-tapping screws) as in g.1.
• It is preferable to connect the extractor to an external
fume evacuation duct.
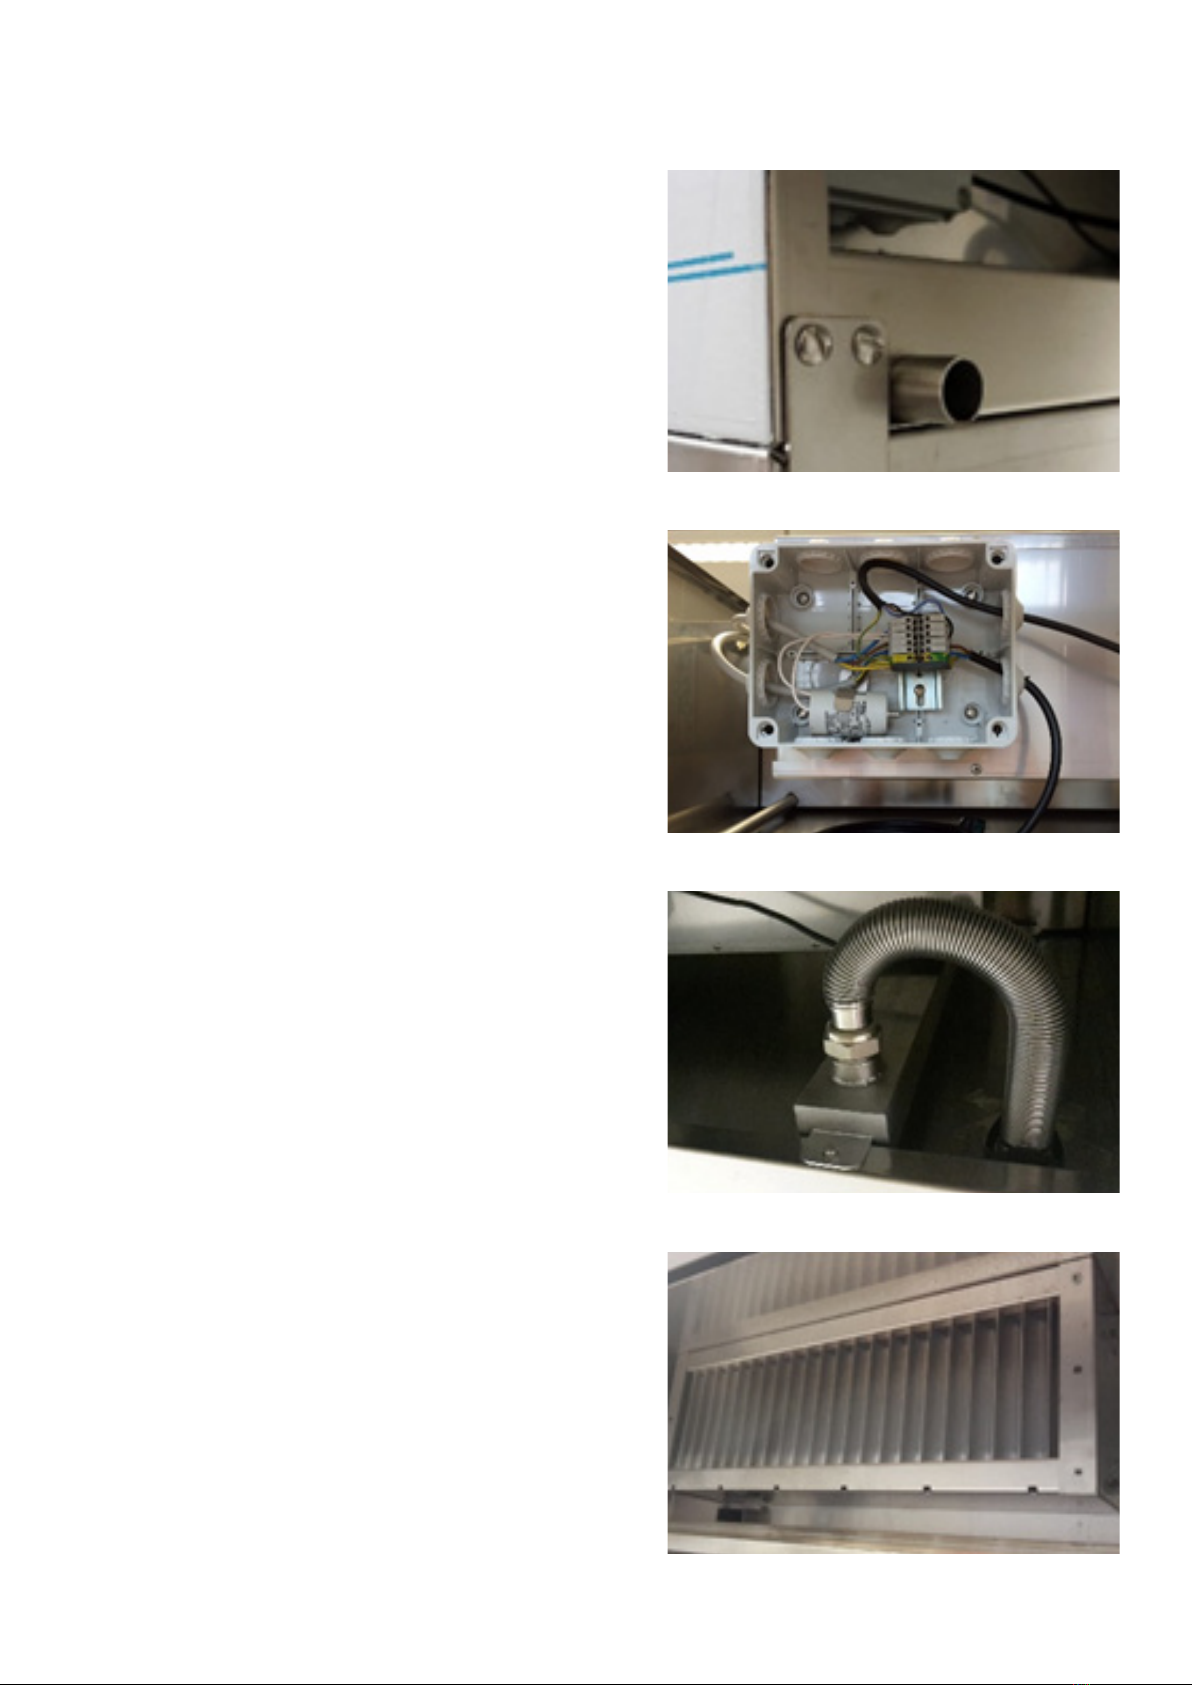
Electric connection
• The electrical connection provides for the connection
of a 3x1.5mm2 cable to the terminal board located
inside the junction box (g. 2) (reachable from the
upper part of the extractor). The cable must be
connected to a wall outlet.
• WARNING: the user must protect the wall outlet with
a bipolar switch.
Connection to the drain
• On the back of the extractor there is a exible hose
which must be inserted in the oven condensate
discharge pipe; when the extractor is on, it is always
under slight depression so it conveys the exhausted
fumes through the condensator as shown in g.3.
• It is not necessary to connect the appliance to the
water supply since the operating principle of this
unit is based on an aluminium condensator (g. 4)
through which the fumes captured by the suction
pass. The dierence in temperature between the
fumes (hot) and the aluminium sheet (cold) produces
condensation, which is collected by the tray placed
under the condensator and drained through a pipe
which must be connected to the drain (g. 1 - page 9)
INSTALLATION
9
It is not necessary to connect the
appliance to the water supply since
the operating principle of this unit is
based on an aluminium condensator
(g. 4) through which the fumes
captured by the suction pass�The
difference in temperature between the
fumes (hot) and the aluminium sheet
(cold) produces condensation, which
is collected by the tray placed under
the condensator and drained through
a pipe which must be connected to
the drain (g. 1 - page 9)
2. OPERATION
The user can turn the extractor on when required (by means of the
switch as shown above): the extractor will be activated at the minimum
speed: in this condition, the removal of the rear fumes�In the presence
of moisture (for example when the door is opened), the extractor will
increase the suction force to capture the most fumes possible�
Therstremovalofthevapours
that come out of the door is
performed by the labyrinth
lterlocatedonthefrontofthe
extractor� (g.5)
The unit features an automatic
moisture detection system
which adjusts the rotation speed
of the motor and therefore the
suction force� (g. 6)
Fig. 4
Fig. 5
Fig. 6
8
1.2 Positioning
The new condensation extractor
for Steambox and Kompatto ovens
is easy to install: it requires only
an electrical connection and a
connection to a drain for "white water"�
The extractor must be placed on the
oven cover and it must be secured with
two brackets to the back of the oven itself
(by drilling a hole in the back and inserting
two self-tapping screws) as in g.1�
It is preferable to connect the extractor
to an external fume evacuation duct�
1.3 Electric connection
The electrical connection provides for
the connection of a 3x1�5mm2cable to
the terminal board located inside the
junction box (g. 2) (reachable from the
upper part of the extractor)�The cable
must be connected to a wall outlet�
WARNING: the user must protect
the wall outlet with a bipolar switch.
1.4 Connection to the drain
On the back of the extractor there is
aexiblehosewhichmustbeinserted
in the oven condensate discharge
pipe; when the extractor is on, it is
always under slight depression so it
conveys the exhausted fumes through
the condensator as shown in g.3�
Fig. 1
Fig. 2
Fig. 3
Fig. 3
Fig. 4
Fig. 2
Fig. 1

9
The user can turn the extractor on when required
(by means of the switch as shown above): the extractor
will be activated at the minimum speed: in this condition,
the removal of the rear fumes. In the presence of
moisture (for example when the door is opened),
the extractor will increase the suction force to capture
the most fumes possible.
The rst removal of the vapours that come out of the door
is performed by the labyrinth lter located on the front
of the extractor. (g.5)
The unit features an automatic moisture detection
system which adjusts the rotation speed of the motor
and therefore the suction force. (g. 6)
INSTRUCTION FOR USE
Fig. 6
Fig. 5
9
It is not necessary to connect the
appliance to the water supply since
the operating principle of this unit is
based on an aluminium condensator
(g. 4) through which the fumes
captured by the suction pass�The
difference in temperature between the
fumes (hot) and the aluminium sheet
(cold) produces condensation, which
is collected by the tray placed under
the condensator and drained through
a pipe which must be connected to
the drain (g. 1 - page 9)
2. OPERATION
The user can turn the extractor on when required (by means of the
switch as shown above): the extractor will be activated at the minimum
speed: in this condition, the removal of the rear fumes�In the presence
of moisture (for example when the door is opened), the extractor will
increase the suction force to capture the most fumes possible�
Therstremovalofthevapours
that come out of the door is
performed by the labyrinth
lterlocatedonthefrontofthe
extractor� (g.5)
The unit features an automatic
moisture detection system
which adjusts the rotation speed
of the motor and therefore the
suction force� (g. 6)
Fig. 4
Fig. 5
Fig. 6

10
Disconnect the appliance from the electric power
supply before performing any cleaning or maintenance
intervention.
The appliance must never be cleaned with direct or high
pressure jets of water. Moreover, the appliance should
not be cleaned with wire sponges, ordinary steel brushes
or scrapers; eventually, you can use stainless steel wool,
wiping the appliance in the direction of sheet metal grain.
To clean it, use warm soapy water.
It is advisable to clean the sensor periodically (g.6).
To clean the sensor, remove it, clean the slots delicately
being careful not to ruin the internal sensor, and the put
the external sensor back in place.
Also clean the condensator periodically (g.4), by
unscrewing the 4 screws. Wash using a mild cleansing
agent and then clean the basin below using a degreaser.
Drain the residual liquid.
CLEANING
AND MAINTANCE

11
REF N. pcs SPARE PARTS HOOD MODEL HOOD CODE HOOD MODEL HOOD CODE HOOD MODEL HOOD CODE HOOD MODEL HOOD CODE
DESCRIPTION DIMENSIONS mm. HGRK01 7080521 HGRK02 7080519 HGRK03 7080522 HGRK04 7080523
1 1 Fan 230/1/50-60HZ W0.37 204 x 233 x 218 YES YES YES YES
2 2 Labirinth lter 1 350 x 350 x 20 YES NO NO YES
3 1 Labirinth lter 2 350 x 350 x 20 NO YES NO NO
4 2 Deector lter 3 356 x 338 x 20 NO NO YES NO
5 1 Charcoal lter 1 (optional) 360 x 173 x 20 YES NO NO YES
6 1 Charcoal lter 2 (optional) 360 x 173 x 20 NO YES NO NO
7 1 Condensator 1 603 x 214 x 122 YES NO NO YES
8 1 Condensator 2 403 x 214 x 122 NO YES NO NO
9 1 Speed Regulator 135 x 74 x 73 YES YES YES YES
SPARE PARTS
MANAGEMENT
10
3. MAINTENANCE and CLEANING
Disconnect the appliance from the electric power supply before
performing any cleaning or maintenance intervention�
The appliance must never be cleaned with direct or high pressure jets of
water� Moreover, the appliance should not be cleaned with wire sponges,
ordinary steel brushes or scrapers; eventually, you can use stainless
steel wool, wiping the appliance in the direction of sheet metal grain�To
clean it, use warm soapy water�
It is advisable to clean the sensor periodically (g.6)� To clean the
sensor, remove it, clean the slots delicately being careful not to ruin the
internal sensor, and the put the external sensor back in place�
Also clean the condensator periodically (g.4), by unscrewing the 4
screws� Wash using a mild cleansing agent and then clean the basin
below using a degreaser�
Drain the residual liquid�
4. SPARE PARTS MANAGEMENT
REF N�
pcs
SPARE PARTS HOOD
MODEL
HOOD
CODE
HOOD
MODEL
HOOD
CODE
HOOD
MODEL
HOOD
CODE
HOOD
MODEL
HOOD
MODEL
DESCRIPTION DIMEN-
SIONS mm�
HGRK01 7080521 HGRK02 7080519 HGRK03 7080522 HGRK04 7080523
1 1 Fan 230/1/50-
60HZ W0�37
204X233X218 YES YES YES YES
2 2 Labirinthlter1 350X350X20 YES NO NO YES
3 1 Labirinthlter2 350X350X20 NO YES NO NO
4 2 Deectorlter3 356X338X20 NO NO YES NO
5 1 Charcoallter1
(optional)
360X173X20 YES NO NO YES
6 1 Charcoallter2
(optional)
360X173X20 NO YES NO NO
7 1 Condensator 1 603X214X122 YES NO NO YES
8 1 Condensator 2 403X214X122 NO YES NO NO
9 1 Speed Regulator 135X74X73 YES YES YES YES

12
At the end of its life span, the appliance must be
disposed of in accordance with legal obligations.
The symbol in g.7 species that, at the end of its life
span, the appliance must be disposed of according
to the indications of the European Parliament Directive
2012/19/EU dated 04/06/2012.
Information regarding disposal in nations of the
European Union.
The European Community Directive regarding WEEE
equipment has been implemented dierently by each
nation, therefore if his appliance is to be disposed of,
we suggest you contact the local authorities or the dealer
to nd out the correct method of disposal.
DISPOSAL
OF THE APPLIANCE
Fig. 7

13
The manufacturer shall not be held liable for
any damages due to improper installation,
tampering with the appliance, misuse,
improper maintenance, failure to comply
with applicable standards and intended use.
The manufacturer reserves the right to make
changes to the product at any time it deems
necessary or useful.


15
NÁVOD K OBSLUZE A INSTALACI

16
Vážený zákazníku,
děkujeme Vám za zakoupení
jednoho z našich výrobků.
Tato trouba je součástí řady elektrických
zařízení určených pro potravinářský sektor.
Naše trouby se snadno používají, jsou
ergonomické a umožňují kontrolu pečení,
přičemž se mohou pochlubit příjemným
a moderním designem.
Na troubu je poskytována 12měsíční
záruka, která se vztahuje na případné
výrobní vady od data uvedeného na
prodejním dokladu. Záruka se vztahuje
na běžný provoz trouby a nevztahuje se
na spotřební materiál (lampy, těsnění atd.)
a na poškození způsobená nesprávnou
instalací, opotřebením, údržbou, opravami,
nesprávným čištěním a odstraňováním
vodního kamene, manipulací
a nesprávným používáním.

17
• Před instalací a používáním spotřebiče si pečlivě
přečtěte tento návod, protože obsahuje důležité
pokyny týkající se jeho bezpečné instalace,
používání a údržby.
• Příručku uchovávejte na místě, které je snadno
přístupné obsluze pro další konzultace.
• Vždy přiložte návod k obsluze, pokud je spotřebič
přenášen; v případě potřeby si vyžádejte nový výtisk
od autorizovaného prodejce nebo přímo od výrobce
• Jakmile odstraníte obal, ujistěte se, že je spotřebič
v dobrém stavu a že nedošlo k jeho poškození
během přepravy. Poškozený spotřebič nikdy
neinstalujte ani nepoužívejte; v případě pochybností
se ihned obraťte na poprodejní technickou pomoc
nebo na místního prodejce.
• Vzhledem k tomu, že obalový materiál je potenciálně
nebezpečný, musí být uložen mimo dosah dětí nebo
zvířat a musí být správně zlikvidován v souladu
s místními předpisy.
• Před instalací zařízení zkontrolujte, zda jsou
systémy v souladu s předpisy platnými v zemi použití
a s předpisy uvedenými na informačním štítku.
• Instalace nebo údržba odlišná od té, která je uvedena
v návodu, může způsobit poškození, zranění nebo
smrtelné nehody.
• Instalaci, mimořádnou údržbu a opravy zařízení
smí provádět pouze odborně kvalikovaný personál
a podle pokynů výrobce.
• Během montáže zařízení není povolen průchod
nebo trvalý pobyt pracovníků, kteří nejsou určeni
k instalaci, v pracovním prostoru.
• Spotřebič smí používat pouze personál, který byl
řádně vyškolen k jeho používání. Aby se předešlo
riziku nehody nebo poškození zařízení, je nezbytné,
aby byl personál neustále školen s ohledem
na bezpečnou obsluhu.
• Spotřebič nesmí používat osoby se sníženými
fyzickými, smyslovými nebo duševními schopnostmi
nebo osoby, které nemají potřebné zkušenosti
nebo znalosti, pokud nejsou pod dohledem nebo
nejsou poučeny o používání zařízení osobou,
která odpovídá za jejich bezpečnost.
• Spotřebič musí být umístěn ve vhodně větrané
místnosti, aby se zabránilo nadměrnému hromadění
škodlivých látek ve vzduchu.
• Děti musí být pod dohledem, aby se zajistilo,
že si se spotřebičem nebudou hrát ani jej používat.
• Během provozu je nutné dávat pozor na horké oblasti
vnějšího povrchu spotřebiče.
• Použití ochrany sluchu není nutné, protože hladina
akustického tlaku trouby je nižší než 70 dB(A).
• V případě poruchy nebo špatné funkce musí být
zařízení deaktivováno; veškeré opravy smí provádět
pouze asistenční středisko autorizované výrobcem
a musí být použity originální náhradní díly.
• Před provedením jakéhokoli zásahu při instalaci
nebo údržbě odpojte zařízení od elektrické sítě.
• Zásahy, zásahy nebo úpravy, které nejsou výslovně
povoleny a které nerespektují to, co je uvedeno
v tomto návodu, mají za následek neplatnost záruky.
• V blízkosti zařízení neodkládejte ani nepoužívejte
hořlavé látky.
• V případě delšího nepoužívání je nutné vypnout
elektrický proud.
• Před uvedením spotřebiče do provozu se ujistěte,
že byly odstraněny všechny části obalu, a ujistěte
se, že byly zlikvidovány v souladu s platnými
právními předpisy.
• Veškeré změny v instalaci spotřebiče, které se
stanou nezbytnými, musí být schváleny a provedeny
autorizovaným technikem.
• Spotřebič je určen pouze pro profesionální použití.
• Na elektroinstalaci zařízení nejsou povoleny
žádné změny.
• Nedodržení předchozích upozornění může ohrozit
vaši bezpečnost i bezpečnost zařízení.
• Na informačním štítku jsou uvedeny důležité
technické informace: ty jsou nezbytné, pokud je
nutné požadovat zásahy při údržbě nebo opravách
spotřebiče; proto se nesmí odstraňovat, poškozovat
ani upravovat.
• Zařízení splňuje základní požadavky směrnice
o strojních zařízeních 2006/42/ES.
• Zařízení splňuje základní požadavky směrnice
o elektromagnetické kompatibilitě 2014/30/ES.
• Zařízení splňuje základní požadavky směrnice
o nízkém napětí 2014/35/ES.
Všeobecná a bezpečnostní upozornění
INSTALACE

9
It is not necessary to connect the
appliance to the water supply since
the operating principle of this unit is
based on an aluminium condensator
(g. 4) through which the fumes
captured by the suction pass�The
difference in temperature between the
fumes (hot) and the aluminium sheet
(cold) produces condensation, which
is collected by the tray placed under
the condensator and drained through
a pipe which must be connected to
the drain (g. 1 - page 9)
2. OPERATION
The user can turn the extractor on when required (by means of the
switch as shown above): the extractor will be activated at the minimum
speed: in this condition, the removal of the rear fumes�In the presence
of moisture (for example when the door is opened), the extractor will
increase the suction force to capture the most fumes possible�
Therstremovalofthevapours
that come out of the door is
performed by the labyrinth
lterlocatedonthefrontofthe
extractor� (g.5)
The unit features an automatic
moisture detection system
which adjusts the rotation speed
of the motor and therefore the
suction force� (g. 6)
Fig. 4
Fig. 5
Fig. 6
8
1.2 Positioning
The new condensation extractor
for Steambox and Kompatto ovens
is easy to install: it requires only
an electrical connection and a
connection to a drain for "white water"�
The extractor must be placed on the
oven cover and it must be secured with
two brackets to the back of the oven itself
(by drilling a hole in the back and inserting
two self-tapping screws) as in g.1�
It is preferable to connect the extractor
to an external fume evacuation duct�
1.3 Electric connection
The electrical connection provides for
the connection of a 3x1�5mm2cable to
the terminal board located inside the
junction box (g. 2) (reachable from the
upper part of the extractor)�The cable
must be connected to a wall outlet�
WARNING: the user must protect
the wall outlet with a bipolar switch.
1.4 Connection to the drain
On the back of the extractor there is
aexiblehosewhichmustbeinserted
in the oven condensate discharge
pipe; when the extractor is on, it is
always under slight depression so it
conveys the exhausted fumes through
the condensator as shown in g.3�
Fig. 1
Fig. 2
Fig. 3
Obr. 3
Obr. 4
Obr. 2
Obr. 1
18
Umístění
• Nový odsavač kondenzátu pro trouby Steambox
a Kompatto se snadno instaluje: vyžaduje pouze
elektrické připojení a připojení k odtoku „bílé vody“.
• Odsavač musí být umístěn na víko trouby a musí
být připevněn dvěma držáky k zadní straně samotné
trouby (vyvrtáním otvoru v zadní části a vložením
dvou samořezných šroubů), jak je uvedeno na obr. 1.
• Odsavač je vhodné připojit k externímu potrubí
pro odvod kouře.
Elektrické připojení
• Elektrické připojení zajišťuje připojení kabelu
3 x 1,5 mm² ke svorkovnici umístěné uvnitř rozvodné
skříňky (obr. 2) (dosažitelné z horní části odsavače).
Kabel musí být připojen do zásuvky.
• VAROVÁNÍ: uživatel musí chránit zásuvku
bipolárním vypínačem.
Připojení k odsávání
• Na zadní straně odsavače je ohebná hadice, kterou
je třeba zasunout do potrubí pro odvod kondenzátu
z trouby; když je odsavač zapnutý, je vždy pod
mírným poklesem, takže odvádí odsávané výpary
přes kondenzátor, jak je znázorněno na obr. 3.
• Spotřebič není nutné připojovat k přívodu vody,
protože princip činnosti tohoto zařízení je založen na
hliníkovém kondenzátoru (obr. 4), kterým procházejí
výpary zachycené odsáváním. Rozdíl teplot mezi
výpary (horkými) a hliníkovým plechem (studeným)
vytváří kondenzát, který se zachycuje ve vaničce
umístěné pod kondenzátorem a odvádí se trubkou,
která musí být připojena k odtoku (obr. 1 - strana 9).
INSTALACE

Obr. 6
Obr. 5
9
It is not necessary to connect the
appliance to the water supply since
the operating principle of this unit is
based on an aluminium condensator
(g. 4) through which the fumes
captured by the suction pass�The
difference in temperature between the
fumes (hot) and the aluminium sheet
(cold) produces condensation, which
is collected by the tray placed under
the condensator and drained through
a pipe which must be connected to
the drain (g. 1 - page 9)
2. OPERATION
The user can turn the extractor on when required (by means of the
switch as shown above): the extractor will be activated at the minimum
speed: in this condition, the removal of the rear fumes�In the presence
of moisture (for example when the door is opened), the extractor will
increase the suction force to capture the most fumes possible�
Therstremovalofthevapours
that come out of the door is
performed by the labyrinth
lterlocatedonthefrontofthe
extractor� (g.5)
The unit features an automatic
moisture detection system
which adjusts the rotation speed
of the motor and therefore the
suction force� (g. 6)
Fig. 4
Fig. 5
Fig. 6
19
Uživatel může odsavač zapnout v případě potřeby
(pomocí přepínače, jak je uvedeno výše): odsavač se
aktivuje při minimální rychlosti: v tomto stavu dochází
k odstranění zadních výparů. V přítomnosti vlhkosti
(například při otevření dveří) odsavač zvýší sací sílu,
aby zachytil co nejvíce výparů.
První odstranění výparů, které vycházejí ze dveří,
provádí labyrintový ltr umístěný na přední straně
odsavače. (obr. 5)
Přístroj je vybaven automatickým systémem detekce
vlhkosti, který upravuje rychlost otáčení motoru,
a tím i sací sílu. (obr. 6)
NÁVOD K POUŽITÍ

20
Před jakýmkoli čištěním nebo údržbou odpojte spotřebič
od elektrické sítě.
Spotřebič se nikdy nesmí čistit přímým nebo
vysokotlakým proudem vody. Spotřebič se dále nesmí
čistit drátěnými houbičkami, běžnými ocelovými kartáči
nebo škrabkami; případně můžete použít nerezovou vlnu,
kterou spotřebič otřete ve směru vláken plechu. K čištění
používejte teplou mýdlovou vodu.
Snímač je vhodné pravidelně čistit (obr. 6). Chcete-li čidlo
vyčistit, vyjměte jej, jemně vyčistěte štěrbiny, přičemž
dávejte pozor, abyste nezničili vnitřní čidlo, a vnější čidlo
vložte zpět na místo.
Pravidelně čistěte také kondenzátor (obr. 4),
a to odšroubováním 4 šroubů. Omyjte jej jemným čisticím
prostředkem a poté odmašťovacím prostředkem vyčistěte
umyvadlo pod ním. Zbytky kapaliny vypusťte.
ČIŠTĚNÍ A ÚDRŽBA
This manual suits for next models
1
Table of contents
Languages:
Other RM Commercial Food Equipment manuals


Popular Commercial Food Equipment manuals by other brands

Rühle
Rühle MPR 900 Turbo Translation of the original instructions

Bartscher
Bartscher Deli 306053 Translation of the original instruction manual

Silver King
Silver King SKPZ92-EDUS2 Technical manual and replacement parts list

EPTA
EPTA MELO HOT Series user manual

Arctic Air
Arctic Air ACP40 Installation, operation & maintenance manual

CARTER-HOFFMANN
CARTER-HOFFMANN LOGIX7 Series Owner's and operator's manual


