RME Audio Fireface UFX User manual

User's Guide
Fireface UFX
The most powerful FireWire®and USB audio interface ever!
USB 2.0 / FireWire 400 Digital I/O System
12 + 16 + 2 Channels Analog / ADAT / AES Interface
24 Bit / 192 kHz Digital Audio
60 x 30 Matrix Router
2 x MIDI I/O
Full Stand-Alone Operation
MIDI Remote Control
TotalMix™
24 Bit / 192 kHz 9
SyncAlign™ZLM™SyncCheck™
SteadyClock™

2 User's Guide Fireface UFX © RME
Important Safety Instructions ..................................6
General
1 Introduction ...............................................................8
2 Package Contents.....................................................8
3 System Requirements ..............................................8
4 Brief Description and Characteristics.....................8
5 First Usage - Quick Start
5.1 Connectors – Controls - Display .............................9
5.2 Quick Start ............................................................11
Installation and Operation - Windows
6 Hardware Installation..............................................14
7 Driver and Firmware
7.1 Driver Installation .................................................14
7.2 Driver Update .......................................................15
7.3 De-installing the Drivers.......................................15
7.4 Firmware Update..................................................15
8 Configuring the Fireface
8.1 Settings Dialog – General ....................................16
8.2 Settings Dialog – Pitch.........................................18
9 Operation and Usage
9.1 Playback...............................................................19
9.2 DVD Playback (AC-3 / DTS) ................................20
9.3 Notes on WDM.....................................................21
9.4 Channel Count under WDM.................................22
9.5 Multi-client Operation ...........................................22
9.6 Analog Recording.................................................23
9.7 Digital Recording..................................................23
9.8 Clock Modes - Synchronization ...........................24
10 Operation under ASIO
10.1 General ................................................................25
10.2 Channel Count under ASIO .................................25
10.3 Known Problems ..................................................26
11 Using more than one Fireface UFX .......................26
12 DIGICheck Windows...............................................27
13 Hotline – Troubleshooting......................................28

User's Guide Fireface UFX © RME 3
Installation and Operation - Mac OS X
14 Hardware Installation ............................................. 30
15 Driver and Firmware
15.1 Driver Installation ................................................. 30
15.2 Driver Update....................................................... 31
15.3 Firmware Update ................................................. 31
16 Configuring the Fireface
16.1 Settings Dialog..................................................... 32
16.2 Clock Modes - Synchronization ........................... 34
17 Mac OS X FAQ
17.1 Round about Driver Installation ........................... 35
17.2 MIDI doesn't work ................................................ 35
17.3 Repairing Disk Permissions................................. 35
17.4 Supported Sample Rates..................................... 35
17.5 Channel Count under Core Audio ....................... 36
17.6 Various Information.............................................. 36
18 Using more than one Fireface ............................... 37
19 DIGICheck Mac........................................................ 37
20 Hotline – Troubleshooting ..................................... 38
Inputs and Outputs
21 Analog Inputs
21.1 Line Rear ............................................................. 40
21.2 Microphone / Line / Inst Front .............................. 40
22 Analog Outputs
22.1 Line ...................................................................... 41
22.2 Phones / Line Out ................................................ 41
23 Digital Connections
23.1 ADAT ................................................................... 42
23.2 AES ...................................................................... 42
23.3 MIDI ..................................................................... 43
24 Word Clock
24.1 Word Clock Input and Output .............................. 44
24.2 Technical Description and Background............... 45
24.3 Cables and Termination....................................... 46
24.4 General Operation ............................................... 46
Stand-Alone Operation
25 Operation and Usage
25.1 General ................................................................ 48
25.2 Settings at the Unit............................................... 48
25.3 Store / Load Setups at the Unit............................ 48
25.4 Storing Setups from the Computer ...................... 48
26 Examples
26.1 12-Channel AD/DA-Converter ............................. 49
26.2 4-Channel Mic Preamp ........................................ 49
26.3 Monitor Mixer ....................................................... 49
26.4 Digital Format Converter...................................... 49
26.5 Analog/Digital Routing Matrix .............................. 49
26.6 Stand-Alone Recorder/Player .............................. 49

4 User's Guide Fireface UFX © RME
TotalMix FX
27 Routing and Monitoring
27.1 Overview ..............................................................52
27.2 The User Interface ...............................................54
27.3 The Channel.........................................................55
27.3.1 Settings ........................................................57
27.3.2 Equalizer ......................................................58
27.3.3 Dynamics .....................................................60
27.4 Section Control Room..........................................61
27.5 The Control Strip ..................................................62
27.5.1 View Options ................................................63
27.5.2 Snapshots - Groups .....................................64
27.5.3 Channel Layout – Layout Presets................64
27.5.4 Scroll Location Markers ...............................66
27.6 Reverb and Echo .................................................67
27.7 Preferences..........................................................70
27.8 Settings ................................................................71
27.8.1 Mixer Page ...................................................71
27.8.2 MIDI Page ....................................................72
27.8.3 OSC Page ....................................................73
27.9 Hotkeys and Usage..............................................74
27.10 Menu Options.......................................................75
28 The Matrix
28.1 Overview ..............................................................76
28.2 Elements of the Matrix View ................................76
28.3 Usage...................................................................76
29 Tips and Tricks
29.1 ASIO Direct Monitoring (Windows) ......................77
29.2 Copy a Submix.....................................................77
29.3 Delete a Submix...................................................77
29.4 Doubling the Output Signal ..................................77
29.5 Recording a Submix - Loopback..........................78
29.6 MS Processing .....................................................79
30 MIDI Remote Control
30.1 Overview ..............................................................80
30.2 Mapping ...............................................................80
30.3 Setup ....................................................................81
30.4 Operation .............................................................81
30.5 Simple MIDI Control .............................................82
30.6 Stand-Alone MIDI Control ....................................83
30.7 Loopback Detection .............................................84
30.8 OSC (Open Sound Control) .................................85

User's Guide Fireface UFX © RME 5
DURec - Direct USB Recording
31 Direct USB Recording
31.1 Overview .............................................................. 88
31.2 Operation ............................................................. 88
31.3 Limitations and Important Notes .......................... 89
31.4 Multichannel WAV File Batch Processor ............. 91
31.5 Technical Background ......................................... 92
Technical Reference
32 Technical Specifications
32.1 Analog.................................................................. 94
32.2 MIDI ..................................................................... 95
32.3 Digital ................................................................... 95
32.4 Digital Inputs ........................................................ 96
32.5 Digital Outputs ..................................................... 97
32.6 General ................................................................ 97
33 Technical Background
33.1 Lock and SyncCheck ........................................... 98
33.2 Latency and Monitoring ....................................... 99
33.3 USB Audio ......................................................... 100
33.4 FireWire Audio ................................................... 101
33.5 DS – Double Speed ...........................................102
33.6 QS – Quad Speed .............................................102
33.7 Noise Level in DS / QS Mode ............................ 103
33.8 SteadyClock....................................................... 103
34 Diagrams
34.1 Block Diagram Fireface UFX ............................. 104
34.2 Connector Pinouts ............................................. 105
Miscellaneous
35 Accessories........................................................... 108
36 Warranty................................................................. 108
37 Appendix................................................................ 109
38 Declaration of Conformity.................................... 110

6 User's Guide Fireface UFX © RME
Important Safety Instructions
ATTENTION! Do not open chassis – risk of electric shock
The unit has non-isolated live parts inside. No user serviceable parts inside.
Refer service to qualified service personnel.
Mains
• The device must be earthed – never use it without proper grounding
• Do not use defective power cords
• Operation of the device is limited to the manual
• Use same type of fuse only
To reduce the risk of fire or electric shock do not expose this device to rain or
moisture. Prevent moisture and water from entering the device. Never leave
a pot with liquid on top of the device. Do not use this product near water, i. e.
swimming pool, bathtub or wet basement. Danger of condensation inside –
don't turn on before the device has reached room temperature.
Installation
Surface may become hot during operation – ensure sufficient ventilation.
Avoid direct sun light and do not place it near other sources of heat, like ra-
diators or stoves. When mounting in a rack, leave some space between this
device and others for ventilation.
Unauthorized servicing/repair voids warranty. Only use accessories
specified by the manufacturer.
Read the manual completely. It includes all information necessary
to use and operate this device.

User's Guide Fireface UFX © RME 7
User's Guide
Fireface UFX
General

8 User's Guide Fireface UFX © RME
1. Introduction
Thank you for choosing the Fireface UFX. This unique audio system is capable of transferring
analog and digital audio data directly to a computer from practically any device. The latest Plug
and Play technology guarantees a simple installation, even for the inexperienced user. The
numerous unique features and well thought-out configuration dialog puts the Fireface UFX at
the very top of the range of computer-based audio interfaces.
The package contains drivers for Windows XP / Vista / 7 and Mac OS X x86 (Intel).
Our high-performance philosophy guarantees maximum system performance by executing as
many functions as possible not in the driver (i.e. the CPU), but within the audio hardware.
2. Package Contents
•Fireface UFX
•Cable USB 2.0, 1.8 m (6 ft)
•RME Driver CD
•Cable IEEE1394a (FW400), 4 m (13 ft)
•Power cord
•Manual
•1 optical cable (TOSLINK), 2 m (6.6 ft)
3. System Requirements
•Windows XP SP2 or up, Intel Mac OS X (10.6 or up)
•1 x OHCI compatible FireWire Port 400 (1394a), FireWire 800 (1394b) via cable adapter
or
•1 x USB 2.0 port
•For USB: Computer with at least Pentium Core 2 Duo CPU
4. Brief Description and Characteristics
•All settings can be changed in real-time
•Buffer sizes/latencies from 48 up to 8192 samples selectable
•8 channels 96 kHz/24 bit Record/Playback via ADAT optical (S/MUX)
•Clock modes slave and master
•Automatic and intelligent master/slave clock control
•Unsurpassed Bitclock PLL (audio synchronization) in ADAT mode
•SteadyClock: Jitter-immune, super-stable digital clock
•DDS technology for free setting of the sample rate
•SyncAlign guarantees sample aligned and never swapping channels
•SyncCheck tests and reports the synchronization status of input signals
•TotalMix for latency-free submixes and perfect ASIO Direct Monitoring
•TotalMix: 1800 channel mixer with 46 bit internal resolution
•TotalMix FX: 3-band EQ, Low Cut, Reverb, Echo, Compressor, Expander, Auto Level
•2 x MIDI I/O, 32 channels high-speed Low-Jitter MIDI
•2 x Hi-power headphone output
•DIGICheck DSP: Level meter in hardware, peak- and RMS calculation

User's Guide Fireface UFX © RME 9
5. First Usage – Quick Start
5.1 Connectors – Controls – Display
The front of the Fireface UFX features four instrument and microphone inputs, two stereo head-
phone outputs, three rotary encoders with push functionality, a graphical colour display, and
several status LEDs.
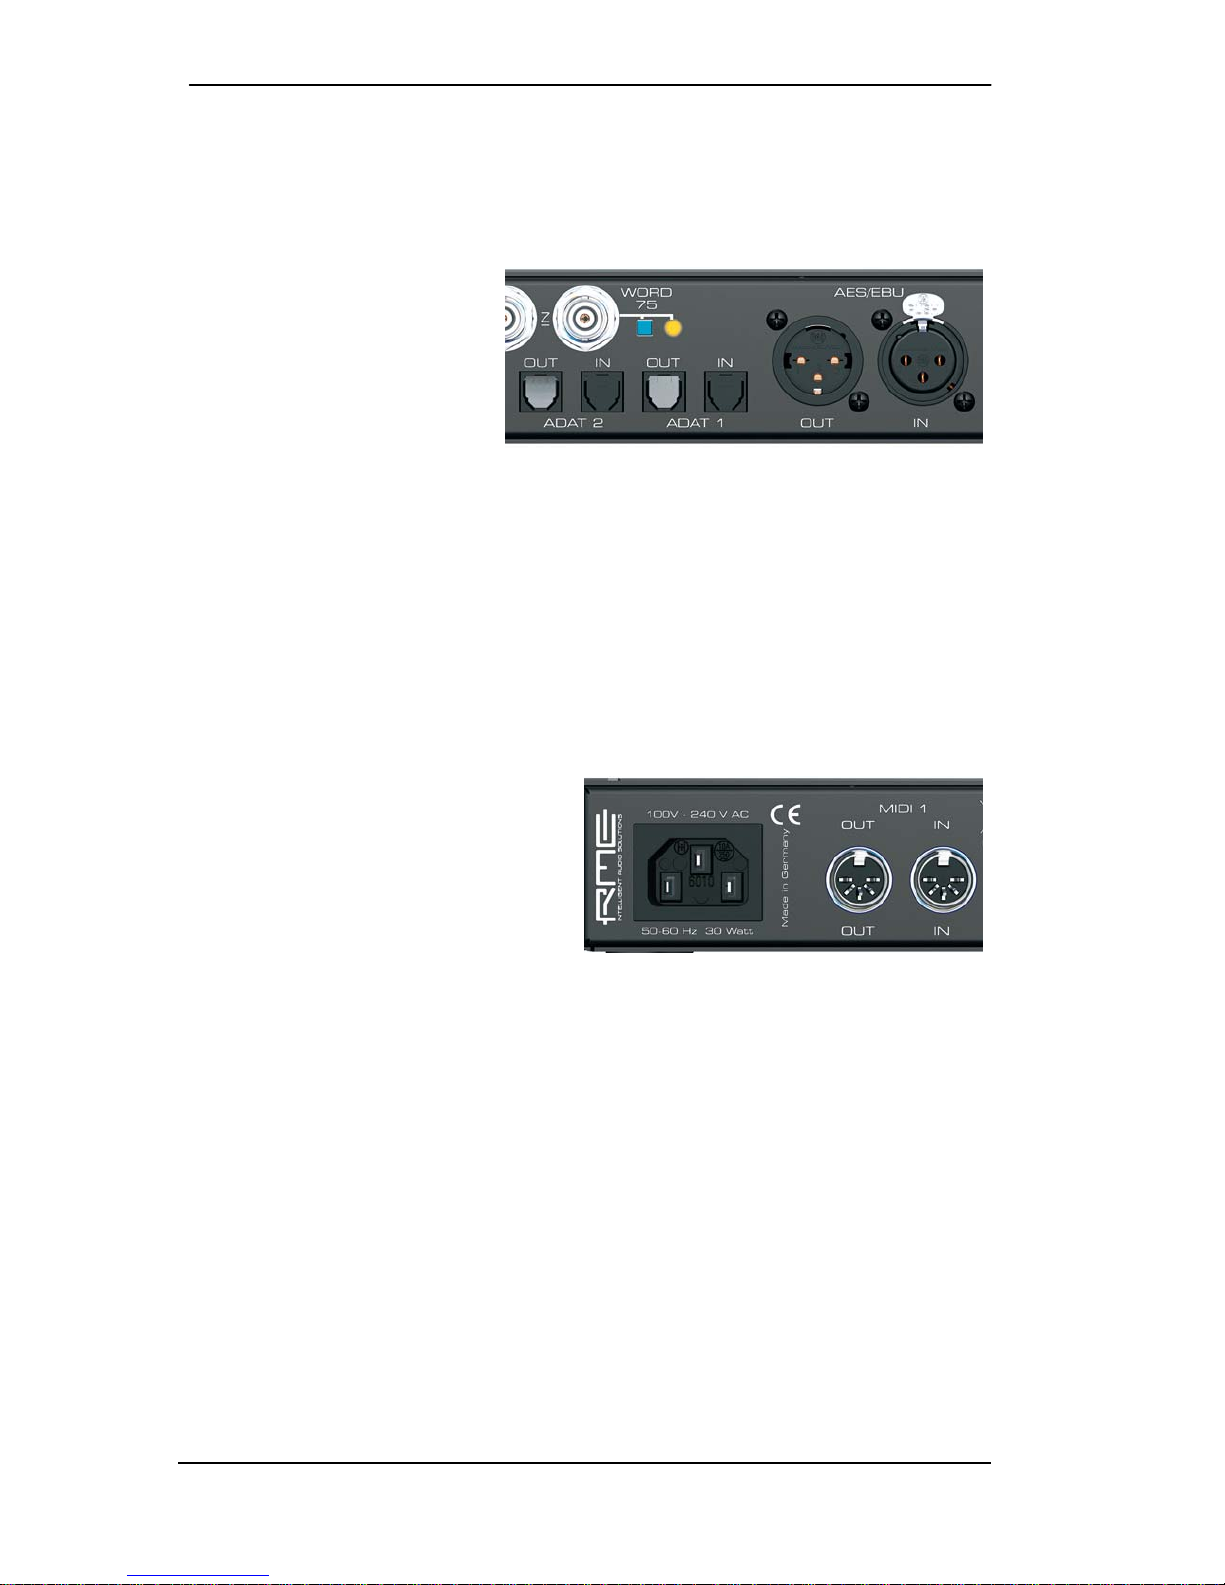
The Neutrik combo sockets of the
four Mic/Line inputs provide XLR and
6.3 mm / 1/4" TRS connection. They
have LEDs for Signal (SIG), Phantom
power (48V) and activated TRS input.
The latter is high impedance and can
be used as instrument input as well.
The analog outputs 9 to 12 feed the
headphones outputs Phones 1 and
Phones 2. These low impedance outputs of highest quality are able to drive headphones at
higher levels undistorted, no matter if low or high impedance headphones are used.
MIDI 2 I/O. Two 5-pin DIN connectors provide the second MIDI input and output.
Memory. Connector for USB stick or USB hard drive. Offers direct Recording / Playback from
the device (DSP firmware 138 or up).
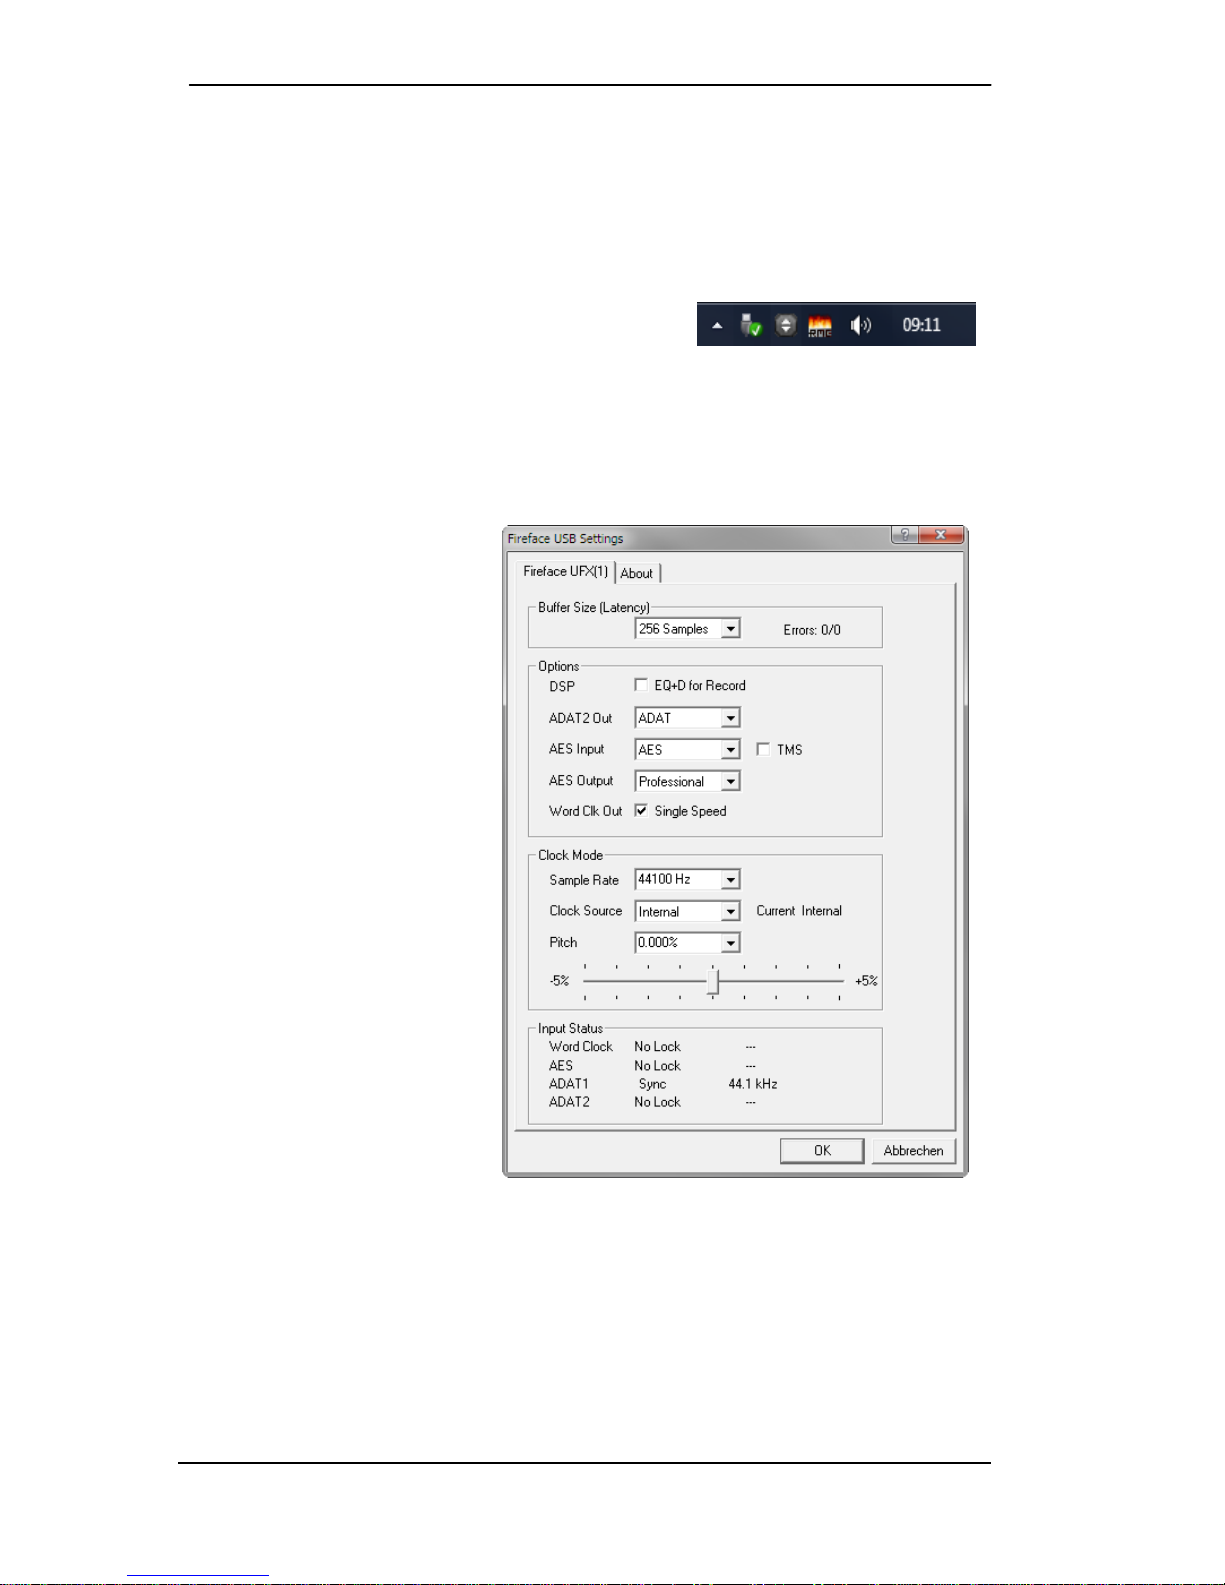
State LEDs. WC, AES, ADAT1, ADAT2. Indicate a valid input signal separately for each digital
input. Additionally, RME's exclusive SyncCheck indicates if one of these inputs is locked, but
not synchronous to the others, in which case the LED will flash. See also chapter 9.8 / 16.2,
Clock Modes - Synchronization.
MIDI LEDs. Indicate separately for input and output if MIDI are received or transmitted.
The blue LED USB and FW extinguish if no USB or FireWire connection has been initialised, or
has been interrupted (error, cable not connected etc.).
The rotary encoder Volume sets the monitoring volume directly at the device. Pushing the but-
ton will change between Main Out, Phones 1 and Phones 2. Watch the display for further infor-
mation.
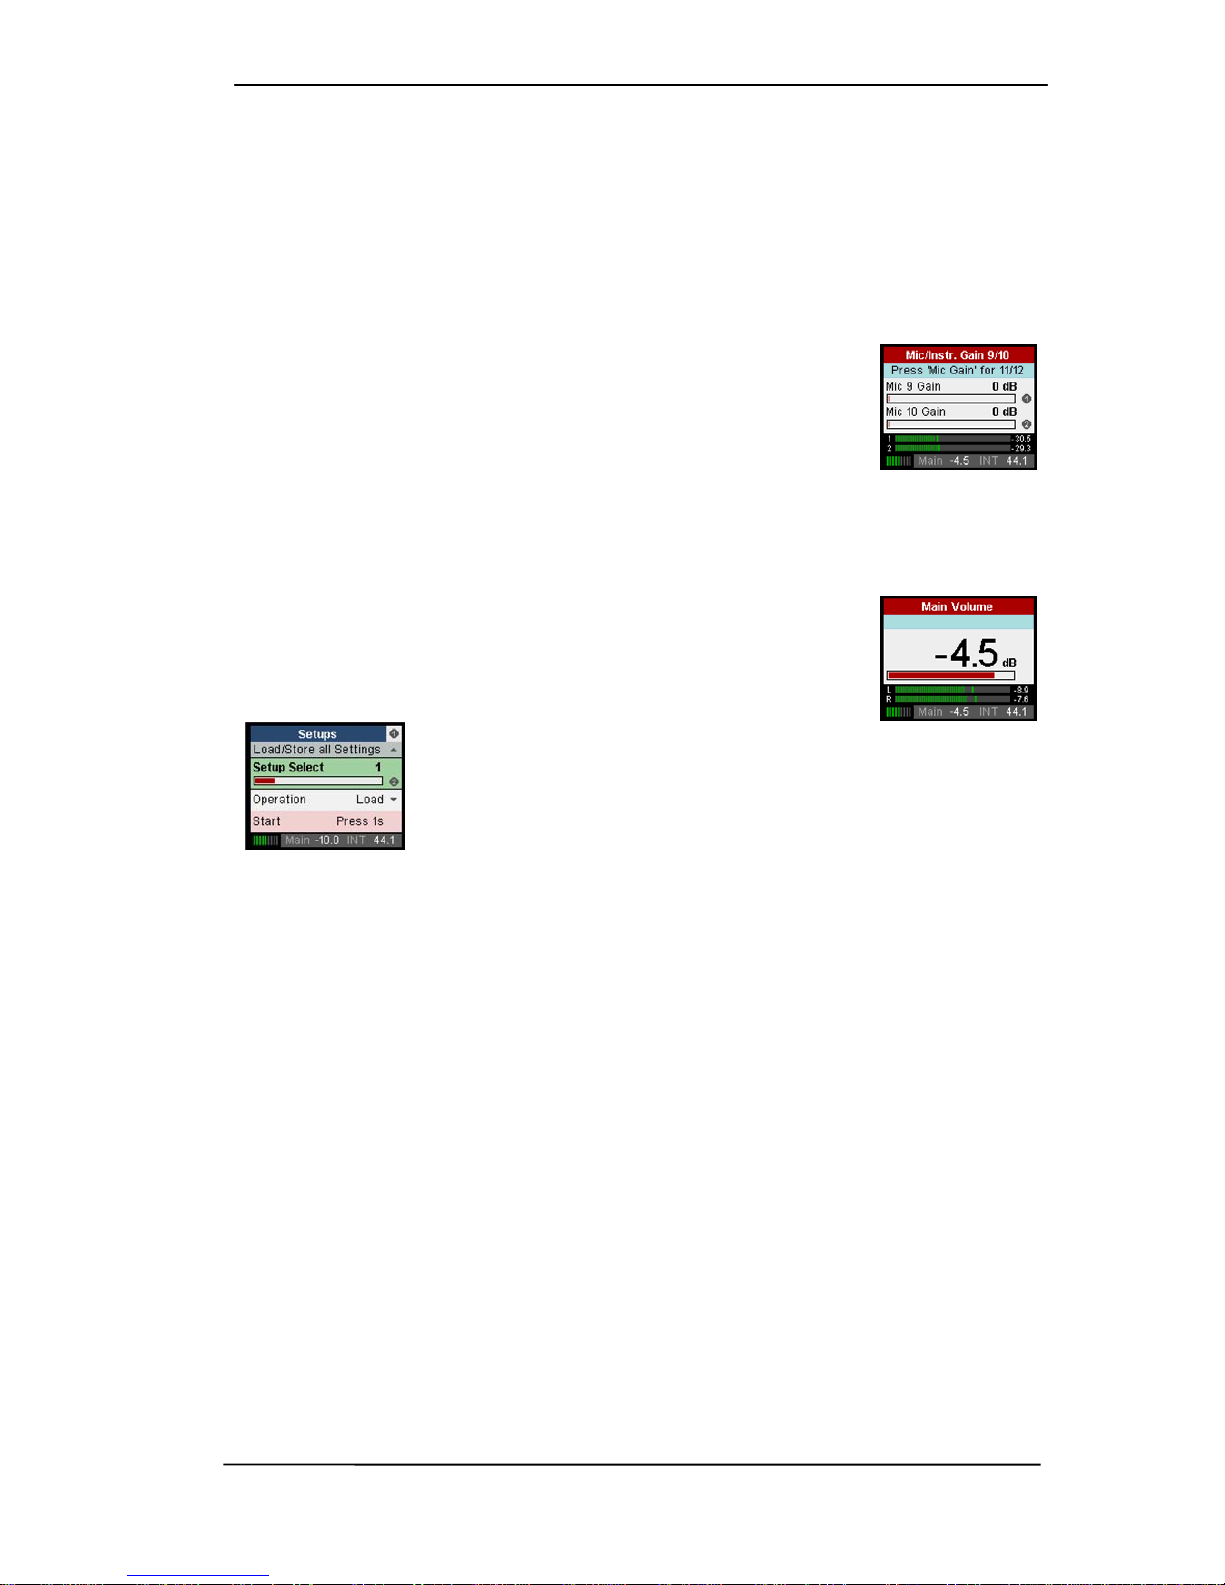
The four keys, the two
encoders 1 and 2, the high-
resolution and clear colour
display, and a well thought-
out menu structure enable
the user to quickly change
and configure the device’s
settings completely without a
computer. Help notes and
clear markers in the display
guide the user through all
functions.

10 User's Guide Fireface UFX © RME
The rear panel of the Fireface UFX features eight analog inputs and outputs, the power socket,
and all digital inputs and outputs:
Balanced Line Level Inputs. 8 balanced analog inputs via 6.3 mm stereo TRS.
Balanced Line Level Outputs. 8 balanced analog outputs, six via 6.3 mm stereo TRS, two via
XLR.
AES/EBU I/O. XLR. The Fireface
UFX accepts the commonly used
digital audio formats, SPDIF as well
as AES/EBU.
ADAT1 I/O. TOSLINK. Standard
ADAT optical port, 8 channels.
ADAT2 I/O. TOSLINK. Standard ADAT optical port, 8 channels. Can also be used as optical
SPDIF input and output, if set up accordingly in the Settings dialog.
Word Clock I/O. BNC. A push switch activates internal termination (75 Ohms). With termination
activated the yellow LED besides the switch will light up.
Remote. Mini-DIN. Connector for the optional remote control with Volume, Store, Dim and Re-
call functions.
USB 2.0. USB socket for connection to the computer.
FW 400. 6-pin FireWire socket for connection to the computer.
MIDI I/O 1. Two 5-pin DIN connectors provide the first MIDI input and output.
IEC receptacle for mains power connection.
The specially developed, internal hi-
performance switch mode power supply
makes the Fireface operate in the range of
100V to 240V AC. It is short-circuit-proof, has
an integrated line filter, is fully regulated
against voltage fluctuations, and suppresses
mains interference.

User's Guide Fireface UFX © RME 11
5.2 Quick Start
After the driver installation (chapter 7 / 15) connect the TRS jacks or the XLR inputs with the
analog signal source. The input sensitivity of the rear inputs can be changed in TotalMix (Input
Channel Settings, Level), assuring the highest signal to noise ratio will be achieved. Also try to
achieve an optimum input level by adjusting the source itself. Raise the source’s output level
until the peak level meters in TotalMix reach about –3 dB.
The analog line inputs of the Fireface UFX can be used with +4 dBu and -10 dBV signals. The
electronic input stage can handle balanced (XLR, TRS jacks) and unbalanced (TS jacks) input
signals correctly.
The signal level of the front inputs can also be optimized directly at the
Fireface. The key MIC/GAIN gives direct access to this setting, which is
then controlled by the encoders 1 and 2. A two-colour LED beside the
sockets signals overload by a colour change from green to red.
The digital outputs of the Fireface UFX provide AES/EBU (SPDIF compatible) and ADAT optical
signals at the corresponding ports.
On the analog playback side (the DA side), a coarse adjustment of the analog output level at
the rear jacks is available in TotalMix (Output Channel Settings, Level) or the Channel Settings
directly at the device.
The output signal of channels 9/10 and 11/12 is available on the front.
Their output level can be set using the VOLUME encoder. This output is a
very low impedance type, which can also be used to connect headphones.
The Fireface UFX can store and load its current state in 6 different
memory slots, called Setups. With this, the Fireface UFX can be used
stand-alone after setting it up accordingly, replacing lots of dedicated
devices (see chapter 25).
In online mode some settings are greyed out, as these should be changed only at the computer
in the Settings dialog or in TotalMix. These include the choice of sample rate and the Mix set-
tings.

12 User's Guide Fireface UFX © RME

User's Guide Fireface UFX © RME 13
User's Guide
Fireface UFX
Installation and Operation – Windows

14 User's Guide Fireface UFX © RME
6. Hardware Installation
USB
•Use the power cord to connect the Fireface with any suitable power outlet.
•Connect computer and Fireface using the supplied USB cable.
•Power on computer and UFX.
Chapter 33.3 explains how to find the ideal USB port.
FireWire
•Use the power cord to connect the Fireface with any suitable power outlet.
•Connect computer and Fireface using the supplied 6-pin FireWire cable (IEEE1394a). In
case your computer does not have any FireWire port, PCI, PCI Express, CardBus and Ex-
pressCard cards can be used to add them. In case your notebook does not have a 6-pin
jack, or did not include a 6-pin to 4-pin adapter: such adapters are available in your local
computer store.
•Power on the computer. Switch on the Fireface when Windows shows the desktop.
Note: FireWire and USB can be connected at the same time, but it is not recommended. Upon
start of the computer the port that becomes active first will be used. With no port active the unit
searches on both USB and FireWire until it finds an active one.
7. Driver and Firmware
7.1 Driver Installation
After the Fireface UFX has been switched on (see 6. Hardware Installation), the hardware as-
sistant finds a Fireface UFX.Insert the RME Driver CD into your CD-ROM drive, and follow
further instructions which appear on your computer screen. The driver files are located in the
directory \Fireface_USB and \Fireface_FW on the RME Driver CD.
Windows now installs the driver of the Fireface UFX and
registers it as a new audio device in the system. After a
reboot, the symbols of TotalMix and Settings dialog will
appear in the task bar.
In case the Hardware Wizard does not show up automatically after installation of the card,
do not attempt to install the drivers manually! An installation of drivers for non-recognized
hardware will cause a blue screen when booting Windows!
In Windows 7 Microsoft removed the automatic start of the Driver Software Update dialog. The-
refore this dialog has to be started manually after the failed driver installation. Hit the Windows
key, type 'Device Manager', start the Device Manager by selecting it from the list and hit Enter.
The device is shown with a yellow warning symbol. Usually it is already found in the correct
category, Sound, Video and Game Controller (Plug & Play detects a multimedia device). Right
click on the device and select 'Update Driver Software' from the context menu.
The dialog Update Driver Software appears. Now follow the instructions given below.
Possible reasons why a Fireface is not found automatically:
•The USB or FireWire port is not active in the system (check in Device Manager)
•The USB or FireWire cable is not, or not correctly inserted into the socket

User's Guide Fireface UFX © RME 15
7.2 Driver Update
When facing problems with the automatic driver update, the user-driven way of driver installa-
tion will work.
Under >Control Panel /System /Device Manager /Sound, Video and Game Controllers /RME
Fireface UFX /Properties /Driver< you'll find the 'Update Driver' button.
XP: Select 'Install from a list or specific location (advanced)', click 'Next', select 'Don't
search I will choose the driver to install', click 'Next', then 'Have Disk'. Now point to the
driver update's directory.
Vista/7: Select 'Browse my computer for driver software', then 'Let me pick from a list of
device drivers from my computer', then 'Have Disk'. Now point to the driver update's direc-
tory.
This method also allows for the installation of older drivers than the currently installed ones.
7.3 De-installing the Drivers
A de-installation of the Fireface's driver files is not necessary – and not supported by Windows
anyway. Thanks to full Plug & Play support, the driver files will not be loaded after the hardware
has been removed. If desired these files can then be deleted manually.
Unfortunately Windows Plug & Play methods do not cover the additional autorun entries of To-
talMix, the Settings dialog, and the registration of the ASIO driver. These entries can be re-
moved from the registry by a software de-installation request. This request can be found (like all
de-installation entries) in Control Panel, Software. Click on the entry 'RME Fireface'.
7.4 Firmware Update
The Flash Update Tool updates the firmware of the Fireface UFX to the latest version. It re-
quires an already installed driver.
Start the program fut_usb.exe. The Flash
Update Tool displays the current revision of
the Fireface firmware, and whether it needs
an update or not. If so, then simply press the
'Update' button. A progress bar will indicate
when the flash process is finished (Verify Ok).
After the update the unit needs to be reset.
This is done by powering down the Fireface
for a few seconds.
Attention: the Fireface should not be switched
off for less than 5 seconds, because Windows
completely unloads the driver, which takes
some time to finish.
A reboot of the computer is not necessary.
When the update unexpectedly fails (status: failure), the unit's Safety BIOS will be used from
the next boot on, the unit stays fully functional. The flash process should then be tried again.

16 User's Guide Fireface UFX © RME
8. Configuring the Fireface
8.1 Settings dialog - General
Configuration of the Fireface UFX is done via its own settings dialog. The panel 'Settings' can
be opened:
•by clicking on the fire symbol in the Task Bar's system tray
The mixer of the Fireface UFX, TotalMix, can be opened:
•by clicking on the double arrow symbol in the Task Bar's system tray
The hardware of the Fireface UFX offers a number of helpful, well thought-of practical functions
and options which affect how the card operates - it can be configured to suit many different
requirements.
The following is available in the 'Settings' dialog:
•Latency
•Operation of the DSP
•Configuration of the digital I/Os
•Current sample rate
•Synchronization behaviour
•State of input and output
Any changes made in the Settings
dialog are applied immediately -
confirmation (e.g. by clicking on OK
or exiting the dialog) is not re-
quired.
However, settings should not be
changed during playback or record
if it can be avoided, as this can
cause unwanted noises.
Also, please note that even in 'Stop'
mode, several programs keep the
recording and playback devices
open, which means that any new
settings might not be applied imme-
diately.
The tab About includes information
about the current driver and
firmware version of the Fireface
UFX.
Buffer Size
The setting Buffer Size determines the latency between incoming and outgoing ASIO and WDM
data, as well as affecting system stability (see chapter 10.1).
Errors does not refer to buffer errors, but USB and FireWire transmission errors. The display
will be reset on any start of a playback/record. More information can be found in chapter 33.3 /
33.4.

User's Guide Fireface UFX © RME 17
Options
DSP – EQ+D for Record
Switches EQ and Dynamics of all input channels into the recording path. In case Loopback has
been activated the EQ and Dynamics of the Output channel are within the recording path. See
also chapter 29.5.
ADAT2
This optical TOSLINK output can operate as ADAT or AES/SPDIF output.
AES Input
Defines the input for the AES (SPDIF) signal. 'AES' relates to the XLR socket, 'ADAT2' to the
second optical TOSLINK input. TMS activates the transmission of Channel Status data and
Track Marker information. In case these information are not required the feature should be turn-
ed off.
AES Output
The AES output signal can have the Channel Status Professional or Consumer (SPDIF). This
setting is also valid when ADAT2 has been set as AES output. For further details please refer to
chapter 23.2.
Word Clk Out
The word clock output signal usually equals the current sample rate. Selecting Single Speed
causes the output signal to always stay within the range of 32 kHz to 48 kHz. So at 96 kHz and
192 kHz sample rate, the output word clock is 48 kHz.
Clock Mode
Sample Rate
Sets the currently used sample rate. Offers a central and comfortable way of configuring the
sample rate of all WDM devices to the same value, as since Vista the audio software is no
longer allowed to set the sample rate. However, an ASIO program can still set the sample rate
by itself.
During record/playback the selection is greyed out, so no change is possible.
Clock Source
The unit can be configured to use its own clock (Internal = Master), or one of the input signals
(Word, AES, ADAT1 and ADAT2). If the selected source isn't available (Input Status No Lock),
the unit will change to the next available one (AutoSync). If none is available then the internal
clock is used. The current clock source is displayed as Current.
Pitch
More information on Pitch is available in chapter 8.2.
Input Status
Indicates for each input (Word, AES, ADAT1, ADAT2) whether there is a valid signal (Lock, No
Lock), or if there is a valid and synchronous signal (Sync). The third column shows the sample
frequency detected by the hardware (coarse recognition, 32 kHz, 44.1 kHz, 48 kHz etc.). In
Clock Mode the clock reference is shown. See also chapter 33.1.
Bandwidth (only for the FireWire driver)
Allows to reduce the amount of bandwidth used on the FireWire bus. See chapter 33.4.
All channels (default) activates all 30 input and output channels.
Analog + AES + ADAT1 disables channels 23–30 (ADAT2).
Analog + AES activates all 12 analog channels plus AES.
Analog 1-8 activates only the first eight analog channels.

18 User's Guide Fireface UFX © RME
8.2 Settings Dialog - Pitch
Usually soundcards and audio interfaces generate their internal clock (master mode) by a
quartz. Therefore the internal clock can be set to 44.1 kHz or 48 kHz, but not to a value in be-
tween. SteadyClock, RME's sensational Low Jitter Clock System, is based on a Direct Digital
Synthesizer (DDS). This superior circuitry can generate nearly any frequency with highest pre-
cision.
DDS has been implemented into the Fireface with regard to the needs of professional video
applications, as well as to maximum flexibility. The section Pitch includes both a list of typical
video frequencies (so called pull up/pull down at 0.1% and 4%) and a fader to freely change the
basic sample rate in steps of 1 Hz (!) over a range of +/- 5%.
The Pitch function requires the Fireface to be in clock mode Master! The frequency setting
will only be applied to this one specific Fireface!
Changing the sample rate during record/playback often results in a loss of audio, or brings
up warning messages of the audio software. Therefore the desired sample rate should be
set at least coarsely before starting the software.
Coarse
Coarse modification in steps of 50 Hz
is done by clicking with the mouse to
the left and right of the fader knob.
Fine
Fine modification in steps of 1 Hz is
done by using the left/right cursor
keys.
Reset
Ctrl key plus left mouse click.
Application examples
Pitch allows for a simultaneous change of speed and tune during record and playback. From
alignment to other sources up to creative effects – everything is possible.
Pitch enables you to intentionally de-tune the complete DAW. This way, the DAW can match
instruments which have a wrong or unchangeable tuning.
Pitch allows for the change of the sample rate of all WDM devices at the same time. Since Vista
this is no longer possible via the audio program, thus requires a manual reconfiguration of all
WDM devices. Changing the sample rate from the Settings dialog solves this problem. As the
change within the system requires some time, record/playback should not be started immedi-
ately, but only after at least 5 seconds after a change.
Tip: the current CPU load can be used to determine if the audio subsystem has finished the re-
configuration.

User's Guide Fireface UFX © RME 19
9. Operation and Usage
9.1 Playback
The Fireface UFX can play back audio data in supported formats only (sample rate, bit resolu-
tion). Otherwise an error message appears (for example at 22 kHz and 8 bit).
In the audio application being used, Fireface must be selected as output device. This can often
be found in the Options, Preferences or Settings menus under Playback Device, Audio Devices,
Audio etc.
We strongly recommend switching all system sounds off (via >Control Panel /Sounds<). Also
Fireface should not be the Preferred Device for playback, as this could cause loss of synchroni-
zation and unwanted noises. If you feel you cannot do without system sounds, you should con-
sider buying a cheap Blaster clone and select this as Preferred Device in >Control Panel
/Multimedia /Audio< or >Control Panel /Sound /Playback<.
The screenshot shows a typical configuration dialog of a (stereo) wave editor. Audio data is
sent to an analog or digital port, depending on which has been selected as playback device.
Increasing the number and/or size of audio buffers may prevent the audio signal from breaking
up, but also increases latency i.e. output is delayed. For synchronized playback of audio and
MIDI (or similar), be sure to activate the checkbox ‘Get position from audio driver’.
Note on Windows Vista/7:
Since Vista the audio application can no longer control the sample rate under WDM. Instead the
user has to work himself through numerous settings (16 with the UFX!), and to set the sample
rate to the same value per stereo device.
Therefore the driver of the Fireface UFX includes a workaround: the sample rate can be set
globally for all WDM devices within the Settings dialog, see chapter 8.1.

20 User's Guide Fireface UFX © RME
9.2 DVD-Playback (AC-3/DTS)
AC-3 / DTS
When using popular DVD software players like WinDVD and PowerDVD, their audio data
stream can be sent to any AC-3/DTS capable receiver using the Fireface's SPDIF output. For
this to work, the WDM SPDIF device of the Fireface has to be selected in >Control Panel/
Sounds and Multimedia/ Audio< or >Control Panel/ Sound/Playback<. Also check 'use preferred
device only'.
The DVD software's audio properties now show the options 'SPDIF Out' or similar. When select-
ing it, the software will transfer the non-decoded digital multichannel data stream to the Fire-
face.
Note: This 'SPDIF' signal sounds like chopped noise at highest level. Try to avoid mixing and
routing the signal to your loudspeakers, as they might get damaged.
Multichannel
PowerDVD and WinDVD can also operate as software decoder, sending a DVD's multichannel
data stream directly to the analog outputs of the Fireface. For this to work select the WDM play-
back device ’Loudspeaker’ of the Fireface in
XP: >Control Panel/ Sounds and Multimedia/ Audio<, and check 'Use only default devices'.
Additionally the loudspeaker setup, found under >Volume/ Speaker Settings/ Advanced< has to
be changed from Stereo to 5.1 Surround.
Vista/7: >Control Panel/ Sound/ Playback < as ‘Standard’. Additionally the loudspeaker setup,
found under >Configuration<, has to be changed from Stereo to 5.1 Surround.
PowerDVD's and WinDVD's audio properties now list several multichannel modes. If one of
these is selected, the software sends the decoded analog multichannel data to the Fireface.
TotalMix can then be used to play back via any desired output channels.
The typical channel assignment for surround playback is:
1 - Left
2 - Right
3 - Center
4 - LFE (Low Frequency Effects)
5 - SL (Surround Left)
6 - SR (Surround Right)
Note 1: Selecting the Fireface to be used as system playback device is against our recommen-
dations, as professional interfaces should not be disturbed by system events. Make sure to re-
assign the selection after usage or to disable any system sounds (tab Sounds, scheme 'No
audio').
Note 2: The DVD player will be synced backwards from the Fireface. This means when using
AutoSync and/or word clock, the playback speed and pitch follows the incoming clock signal.
Table of contents
Other RME Audio Accessories manuals

RME Audio
RME Audio Hammerfall RPM User manual

RME Audio
RME Audio Hammerfall HDSPe MADIface User manual

RME Audio
RME Audio Fireface 400 User manual

RME Audio
RME Audio ADI-648 User manual

RME Audio
RME Audio MADIface USB User manual

RME Audio
RME Audio ADI-192 DD User manual

RME Audio
RME Audio Babyface User manual

RME Audio
RME Audio Fireface UC User manual

RME Audio
RME Audio ADI-648 User manual

RME Audio
RME Audio ADI-8 DD User manual