Road Ranger SPORTLID V User manual

OE STYLING BAR FITTING INSTRUCTIONS
FOR VOLKSWAGEN AMAROK 10+
Part # 10055955
Instruction # 10055950

Rev 2.0 - 12/03/2020 Page 2 of 16
READ INSTRUCTIONS CAREFULLY BEFORE COMMENCING THIS ACTIVITY.
PROFORM Plastics Ltd
35 Foreman Road, Hamilton, New Zealand 3200
In producing this document PROFORM Plastics Ltd. has relied upon information and representations made by third party suppliers and to the extent permitted by
law PROFORM accepts no responsibility for any losses, faults or damage caused to the vehicle or accessory components that occur due to a failure to properly
follow these instructions.
VOLKSWAGEN OE STYLING BAR FITTING INSTRUCTIONS
Part # 10055955
Instruction #: 10055950
General Notes
• .
•
accessory and void the warranty.
• Ensure all recyclable discarded vehicle/accessory components and packaging are disposed following local recycling
regulations.
• Technician.
• Safely store and protect any removed vehicle components.
• Ensure all bare metal surfaces are protected using Automotive Bare Metal Primer and touch-up paint.
• Remove all metal swarf and dust from all vehicle surfaces if surface is used for accessory installation.
•
• Apply any adhesives to the vehicle only when the surface temperature is between 20°C to 40°C.
• Recommended all smooth lids are painted. Failure to paint lid will void the warranty.
Safety Notes
• Check that all work practises comply with safety standards.
• It is advisable to seek assistance from another person when lifting heavy components.
• While using power tools ensure safe procedures are followed.
• Appropriate clothing & PPE must be worn.
General Vehicle and Accessory Warranty Notes and Cautions
•
•
• Accessory Fitting Instructions as this may void the
warranty.

Rev 2.0 - 12/03/2020 Page 3 of 16
READ INSTRUCTIONS CAREFULLY BEFORE COMMENCING THIS ACTIVITY.
PROFORM Plastics Ltd
35 Foreman Road, Hamilton, New Zealand 3200
In producing this document PROFORM Plastics Ltd. has relied upon information and representations made by third party suppliers and to the extent permitted by
law PROFORM accepts no responsibility for any losses, faults or damage caused to the vehicle or accessory components that occur due to a failure to properly
follow these instructions.
VOLKSWAGEN OE STYLING BAR FITTING INSTRUCTIONS
Part # 10055955
Instruction #: 10055950
Tools Required
No. Description Image No. Description Image
1 2
3 4
5 6
7 8
9 10
11 12
Fitment Time : 45 Minutes
product only and do not include administration or vehicle processing time.
Tools Required
No. Description Image No. Description Image
1 2
3 4
5 6
7 8
9 10
11 12
Drill
Torque Wrench
5mm Metric Hex Bit
Ø11mm Drill Bit
Ø12mm Drill Bit
Ø19mm Hole Saw
Ø25mm Hole Saw
Loctite 243
Masking Tape
5mm Metric Hex Key
Vice Grips
Tectyl 506-WD Utility Knife
13mm Spanner
17mm Spanner 25mm Grinding Disc

Rev 2.0 - 12/03/2020 Page 4 of 16
READ INSTRUCTIONS CAREFULLY BEFORE COMMENCING THIS ACTIVITY.
PROFORM Plastics Ltd
35 Foreman Road, Hamilton, New Zealand 3200
In producing this document PROFORM Plastics Ltd. has relied upon information and representations made by third party suppliers and to the extent permitted by
law PROFORM accepts no responsibility for any losses, faults or damage caused to the vehicle or accessory components that occur due to a failure to properly
follow these instructions.
VOLKSWAGEN OE STYLING BAR FITTING INSTRUCTIONS
Part # 10055955
Instruction #: 10055950
Kit Contents- Hardware
No. Item Description Quantity Image Part Number
Kit Contents- Hardware
No. Item Description Quantity Image Service
Part Number
1Boots 1
10054052
2 Foam Seals 1
3
4
5
6
7
M8 Rivnut Installation Bolt 1 10056040
M8 Rivnut 6 10056041
19mm Plug 4 10055992
EPDM M6x22x3mmWasher 4 10056099
M8x50mm Bolt 4 10054543

Rev 2.0 - 12/03/2020 Page 5 of 16
READ INSTRUCTIONS CAREFULLY BEFORE COMMENCING THIS ACTIVITY.
PROFORM Plastics Ltd
35 Foreman Road, Hamilton, New Zealand 3200
In producing this document PROFORM Plastics Ltd. has relied upon information and representations made by third party suppliers and to the extent permitted by
law PROFORM accepts no responsibility for any losses, faults or damage caused to the vehicle or accessory components that occur due to a failure to properly
follow these instructions.
VOLKSWAGEN OE STYLING BAR FITTING INSTRUCTIONS
Part # 10055955
Instruction #: 10055950
Kit Contents- Hardware
No. Item Description Quantity Image Part Number
Kit Contents- Hardware
No. Item Description Quantity Image Service
Part Number
8M8x10mm Spacer 4
9 M8x7.5mm Spacer 4
10
11
M8x19mm Washer 4 10003717
M8x24x2mm Washer 4 10055714
10053165
10056063
VOLKSWAGEN AMAROK OE STYLING BAR
PART No# 2H0071000B72A or
240071000DNP
NOT SUPPLIED

Rev 2.0 - 12/03/2020 Page 6 of 16
READ INSTRUCTIONS CAREFULLY BEFORE COMMENCING THIS ACTIVITY.
PROFORM Plastics Ltd
35 Foreman Road, Hamilton, New Zealand 3200
In producing this document PROFORM Plastics Ltd. has relied upon information and representations made by third party suppliers and to the extent permitted by
law PROFORM accepts no responsibility for any losses, faults or damage caused to the vehicle or accessory components that occur due to a failure to properly
follow these instructions.
VOLKSWAGEN OE STYLING BAR FITTING INSTRUCTIONS
Part # 10055955
Instruction #: 10055950
Check that the contents of the Fitting Kit are
complete and undamaged.
If any contents of the Fitting Kit are found
incomplete or damaged they must be replaced
using the specied accessory components.

Rev 2.0 - 12/03/2020 Page 7 of 16
READ INSTRUCTIONS CAREFULLY BEFORE COMMENCING THIS ACTIVITY.
PROFORM Plastics Ltd
35 Foreman Road, Hamilton, New Zealand 3200
In producing this document PROFORM Plastics Ltd. has relied upon information and representations made by third party suppliers and to the extent permitted by
law PROFORM accepts no responsibility for any losses, faults or damage caused to the vehicle or accessory components that occur due to a failure to properly
follow these instructions.
VOLKSWAGEN OE STYLING BAR FITTING INSTRUCTIONS
Part # 10055955
Instruction #: 10055950
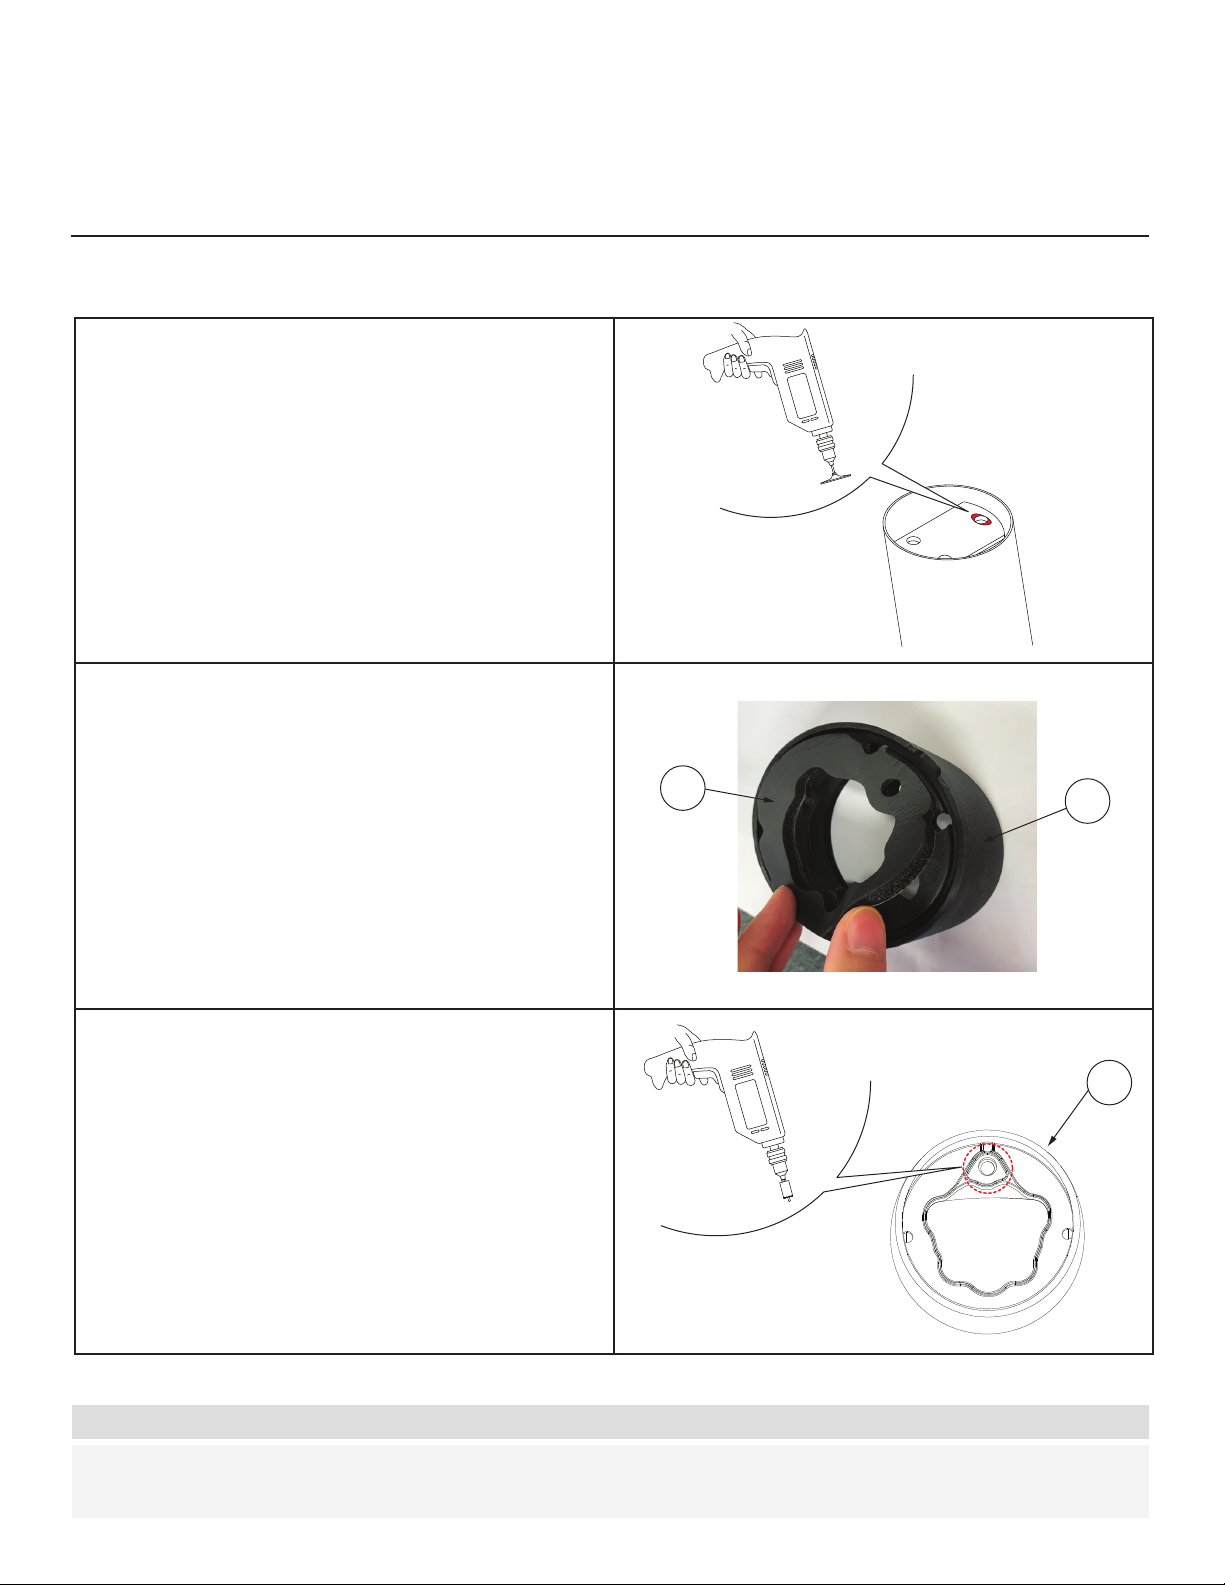
Step 1
• Instruction text here
For diagrams that less space
use two or three step instruction page master
90°
ABS
Aluminium
Aluminium
!! Do Not Drill !!
Step 1 IMPORTANT! Take care and drill correct holes
• Place masking tape around pilot holes in aluminium frame to prevent swarf from scratching the aluminium frame.
Using pilot holes in the aluminium as a position guide, drill 19ø hole through one layer of aluminium only!
Note : The pilot drill bit of the hole saw can pass through all layers if required - See next step
•
•
Drill Ø19mm
Drill Ø19mm
!! Do Not Drill !!
!! Do Not Drill !!
!! Do Not Drill !!
!! Do Not Drill !!
Drill Ø19mm
Through one layer only! Drill Ø19mm
Through one layer only!
Through one layer only!
Through one layer only!

Rev 2.0 - 12/03/2020 Page 8 of 16
READ INSTRUCTIONS CAREFULLY BEFORE COMMENCING THIS ACTIVITY.
PROFORM Plastics Ltd
35 Foreman Road, Hamilton, New Zealand 3200
In producing this document PROFORM Plastics Ltd. has relied upon information and representations made by third party suppliers and to the extent permitted by
law PROFORM accepts no responsibility for any losses, faults or damage caused to the vehicle or accessory components that occur due to a failure to properly
follow these instructions.
VOLKSWAGEN OE STYLING BAR FITTING INSTRUCTIONS
Part # 10055955
Instruction #: 10055950
Step 1
• Instruction text here
For diagrams that less space
use two or three step instruction page master
Step 2 IMPORTANT! Take care and drill correct holes
• Using pilot holes in the aluminium as a position guide, drill 12ø hole through second layer of aluminium and ABS
90°
ABS
Aluminium
Aluminium
Drill Ø12mm
Drill Ø12mm
!! Do Not Drill !!
!! Do Not Drill !!
!! Do Not Drill !!
!! Do Not Drill !!
Drill Ø12mm Drill Ø12mm
Through total thickness
Through total thickness
Through total thickness Through total thickness

Rev 2.0 - 12/03/2020 Page 9 of 16
READ INSTRUCTIONS CAREFULLY BEFORE COMMENCING THIS ACTIVITY.
PROFORM Plastics Ltd
35 Foreman Road, Hamilton, New Zealand 3200
In producing this document PROFORM Plastics Ltd. has relied upon information and representations made by third party suppliers and to the extent permitted by
law PROFORM accepts no responsibility for any losses, faults or damage caused to the vehicle or accessory components that occur due to a failure to properly
follow these instructions.
VOLKSWAGEN OE STYLING BAR FITTING INSTRUCTIONS
Part # 10055955
Instruction #: 10055950
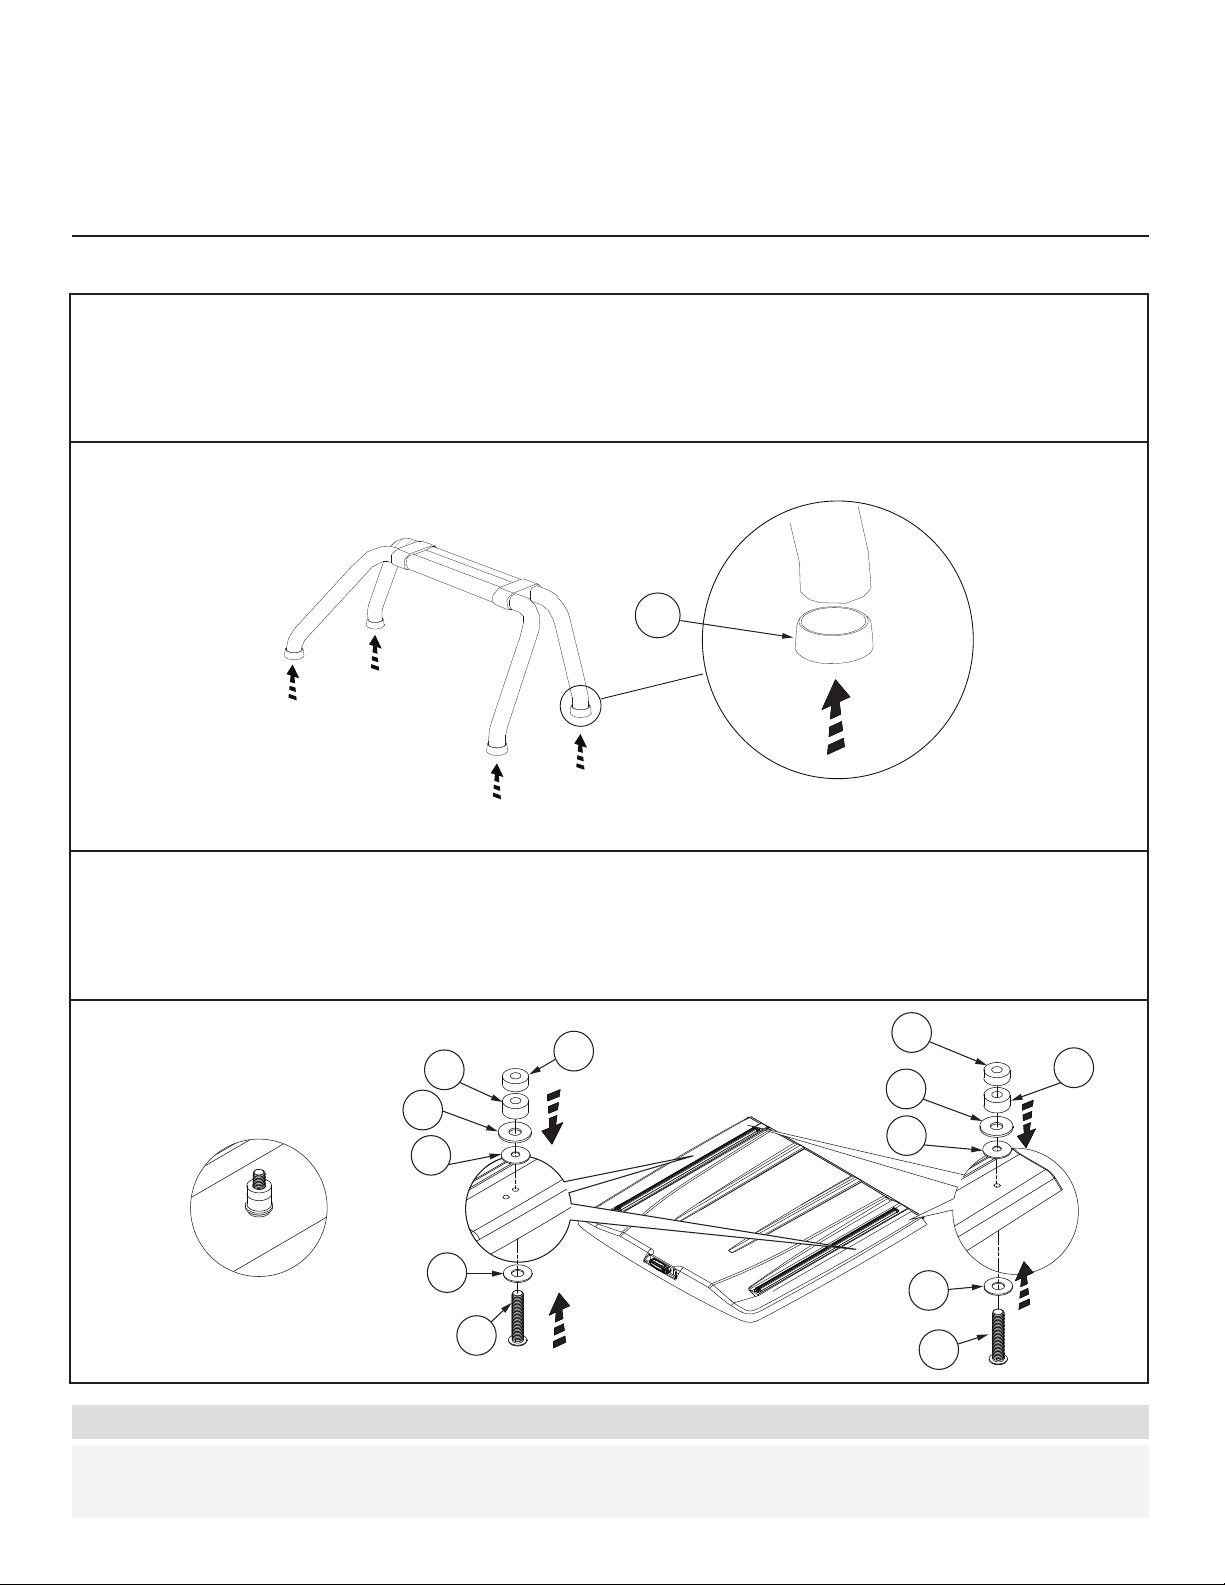
Step 3
• Remove rubber feet and brackets from bar.
• Recycle the fasteners and brackets.
• Keep the rubber feet for later steps.
Step 4
• Using vice grips, break of the M6 threaded boss on
the feet of the bar.
• Recycle the boss.
x4
Step 5
• Drill out hole with Ø11mm drill bit
X4
Rev 2.0 - 12/03/2020 Page 10 of 16
READ INSTRUCTIONS CAREFULLY BEFORE COMMENCING THIS ACTIVITY.
PROFORM Plastics Ltd
35 Foreman Road, Hamilton, New Zealand 3200
In producing this document PROFORM Plastics Ltd. has relied upon information and representations made by third party suppliers and to the extent permitted by
law PROFORM accepts no responsibility for any losses, faults or damage caused to the vehicle or accessory components that occur due to a failure to properly
follow these instructions.
VOLKSWAGEN OE STYLING BAR FITTING INSTRUCTIONS
Part # 10055955
Instruction #: 10055950
Step 6
• Using a grinding disc remove the the weld from the
boss.
• Grind at. X4
Step 7
• Peel off the backing paper on the boots foam seals
(item 2)
• Adhere the foam seals to the bottom of the boots
(item 1)
• Ensure the cut out prole lines up with the boot
21
Step 8
• Drill out hole in boots (item 1) with Ø25mm hole
saw 1
X4
Rev 2.0 - 12/03/2020 Page 11 of 16
READ INSTRUCTIONS CAREFULLY BEFORE COMMENCING THIS ACTIVITY.
PROFORM Plastics Ltd
35 Foreman Road, Hamilton, New Zealand 3200
In producing this document PROFORM Plastics Ltd. has relied upon information and representations made by third party suppliers and to the extent permitted by
law PROFORM accepts no responsibility for any losses, faults or damage caused to the vehicle or accessory components that occur due to a failure to properly
follow these instructions.
VOLKSWAGEN OE STYLING BAR FITTING INSTRUCTIONS
Part # 10055955
Instruction #: 10055950
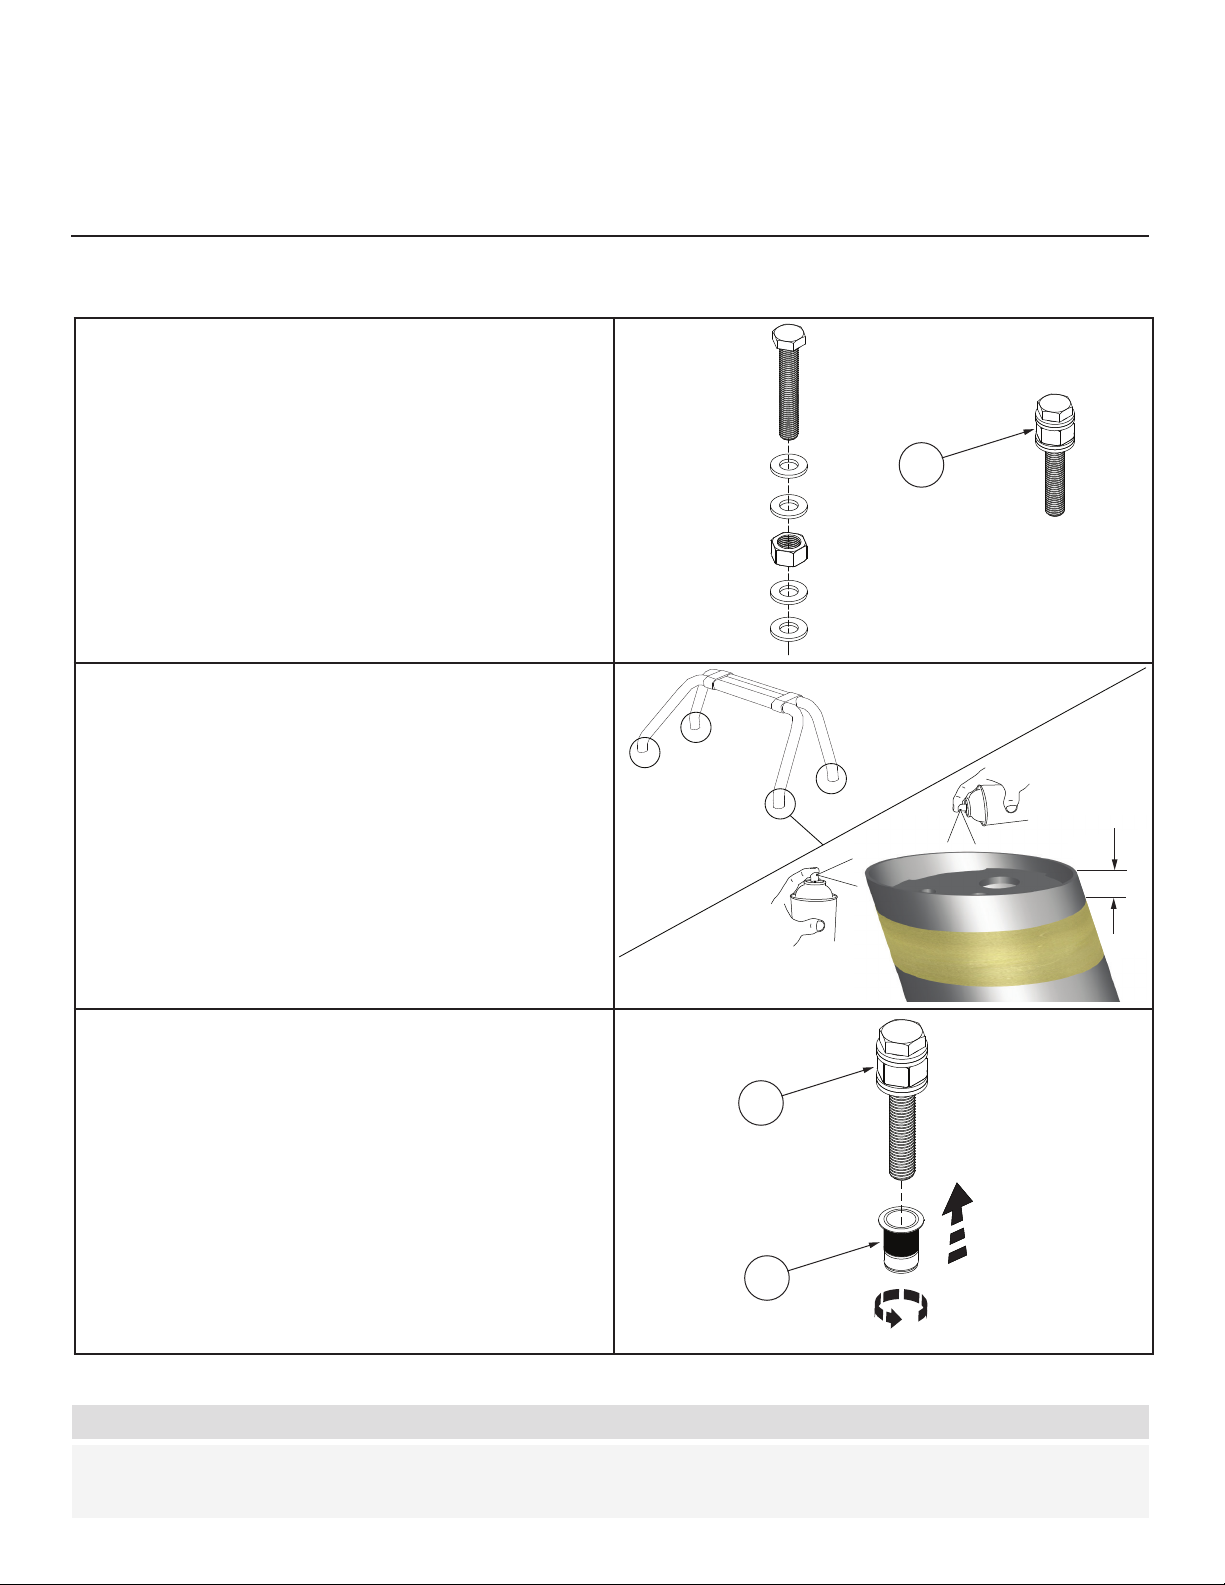
Step 9
• Assemble rivnut installation bolt.
X1
3
Step 10 - REQUIRED ON BLACK BAR ONLY!
IMPORTANT! CRITICAL STEP!
• Mask bar feet 10mm from edge
• Apply Rust Preventative TECTYL 506-WD on the
inside and outside of the bar up to the masking
tape.
10mm
Step 11
• Screw rivnut (item 4) onto the rivnut installation
bolt (item 3) all the way.
10mm
X1
3
X1
4
Rev 2.0 - 12/03/2020 Page 12 of 16
READ INSTRUCTIONS CAREFULLY BEFORE COMMENCING THIS ACTIVITY.
PROFORM Plastics Ltd
35 Foreman Road, Hamilton, New Zealand 3200
In producing this document PROFORM Plastics Ltd. has relied upon information and representations made by third party suppliers and to the extent permitted by
law PROFORM accepts no responsibility for any losses, faults or damage caused to the vehicle or accessory components that occur due to a failure to properly
follow these instructions.
VOLKSWAGEN OE STYLING BAR FITTING INSTRUCTIONS
Part # 10055955
Instruction #: 10055950
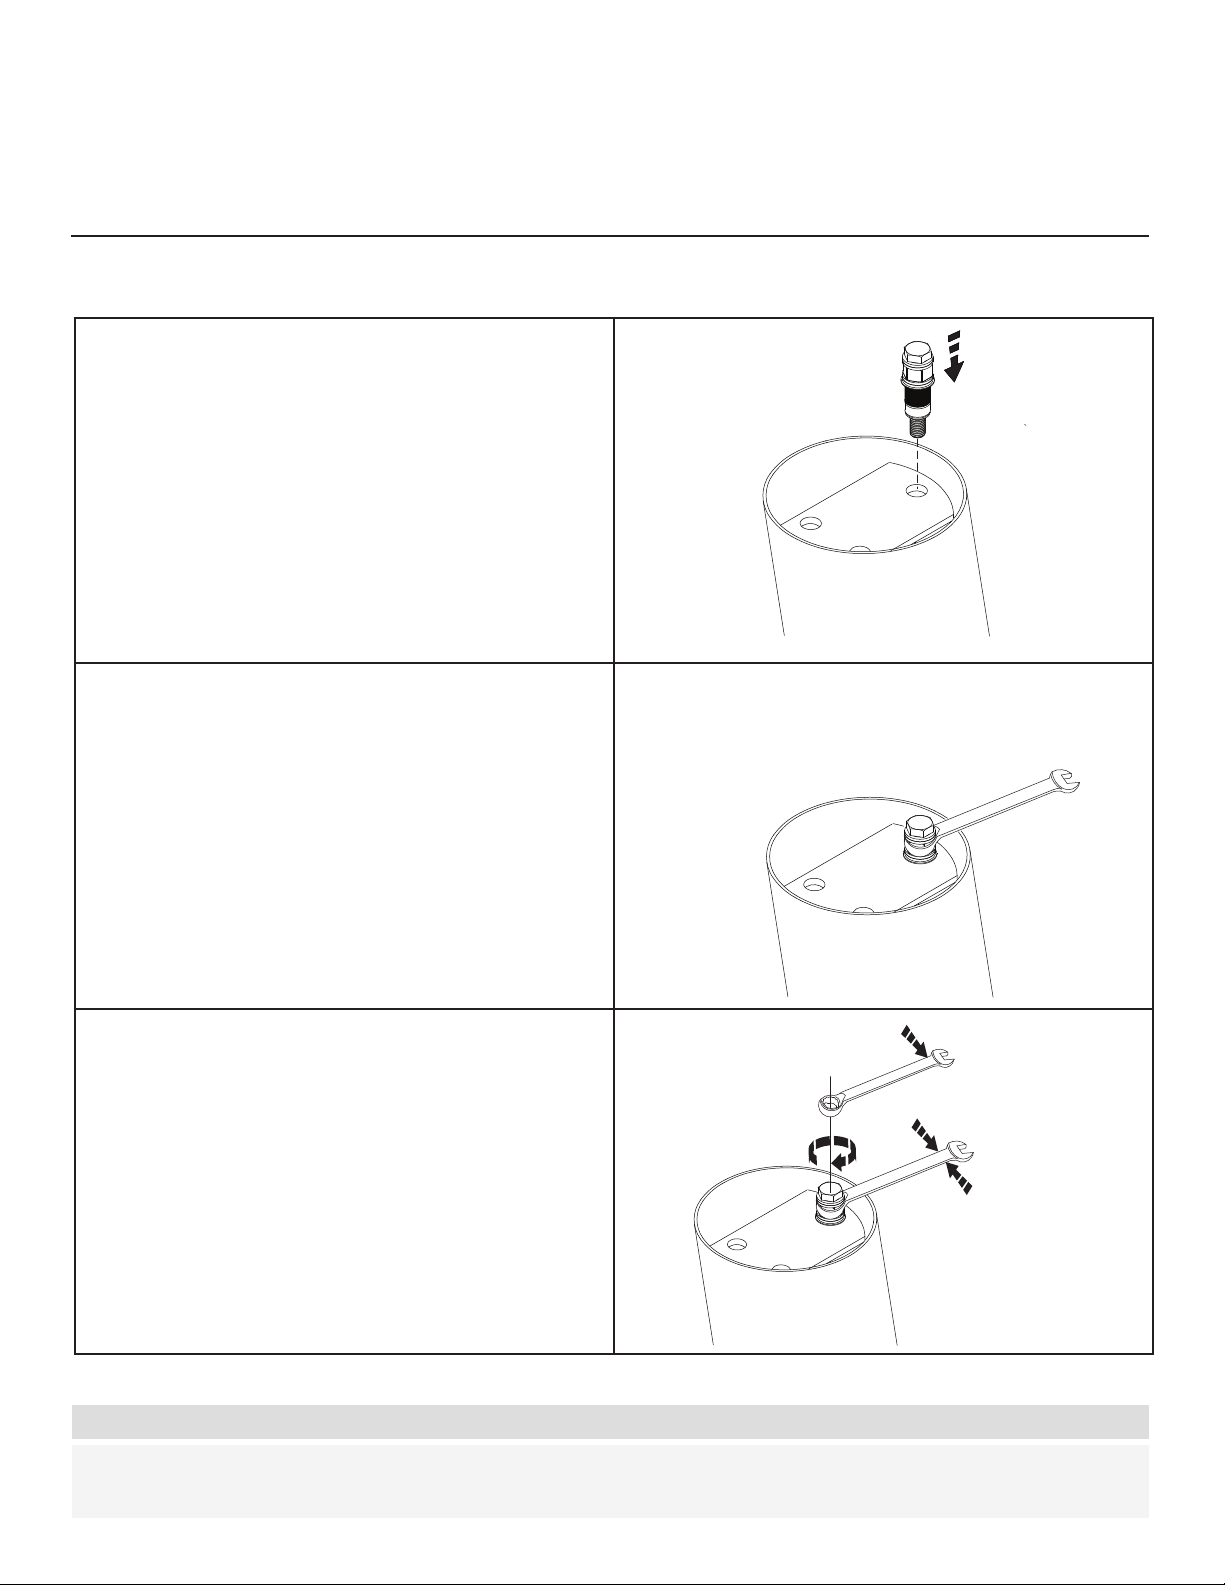
Step 12
• Place rivnut installation bolt into the Ø11mm hole
drilled in the bar.
X4
Step 13
• Use a 17mm spanner to hold the M10 nut
Step 14
• Ensure installation bolt is held rmly into hole.
• Hold the 17mm spanner.
• Use a 13mm spanner to tighten the M8
Rev 2.0 - 12/03/2020 Page 13 of 16
READ INSTRUCTIONS CAREFULLY BEFORE COMMENCING THIS ACTIVITY.
PROFORM Plastics Ltd
35 Foreman Road, Hamilton, New Zealand 3200
In producing this document PROFORM Plastics Ltd. has relied upon information and representations made by third party suppliers and to the extent permitted by
law PROFORM accepts no responsibility for any losses, faults or damage caused to the vehicle or accessory components that occur due to a failure to properly
follow these instructions.
VOLKSWAGEN OE STYLING BAR FITTING INSTRUCTIONS
Part # 10055955
Instruction #: 10055950
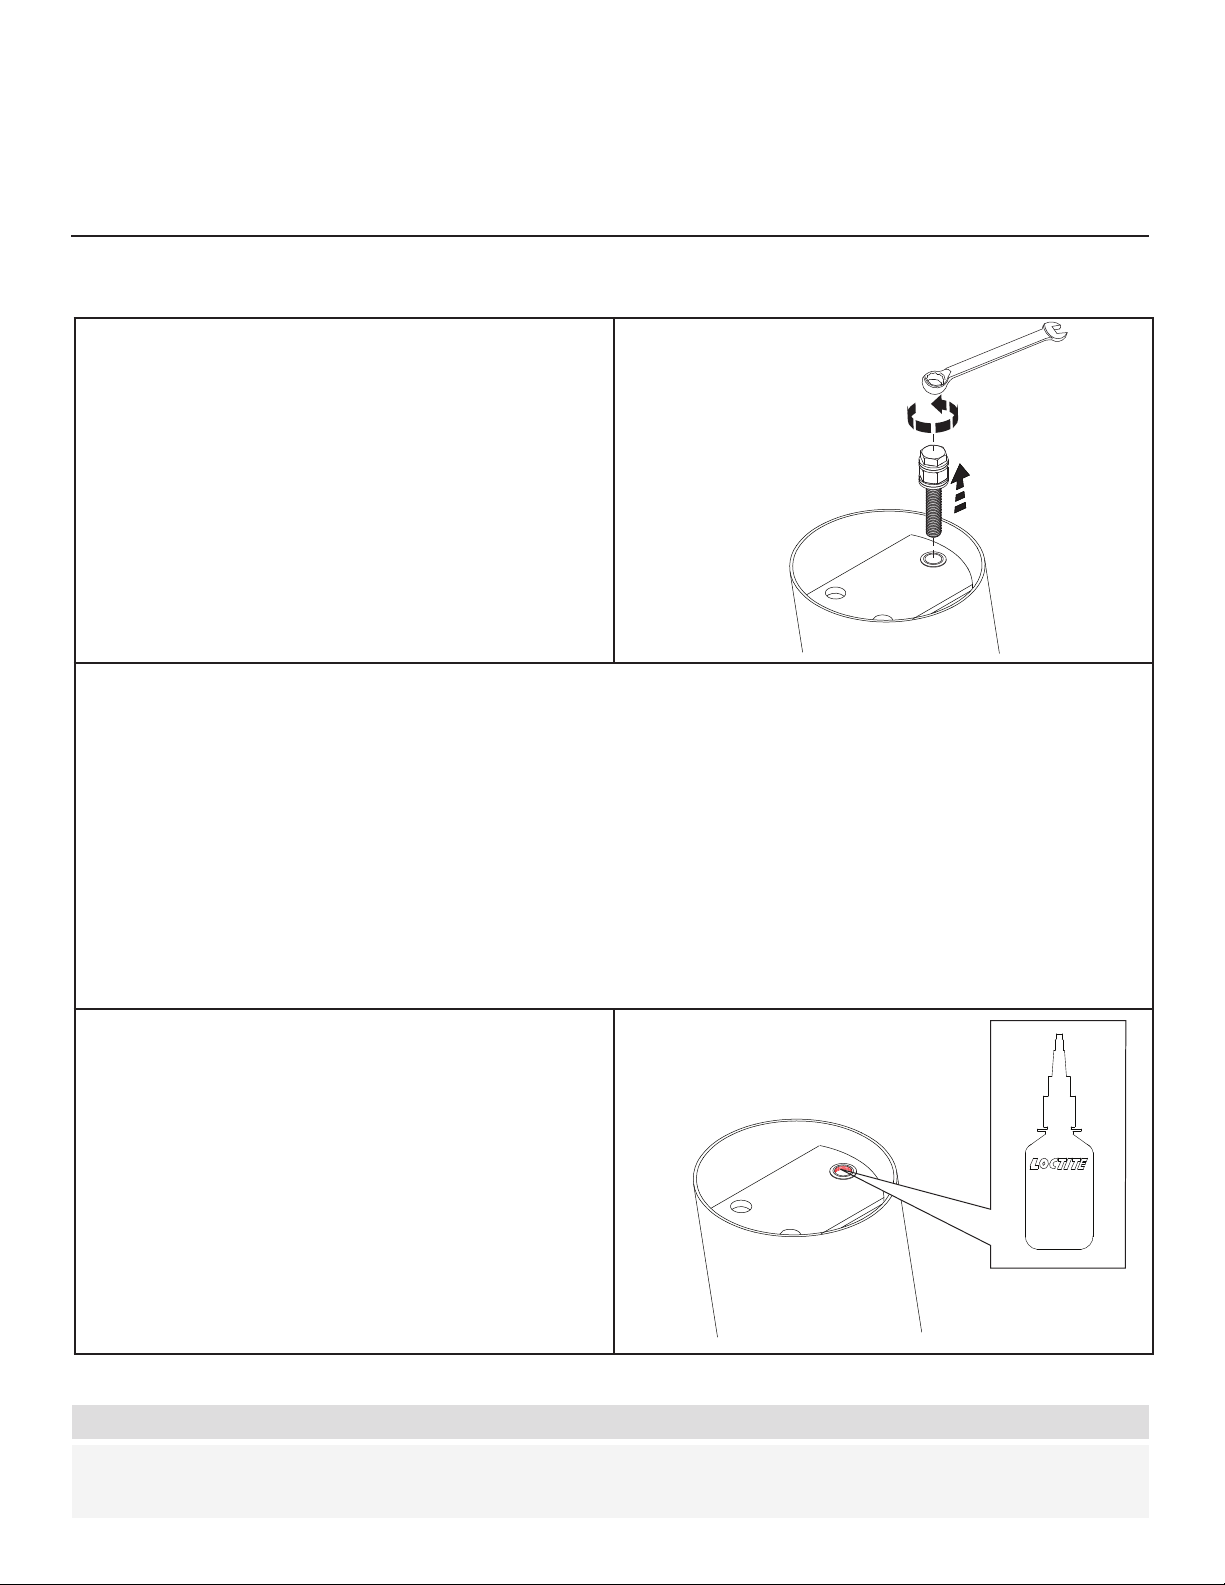
Step 15
• Unscrew the hex head bolt and remove the rivnut
installation bolt (item 3)
Step 16
Step 17
IMPORTANT! CRITICAL STEP!
• Apply LOCTITIE 243 (not supplied) to the thread of
the rivnut.
• DO NOT allow LOCTITE to touch painted or un-
painted lid
x4
IMPORTANT! CRITICAL STEP!
• Inspect rivnut to ensure it is installed correctly.
• If necessary reinsert rivnut installation bolt (item 3) and
tighten further
• Repeat steps 9 to 16 for other feet.
Rev 2.0 - 12/03/2020 Page 14 of 16
READ INSTRUCTIONS CAREFULLY BEFORE COMMENCING THIS ACTIVITY.
PROFORM Plastics Ltd
35 Foreman Road, Hamilton, New Zealand 3200
In producing this document PROFORM Plastics Ltd. has relied upon information and representations made by third party suppliers and to the extent permitted by
law PROFORM accepts no responsibility for any losses, faults or damage caused to the vehicle or accessory components that occur due to a failure to properly
follow these instructions.
VOLKSWAGEN OE STYLING BAR FITTING INSTRUCTIONS
Part # 10055955
Instruction #: 10055950
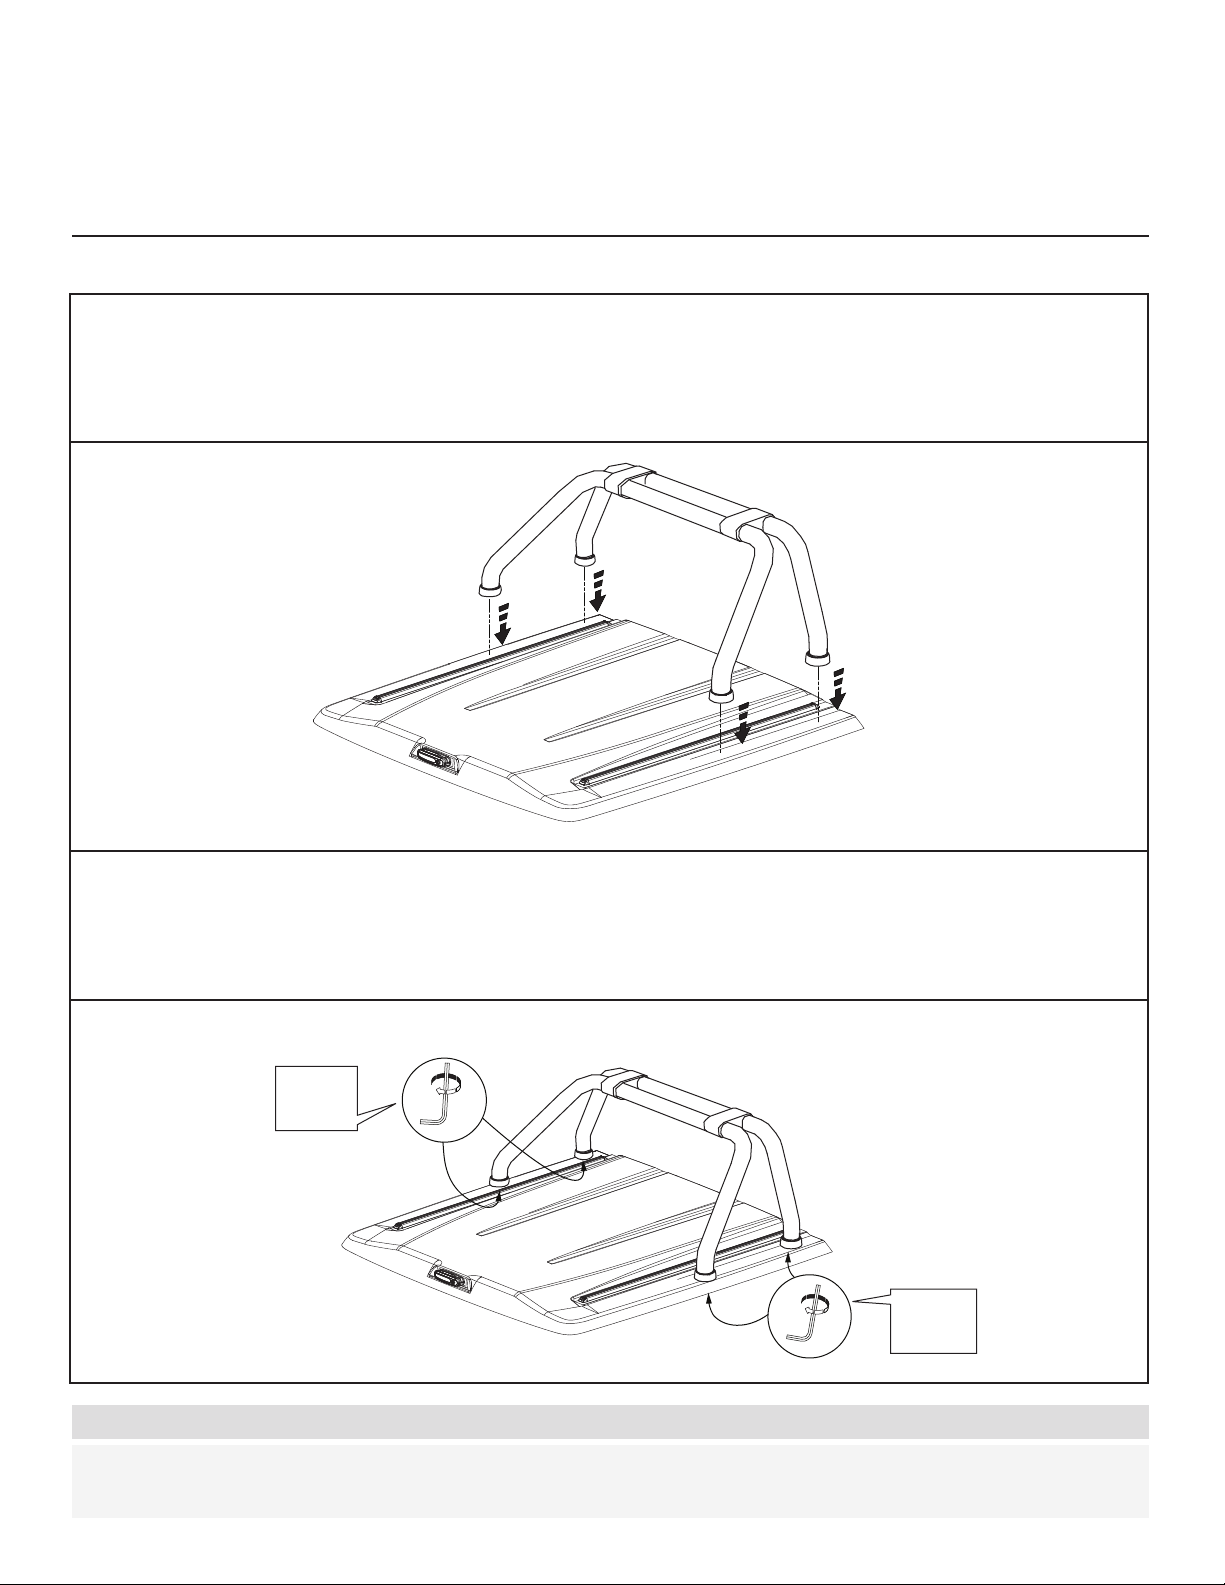
Step 18
• Place boots (item1) onto bar
Step 19
• Install fasteners in the order shown
x4
1
Top View Installed
7
10 10
7
x2
x2
8
6
11
98
11
9
6
Rev 2.0 - 12/03/2020 Page 15 of 16
READ INSTRUCTIONS CAREFULLY BEFORE COMMENCING THIS ACTIVITY.
PROFORM Plastics Ltd
35 Foreman Road, Hamilton, New Zealand 3200
In producing this document PROFORM Plastics Ltd. has relied upon information and representations made by third party suppliers and to the extent permitted by
law PROFORM accepts no responsibility for any losses, faults or damage caused to the vehicle or accessory components that occur due to a failure to properly
follow these instructions.
VOLKSWAGEN OE STYLING BAR FITTING INSTRUCTIONS
Part # 10055955
Instruction #: 10055950
Step 20
• Place bar onto lid
Step 21
• Tighten M8 bolts (item7) using 5mm hex key and torque wrench
MAX TORQUE
SETTING=
9 Nm or
6.6 Ft/Pounds
MAX TORQUE
SETTING=
9 Nm or
6.6 Ft/Pounds
x2
x2
Rev 2.0 - 12/03/2020 Page 16 of 16
READ INSTRUCTIONS CAREFULLY BEFORE COMMENCING THIS ACTIVITY.
PROFORM Plastics Ltd
35 Foreman Road, Hamilton, New Zealand 3200
In producing this document PROFORM Plastics Ltd. has relied upon information and representations made by third party suppliers and to the extent permitted by
law PROFORM accepts no responsibility for any losses, faults or damage caused to the vehicle or accessory components that occur due to a failure to properly
follow these instructions.
VOLKSWAGEN OE STYLING BAR FITTING INSTRUCTIONS
Part # 10055955
Instruction #: 10055950
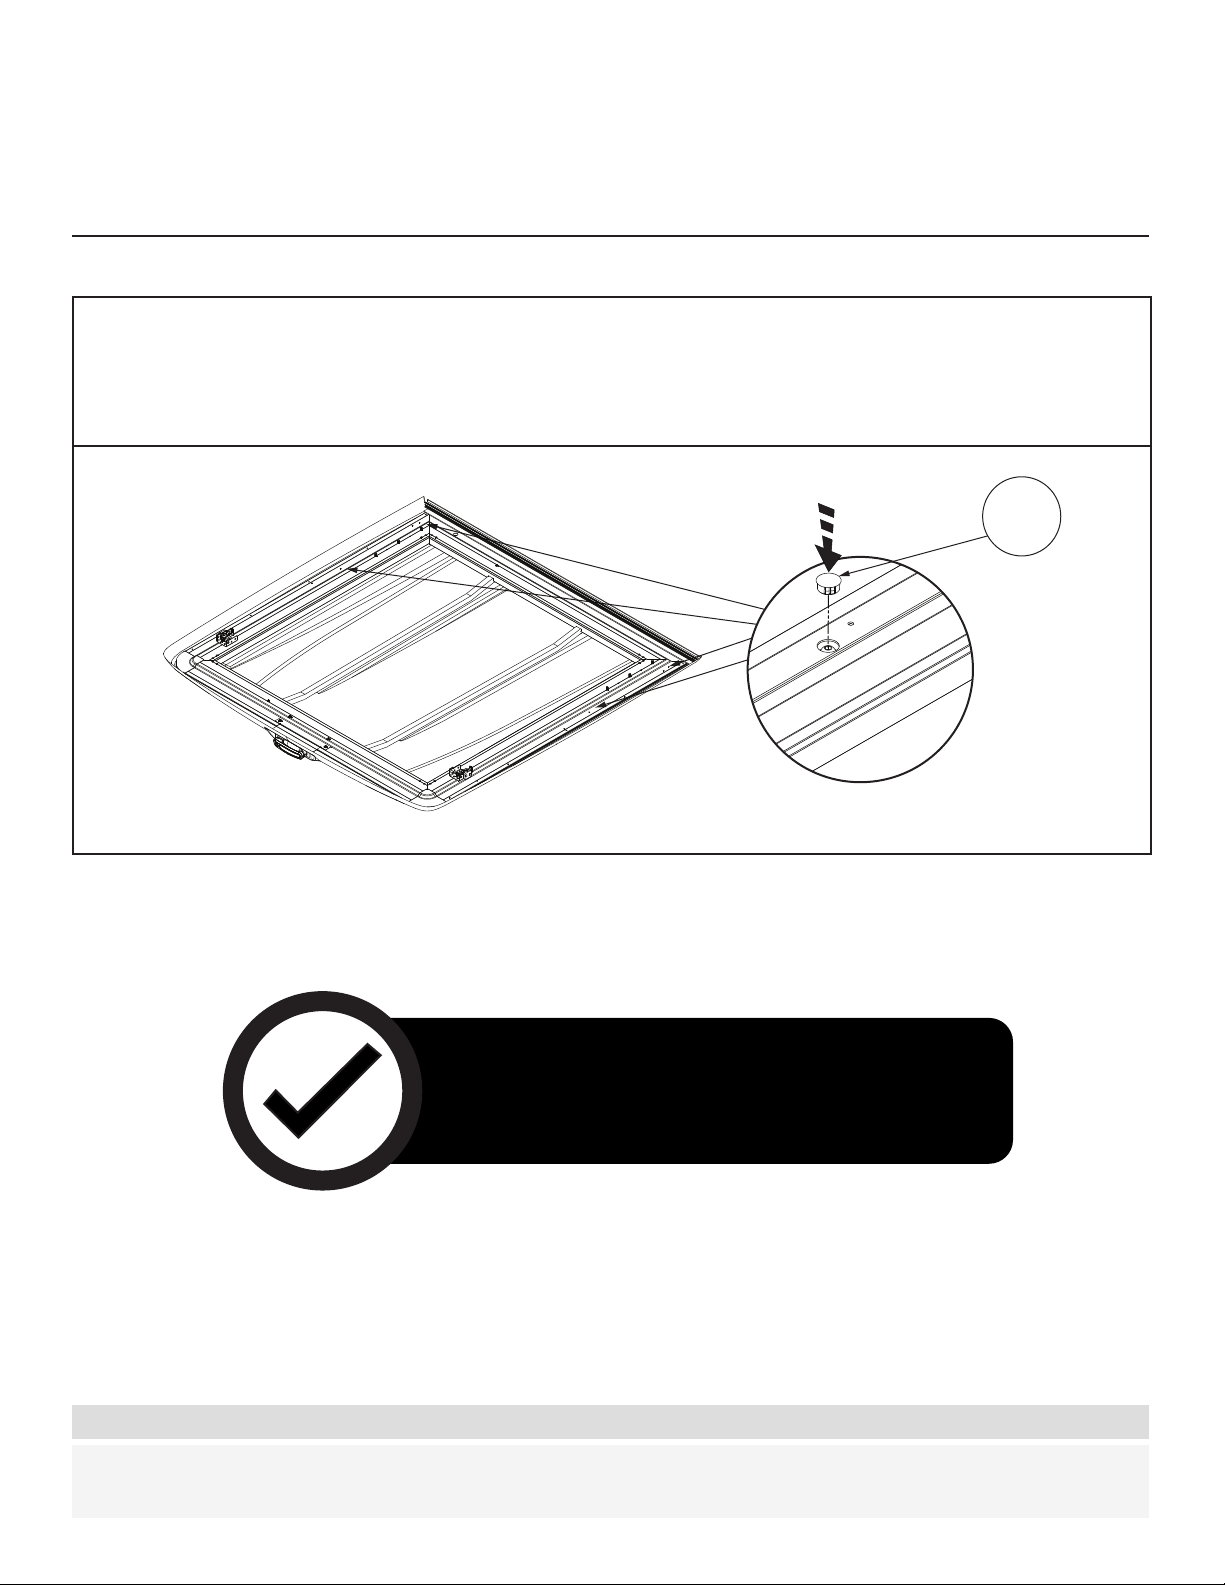
Step 22
• Fix plugs (item 5) to holes
For diagrams that need more space
format one diagram per page
Installation complete. Please place these tting
instructions inside the owners manual wallet.
5
x4
This manual suits for next models
1
Other Road Ranger Automobile Accessories manuals

Road Ranger
Road Ranger H392 User manual

Road Ranger
Road Ranger 333.1845.1/6 User manual

Road Ranger
Road Ranger ET 210208 User manual

Road Ranger
Road Ranger ET 200022 User manual

Road Ranger
Road Ranger ET 210014 User manual

Road Ranger
Road Ranger ET 400011 User manual

Road Ranger
Road Ranger ET313008 User manual

Road Ranger
Road Ranger ET 210207 User manual
Popular Automobile Accessories manuals by other brands


ULTIMATE SPEED
ULTIMATE SPEED 279746 Assembly and Safety Advice

SSV Works
SSV Works DF-F65 manual

ULTIMATE SPEED
ULTIMATE SPEED CARBON Assembly and Safety Advice

Witter
Witter F174 Fitting instructions

WeatherTech
WeatherTech No-Drill installation instructions

TAUBENREUTHER
TAUBENREUTHER 1-336050 Installation instruction