ROBINHOOD HIC604TFG User manual

Installation and Operating Instructions Issue 1
Description: ROBINHOOD 60CM INDUCTION COOKTOP
Model Number: HIC604TFG

Contents
Congratulations!
Thank you for choosing one of our appliances. Before you use the appliance, we strongly recommend that you read
through the whole user manual which provides important safety instructions and description of the product and the
proper use of its functions.
To avoid the ever-present risks involved with using an electrical appliance it is vital that the oven is installed
correctly and that you read the safety instructions carefully to avoid misuse and hazards. It is important that you
retain these instructions and your proof of purchase along with any other important documents about this product
for future reference.
Due to continual product development, Robinhood reserves the right to alter specifications or appearances without
notice.
Important Safety Instructions ..............................................................................................................................1
Installation............................................................................................................................................................3
Appliance details ..................................................................................................................................................5
Electrical connection ............................................................................................................................................6
Operating Instructions..........................................................................................................................................7
Cleaning and Maintenance................................................................................................................................ 11
Warranty Certificate (New Zealand).................................................................................................................. 13
Warranty Certificate (Australia) ........................................................................................................................ 14
Disposal Information
•Most of the packing materials are recyclable. Please dispose of these materials through your local recycling
depot or by placing them in appropriate collection containers.
•If you wish to discard this product, please contact your local authorities and ask for the correct method of
disposal.

1
Important Safety Instructions
•This appliance is not intended for use by persons (including children) with reduced physical, sensory or
mental capabilities, or lack of experience and knowledge, unless they have been given supervision or
instruction concerning use of the appliance by a person responsible for their safety. Children should be
supervised to ensure that they do not play with the appliance.
•Do not leave this cooktop unattended or unsupervised whilst children or infirmed are present.
•Accessible parts will become hot when in use and directly after use, care should be taken to avoid touching
the burners. To avoid burns and scalds keep children away.
•The installation of this cooktop is to be carried out by using only a qualified electrician.
•This cooktop is to be installed in accordance with the local, national building, electrical and plumbing codes.
•If the power supply cable is damaged, it must be replaced by the manufacturer or its service agent or
similarly qualified person to avoid a hazard.
•The cooktop is not intended to be operated by means of an external timer or separate remote-control
system.
•If the surface is cracked, switch off the appliance to avoid the possibility of electric shock, for cooktop
surfaces of glass-ceramic or similar material which protect live parts
•CAUTION –The cooking process must be supervised. A short term cooking process must be supervised
continuously.
•Warning –Unattended cooking on a cooktop with fat or oil can be dangerous and may result in a fire.
•Danger of fire: Do not store items on the cooking surfaces.
•WARNING: If the surface is cracked, switch off the appliance to avoid the possibility of electric shock.
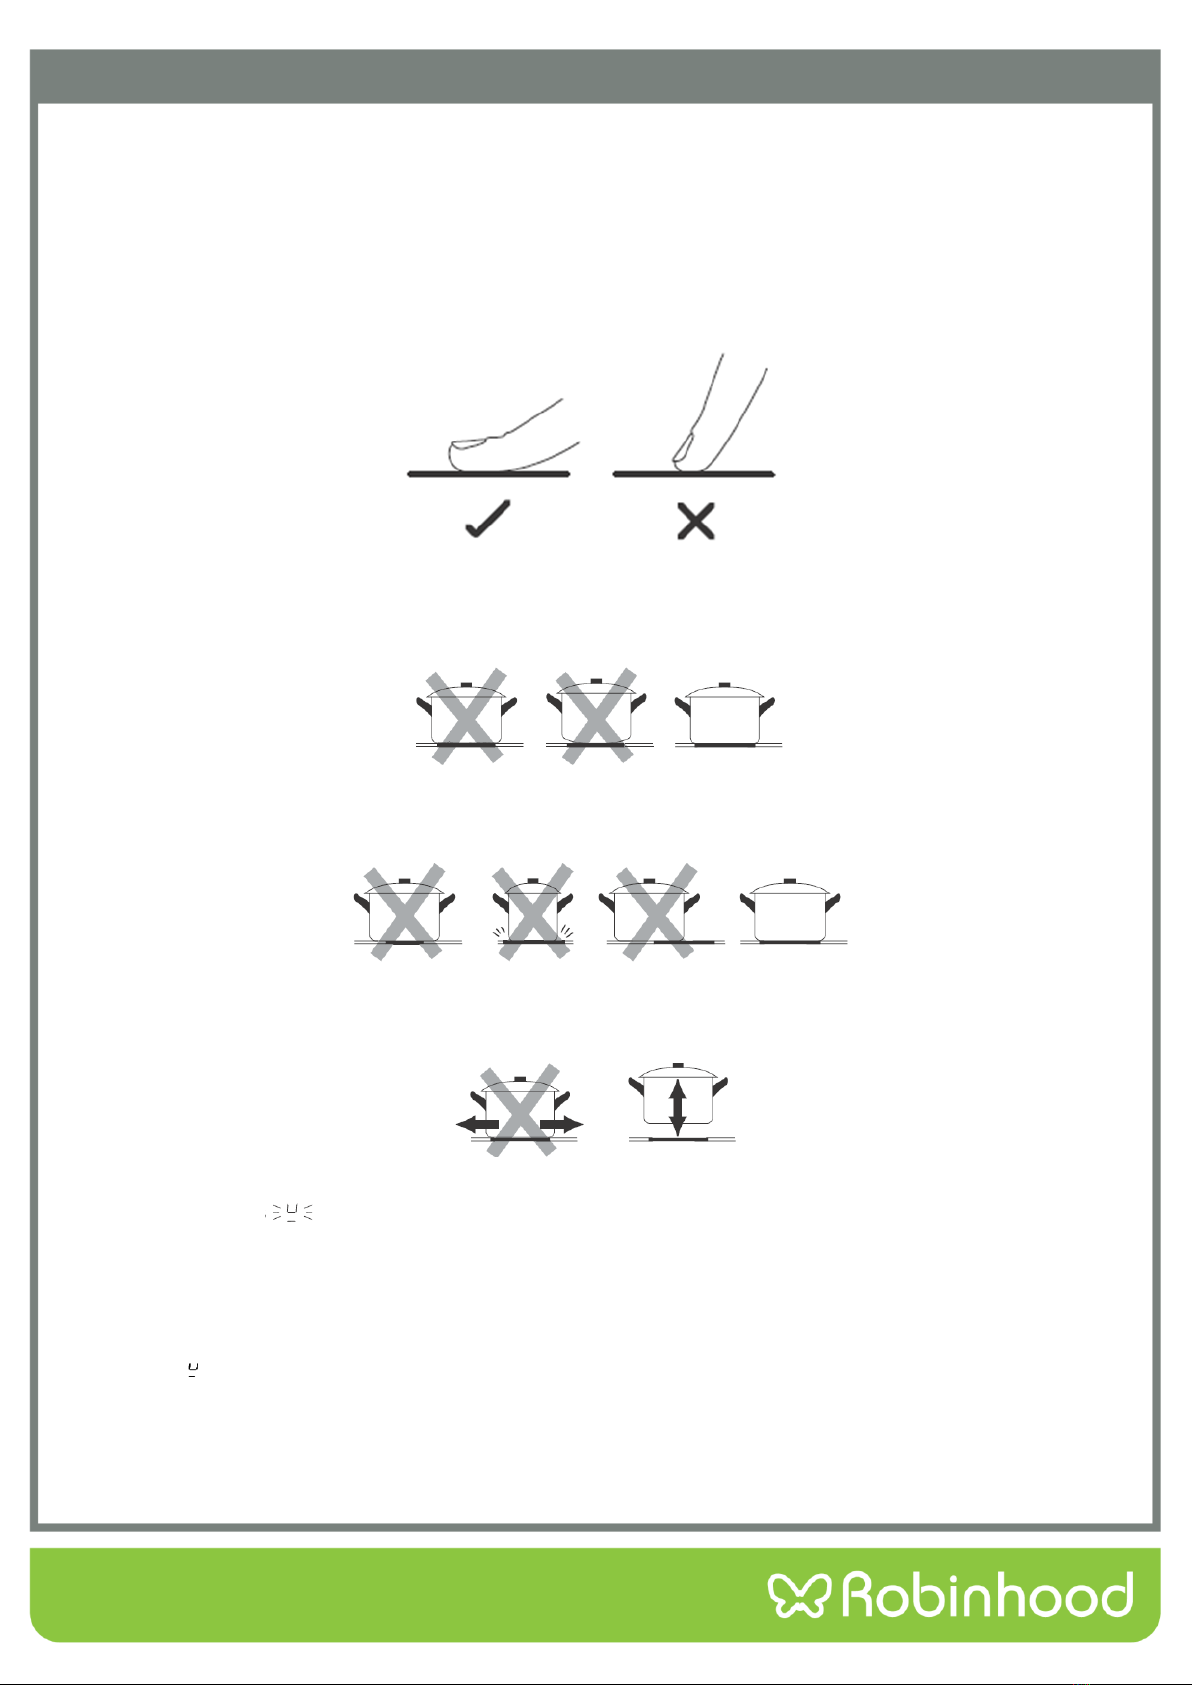
•Metallic objects such as knives, forks, spoons and lids should not be placed in the hob surface since they can
get hot.
•The appliance may be built-in and connected to the power supply only by a qualified technician. Particular
areas of the cooktop surface (adjacent to the hotplates) are hot during operation.
•Hot oil ignites readily, so be sure have the preparation of such food (fries) under constant control. Hotplates
may not be left in operation empty, without any dishes on top.
•Never use the appliance as a room heater.
•Never use the ceramic-glass cooktop as a working surface. Sharp objects may damage the cooktop surface.
•Never place any metal objects upon the induction hotplate, such as knives, forks, spoons, pot lids, and the
like, as they may get very hot.
•Preparation of food in aluminum or plastic cookware is not allowed. Never place any plastic objects or
aluminum foil upon the cooktop surface.
•In case any other appliances are plugged in the electric mains close to the cooktop, prevent contact of the
plug cable with the hot cooking zones.
•Never keep any flammable or temperature sensitive objects, like cleaning agents, sprays, detergents, etc.,
below or near the appliance.
•WARNING: If the surface is cracked, switch off the appliance to avoid the possibility of an electric shock.
Never use cracked or broken ceramic-glass cooktop. In case you notice any visible cracks on the surface, cut
the power supply immediately and contact Customer Service.
•In case of any malfunction, disconnect the appliance from the power supply and call customer service.
•Do not use high-pressure steam cleaner or hot steam to clean the appliance.
•The appliance is manufactured in compliance with the relevant safety standards.
•If the electrical supply is restricted, means of an all-plug disconnection must be accessible and incorporated
in the fixed wiring, in accordance with the wiring rules.

2
Installation Warnings
•The appliance must be installed by a qualified person in accordance with local and national building
regulations.
•Panels and furniture lining of the kitchen cabinet receiving the cooktop must be treated with temperature
resistant adhesives 80°C (otherwise they may become discolored or deformed due to inadequate
temperature resistance).
•The cooktop is intended for installation into a benchtop above a kitchen cabinet of min 600mm width or
more.
•The distance between the cooking surface of the cooktop and any cabinets or rangehoods above must be no
less than 650mm. Take note that the instruction manual for the rangehood may specify a different minimum
distance. If so, the greater distance must be used.
•The use of hard wood decorative borders around the worktop behind the appliance is allowed, in case the
minimum distance remains as indicated on the installation illustrations.
•Minimum distance between the built-in cooktop and rear wall is indicated at the illustration for the
installation of the built- in cooktop.
•Induction cooktop may be installed into benchtop between 25mm to 40mm thick.
•Kitchen cabinet must not have a drawer directly below cooktop. It must be fitted with a horizontal board at
least 30mm away from the cooktop bottom surface. Space between the plate and the cooktop must be
empty and no objects may be stored or kept there. The board should be removable (access during
maintenance) and comply with the ventilation requirements in this manual.
•The rear side of the kitchen element must also have a 50mm high opening along the entire width of the
element, and the front part must have an opening of no less than 10mm.
•Incorporation of the oven under the induction cooktop is permissible for ovens equipped with a cooling fan.
Do not install the appliance above a dishwasher or refrigerator.

3
Installation
Built-in induction cooktop cutout dimensions
Cut out the work surface according to the sizes shown in the image below.
Ensure that there is a minimum of 50mm of space around the cutout.
The thickness of the bench should be at least 30mm. Please select heat-resistant and insulated bench materials
(Wood and similar fibrous or hygroscopic materials should not be used as the bench material unless impregnated) to
avoid the electrical shock and larger deformation caused by heat radiation from the hotplate.
Note: The safety distance between the sides of the hob and the inner surfaces of the worktop should be at least
3mm.
Important: Ensure that the cooktop is well ventilated and that the air inlet and outlet are not blocked.
B(mm)
C(mm)
D
E
50 min.
20 min.
Air inlet
Air outlet (5mm)
To avoid accidentally touching the hot underside of the cooktop, or getting an unexpected electric shock, it is
necessary to put a wooden insert, fixed by screws, at a minimum distance of 50mm from the bottom of the cooktop.
HIC604TFG
L (mm)
590
W (mm)
520
H (mm)
62
D (mm)
58
A (mm)
561-564
B (mm)
491-494
X (mm)
50 (min)
F (mm)
3 (min)

4
Installation
Note:
There are ventilation holes around outside of the cooktop. Ensure that these holes are not blocked by the bench
when you install the cooktop.
Be aware that any glue used on the bench must be resistant to a minimum temperature of 150°C.
The rear wall, adjacent and surrounding surfaces must therefore be able to withstand a temperature of 90°C.
Before locating the fixing brackets
The unit should be placed on a stable, smooth surface (use the packaging). Do not apply force onto the controls
protruding from the hob.
Fix the hob to the bench by screwing the four brackets to the bottom of the cooktop (see image) after installation.
Note: The brackets should not touch the bench after installation (see image above).

5
Appliance details
General Information
Before installing and operating the cooktop, carefully read the following important information regarding installation
safety and maintenance. Keep this information booklet accessible for further consultations.
Specifications
Model
HIC604TFG
Cooking Zones
4 Zones
Supply Voltage
220-240V~ 50 Hz
Rated Power
7200W
Product Size D×W×H
(mm)
590X520X62
Top View
1. Max. 1300/1500W Zone
4. Max. 1800/2000W Zone
2. Max. 2300/2600W Zone
5. Glass plate
3. Max. 1800/2000W Zone
6. Control panel
Control Panel
1. ON / OFF control
2. Timer control
3. Boost
4. Heating zone selection controls
5. Power / Timer regulating key
6. Key lock control
2
1
3
5
4
6
3
2
4
5
6
1

6
Electrical connection
LOCAL AUTHORITY REQUIREMENTS
Installation is only permitted by a licensed electrician and carried out according to
instructions provided by the manufacturer. Incorrect installation might cause harm
and damage, for which the manufacturer accepts no responsibility.
Electrical Installation
Before carrying out the connection to the power supply, the voltage rating of the appliance (stamped on the
appliance identification plate) must be checked for correspondence to the available mains supply voltage, and the
mains electric wiring should be capable of handling the oven’s power rating (also indicated on the identification
plate). If you have any doubts, call in a qualified technician.
NOTE: For connections to the mains power supply, never use adapters, reductions or multiple power points as these
may overheat and catch fire. Do not install separate timers.
After having installed the appliance, the switched outlet must always be in an accessible position. The electrical
safety of this appliance can only be guaranteed if the cooktop is correctly and efficiently earthed, always ensure that
the earthing is efficient; if you have any doubts call in a licensed electrician to check the system. The manufacturer
declines all responsibility for damage resulting from an installation which has not been correctly earthed.
WARNING: If any damage occurs to the power cable during or after installation, it must be replaced immediately by
a licensed electrician with a replacement cable from your Service Centre.
The cooktops are to be connected to a single phase 220-240Vac 50 Hz supply.
The appliance is designed for fixed connection to the mains. Means for disconnection with a suitable - isolating
switch must be incorporated in the fixed wiring in accordance with the wiring rules. The power supply cord must not
touch against any hot surfaces and must be placed so that its temperature does not exceed 75 °C at any point along
its length.
Wire cross-sectional
area
Connection mode
L
N
PE
Single phase 1N~
Minimum 2.5mm
Minimum 2.5mm
Minimum 2.5mm

7
Operating Instructions
Touch Controls
•The controls respond to touch, so you do not need to apply any pressure.
•Use the pad of your finger, not the tip.
•You will hear a beep each time a touch is registered.
•Make sure the controls are always clean, dry, and that there are no objects (e.g., a utensil or a cloth)
covering them. Even a thin film of water may make the controls difficult to operate.
Choosing the Right Cookware
Do not use cookware with jagged edges or a curved base.
Make sure that the base of your pan is smooth, sits flat against the glass, and is the same size as the cooking zone.
Always centre your pan on the cooking zone.
Always lift pans off the cooktop –do not slide, or they may scratch the glass.
If the display flashes alternately with the heat setting
This means that:
•you have not placed a pan on the correct cooking zone or,
•the pan you’re using is not suitable for induction cooking or,
•the pan is too small or not properly centered on the cooking zone.
No heating takes place unless there is a suitable pan on the cooking zone.
The display “ ”will automatically disappear after 1 minute if no suitable pan is placed on it.

8
Operating Instructions
Using the Cooktop
When the power is connected you will hear a beep and all the lights will come on for one second and then go out.
This indicates that the cooktop has entered standby mode.
Turn the cooktop on by touching the On / Off control. All
indicators will show “-“.
Place a suitable pan on the cooking zone that you wish to use.
Make sure that the bottom of the pan and the surface of the
cooking zone are clean and dry.
Touching the heating zone selection control
Touching the control B for boost function, the indicator will show
“P” for selected zone. To cancel boost function, touch control B or
touch“-“.
Select a heat setting by touching the “+” or “-” control. You can
modify the heat setting at any time during cooking. By holding
down either of these controls, the value will adjust up or down.
Note: If you don’t choose a heat setting within one minute, the
cooktop will automatically switch off.
Turn the cooking zone off by scrolling down to “0” or touching the
“+” and “-” buttons together.
Turn the whole cooktop off by touching the On/Off button.
Beware of hot surfaces
“H” will indicate which cooking zone is hot to touch. It will disappear when the surface has
cooled down to a safe temperature.

9
Operating Instructions
Safety Lock
The controls can be locked to prevent accidental use and to protect children. When the controls are locked, all
buttons except for the On/Off button are disabled.
To lock the controls, press the lock button. The timer indicator will display “Lo”.
To unlock the controls, press and hold the lock button while the cooktop is turned on.
Using the Timer
The timer can be used in two different ways:
You can use it as an alarm. In this case it will not turn any cooking zones off.
You can use it to automatically turn off a cooking zone after the timer has finished.
The timer can be set to a maximum of 99 minutes.
Using the Timer as an Alarm
Adjust the timer with the “+” and “-“ buttons. The timer display will start
flashing.
When the time is set, the timer will begin counting down immediately. The
display will show the remaining time and the timer indicator will flash for
five seconds.
To cancel the timer, hold the “+” and “-“ buttons together. The display will
change to “--“.
Once the timer has elapsed, the buzzer will sound for 30 seconds. The
display will change to “--“.
Hint:
Touch the “+” or “-“ buttons once to change the timer by one minute.
Touch and hold the “+” or “-“ buttons to change the timer by ten minutes.
If the setting exceeds 99 minutes, the timer will automatically return to 0 minutes.

10
Operating Instructions
Setting the Timer to turn one or more Cooking Zones Off
Touch the “+” or “-“ control of the cooking zone you wish to set the timer
for.
Set the timer as described on the previous page.
A red dot next to the power level for the corresponding cooking zone will
illuminate to indicate that the timer has been set for it.
When the timer has elapsed the corresponding cooking zone will switch off
automatically. The cooking zone display will show “H” which means that it is
still hot.
Note: If you wish to change the timer once it has been set, you need to start from the beginning.
Multiple Timers
If more than one cooking zone is using the automatic timer function, the timer display will show the shortest time
remaining. The red dot n next to the power indicator will flash to show to currently displayed timer.
When the shortest timer has elapsed, the corresponding the display will show the next shortest time.
Over-Temperature Protection
This cooktop is equipped with a temperature sensor which can detect when the cooktop is at an excessive heat. If
this happens, the sensor will automatically switch off a cooking zone.
Residual Heat Warning
When a cooking zone is switched off but still hot, its display will show “H” to indicate that it is still hot.
Default Working Times
If you forget to turn off a cooking zone, there is an automatic shut off safety feature that will automatically turn the
cooking zone off after a period. See the table below for the working times.
Power level
1
2
3
4
5
6
7
8
9
Default working timer (hour)
8
8
8
4
4
4
2
2
2

11
Cleaning and Maintenance
Cleaning
Problem
Resolution
Important
Everyday soiling on
glass (fingerprints,
marks, stains left by
food or non-sugary
spillovers on the glass)
1. Switch the power to the cooktop
off.
2. Apply a cooktop cleaner while the
glass is still warm (but not hot!)
3. Rinse and wipe dry with a clean
cloth or paper towel.
4. Switch the power to the cooktop
back on.
•When the power to the cooktop is
switched off, there will be no ‘hot
surface’ indication, but the cooking
zone may still be hot! Take extreme
care.
•Heavy-duty scourers, some nylon
scourers and harsh/abrasive cleaning
agents may scratch the glass. Always
read the label to check if your cleaner
or scourer is suitable.
•Never leave cleaning residue on the
cooktop: the glass may become
stained.
Boil-overs, melts, and
hot sugary spills on the
glass
Remove these immediately with a fish
slice, palette knife or razor blade
scraper suitable for glass cooktops, but
beware of hot cooking zone surfaces:
1. Switch the power to the cooktop
off at the wall.
2. Hold the blade or utensil at a 30°
angle and scrape the soiling or
spill to a cool area of the cooktop.
3. Clean the soiling or spill up with a
dish cloth or paper towel.
4. Follow steps 2 to 4 for ‘Everyday
soiling on glass’ above.
•Remove stains left by melts and
sugary food or spillovers as soon as
possible. If left to cool on the glass,
they may be difficult to remove or
even permanently damage the glass
surface.
•Cut hazard: when the safety cover is
retracted, the blade in a scraper is
razor-sharp. Use with extreme care
and always store safely and out of
reach of children.
Spillovers on the touch
controls
1. Switch the power to the cooktop
off.
2. Soak up the spill
3. Wipe the touch control area with a
clean damp sponge or cloth.
4. Wipe the area completely dry with
a paper towel.
5. Switch the power to the cooktop
back on.
•The cooktop may beep and turn itself
off, and the touch controls may not
function while there is liquid on them.
Make sure you wipe the touch control
area dry before turning the cooktop
back on.

12
Cleaning and Maintenance
Troubleshooting
Problem
Possible causes
What to do
The cooktop cannot be
turned on.
No power.
Make sure the cooktop is connected to the
power supply and that it is switched on.
Check whether there is a power outage in
your home or area. If you’ve checked
everything and the problem persists, call a
qualified technician.
The touch controls are
unresponsive.
The controls are locked.
Unlock the controls. See section ‘Operating
Instructions’ for instructions.
The touch controls are
difficult to operate.
There may be a slight film of
water over the controls, or you
may be using the tip of your
finger when touching the
controls.
Make sure the touch control area is dry and
use the ball of your finger when touching the
controls.
The glass is being
scratched.
•Rough-edged cookware.
•Unsuitable, abrasive scourer
or cleaning products being
used.
Use cookware with flat and smooth bases.
See ‘Choosing the Right Cookware’.
Some pans make
crackling or clicking
noises.
This may be caused by the
construction of your cookware
(layers of different metals
contracting and expanding
differently).
This is normal for cookware and does not
indicate a fault.
The induction hob
makes a low
humming noise
when used on
a high heat setting.
This is caused by the
technology of induction
cooking.
This is normal, but the noise should
quieten down or disappear completely
when you decrease the heat setting.
Fan noise coming
from the induction
hob.
A cooling fan built into your
induction hob has come on
to prevent the electronics
from overheating. It may
continue to run even after
you’ve turned the
induction
hob off.
This is normal and needs no action. Do
not switch the power to the induction
hob off at the wall while the fan is
running.
Pans do not become
hot and appears in
the display.
The induction hob cannot
detect the pan because it is
not suitable for induction
cooking.
The induction hob cannot
detect the pan because it is
too small for the cooking
zone or not properly
centered
on it.
Use cookware suitable for induction
cooking. See section ‘Choosing the right
cookware’.
Centre the pan and make sure that its
base matches the size of the cooking
zone.

13
Warranty Certificate (New Zealand)
Terms and Conditions
The following conditions apply in respect of the warranty given in this certificate:
1. Monaco Corporation Limited (“Monaco”) warrants the following Robinhood products against manufacturing defects and
faulty materials, under normal use and subject to the exclusions in this certificate, for a period of:
•Rangehood, Ovens, Cooktops, Dishwashers, Refrigeration - 24 months from date of original purchase for domestic
use.
•Uniduct –12 months from date of original purchase for domestic use.
•Ironing centre –12 months from date of original purchase for domestic use.
•Sinks sets–5 years on stainless steel sink including draining bench from date of original purchase for domestic use, 6
months on all stainless steel accessories, including wire rack, colander and tray from date of original purchase for
domestic use.
•Laundry Tub - 5 years on stainless bowl, 24 months on Tap, Cabinet and other components from the date of original
purchase for domestic use.
“Original purchase”, when used in this certificate, means purchase by the customer directly from Monaco or one of its approved
suppliers.
2. This warranty is limited to the repair or replacement, at our option, within the warranty period of any component part
which we at our discretion determine to contain faulty materials or a manufacturing defect in breach of this warranty. This
warranty is subject to terms and conditions set out in this certificate.
3. The warranty only applies within New Zealand.
4. The customer must produce the original invoice or other purchase documentation as proof of the original purchase date.
Warranty exclusions
1. The warranty does not apply where, in Monaco’s opinion:
•The defect is caused by misuse, wear and tear, dirt, fire or accidental damage. The product has been repaired or
serviced by an unauthorised person.
•The product was not installed in accordance with our instructions.
•The product was purchased overseas or was not designed for use in New Zealand. The product was not used, cleaned
or cared for in accordance with our instructions.
•The product was used outdoors.
2. In addition, this warranty does not extend to damage or defects which in our opinion, directly or indirectly arise from or
are due to:
•Exposing the product to acidic or corrosive materials or chemicals such as dyes, solvents, denture cleaner or acetone;
Using inappropriate household cleaning products such as abrasive cream or powder cleansers, furniture polish,
bleach, mentholated spirits, drain cleaners, sugar soap, metal pads and strongly alkaline or acidic cleaners;
•Heat damage, including from washing the product at high temperatures;
•Impact or mishandling the product, including the impact caused by objects scraped along, thrown or dropped on the
product surface or excessive weight being placed on the product;
•Structural or support changes in or affecting the building or the application where the product has been installed;
•Failure to clean or maintain the product as recommended; or any other causes specified in the product information as
being excluded from this warranty.
3. Variations with the colour or gloss within the product or any ageing or fading of colour, shine or gloss level over time are
not covered by this warranty. The warranty does not cover visual imperfections or blemishes in the surface and edges of
the product that were not brought to your supplier’s attention at the time you inspected the product.
4. Costs incurred on installation or removal of a product, or any reinstallation of a product, or any associated costs, are not
covered by this warranty.
5. Monaco will not be liable for consequential or indirect loss or damage whatsoever and however arising out of or in
connection with the supply, performance or removal of the product, including (but not limited to) loss of profit, loss of
revenue, loss of contract, loss of goodwill or increased cost of workings, even if due to the negligence of Monaco or any of
its approved suppliers, employees or agents.
6. Charcoal filters and light bulbs are not covered by this warranty
7. This warranty and the statements contained in this certificate or other documents given to you do not exclude, restrict or
modify the application of any term implied into this warranty by statute, provided that (to the extent any statutory
provision permits Monaco to limit its liability for a breach of an implied condition or warranty) Monaco’s liability for such
breach is limited to the payment of the cost of replacing the product, repairing the product or acquiring an equivalent
product.
8. Subject to clause 5, our obligations under this warranty are limited to those set out in this certificate, and this warranty is
expressly instead of all other warranties, express or implied, including any implied warranty of merchantability or fitness
for a particular purpose and notwithstanding any course of dealing between the parties or custom and usage in trade to
the contrary.
Terms and conditions are subject to change.

14
Warranty Certificate (Australia)
Terms and Conditions
If you are a consumer under the Australian Consumer Law, our goods come with guarantees that cannot be excluded under the Australian
Consumer Law. You are entitled to a replacement or refund for a major failure and for compensation for any other reasonably foreseeable
loss or damage. You are also entitled to have the goods repaired or replaced if the goods fail to be of acceptable quality and the failure does
not amount to a major failure.
1. Shriro Australia Pty Limited (“Shriro”) also warrants the following Robinhood products against manufacturing defects and faulty
materials, under normal use and subject to the exclusions in this certificate, for a period of:
•Rangehood, Ovens, Cooktops, Dishwashers, Refrigeration - 24 months from date of original purchase for domestic use.
•Uniduct –12 months from date of original purchase for domestic use.
•Ironing centre –12 months from date of original purchase for domestic use.
•Sinks sets–5 years on stainless steel sink including draining bench from date of original purchase for domestic use, 6 months
on all stainless steel accessories, including wire rack, colander and tray from date of original purchase for domestic use.
•Laundry Tub - 5 years on stainless bowl, 24 months on Tap, Cabinet and other components from the date of original
purchase for domestic use. “Original purchase”, when used in this certificate, means purchase by the customer directly from
Shriro or one of its approved suppliers.
2. This warranty is limited to the repair or replacement, at our option, within the warranty period of any component part which we at
our discretion determine to contain faulty materials or a manufacturing defect in breach of this warranty. This warranty is subject
to terms and conditions set out in this certificate.
3. The warranty only applies within Australia.
4. For warranty service outside of capital city metropolitan area or 30 km from nearest authorised service agent you will be liable for
reasonable travelling expenses and the cost of transport of the product or parts to and from the service agent
5. To make a claim under this warranty, you must produce the original invoice or other purchase documentation as proof of the
original purchase date. You must send your claim to Shriro Australia Pty Limited, 104 Vanessa Street, Kingsgrove, NSW, 2208,
within 7 days of any alleged defect or failure of the product first becoming apparent. You are responsible for the expense of
making a claim under this warranty.
This warranty is given by:
Shriro Australia Pty Ltd, ABN: 28 002 386 129
Telephone: 1800 648 556
Facsimile: 1800 628 577
www.robinhood.com.au
Attention: Customer Services Manager
Warranty exclusions
1. The warranty does not apply where, in Shriro’s opinion:
•The defect is caused by misuse, wear and tear, dirt, fire or accidental damage. The product has been repaired or serviced by
an unauthorised person.
•The product was not installed in accordance with our instructions.
•The product was purchased overseas or was not designed for use in Australia.
•The product was not used, cleaned or cared for in accordance with our instructions.
•The product was used outdoors.
2. All Robinhood Rangehoods are suitable for indoor use only and not suitable over BBQs or charcoal cookers designed for outdoor
use.
3. In addition, this warranty does not extend to damage or defects which in our opinion, directly or indirectly arise from or are due
to: exposing the product to acidic or corrosive materials or chemicals such as dyes, solvents, denture cleaner or acetone; using
inappropriate household cleaning products such as abrasive cream or powder cleansers, furniture polish, bleach, mentholated
spirits, drain cleaners, sugar soap, metal pads and strongly alkaline or acidic cleaners; heat damage, including from washing the
product at high temperatures; impact or mishandling the product, including the impact caused by objects scraped along, thrown
or dropped on the product surface or excessive weight being placed on the product; structural or support changes in or affecting
the building or the application where the product has been installed; failure to clean or maintain the product as recommended; or
any other causes specified in the product information as being excluded from this warranty.
4. Variations with the colour or gloss within the product or any ageing or fading of colour, shine or gloss level over time are not
covered by this warranty. The warranty does not cover visual imperfections or blemishes in the surface and edges of the product
that were not brought to your supplier’s attention at the time you inspected the product.
5. We will not be responsible under this warranty for, nor pay the costs of, removing the existing product, or reinstalling the new
product, or any associated costs or damages.
6. Charcoal filters and light bulbs are not covered by this warranty.
The benefits given by this warranty are in addition to other rights and remedies of consumers under any law in relation to the goods which
cannot be excluded.
This warranty certificate is not intended to create a contract between Shriro Australia Pty Limited and the purchaser.
New Zealand
Monaco Corporation Ltd
Telephone: (09) 415 6000
Facsimile: (09) 415 7400
www.robinhood.co.nz
Australia
Shriro Australia Pty Ltd
ABN 28 002 386 129
Telephone: 1800 648 556
Facsimile: 1800 628 577
www.robinhood.com.au
IM Ref: HIC604TFG IM v4 06/04/2021
Table of contents
Other ROBINHOOD Cooktop manuals

ROBINHOOD
ROBINHOOD HEE604TFG User manual

ROBINHOOD
ROBINHOOD HEF302TCOM User manual

ROBINHOOD
ROBINHOOD HEA604TFG User manual

ROBINHOOD
ROBINHOOD HGA604FKSS User manual

ROBINHOOD
ROBINHOOD HEC604KX User manual

ROBINHOOD
ROBINHOOD HEAB604FKG User manual

ROBINHOOD
ROBINHOOD HEF604TCOM User manual

ROBINHOOD
ROBINHOOD HEC Series User manual

ROBINHOOD
ROBINHOOD HIA905TFG User manual

ROBINHOOD
ROBINHOOD HEA905TFG User manual