Robinson Willey FIREGEM VISA 2 Operation instructions

ContactDetails
Pleasenotethatsomeofthecontactdetailson
thisPDFdocumentmaynotbecurrent.
Pleaseusethefollowingdetailsifyouneedto
contactus:
Telephone:08448793588
Email:[email protected]
TheHelpCentresectionofthiswebsitealsofeaturesawiderange
ofinformationwhichmaybeofusetoyouandisavailable24
hoursaday.Itincludes:
•Manualsandguidesdownloads
•Servicing
•Wheretobuyourproducts
•Literaturedownloads
www.robinsonwilley.co.uk/help
A division of GDC Group Ltd
Millbrook House Grange Drive Hedge End Southampton SO30 2DF
www.robinsonwilley.co.uk
Re
g
istered No: 1313016 En
g
land
VAT GB 287 1315 50004
EEE Producer Registration Number –
WEE/GE0057TS
Paper from sustainable sources
1USER
Users Operating Instructions
THIS LEAFLET IS INTENDED TO HELP YOU UNDERSTAND AND USE YOUR NEW FIRE EFFICIENTLY.
PLEASE READ THESE INSTRUCTIONS BEFORE USING THE FIRE AND KEEP FOR FUTURE REFERENCE.
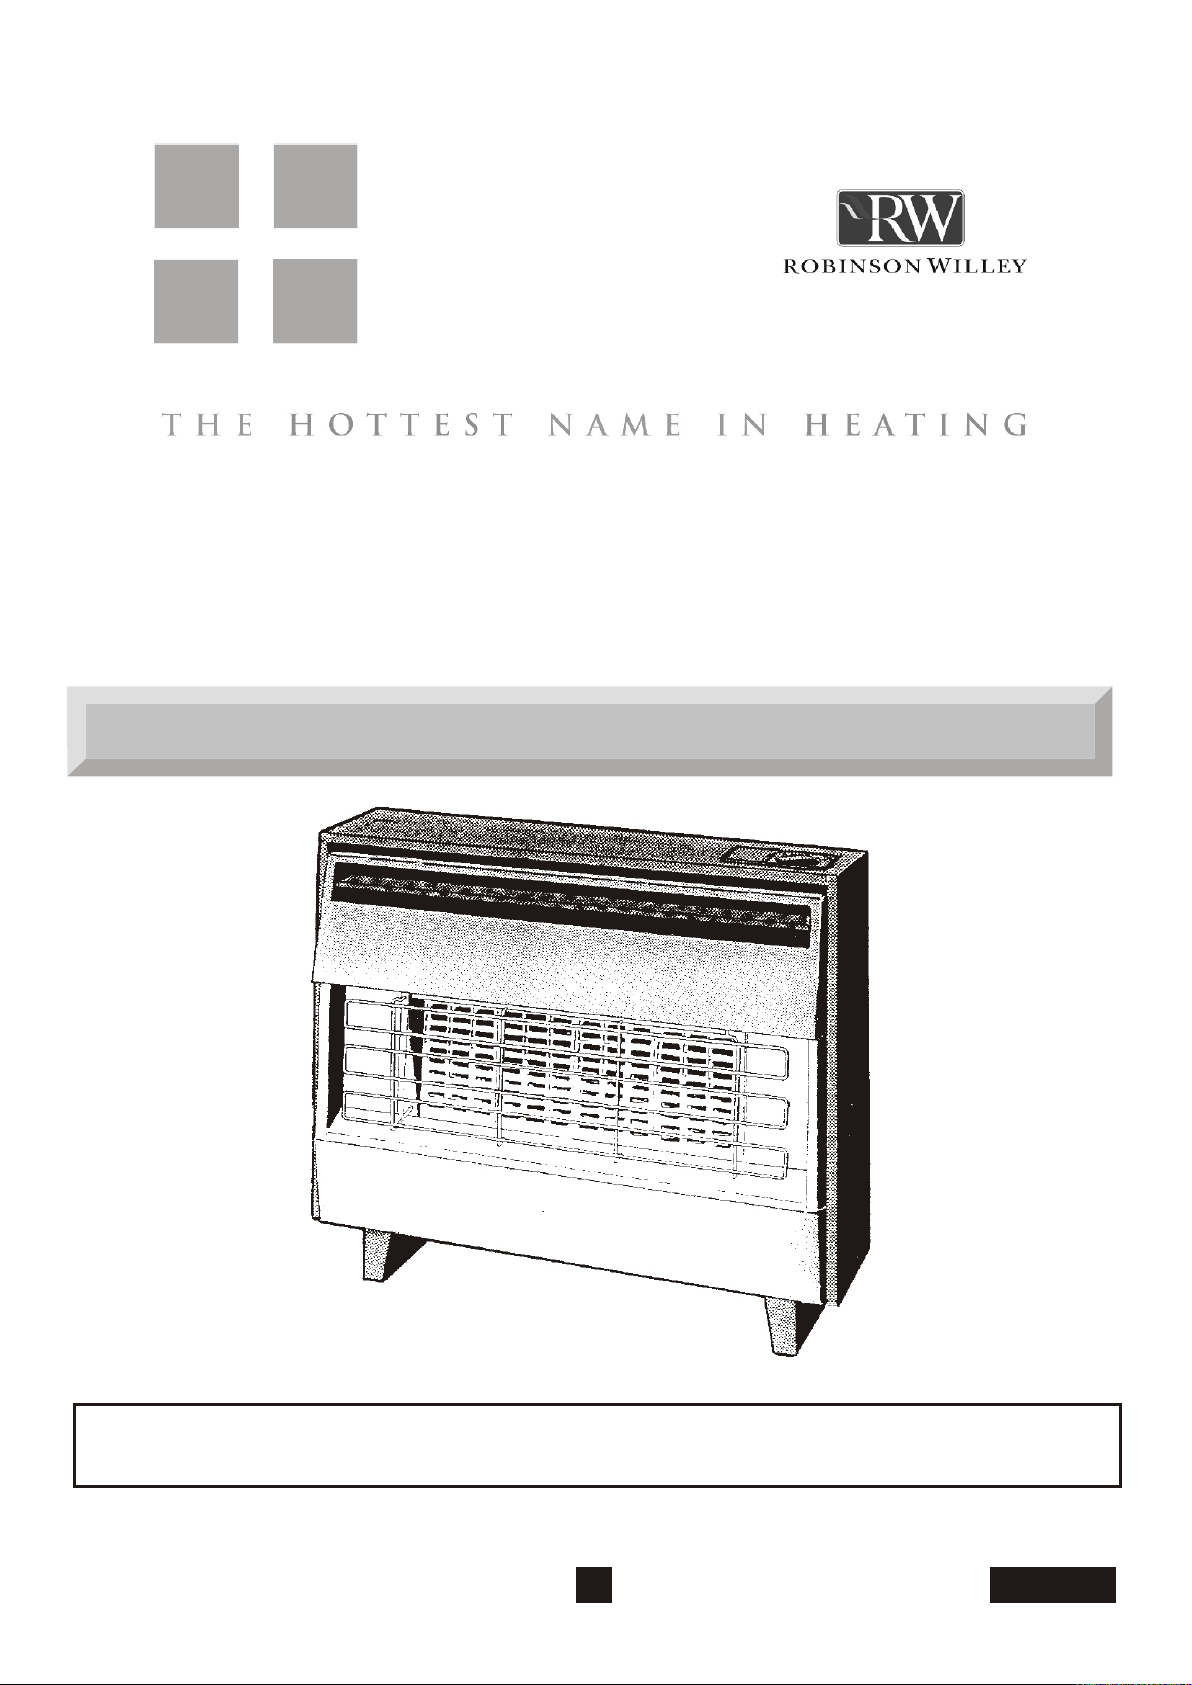
FIREGEM VISA 2
with SAFEGUARD
AND FIREGEM VISA 2 DELUXE
with SAFEGUARD

INTRODUCTION
This fire is for use on Natural Gas only and MUST NOT be used on any other gas.
This appliance must be installed and serviced in accordance with the relevant Codes of Practice and the Gas Safety (Installation
and Use) Regulations and the rules in force, by a competent person (i.e. a GAS SAFE registered engineer) . Where solid fuel has
been used the chimney must be swept before the fire is installed.
NOTE
After the fire has been installed, you may wish to fix a shelf of combustible material above it. This is quite acceptable, provided you
use a shelf of not more than 150mm (6in) from front to back, and that you keep a gap of at least 114mm (4.5in) between the top of
the fire and the underside of the shelf. The above dimension of 114mm (4.5in) applies also in the case of an non-combustible shelf
to allow access to the tap handle.
Ensure that permanent objects are no closer to the fire sides than 3mm (1/8in).
When the fire is first used, a slight smell may be given off, but this will soon clear.
The fire MUST NOT be placed directly on a carpet or combustible material when floor mounted. When the fire is fitted on the wall
the bottom of the case MUST be 150mm (6in) above the floor, carpet or other combustible materials.
Do not obstruct the convected air outlet by putting clothes etc. on top of the fire. When fitting any heating appliance or
wallpapering a room in which one is fitted, if blown vinyl or sensitive wallpapers are used in the vicinity of the heat source then
they may become discoloured.
The guard fitted to this fire conforms to the requirements of BS 1945 : 1991 and satisfies the Heating Appliance (Fireguards)
(Safety) Regulations 1991 and is designed to prevent risk of fire or injury from burns. It should not be permanently removed.
IT DOES NOT GIVE FULL PROTECTION FOR YOUNG CHILDREN, THE ELDERLY OR THE INFIRM.
A fireguard conforming to B.S. 8423 (Fireguards for heating appliances for domestic use) should be used for the protection of
children, the elderly or the infirm. Such a guard is also recommended for pet animals.
NOTE: A ‘Control Knob Adaptor’ to assist with the operation of the fire is included, if required. Keep it for possible future use.
WARNING
If the flames are found to be extinguished and the control knob is NOT in the OFF position, the control knob must be turned to
OFF and no attempt should be made to relight the gas until at least 3 minutes have elapsed.
The fire is fitted with a flame supervision and Oxygen depletion device. This will shut the fire off if the pilot goes out for any reason.
This may be caused by the Oxygen level in the room falling below a prescribed level due to a poor flue pull etc. If the fire keeps
going out you must have it checked by a competent person (i.e. a GAS SAFE registered engineer) .
The pilot burns at all settings, giving a localised extra glow to the left of the centre right hand radiant. This localised glow will be
more visible at the lower settings, and is quite normal.
DRESSGUARD
TO LIGHT THE FIRE
2
Push in the control knob and turn it anti-clockwise from the
OFF position towards pilot until you feel some
resistance. With the knob still pushed in, pause for one to
two seconds and then continue to turn to pilot . The
piezo operates and two ‘clicks’ will be heard and the pilot
lights. Keep the control knob pushed in for a further 10
seconds before releasing. The pilot should remain lit.
If the pilot did not light or failed to remain alight, push in
the control knob slightly and turn clockwise to the OFF
position and repeat the lighting procedure.
Turn the control knob anticlockwise from OFF to Pilot
position. Push in knob, sparks will be heard and the pilot
will light. When the pilot is lit, keep the knob pushed in for
a further 10 seconds before releasing. The pilot should
remain lit.
If the pilot did not light or failed to remain lit, wait a few
seconds and repeat the lighting procedure.
Piezo Spark Ignition (2 clicks) Battery Spark Ignition
3
Push in the control knob slightly and turn it clockwise to the OFF position.
Depressing and rotating the knob clockwise from the full-on position brings you firstly to the 3 position. At this setting the centre
two radiants are bright and the outer two radiants are on low. The two outer radiants are extinguished by turning the tap knob to
the halfway 2 position. This position gives approximately half the full heat of the fire. Rotating the knob further in a clockwise
direction brings you to the 1 position. This gives you about 1/4 of the full heat of the fire and is the most economical setting.
(A) FRONT PANEL: The front panel is a one piece assembly and can be removed very easily. This is done by lifting the front panel
upwards to clear the lower support pins and then pulling outwards and downwards from the fire. When replacing care must be
taken to ensure that the top slots are correctly engaged before sliding the panel upwards and back into position on the lower
support pins.
N.B.: The four pins that support the front panel are fitted in the front of the slots in the metal case.
(b) RADIANT CHANGING: Before changing the radiant ensure that the fire is cold. Remove the front panel as described above.
The radiant is then removed by lifting upwards and outwards. When replacing the radiant ensure that the bottom of the radiant
is seated down and behind the raised front edge The makers part number for the radiant is 995 971 and the G.C. number is
154 371.
(c) REPLACING BATTERY (Electronic ignition): Remove front panel (a) above. Remove battery and replace with a new one.
Do not attempt to clean the heater while it is warm. Generally cleaning can be done with a damp soapy cloth followed by polishing
with a soft cloth.
Abrasive cleaners should never be used. The teak or rosewood effect of the Firegem Visa 2 Deluxe should be wiped with a damp
cloth only. Do not apply furniture polish to this case.
TO TURN OFF
LIGHTING WITH A MATCH OR TAPER
ECONOMY USE
CLEANING
SIMPLE MAINTENANCE
CONTROL KNOB RADIANT PICTURE
SETTING
1 Centre 2 radiants on low
2 Centre 2 radiants on full
3 Centre 2 radiants on full, outer 2 on low
4 All 4 radiants on full
NOTE
The control knob should be pushed in slightly
before turning and always set to one of the stated
positions. Turn the control knob to the desired
setting.
Note also that lighting instructions are provided
inside the lift up flap of the bezel on the top right
side of the fire.
Piezo Spark Ignition (2 clicks)
Ignition is via a piezo electric spark generator and is energised
during operation of the tap. It does not need batteries or an
external electrical supply.
The gas can be lit with a match if necessary. First, remove the
front panel (see (a) below) then light the match and place near
the pilot, and then turn the gas tap to the pilot position, press
down and light the pilot. Hold down for a further 10 seconds
before releasing, the pilot should still remain lit. Replace the front
panel before turning the gas tap knob to a higher position.
Battery Spark Ignition
Ignition is by an electronic spark generator powered by a
PP3 battery and operates to light the pilot. In the event of
failure of the electronic spark due to low battery etc. the fire
can be lit with a match or taper.
First remove the front panel (see (a) below). Light the match
or taper, place it near the pilot, turn the knob to the PILOT
position and press down to light the pilot. Keep the knob
pushed in for 10 seconds before releasing. The pilot should
remain lit.
Replace the front panel before turning the control knob to a
higher position.

For spares and service apply to your Local Supplier or Installer, stating that the appliance is a Firegem Visa 2 (or Visa 2 Deluxe)
with Safeguard and quoting the serial number of the badge located on the left inside of the fire. This badge can be seen by
removing the front panel. Also inform them if your fire has battery spark ignition fitted.
ADVANTAGE SHOULD BE TAKEN OF REGULAR SERVICING/INSPECTION FOR GAS APPLIANCES (i.e. once a year), BY A GAS
SAFE REGISTERED ENGINEER, TO ENSURE CONTINUED AND SAFE OPERATION.
If any "Home Improvements" are made to the dwelling in which a gas appliance is fitted, e.g. the fitting of an extractor fan, draught
proofing or double glazing, then the air supply to and the flueing of the appliance must be re-checked by a competent person (i.e.
a GAS SAFE registered engineer).
Full on, the gas fire consumes about 6 units of gas per hour. The price of one unit will vary according to the tariff.
When installed in a typical chimney the fire gives an output of 4.87kW (16600Btu/h).
FIREGEM VISA 2 FIREGEM VISA 2 DELUXE
Height 540mm (211/4in) 556mm (22in)
Width 660mm (26in) 695mm (273/8in)
Depth 196mm (77/10in) 198mm (78/10in)
G.C. NUMBERS
Firegem Visa 2 32 689 34
Firegem Visa 2 Deluxe 32 689 36
Firegem Visa 2 (Black) 32 689 35
Firegem Visa 2 Deluxe(Black) 32 170 03
Issue 11
992278
4
SPARES AND SERVICE
THE GAS CONSUMERS' COUNCIL
(GCC) IS AN INDEPENDENT
ORGANISATION WHICH PROTECTS
THE INTEREST OF GAS USERS.
IF YOU NEED ADVICE, YOU WILL FIND
THE TELEPHONE NUMBER IN YOUR
LOCAL TELEPHONE DIRECTORY
UNDER GAS.
Robinson Willey
Bentleywood Way, Network 65 Business Park, Hapton, Burnley BB11 5ST.
Telephone: 01282 686791 Fax: 01282 686799
E-mail: info@robinsonwilley.co.uk
website: www.robinsonwilley.co.uk
Robinson Willey is a Trading Division of the GDC Group Ltd
This manual suits for next models
2
Popular Heater manuals by other brands


Fakir
Fakir RF-09 TURBO PLUS manual

Royal Sovereign
Royal Sovereign HFN-03 owner's manual

usha
usha OFR 3211F PTC instruction manual

BN Thermic
BN Thermic BNTMOUH02 Installation and operating instructions

Trustech
Trustech SFH-181TP owner's manual

Sunhouse
Sunhouse SPH050 Installation and operating instructions


