Rohde & Schwarz TSME User manual

R&S®TSME
Ultra Compact Drive Test Scanner
User Manual
User Manual
Version 10
1514654202
(?>ÏZ2)

This manual describes the following R&S®TSME models and options:
●R&S®TSME (1514.6520K02)
●TD-SCDMA Option R&S®TSME-K20 (1510.0079.02)
●WCDMA Scanner Option R&S®TSME-K21 (1514.6820.02)
●CDMA2000® Option R&S®TSME-K22 (1514.6836.02)
●GSM Scanner Option R&S®TSME-K23 (1510.0085.02)
●1xEVDO Option R&S®TSME-K24 (1510.0010.02)
●CW Scanner Option R&S®TSME-K25 (1522.6954.02)
●TETRA Scanner Option R&S®TSME-K26 (1514.6920.02)
●RF Power Scan Option R&S®TSME-K27 (1514.6813.02)
●WiMAX Scanner Option R&S®TSME-K28 (1514.6842.02)
●LTE Scanner Option R&S®TSME-K29 (1514.6859.02)
●LTE MIMO 2x2, 4x2, 4x4 R&S®TSME-K30 (1514.6871.02)
●LTE DL Allocation Analyzer R&S®TSME-K31 (1522.6990.02)
●LTE eMBMS Option R&S®TSME-K32 (1522.6960.02)
●LTE UL Allocation Analyzer R&S®TSME-K33 (4900.5112.02)
●NB-IoT/Cat NB1 Scanning R&S®TSME-K34 (1522.6731.02
●Automatic Channel Detection R&S®TSME-K40 (1514.7232.02)
© 2018 Rohde & Schwarz GmbH & Co. KG
Mühldorfstr. 15, 81671 München, Germany
Phone: +49 89 41 29 - 0
Fax: +49 89 41 29 12 164
E-mail: [email protected]
Internet: www.rohde-schwarz.com
Subject to change – Data without tolerance limits is not binding.
R&S® is a registered trademark of Rohde & Schwarz GmbH & Co. KG.
CDMA2000® is a registered trademark of the Telecommunications Industry Association (TIA -USA).
WiMAX Forum® is a registered trademark of the WiMAX Forum. WiMAXTM, the WiMAX Forum logo, WiMAX Forum CertifiedTM and
the WiMAX Forum Certified logo are trademarks of the WiMAX Forum.
Trade names are trademarks of the owners.
1514.6542.02 | Version 10 | R&S®TSME
The following abbreviations are used throughout this manual: R&S®TSME is abbreviated as R&S TSME.

1171.1307.42 - 05
1
Safety Instructions
Instrucciones de seguridad
Sicherheitshinweise
Consignes de sécurité
Risk of injury and instrument damage
The instrument must be used in an appropriate manner to prevent
electric shock, fire,
personal injury or instrument damage.
●
Do not open the instrument casing.
●
Read and observe the "Basic Safety Instructions" delivered as
printed brochure with the instrument.
●
Read and observe the safety instructions in the following sections.
Note that the data sheet may specify additional operating conditions.
●
Keep the "Basic Safety Instructions" and the product documentation
in a safe place and pass them on to the subsequent users.
Riesgo de lesiones y daños en el instrumento
El instrumento se debe usar de manera adecuada para p
revenir
descargas eléctricas, incendios, lesiones o daños materiales.
●
No abrir la carcasa del instrumento.
●
Lea y cumpla las "Instrucciones de seguridad elementales"
suministradas con el instrumento como folleto impreso.
●
Lea y cumpla las instrucciones de seguridad incluidas en las
siguientes secciones. Se debe tener en cuenta que las
especificaciones técnicas pueden contener condiciones adicionales
para su uso.
●
Guarde bien las instrucciones de seguridad elementales, así como
la documentación del producto, y entréguelas a usuarios
posteriores.

1171.1307.42 - 05
2
Gefahr von Verletzungen und Schäden am Gerät
Betreiben Sie das Gerät immer ordnungsgemäß, um elektrischen
Schlag, Brand, Verletzungen von Personen oder Geräteschäden zu
verhindern.
●
Öffnen Sie das Gerätegehäuse nicht.
●
Lesen und beachten Sie die "Grundlegenden Sicherheitshinweise",
die als gedruckte Broschüre dem Gerät beiliegen.
●
Lesen und beachten Sie die Sicherheitshinweise in den folgenden
Abschnitten; möglicherweise enthält das Datenblatt weitere
Hinweise zu speziellen Betriebsbedingungen.
●
Bewahren Sie die "Grundlegenden Sicherheitshinweise" und die
Produktdokumentation gut auf und geben Sie diese an weitere
Benutzer des Produkts weiter.
Risque de blessures et d'endommagement de l'appareil
L'ap
pareil doit être utilisé conformément aux prescriptions afin d'éviter
les électrocutions, incendies, dommages corporels et matériels.
●
N'ouvrez pas le boîtier de l'appareil.
●
Lisez et respectez les "consignes de sécurité fondamentales"
fournies avec l’appareil sous forme de brochure imprimée.
●
Lisez et respectez les instructions de sécurité dans les sections
suivantes. Il ne faut pas oublier que la fiche technique peut indiquer
des conditions d’exploitation supplémentaires.
●
Gardez les consignes de sécurité fondamentales et la
documentation produit dans un lieu sûr et transmettez ces
documents aux autres utilisateurs.

Contents
R&S®TSME
3User Manual 1514.6542.02 ─ 10
Contents
1 Introduction............................................................................................ 5
1.1 Feature Overview.......................................................................................................... 5
1.2 Measurement Setup...................................................................................................... 5
1.3 The R&S TSME Option Concept.................................................................................. 8
2 Preparing for Use................................................................................. 11
2.1 Unpacking and Setting Up the Instrument............................................................... 12
2.2 Connecting the R&S TSME........................................................................................ 15
2.3 Switching the Instrument On and Off........................................................................33
2.4 Connecting the R&S TSME to a Software Application for the First Time..............34
2.5 Checking the Instrument............................................................................................ 35
3 Front and Rear Panel Description...................................................... 37
3.1 Front Panel.................................................................................................................. 37
3.2 Rear Panel....................................................................................................................37
4 Basic R&S TSME Functions................................................................41
4.1 The R&S TSME Device Manager................................................................................41
4.2 Obtaining Device Information.................................................................................... 43
4.3 Changing the IP Address for Multiple R&S TSME Configuration...........................45
4.4 Installing and Managing Software License Keys..................................................... 46
4.5 Obtaining Firmware and Correction Data Updates..................................................48
4.6 Configuring Measurement Bands..............................................................................50
4.7 Aligning R&S TSME Manually....................................................................................52
4.8 Interacting with R&S ROMES, R&S NESTOR, and R&S ViCom.............................. 52
5 Maintenance......................................................................................... 56
6 Troubleshooting................................................................................... 58
6.1 Overview of Instrument Modes..................................................................................58
6.2 Guide to Solving Instrument Connection Problems................................................60
6.3 Solving Other Miscellaneous Problems....................................................................63

Contents
R&S®TSME
4User Manual 1514.6542.02 ─ 10
Annex.................................................................................................... 65
A Available Cellular Bands..................................................................... 65
Index......................................................................................................72

Introduction
R&S®TSME
5User Manual 1514.6542.02 ─ 10
1 Introduction
1.1 Feature Overview
The R&S TSME ultra compact drive test scanner is a high-power platform for optimiz-
ing all conventional mobile radio networks. A highly sensitive 20 MHz front end for any
input frequencies from 350 MHz to 4400 MHz, and an FPGA-based software-defined
architecture offer unsurpassed performance while providing maximum flexibility and
future-proofness.
●User-definable input frequency range from 350 MHz to 4400 MHz
●An RF and signal processing path with a bandwidth of 20 MHz
●Measurements on various mobile communication standards
●Support of automatic channel detection
●Support of MIMO measurement setups
●Support of position estimation of base stations together with R&S ROMES software
(R&S ROMES option ROMES4LOC)
●Parallel measurements in GSM, WCDMA, TD-SCDMA, CDMA2000® 1xEV-DO,
WiMAXTM, LTE and TETRA networks
●ViCom programming interface for customer-specific applications
●Future-proof software-defined architecture
●Embedded high sensitivity GPS receiver
1.2 Measurement Setup
The R&S TSME is not a stand-alone drive test scanner; it requires a host PC connec-
ted via LAN and some additional equipment in order to perform measurements.
Measurement Setup

Introduction
R&S®TSME
6User Manual 1514.6542.02 ─ 10
Figure 1-1: Typical measurement setup with the R&S
TSME
Important requirements for host PC
In order to control and perform measurements with the R&S TSME, a host PC or note-
book with LAN interface is required (not included in the package), with the following
minimum configuration:
●Intel Quad-Core i7
●4 GB Memory
●Windows 7
●Dedicated Gbit LAN adapter with Jumbo Frames (9 kB) and Flow Control
enabled
It is important for the host PC to have its own dedicated LAN adapter for the connec-
tion to one or more R&S TSMEs only, and is not integrated in a regular office network.
The host PC must have a fixed IP address with which it connects to the R&S TSME.
There are different possibilities for the host PC to control the R&S TSME:
●Using the drive test software platform R&S ROMES or R&S NESTOR (not part of
this package!)
●Using the R&S ViCom programming interface package and integrating the
R&S TSME as an OEM product into a customer-specific software application
The host PC is required for the following tasks:
●Obtaining hardware and firmware information on the R&S TSME (via the
R&S TSME Device Manager, see Chapter 4.2, "Obtaining Device Information",
on page 43)
Measurement Setup

Introduction
R&S®TSME
7User Manual 1514.6542.02 ─ 10
●Configuring the R&S TSME (via the R&S TSME Device Manager, see Chapter 4.1,
"The R&S TSME Device Manager", on page 41)
●Sending the measurement commands (via the drive test software), thus controlling
and performing the actual measurement
●Updating the R&S TSME firmware when required (see "Automatic firmware
updates" on page 53)
In addition to the host PC, the following further equipment is required to perform mea-
surements with the R&S TSME:
For an overview of the package contents for the R&S TSME refer to "Accessory list"
on page 12 and to the Release Notes.
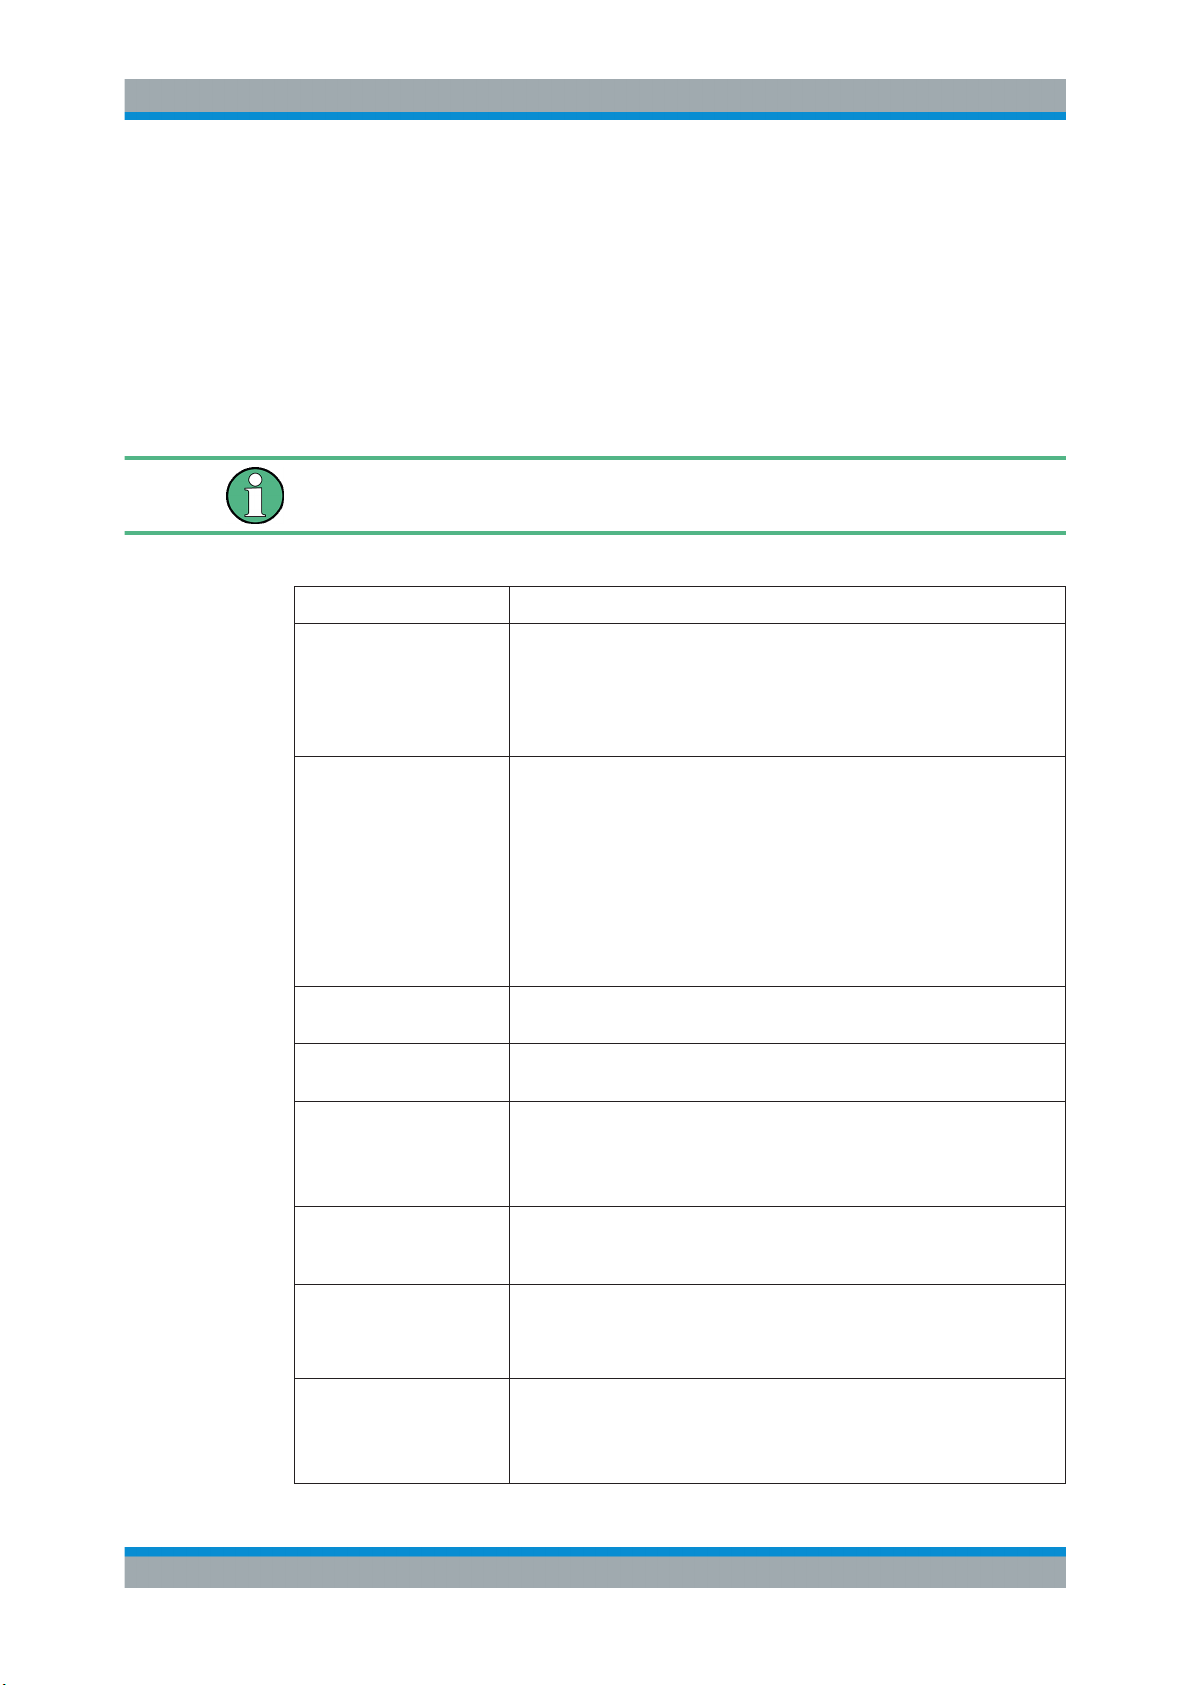
Table 1-1: Equipment required to perform measurements with the R&S
TSME
Equipment Availability
Antennas ●GPS: active antenna with cable and SMA connector included in pack-
age
●RF antenna and cable (not included)
●Optionally: R&S TSME accessory antennas
(See the product page on the Rohde & Schwarz website at: https://
www.rohde-schwarz.com/product/TSME > "Options")
Connection cables ●DC power supply cable with a cigarette lighter connector (included in
package)
●Optionally, 4-fold DC y-cable (R&S TSME-ZYC4) to run 4 R&S TSMEs
from one AC power supply (e.g. R&S TSMW-Z1)
●LAN cable to connect host PC (RJ45 Patch cable CAT6 2m, included in
package)
●Synchronization cable to synchronize multiple R&S TSMEs
– option R&S TSME-ZC2 - Synchronization cable for 2 R&S TSMEs
(order no. 1522.6560.02)
– option R&S TSME-ZC4 - Synchronization cable for 4 R&S TSMEs
(order no. 1522.6831.02)
AC power supply Optionally included in package: R&S TSME-Z1 (order number
1514.6913.02)
World-wide adapter for
earthing type plug
Included in R&S TSME-Z1 option, required to use the R&S TSME-Z1 world
wide
LAN switch Optionally, 5-port Gbps LAN switch with 9k jumbo frame support, AC or USB
powered, to connect 4 R&S TSMEs to one host PC
(For example: R&S TSPC-LS Gbit LAN Switch - USB powered, order no.
3624.8364.02)
USB to LAN Adapter Optionally, USB 3.0 To Gbit LAN Adapter (R&S TSPC-U2L, order no.
3593.8430.02), provides an additional LAN port on the host PC to connect
two R&S TSMEs to one host PC
Mechanical connections for
multiple R&S TSMEs
Metal brackets and screws included in
option R&S TSME-ZC2 - Synchronization cable for 2 R&S TSMEs
option R&S TSME-ZC4 - Synchronization cable for 4 R&S TSMEs
Required software options Installed at the factory
Additional software options can be installed subsequently via the
R&S TSME Device Manager (for details refer to Chapter 4.6, "Configuring
Measurement Bands", on page 50).
Measurement Setup

Introduction
R&S®TSME
8User Manual 1514.6542.02 ─ 10
Equipment Availability
R&S ROMES or R&S NES-
TOR measurement software
with appropriate technology
option(s)
Not included in package
or: R&S ViCom Interface
package for customer soft-
ware
Included in package
1.3 The R&S TSME Option Concept
The R&S TSME scanner consists of the R&S TSME hardware as well as a set of
(specified) technology and band options when it comes from the factory.
1.3.1 Technology Options
Technology options allow for the R&S TSME to scan the input based on a specific
technology, for example, LTE. All technology options can be installed on the same
instrument; the R&S TSME can measure various technologies simultaneously.
Following technology options are available (for current availabilities see http://
www2.rohde-schwarz.com/product/TSME.html):
Table 1-2: Available R&S
TSME technology options
Options Order number Description
R&S TSME-K20 1510.0079.02 R&S TSME scanner option: TD-SCDMA
R&S TSME-K21 1514.6820.02 R&S TSME scanner option: WCDMA
R&S TSME-K22 1514.6836.02 R&S TSME scanner option: CDMA2000
R&S TSME-K23 1510.0085.02 R&S TSME scanner option: GSM
R&S TSME-K24 1510.0010.02 R&S TSME scanner option: EVDO
R&S TSME-K25 1522.6954.02 R&S TSME scanner option: CW
R&S TSME-K26 1514.6920.02 R&S TSME scanner option: TETRA
R&S TSME-K27 1514.6813.02 R&S TSME scanner option: RF-Power Scan
R&S TSME-K28 1514.6842.02 R&S TSME scanner option: WiMAX
R&S TSME-K29 1514.6859.02 R&S TSME scanner option: LTE
R&S TSME-K30 1514.6871.02 R&S TSME scanner option: LTE MIMO
R&S TSME-K31 1522.6990.02 R&S TSME scanner option: LTE DL Allocation Ana-
lyzer
R&S TSME-K32 1522.6960.02 R&S TSME scanner option: LTE eMBMS
R&S TSME-K33 4900.5112.02 R&S TSME scanner option: LTE UL Allocation Ana-
lyzer
The R&S TSME Option Concept

Introduction
R&S®TSME
9User Manual 1514.6542.02 ─ 10
Options Order number Description
R&S TSME-K34 1522.6731.02 R&S TSME scanner option: NB-IoT/Cat NB1-Scanning
R&S TSME-K40 1514.7232.02 R&S TSME Automatic Channel Detection
Ordering software options
When you order a software option you must supply the serial number of the
R&S TSME. License keys are shipped as a printed "License Keys List". Advance deliv-
eries may consist of a PDF file. Unregistered software licenses can be downloaded
from the Rohde & Schwarz website (https://extranet.rohde-schwarz.com/service).
For details see the "R&S TSME-Kx Software Options Installation Manual".
1.3.2 Band Options
The band options have been introduced as a new concept to provide a more cost effi-
cient scanner configuration when only a limited number of bands need to be measured.
Using these options, the measurement bandwidth of the R&S TSME is limited to a
number of cellular network bands (uplink and downlink). The bands can be freely
selected by the user. Band options are independent from the technology options: a
licensed technology can be measured in all licensed bands (uplink and downlink).
Alternatively, a R&S TSME band option is provided which can measure the full band-
width. With this option the scanner can measure in the complete bandwidth from
350 MHz to 4.4 GHz without limitations. All installed technologies can be measured in
this bandwidth at the same time.
Example:
For example, an R&S TSME with the technology options R&S TSME-K21 (WCDMA)
and R&S TSME-K23 (GSM), as well as the band option R&S TSME-K2B (2 bands
measured simultaneously), can scan for GSM and WCDMA signals in two bands (e.g.
900 MHz and 1800 MHz) at the same time.
Upgrade options are available to increase the bandwidth of the R&S TSME from a limi-
ted number of bands to full bandwidth.
Following band options are available:
Table 1-3: Available R&S
TSME band options
Options Order number Description
R&S TSME-KAB 1514.7384.02 All bands measured simultaneously
R&S TSME-K1B 1514.7403.02 1 band measured simultaneously
R&S TSME-K2B 1514.7410.02 2 bands measured simultaneously
R&S TSME-K3B 1514.7426.02 3 bands measured simultaneously
R&S TSME-K4B 1514.7432.02 4 bands measured simultaneously
The R&S TSME Option Concept

Introduction
R&S®TSME
10User Manual 1514.6542.02 ─ 10
Options Order number Description
R&S TSME-K5B 1514.7449.02 5 bands measured simultaneously
R&S TSME-KUB 1514.7390.02 Upgrade: 1 additional band measured simultaneously
The R&S TSME band assignment can be reconfigured by the user (see Chapter 4.6,
"Configuring Measurement Bands", on page 50).
For an overview of available cellular bands and their characteristics see Chapter A,
"Available Cellular Bands", on page 65.
The R&S TSME Option Concept

Preparing for Use
R&S®TSME
11User Manual 1514.6542.02 ─ 10
2 Preparing for Use
Risk of injury due to disregarding safety information
Observe the information on appropriate operating conditions provided in the data sheet
to prevent personal injury or damage to the instrument. Read and observe the basic
safety instructions provided with the instrument, in addition to the safety instructions in
the following sections. In particular:
●Do not use an isolating transformer to connect the instrument to the AC power sup-
ply.
●Do not open the instrument casing.
Risk of instrument damage during operation
An unsuitable operating site or test setup can cause damage to the instrument and to
connected devices. Ensure the following operating conditions before you switch on the
instrument:
●The instrument is dry and shows no sign of condensation.
●The instrument is positioned as described in the following sections.
●Signal levels at the input connectors are all within the specified ranges.
Instrument damage caused by electrostatic discharge
Electrostatic discharge (ESD) can damage the electronic components of the instrument
and the device under test (DUT). Electrostatic discharge is most likely to occur when
you connect or disconnect a DUT or test fixture to the instrument's test ports. To pre-
vent electrostatic discharge, use a wrist strap and cord and connect yourself to the
ground, or use a conductive floor mat and heel strap combination.

Preparing for Use
R&S®TSME
12User Manual 1514.6542.02 ─ 10
EMI suppression
Electromagnetic interference (EMI) may affect the measurement results.
To suppress generated electromagnetic interference (EMI):
●Use suitable shielded cables of high quality. For example, use double-shielded RF
and LAN cables.
●Always terminate open cable ends.
●Note the EMC classification in the data sheet.
●Use the supplied DC cable or a DC cable shorter than 3 m.
●Do not operate the instrument in DC mains.
●Operate the instrument only with an active antenna connected to the [GPS ANT]
connector.
2.1 Unpacking and Setting Up the Instrument
The following section describes how to set up the instrument.
Risk of instrument damage due to inappropriate operating conditions
Specific operating conditions are required to ensure accurate measurements and to
avoid damage to the instrument. Observe the information on appropriate operating
conditions provided in the basic safety instructions and the instrument's data sheet.
Check the equipment for completeness using the delivery note and the accessory lists
for the various items. Check the instrument for any damage. If there is damage, imme-
diately contact the carrier who delivered the instrument. Make sure not to discard the
box and packing material.
Packing material
Retain the original packing material. If the instrument needs to be transported or ship-
ped later, you can use the material to protect the control elements and connectors.
Accessory list
The following items are included with shipment of the R&S TSME:
●DC power supply cable with a cigarette lighter connector
●LAN cable to connect host PC (RJ45 Patch cable CAT6 2m)
●Active GPS antenna
●CD-ROM with required R&S TSME software, drivers, tools, and manual
Unpacking and Setting Up the Instrument

Preparing for Use
R&S®TSME
13User Manual 1514.6542.02 ─ 10
Rackmounting
The R&S TSME can be installed in a 19 inch rack using a rack adapter kit for one or
two R&S TSMEs (option R&S TSME-Z2, 1522.6502.02). The installation instructions
are part of the adapter kit.
Figure 2-1: R&S
TSME mounted in a rack (option R&S
TSME-Z2)
Other mounting options
A stack of R&S TSMEs can be mounted to a metal base using the option R&S TSME-
Z4 (1522.6590.02). How to connect the individual R&S TSMEs is described in Chap-
ter 2.2.5.4, "Connecting Multiple R&S TSMEs with Each Other", on page 25.
Figure 2-2: R&S
TSME mounted to a metal base (option R&S
TSME-Z4)
Alternatively, the R&S TSME can be packed in a backpack system (R&S TSME-Z3,
order no. 1514.6936.02, see the corresponding "Getting Started" manual).
Unpacking and Setting Up the Instrument

Preparing for Use
R&S®TSME
14User Manual 1514.6542.02 ─ 10
Figure 2-3: R&S
TSME packed in a backpack system (option R&S
TSME-Z3)
Risk of instrument damage due to overheating
An insufficient airflow can cause the instrument to overheat, which may disturb the
operation and even cause damage.
Make sure that all fan openings are unobstructed and that the airflow perforations are
unimpeded, particularly when the instrument is installed in a rack or packed in a back-
pack. The R&S TSME draws in fresh air from the bottom and warm air flows out at its
sides.
Thus, if no active cooling is installed, ensure that the following surrounding spaces to
the instrument are kept clear:
●Bottom side: minimum 1 cm
●Left/right sides: minimum 2 cm
In very warm environments, do not stack instruments - place them side by side so that
each instrument can draw sufficiently cool air.
Unpacking and Setting Up the Instrument

Preparing for Use
R&S®TSME
15User Manual 1514.6542.02 ─ 10
2.2 Connecting the R&S TSME
This section describes how to connect the R&S TSME to the other devices in the mea-
surement setup (see also Chapter 1.2, "Measurement Setup", on page 5).
●Connecting the DC Power Supply...........................................................................15
●Setting Up the LAN Connection to the Host PC......................................................16
●Connecting External Devices..................................................................................21
●Connecting a Kensington Lock............................................................................... 22
●Connecting Multiple R&S TSMEs to one Host PC (LTE MIMO Setups, Parallel
Usage).....................................................................................................................23
2.2.1 Connecting the DC Power Supply
The DC power supply connector is on the rear panel of the unit. Voltages from 10 V to
27 V are supported. There is no need to set the used voltage manually.
Possible power cable connections
The R&S TSME can work with the following DC power supplies:
●Cigarette lighter power supply (for example in a vehicle) using the supplied DC
power cable
●Optional AC power supply and power cable R&S TSME-Z1 (see Table 1-1)
●Proprietary power supply with an adapted power cable
Using the supplied cigarette lighter power supply cable
► To use the power supply from a cigarette lighter, connect the supplied power cable
from the R&S TSME to the cigarette lighter.
Connecting a proprietary power supply
► To use a proprietary DC supply with the R&S TSME power cable, demount the cig-
arette lighter adapter from the supplied power cable and connect the open ends of
the cable to the proprietary power supply. Be sure to respect the correct polarity
(see Figure 2-4).
Connecting the R&S TSME

Preparing for Use
R&S®TSME
16User Manual 1514.6542.02 ─ 10
Figure 2-4: Supplied power cable with cigarette lighter adapter
Danger of shock!
To avoid a shock hazard and instrument damage, note the following:
●After moisture condensation, allow the instrument to dry before switching on.
●The instrument is still power-supplied while it is in standby mode, that is, with the
power button switched off, but still connected with the DC power supply.
●After connecting the power supply the instrument is immediately under power.
●The supplied DC connector is intended for disconnection.
●If any DC supply other than R&S TSME-Z1 is used:
– The DC supply must be in accordance with IEC / EN / UL / CSA 60950-1 or
IEC / EN / UL / CSA EN EN61010-1.
– Use only Safety Extra Low Voltage (SELV) power supplies
– Observe the DC input range of 10 V to 27 V with maximum of 1.8 A (inrush cur-
rent)
– The 12 V vehicle cigarette lighter socket must be fused
2.2.2 Setting Up the LAN Connection to the Host PC
As mentioned in Chapter 1.2, "Measurement Setup", on page 5, a host PC or notebook
with LAN interface is required to control and perform measurements with the
R&S TSME.
Connecting the R&S TSME

Preparing for Use
R&S®TSME
17User Manual 1514.6542.02 ─ 10
The R&S TSME is equipped with a network interface and can be connected to an
Ethernet LAN (local area network). The interface can be used to connect the
R&S TSME to a host PC.
How to connect multiple R&S TSMEs to a single host PC (for example for LTE MIMO
setups) is described in Chapter 2.2.5, "Connecting Multiple R&S TSMEs to one Host
PC (LTE MIMO Setups, Parallel Usage)", on page 23.
The following scenarios are possible.
●Connection between PC and R&S TSME(s) using static IP addresses.
●Connection between PC and R&S TSME(s) using dynamical generated IP
addresses (Auto-IP).
Operating Modes
The "Full auto-IP" operating mode is only available with following versions of ROMES,
ViCom and NESTOR software.
●R&S ROMES: Version 18.1 and later
●R&S ViCOM: Version 16.20 and later
●R&S NESTOR: Version 2.7.0 and later
●"Full auto-IP" operating mode
IP addresses are automatically generated on PC and R&S TSME(s) if the following
conditions are met:
– PC network interface is configured to obtain an IP address automatically
– IP address stored in R&S TSME(s) is not in range 169.254.0.1 –
169.254.255.254 (inclusive).
Note: This is the IP address set by the R&S TSME Device Manager.
●"Partial auto-IP" operating mode
IP address is automatically generated on PC and a static IP address is used on
R&S TSME if the following conditions are met:
– PC network interface is configured to obtain an IP address automatically
– IP address stored in R&S TSME is in range 169.254.0.1 – 169.254.255.254
(inclusive).
Note: This is the IP address set by the R&S TSME Device Manager.
●"Static IP" operating mode
IP address is manually set on PC and a static IP used on R&S TSME if the follow-
ing conditions are met:
– PC LAN interface is configured to use a user-defined IP address, not in range
169.254.0.1 – 169.254.255.254 (inclusive).
Recommendations/Limitations of Operating Modes
●"Full auto-IP" operating mode
Connecting the R&S TSME

Preparing for Use
R&S®TSME
18User Manual 1514.6542.02 ─ 10
– Only 1 PC and 1 or more R&S TSME devices per LAN interface, either connec-
ted directly or via a L2 switch. (This operating mode shall not be used when
more than 1 PC is physically connected to the same subnetwork, e.g. via the
switch.)
– PC’s LAN interface shall not receive an IP from a DHCP server. (The IP
address generated for PC shall be matching following pattern:
169.254.X.Y.)
– All R&S TSME devices on the same LAN interface shall be configured with
stored IP addresses not in the range 169.254.1.0 – 169.254.254.255 (inclusive)
to prevent conflicts.
Note: R&S TSME devices with stored IP addresses in ranges 169.254.0.1 –
169.254.0.255 (inclusive) or 169.254.255.0 – 169.254.255.254 (inclusive) are
effectively operating in "partial auto-IP" operating mode.
– Depending on software accessing the R&S TSME devices, it may be manda-
tory to configure the stored IP addresses in all R&S TSME devices to be
unique.
Example: R&S TSME Device Manager does not have this requirement, R&S
ROMES / R&S Nestor may have such requirements depending on the use
made internally of the stored IP address as unique identifier.
●"Partial auto-IP" operating mode
This mode shall only be used for specific cases, "full auto-IP" or "static IP" operat-
ing modes shall be preferred.
– 1 or more PCs and 1 or more R&S TSME devices per LAN interface, either
connected directly or via a L2 switch
– Each of the PC’s LAN interface physically connected to the sub network shall
not receive an IP from a DHCP server. (The IP address generated for PC shall
be matching following pattern: 169.254.X.Y.)
– All R&S TSME devices on the same LAN interface shall be configured with
stored IP addresses in the ranges 169.254.0.1 – 169.254.0.255 (inclusive) or
169.254.255.0 – 169.254.255.254 (inclusive), and use unique IP addresses.
These ranges are important to prevent conflicts with IP addresses dynamically
generated for the PC LAN interfaces.
Note: If a R&S TSME is shared with 2 or more PCs, and its stored IP address
is not in the defined range above, this may lead in rare cases to IP conflicts. It
is therefore recommended to respect this rule.
●"Static IP" operating mode
– 1 or more PCs and 1 or more R&S TSME(s), either connected directly or via a
L2 switch.
– Other network devices are permitted, as long as all IP addresses used are
unique.
This section describes how to configure the LAN interface for a single R&S TSME. It
includes the following topics:
●Configuring the LAN Interface on the Host PC....................................................... 19
●Connecting the R&S TSME to the Host PC............................................................ 21
Connecting the R&S TSME
Table of contents
Other Rohde & Schwarz Scanner manuals

Rohde & Schwarz
Rohde & Schwarz R&S TSMA6 User manual

Rohde & Schwarz
Rohde & Schwarz TSMA6B User manual

Rohde & Schwarz
Rohde & Schwarz TSMA User manual

Rohde & Schwarz
Rohde & Schwarz TSMA6B User manual

Rohde & Schwarz
Rohde & Schwarz TSMA6B User manual

Rohde & Schwarz
Rohde & Schwarz TSME6 User manual

Rohde & Schwarz
Rohde & Schwarz TSME6 User manual

Rohde & Schwarz
Rohde & Schwarz TSMA6 Series User manual

Rohde & Schwarz
Rohde & Schwarz TSME6 User manual

Rohde & Schwarz
Rohde & Schwarz TSMA6B User manual