Rokky Rokky Heat User instructions
Rokky Heat
Assembly and operating manual
Download Startup-guide to nd out
how to congure and use the application
the Rokky system.
www.rokky.co/support


1
EN
Hello!
You have just joined the ROKKY community. We are happy that you
are with us. Using the ROKKY heating system, you prove that care
for the natural environment is extremely important to you. You have
chosen ROKKY, which reduces CO2 emissions by up to 60%, while
also saving huge savings on heating.
Although ROKKY system is extremely intuitive, we encourage you to
read the basic information about the product. You can always write to
us or nd additional information on our website www.rokky.co
2
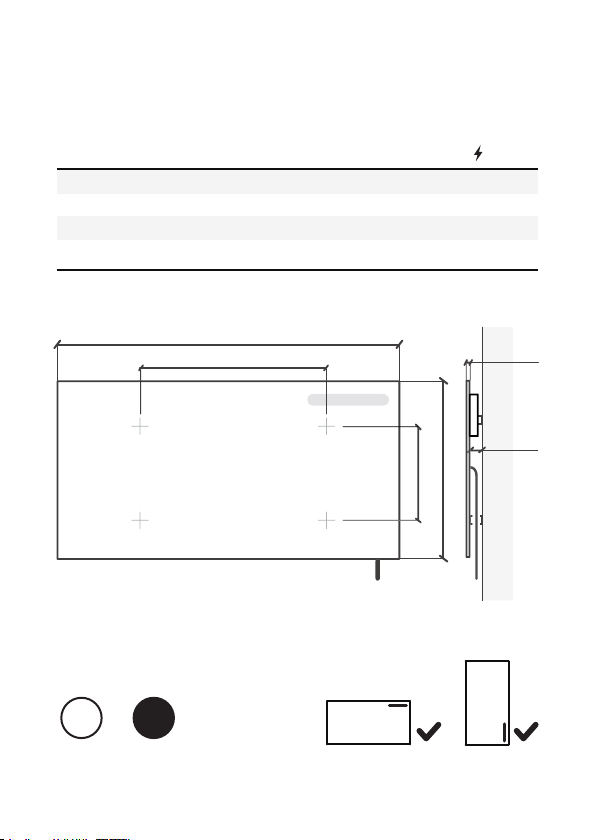
HEATER’S TECHNICAL PARAMETERS
A[mm] B [mm] C [mm] D [mm] [W]
330
330
330
330
900
1200
1490
1800
500
500
500
500
370
670
970
1270
450
550
650
800
B
C
D
A
12 mm
biały czarny
50 mm

3
EN
SAFETY
Life is the greatest value. ROKKY is an electrical product. Take care
of your and your loved ones’ safety. Familiarize yourself with the ba-
sic principles of product use.
1. Use only a working product. If you notice any external damage, con-
tact an electrician before connecting the device to a power source.
2. Before connecting the device, check that the voltage stated on the
nameplate matches the voltage in the domestic electrical system.
3. Check regularly that the power cord has not been damaged and that
it is safe to use.
4. Remember! A damaged cord should only be replaced by a qualied
specialist. Entrust the exchange to those who have the appropriate
permissions.
5. Do not mount a device that is connected to a voltage.
6. Do not allow the heater to be ooded with water under the threat of
loss of life.
7. When standing in a bathtub, paddling pool or barefoot on a wet oor,
do not touch the device.
8. ROKKY is intended for home, oce and hotel use.
9. ROKKY is not intended for use by children or people with limited
mental performance or who do not have the necessary knowledge
or experience in the use of similar equipment. In this case, supervi-
sion or appropriate training by persons responsible for their safety
is necessary.

4
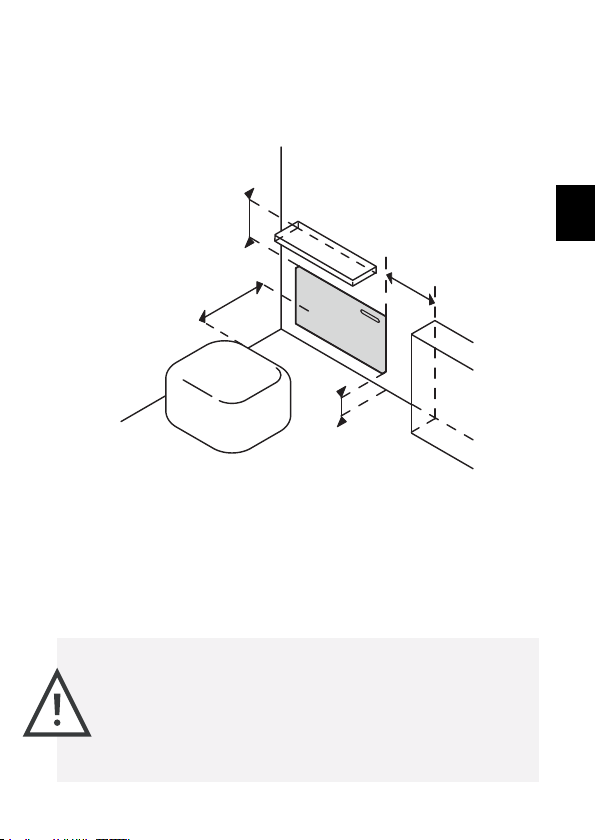
WHERE TO INSTALL THE DEVICE?
The ROKKY radiator was designed for heating residential, oce and ho-
tel rooms. If the device is installed in a place for other purposes, consult
the manufacturer. The device has been equipped with protection made
in 2nd class of protection - CLASSE II, it also has IPx5 splash protection
enabling installation of the device in the second and third zone of the
bathroom room. (drawing)
0,6 m
0,6 m
0,6 m
2,4 m
2,25 m
0
1
2
3
5
EN
When choosing a place to mount the device, it is necessary to keep the
minimum distances between the device and other objects in a given
room. (drawing)
The lightweight design of the device allows its assembly on virtually all
types of walls. If the walls of the room are made of wood or the surface
of the room is covered with wallpaper with a foam base, a special insu-
lating pad should be inserted between the wall of a given room and the
frame of the device.
Warning! The device should not be installed in the imme-
diate vicinity of openings or devices controlling ventilation
and air conditioning, and below electried power sockets.
>50 cm
>50 cm
> 20 cm
> 15 cm

6
DEVICE CONSTRUCTION
Aluminum radiator body
Control Panel
Class II power cord (depending on version with or without plug)
Radiator control module
Power switch
Mounting console mounting locations
Front Back
A
A
B
B
C
C
E
E
D
D
F
F

7
EN
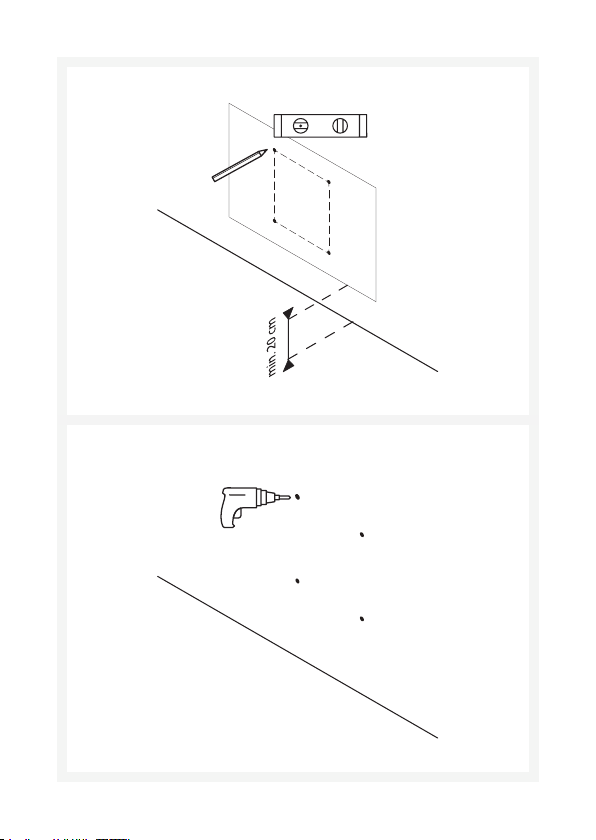
DEVICE INSTALLATION
Contents of the package:
Before proceeding with assembly, additionally obtain the necessary
tools such as a spirit level, drill, pencil, tape measure, screwdriver.
In order to make the proper installation you will need the appropriate
dowels and screws adapted to the type of wall you have.
Warning! The device must not be live during installation.
Unplug the power plug. Familiarize yourself with the safety
rules.
8
1.
2.
4x
Dimensions: see table on page 2.
D
C
Table of contents
Popular Heater manuals by other brands

oventrop
oventrop Regucor Series quick start guide

Blaze King
Blaze King CLARITY CL2118.IPI.1 Operation & installation manual

ELMEKO
ELMEKO ML 150 Installation and operating manual

BN Thermic
BN Thermic 830T instructions

KING
KING K Series Installation, operation & maintenance instructions

Empire Comfort Systems
Empire Comfort Systems RH-50-5 Installation instructions and owner's manual

Well Straler
Well Straler RC-16B user guide

EUROM
EUROM 333299 instruction manual

Heylo
Heylo K 170 operating instructions

Eterna
Eterna TR70W installation instructions

Clarke
Clarke GRH15 Operation & maintenance instructions

Empire Heating Systems
Empire Heating Systems WCC65 Installation and owner's instructions


