RokPak Pioneer Series User manual

USER MANUAL
Pioneer Series

To download this user manual in a dierent language Visit :
www.rokpak.com/manuals.
Pour tlcharger ce manuel de l’utilisateur dans une autre
langue, rendez-vous sur: www.rokpak.com/manuals.
Para descargar este manual de usuario en otro idioma,
www.rokpak.com/manuals.
Per scaricare questo manuale utente in un’altra lingua,
visita : www.rokpak.com/manuals.
Para baixar este manual do usurio em outro idioma,
acesse www.rokpak.com/manuals.
Wenn Sie dieses Benutzerhandbuch in einer anderen
Sprache herunterladen mchten, besuchen Sie
www.rokpak.com/manuals.
WELCOME
For more information, visit us at : www.rokpak.com
twitter.com/ocialrokpak instagram.com/ocialrokpakfacebook.com/ocialrokpak
Visit our website www.RokPak.com or our
social media pages

TABLE OF CONTENTS
3
Accessories ............................................................................... 4
Pioneer Series Features............................................................ 5
LCD............................................................................................. 6
How to Charge Your Pioneer Series ......................................... 7
Charging USB Devices .............................................................. 8
Interior and Exterior Flashlights............................................... 9
SOS Function ........................................................................... 10
Storage and Cleaning .............................................................. 11
Warranty and Support ............................................................ 12
For more information, visit us at : www.rokpak.com
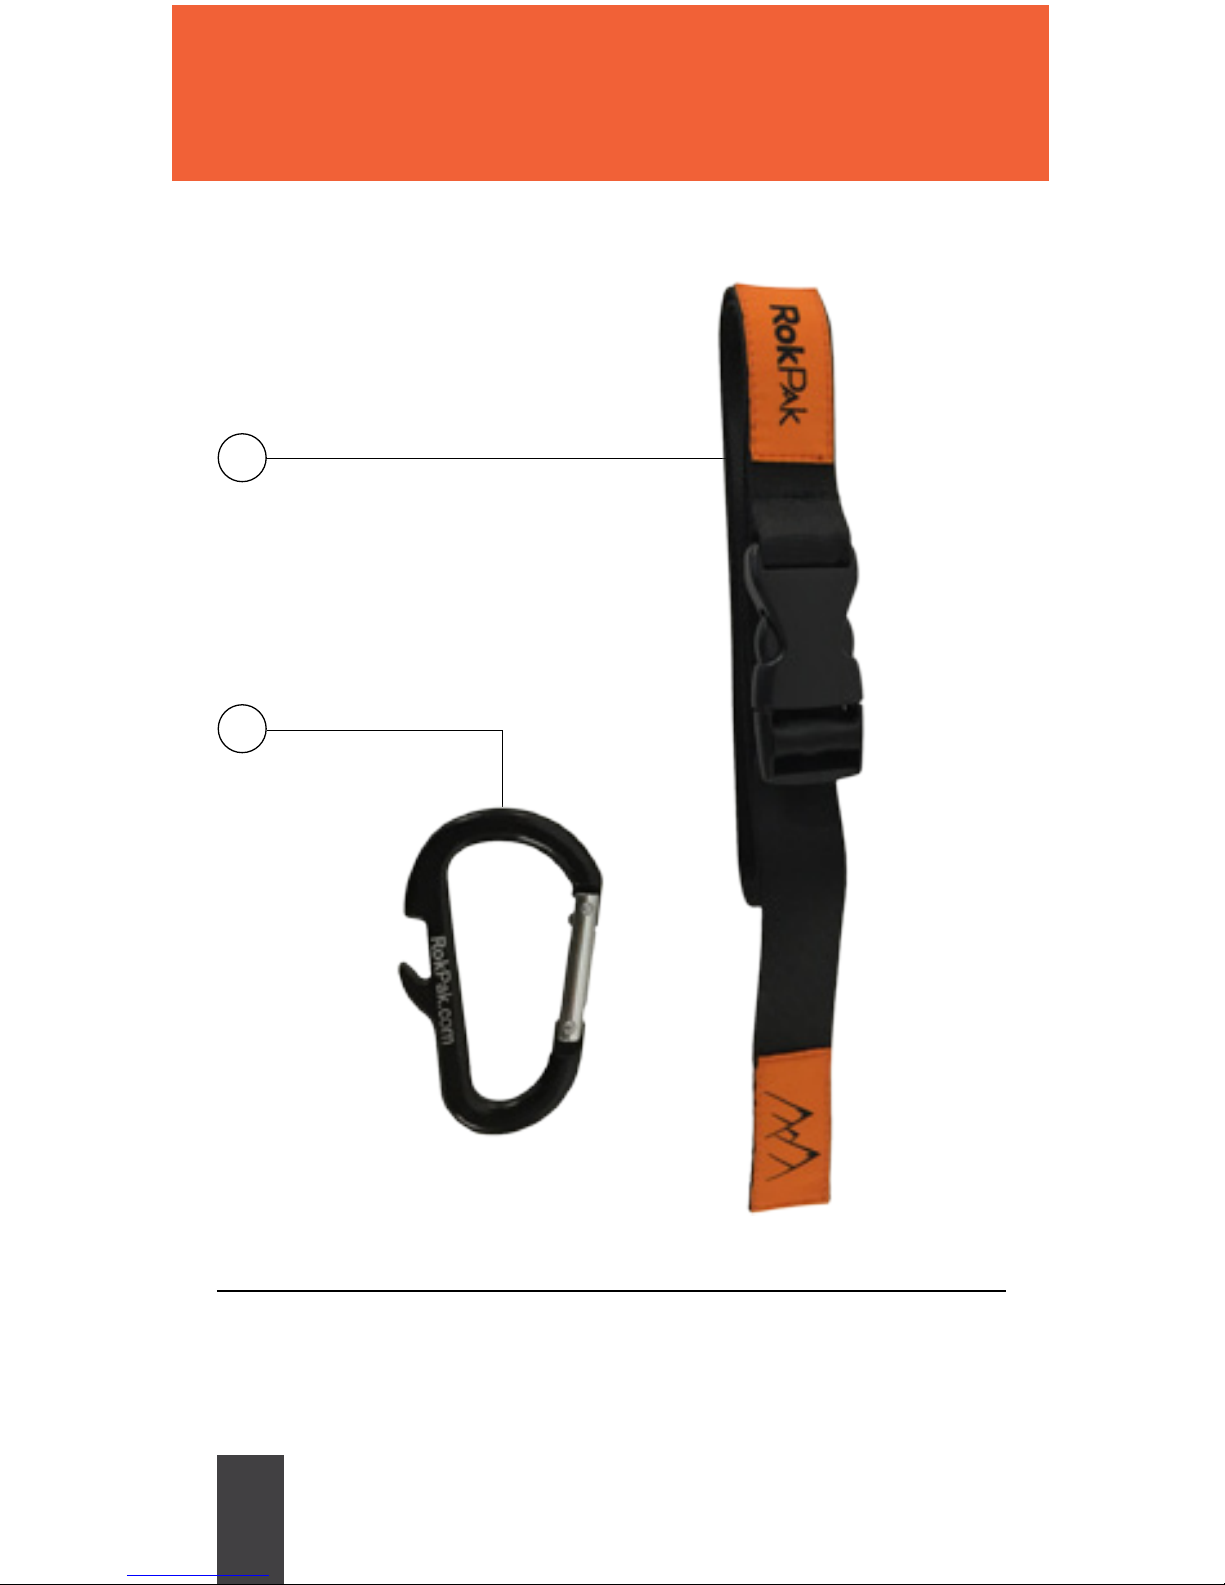
4
1. Carabiner
2. 3. Buckle Strap
ACCESSORIES
1
2
For more information, visit us at : www.rokpak.com
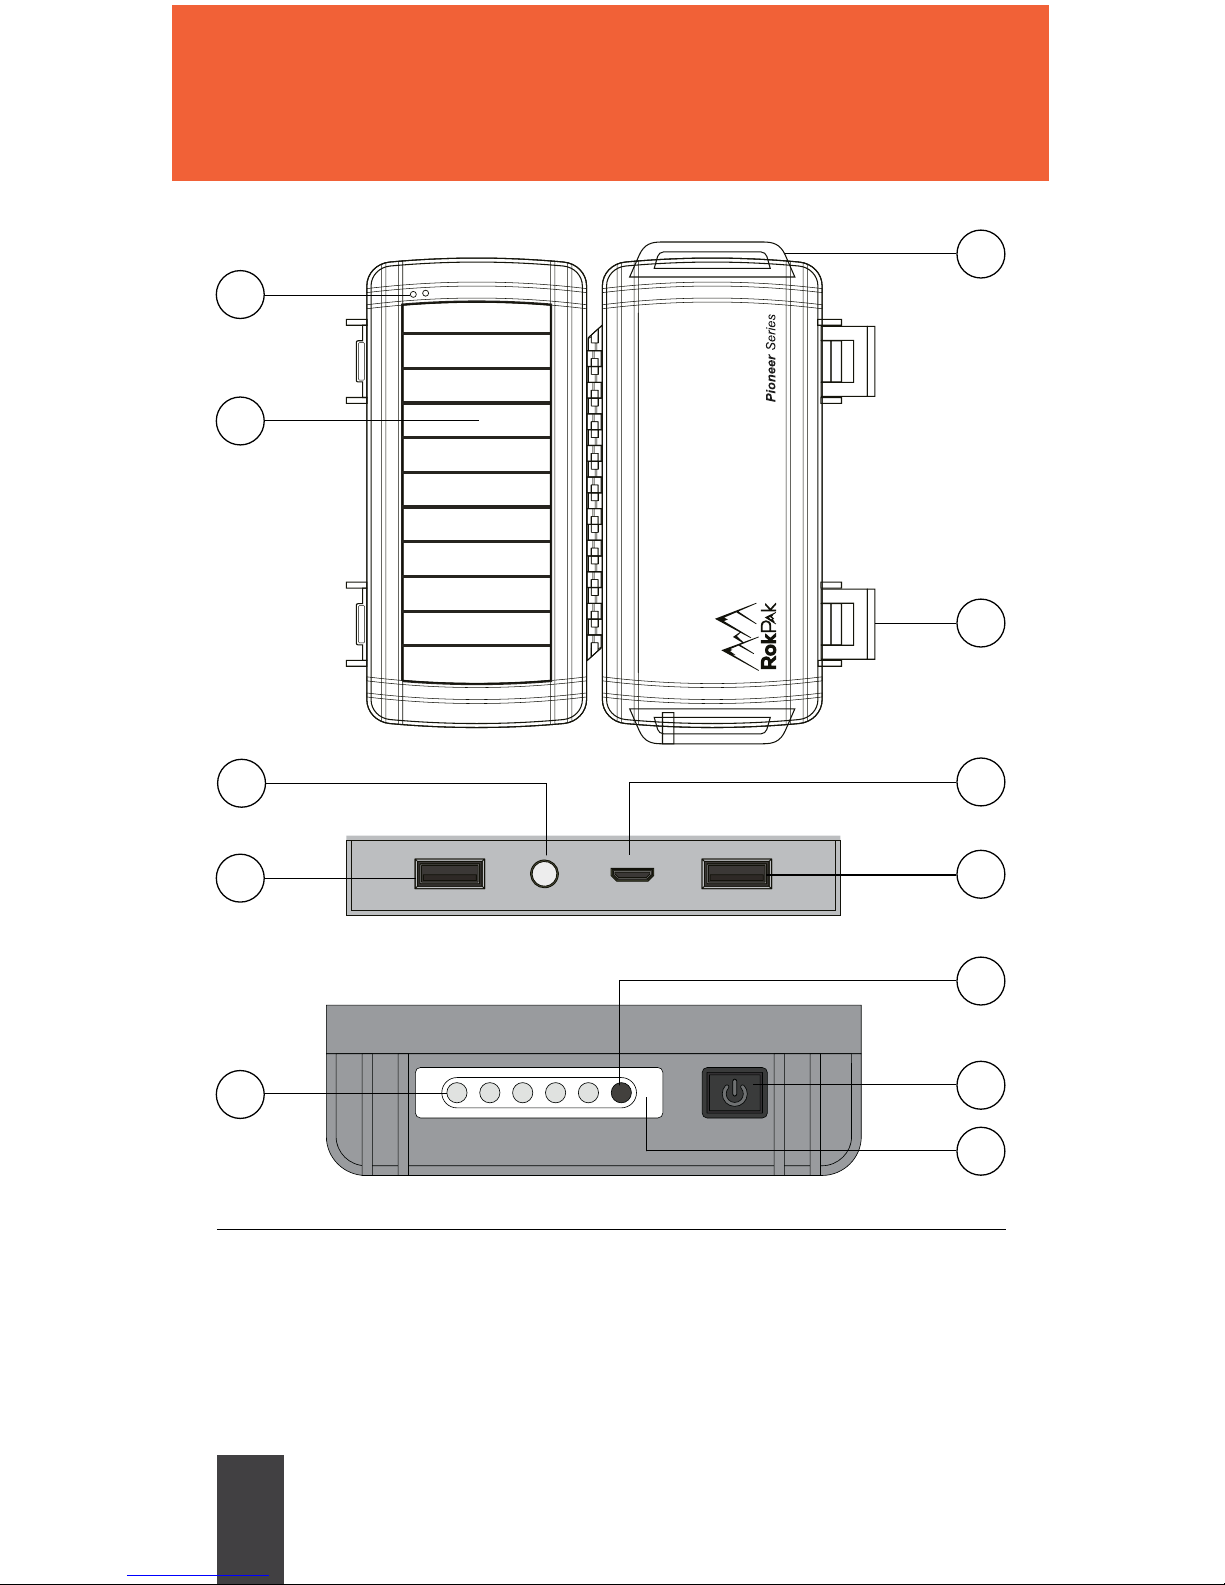
PIONEER SERIES FEATURES
5
1. Water Detection System
2. Ultra Fast Solar Panel
3. Multiple Points for
Securing
4. Easy Open Latches
5. LED Flashlight
6. Smart USB
7. Micro USB
8. 5 LED Flashlight
9. Blue LED Solar Charg-
ing Indicator
10. So Touch ON/OFF
Button Exterior
Flashlight
11. Electroplated Reec-
tor System
3
1
2
4
6
5
6
9
10
11
7
OUT1 OUT2
8
For more information, visit us at : www.rokpak.com

LCD
6
1. Input Status
2. SOS Automatic / Manual Switch
3. Battery Power Indicators
4. Output 1 Status
5. Output 2 Status
6. ON/OFF Button Interior
Flashlight
* See page 7 for charging function / *See page 8 for operation of LCD / *See page 9
for operation of ashlight
2
3
1
4
5
6
3
On / O Button activates LCD backlight, charging and interior
ashlight
For more information, visit us at : www.rokpak.com

HOW TO CHARGE YOUR PIONEER SERIES
7
To Charge Via USB Cable:
Connect the included USB cable to your RokPak and connect the other end of the
cable to a power source such as wall charger, auto charger, or computer. If IN on the
LCD screen is visible the battery is charging.
To Charge Via Solar Panel:
Expose the Solar Panel to any light source. The Blue LED Indicator on the outside of
the box will activate once the solar panel is exposed to sunlight or almost any other
light source.
Check Battery Life by viewing the LCD. Press the On / O button to activate the LCD
backlight.
TIP: The RokPak Pioneer series will charge under almost any
light source, but sunlight is the fastest.
For more information, visit us at : www.rokpak.com

CHARGING USB DEVICES
8
There are 2 USB ports for charging. Simply plug in your compatible USB device and
charging will start automatically.
Each USB port is labeled OUT1 and OUT 2. When a USB port is in use the LCD will
show which USB port is in use.
SMART USB PORTS
Each USB port is capable of determining how much power is needed to charge your
device.
COMPATIBLE DEVICES
Almost any USB device can be charged with the RokPak. Compatible devices in-
clude but not limited to smartphones, tablets, GPS devices, cameras, MP3 players,
smart watches, tness trackers, etc.
For more information visit www.rokpak.com to see specica-
tion sheets for specic products.
For more information, visit us at : www.rokpak.com

FLASHLIGHTS
9
INTERIOR LED FLASHLIGHT
To Activate : Hold down On/O button located next to the LCD. This will activate the
interior ashlight.
To Deactivate: Hold down On/O button located next to the LCD until the ashlight
turns o.
ExTERIOR 5 LED FLASHLIGHT
To Activate : Press the On/O button located on the outside of the RokPak next to
the ashlight.
Functions :
This ashlight has 4 functions (Low, High, Strobe, SOS). Press the On/O button
once to activate High setting. Each time the On/O button is pressed the function
will switch to the next function.
To Deactivate :
Press the On/O button located on the outside of the RokPak next to the ashlight
until it turns o. User must cycle through all settings before it turns o.
For more information, visit us at : www.rokpak.com

SOS FUNCTION
10
The RokPak is equipped with a water activated sensor that activates the 5 LED
Flashlight to its SOS setting. The international distress signal ashing will continue
as long as the sensor is submerged in water.
On a full charge the SOS signal will last for over 200 hours. If there is sunlight to
recharge the battery the SOS signal can last longer.
The SOS function can also be activated by pressing the exterior On/O button 3
times (3X).
This is very useful for many situations including being stranded in the wilderness or
on the side of the road. The LED SOS function will allow the user to be spotted eas-
ily. Allowing searchers or people passing by to the users location and alert help.
Manual Option :
The Automatic SOS function can be deactivated. There is an
On/O switch located to the le of the LCD.
For more information, visit us at : www.rokpak.com
Table of contents


