manuals.online logo
Brands
  1. Home
  2. •
  3. Brands
  4. •
  5. Roland
  6. •
  7. Electronic Keyboard
  8. •
  9. Roland Fantom-S88 User manual

Roland Fantom-S88 User manual

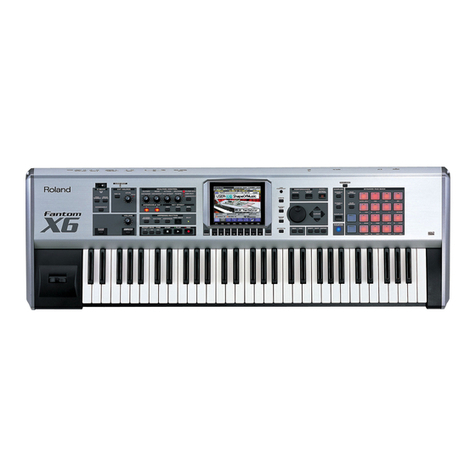
®ÂØÒňÎ
Fantom-S
Fantom-S88
Workstation keyboard
TurboStart
TBS186 ©2003 Roland Corporation U.S.
www.RolandUS.com
Faxback #20219 Page 1
It’s a Fact…
Roland’s Fantom-S and Fantom-S88 workstation
keyboards are complete solutions for professional
music production. The 61-note Fantom-S and 88-
note Fantom-S88 both feature seamless integration
of audio and MIDI—plus advanced sampling.
• Advanced music production studios with 61-note
Keyboard (Fantom-S) or 88-note Progressive
Hammer-Action keyboard (Fantom-S88)
• Seamless integration of audio and MIDI using
ROM waves and user sampling with realtime
timestretch capability
• All new patches and rhythm sets built from new
64 MB wave ROM
• 32 MB sample RAM (expandable up to 288 MB)
with .WAV/AIFF compatibility.
• 16 MB flash RAM retains your favorite sounds;
optional SmartMedia storage.
• New Skip Back Sampling for continuous
sampling—never lose an idea again!
• DYNAMIC PAD BANK with 16 velocity-sensitive
pads for easy sample triggering
• 3 MFX processors, plus dedicated reverb,
chorus and new mastering processor
• Expandable via four optional SRX-Series Wave
Expansion Boards.
• USB port for .WAV/AIFF file exchange with a PC
or Mac
• 4 Line outputs, 2 stereo or 4 mono; stereo line
input and 24 bit S/P DIF digital output.
Playing the Demo Songs
The Fantom-S /-S88 has five built-in demo songs. To
play them:
1. Press MENU.
2. Turn the VALUE dial to select Demo Play.
3. Press ENTER.
4. Turn the VALUE dial to select a song.
5. Press ENTER.
6. When you’re done listening, press F8 (Exit).
Selecting and Auditioning Patches
Use the following steps to hear some of the patches
in the Fantom-S and Fantom-S88:
1. Press PATCH/RHYTHM so it’s lit.
2. Press F1 (Kbd Part).
3. Turn the VALUE dial to select a patch.
4. Play the selected patch.
Selecting Patches by Category
You can quickly select patches from any of 38
different categories. Use the following steps to find
patches by category:
1. Press PATCH/RHYTHM so it’s lit.
2. Press F1 (Kbd Part).
3. Press F3 (Patch List).
4. Press F6 so a checkmark appears next to
“Categ.”
5. Press F1 (5) or F2 (6) to select a category.
6. Turn the VALUE dial to audition the patches in
the selected category.
Layering Two Patches
Multiple sounds in a performance can be layered
together. Use the following procedure to layer Part 1
with Part 2:
1. Press LAYER/SPLIT so it’s lit.
2. Turn the VALUE dial to select PRST: 01 Seq:
Template.
3. Use CURSOR 5or 6and the VALUE dial to
place a checkmark next to Parts 1 and 2.
4 Press F2 (Part View).
5. Turn the VALUE dial to select PR-B 104 Warm
Strings as the patch for Part 2.
6. Press CURSOR 5 to highlight Part 1.
7. Turn the VALUE dial to select PR-A 003 Warm
Piano.
8. Play the layered piano and string sounds.
Creating a Split
After creating a layer, creating a split is easy. Follow
these steps to create a split between Parts 1 and 2.
1. Follow Steps 1-7 of “Layering Two Patches”
above.
2. Press LAYER/SPLIT so it’s lit.
3. Press F3 (Key Range).
4. Press CURSOR 5or 6to select PART 1.
5. Turn the VALUE dial to select C4 in the box
below “Lower.”
6. Press CURSOR 6to select PART 2.
7. Press CURSOR 4to highlight the box below
“Upper.”
8. Turn the VALUE dial to select B3.
9. Play the keyboard to hear the newly created split
between PR-B 104 Warm Strings on the left and
PR-A 003 Warm Piano on the right.
®ÂØÒňÎ
Fantom-S
Fantom-S88
Workstation keyboard
TurboStart
TBS186 ©2003 Roland Corporation U.S.
www.RolandUS.com
Faxback #20219 Page 2
Auditioning the Rhythm Sets with the
DYNAMIC PADS
The Fantom-S/-S88 has rhythm sets that contain a
variety of percussion instruments and special-effects
sounds. Use the following steps to audition the
different sets while playing the DYNAMIC PADS:
1. Press PATCH/RHYTHM so it’s lit.
2. Press F2 (Pad Part).
3. Turn the VALUE dial to select a rhythm set.
4. Play the DYNAMIC PADS.
Sampling
The Fantom-S and Fantom-S88 contain a sampler for
recording audio sources from a microphone or CD
and so on. Use the following steps to sample:
1. Connect a microphone or CD player to the
appropriate input on the back of the Fantom.
2. Press INPUT SETTING so it’s lit.
3. Turn the VALUE dial to select the appropriate
input selection.
Note: If you’re using a microphone, first confirm that
any amplifiers or monitors are turned down before
selecting MICROPHONE.
4. Press the SAMPLING button so it’s flashing.
5. Press F1 (Sampling).
6. Speak into the microphone or play the external
sound source while turning the LEVEL control
knob clockwise to adjust your input levels.
Note: If the levels are too high, the PEAK indicator
which is next to the LEVEL control knob lights. If this
occurs, reduce the input level.
7. Press F8 (Start).
8. Perform or play whatever it is you’re sampling.
9. Press F7 (Stop) when you’re finished.
10. Press and hold F8 (Preview) to hear the sample.
Assigning a Sample to a DYNAMIC
PAD
Now that we’ve sampled a sound, let’s assign it to a
DYNAMIC PAD:
1. Press PATCH/RHYTHM so it’s lit.
2. Press SAMPLE LIST so it’s lit.
3. Turn the VALUE dial to select the sample you
wish to assign—the selected sample is
highlighted.
Note: To audition the selected sample, press and
hold F8 (Preview) to hear it.
4. Press F7 (Load Utility).
5. Press F2 (To Pad).
6. Press the DYNAMIC PAD that you want to use.
7. Press F8 (Exec) twice—“Assign to pad
completed” briefly appears in the display.
8. Press the DYNAMIC PAD to audition its sample.
Writing a Sample into Memory
Newly recorded samples must be written into the
memory before turning off the Fantom-S/-S88
—otherwise, the sample will be lost. Use the
following procedure to save a sample:
1. Press SAMPLE LIST so it’s lit.
2. Turn VALUE to select the desired sample.
3. Press WRITE.
4. Press F3 (Sample).
5. Use the VALUE dial and CURSOR buttons to
name the sample.
6. Press F8 (Write).
7. Press F2 to select User—if you’re using a
SmartMedia card, press F3 to select Card.
8. Turn the VALUE dial to select a destination for
the sample.
9. Press F8 (Write).
10. Press F8 (Exec).
Assigning the D Beam
You can assign various functions to the D Beam. Use
the following steps to set up the D Beam for
controlling the resonance in a patch.
1. Press PATCH/RHYTHM until it’s lit.
2. Press F1 (Kbd Part).
3. Turn the VALUE dial to select PR-A: 029
Remember.
4. Press ASSIGNABLE under the D Beam until it’s
lit.
5. Press F5 (Ctrl Setting).
6. Press F1 (5) or F2 (6) to select D Beam
(Asgn).
7. Use CURSOR 5or 6to highlight the Type box.
8. Turn VALUE to select CC71:RESONANCE.
9. Play the keyboard while slowly raising and
lowering your hand over the D Beam.

Other manuals for Fantom-S88

1

This manual suits for next models

1

Other Roland Electronic Keyboard manuals

Roland EXR-5S User manual

Roland

Roland EXR-5S User manual

Roland V-Synth User manual

Roland

Roland V-Synth User manual

Roland JUNO-G User manual

Roland

Roland JUNO-G User manual

Roland PC-150 User manual

Roland

Roland PC-150 User manual

Roland Fantom G8 User manual

Roland

Roland Fantom G8 User manual

Roland E-X30 User manual

Roland

Roland E-X30 User manual

Roland S-10 User manual

Roland

Roland S-10 User manual

Roland JX-305 User manual

Roland

Roland JX-305 User manual

Roland Fantom-X User manual

Roland

Roland Fantom-X User manual

Roland S-50 Operating and maintenance manual

Roland

Roland S-50 Operating and maintenance manual

Roland V-Combo VR-09 User manual

Roland

Roland V-Combo VR-09 User manual

Roland Fantom-Xa Owner's manual

Roland

Roland Fantom-Xa Owner's manual

Roland BK-5 User manual

Roland

Roland BK-5 User manual

Roland Jupiter-80 Instructions and recipes

Roland

Roland Jupiter-80 Instructions and recipes

Roland S-10 Operating and maintenance manual

Roland

Roland S-10 Operating and maintenance manual

Roland Fantom-Xa Specification sheet

Roland

Roland Fantom-Xa Specification sheet

Roland Va-3 Operating and maintenance manual

Roland

Roland Va-3 Operating and maintenance manual

Roland Fantom G6 Specification sheet

Roland

Roland Fantom G6 Specification sheet

Roland Fantom-X User manual

Roland

Roland Fantom-X User manual

Roland MKB-1000 User manual

Roland

Roland MKB-1000 User manual

Roland PK-7 User manual

Roland

Roland PK-7 User manual

Roland JD-Xi User manual

Roland

Roland JD-Xi User manual

Roland EXR-3 User manual

Roland

Roland EXR-3 User manual

Roland AX-1 Operating and maintenance manual

Roland

Roland AX-1 Operating and maintenance manual

Popular Electronic Keyboard manuals by other brands

NONLINEAR LABS C15 quick start

NONLINEAR LABS

NONLINEAR LABS C15 quick start

Yamaha PortaSound PS-1 Guía para tocar

Yamaha

Yamaha PortaSound PS-1 Guía para tocar

Casio Celviano AP-21 user guide

Casio

Casio Celviano AP-21 user guide

Native Instruments A Series user manual

Native Instruments

Native Instruments A Series user manual

Kurzweil EP Series EP-400 user guide

Kurzweil

Kurzweil EP Series EP-400 user guide

Radio Shack 42-4058 owner's manual

Radio Shack

Radio Shack 42-4058 owner's manual

Yamaha Clavinova CLP-110 Quick operation guide

Yamaha

Yamaha Clavinova CLP-110 Quick operation guide

Yamaha PortaSound PSS-101 Manual del propietario

Yamaha

Yamaha PortaSound PSS-101 Manual del propietario

Yamaha PortaTone PSR-31 owner's guide

Yamaha

Yamaha PortaTone PSR-31 owner's guide

midiplus X Pro Mini Series user manual

midiplus

midiplus X Pro Mini Series user manual

Yamaha DDKU-L7 owner's manual

Yamaha

Yamaha DDKU-L7 owner's manual

ARP 3620 owner's manual

ARP

ARP 3620 owner's manual

Roli Seaboard RISE 2 quick start guide

Roli

Roli Seaboard RISE 2 quick start guide

midiplus BK492 owner's manual

midiplus

midiplus BK492 owner's manual

Barton Motors BMC038 manual

Barton Motors

Barton Motors BMC038 manual

Casio Privia PX-110 Function guide

Casio

Casio Privia PX-110 Function guide

Alesis Fusion 6HD Disassembly procedure

Alesis

Alesis Fusion 6HD Disassembly procedure

Casio LK-120 user guide

Casio

Casio LK-120 user guide

manuals.online logo
manuals.online logoBrands
  • About & Mission
  • Contact us
  • Privacy Policy
  • Terms and Conditions

Copyright 2025 Manuals.Online. All Rights Reserved.