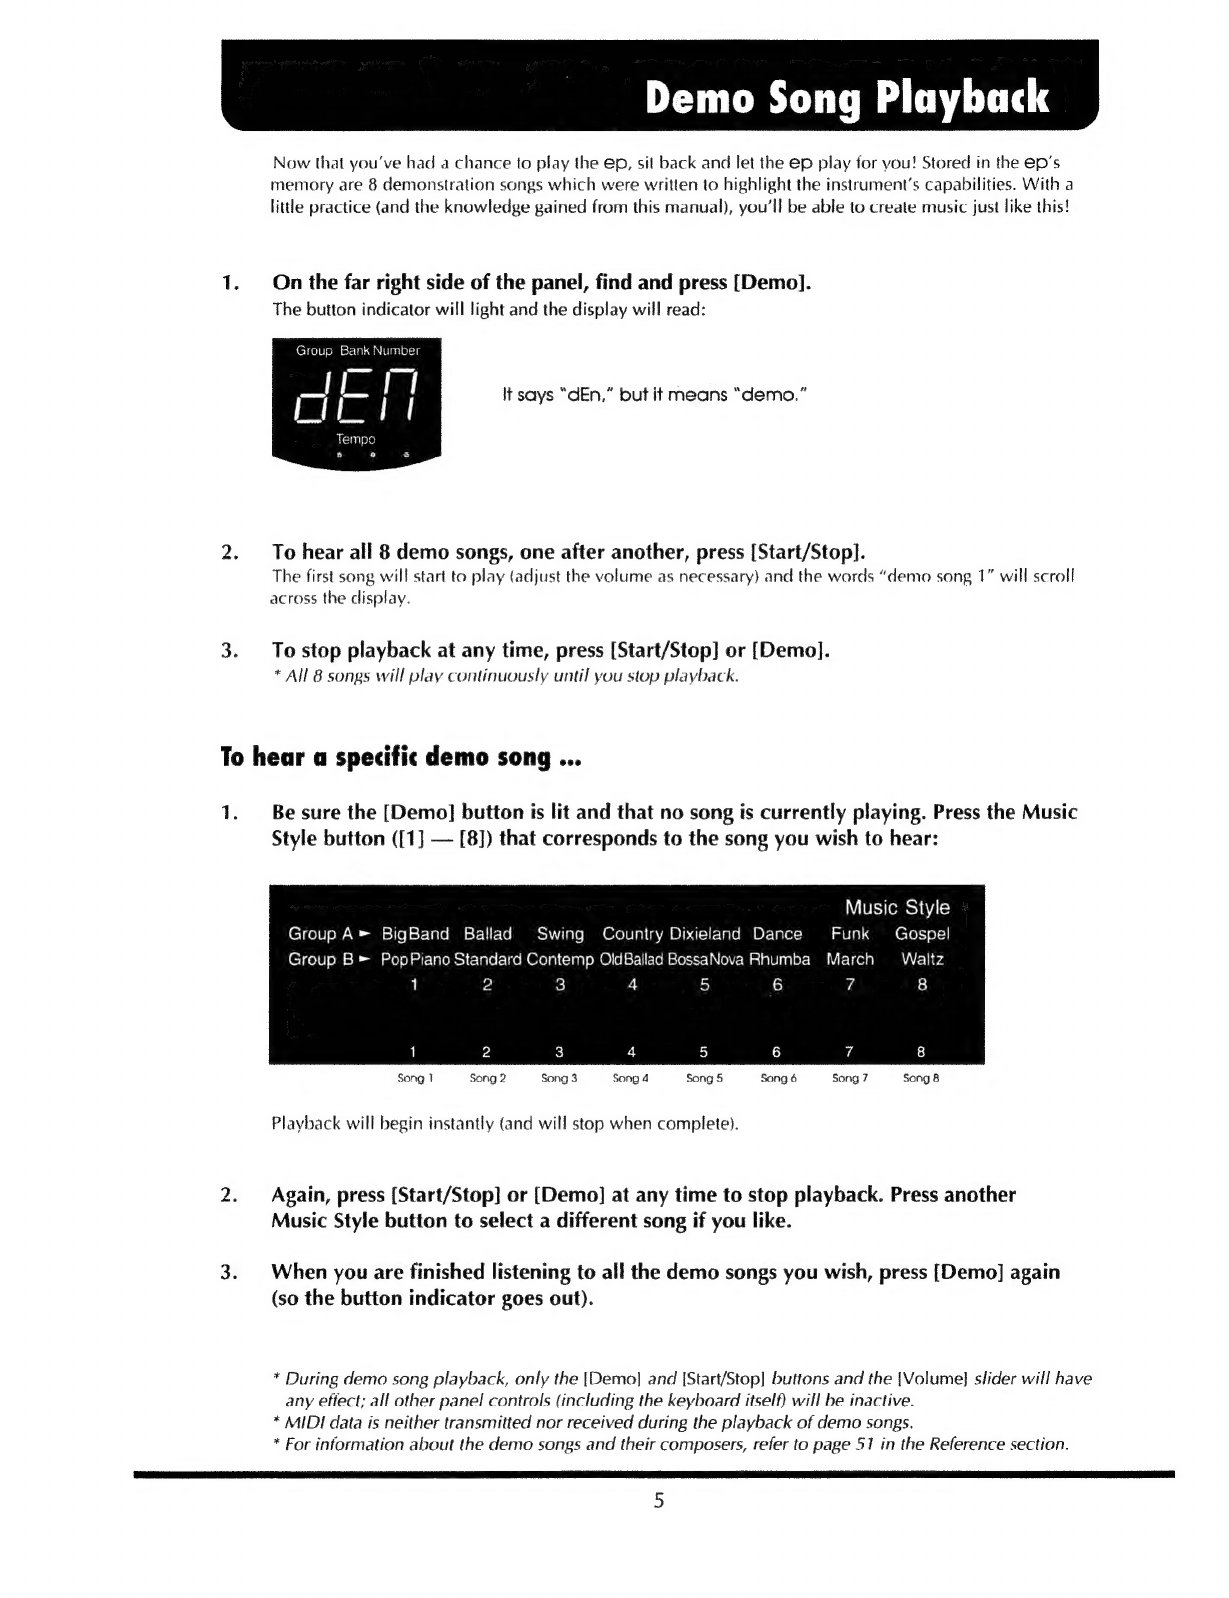
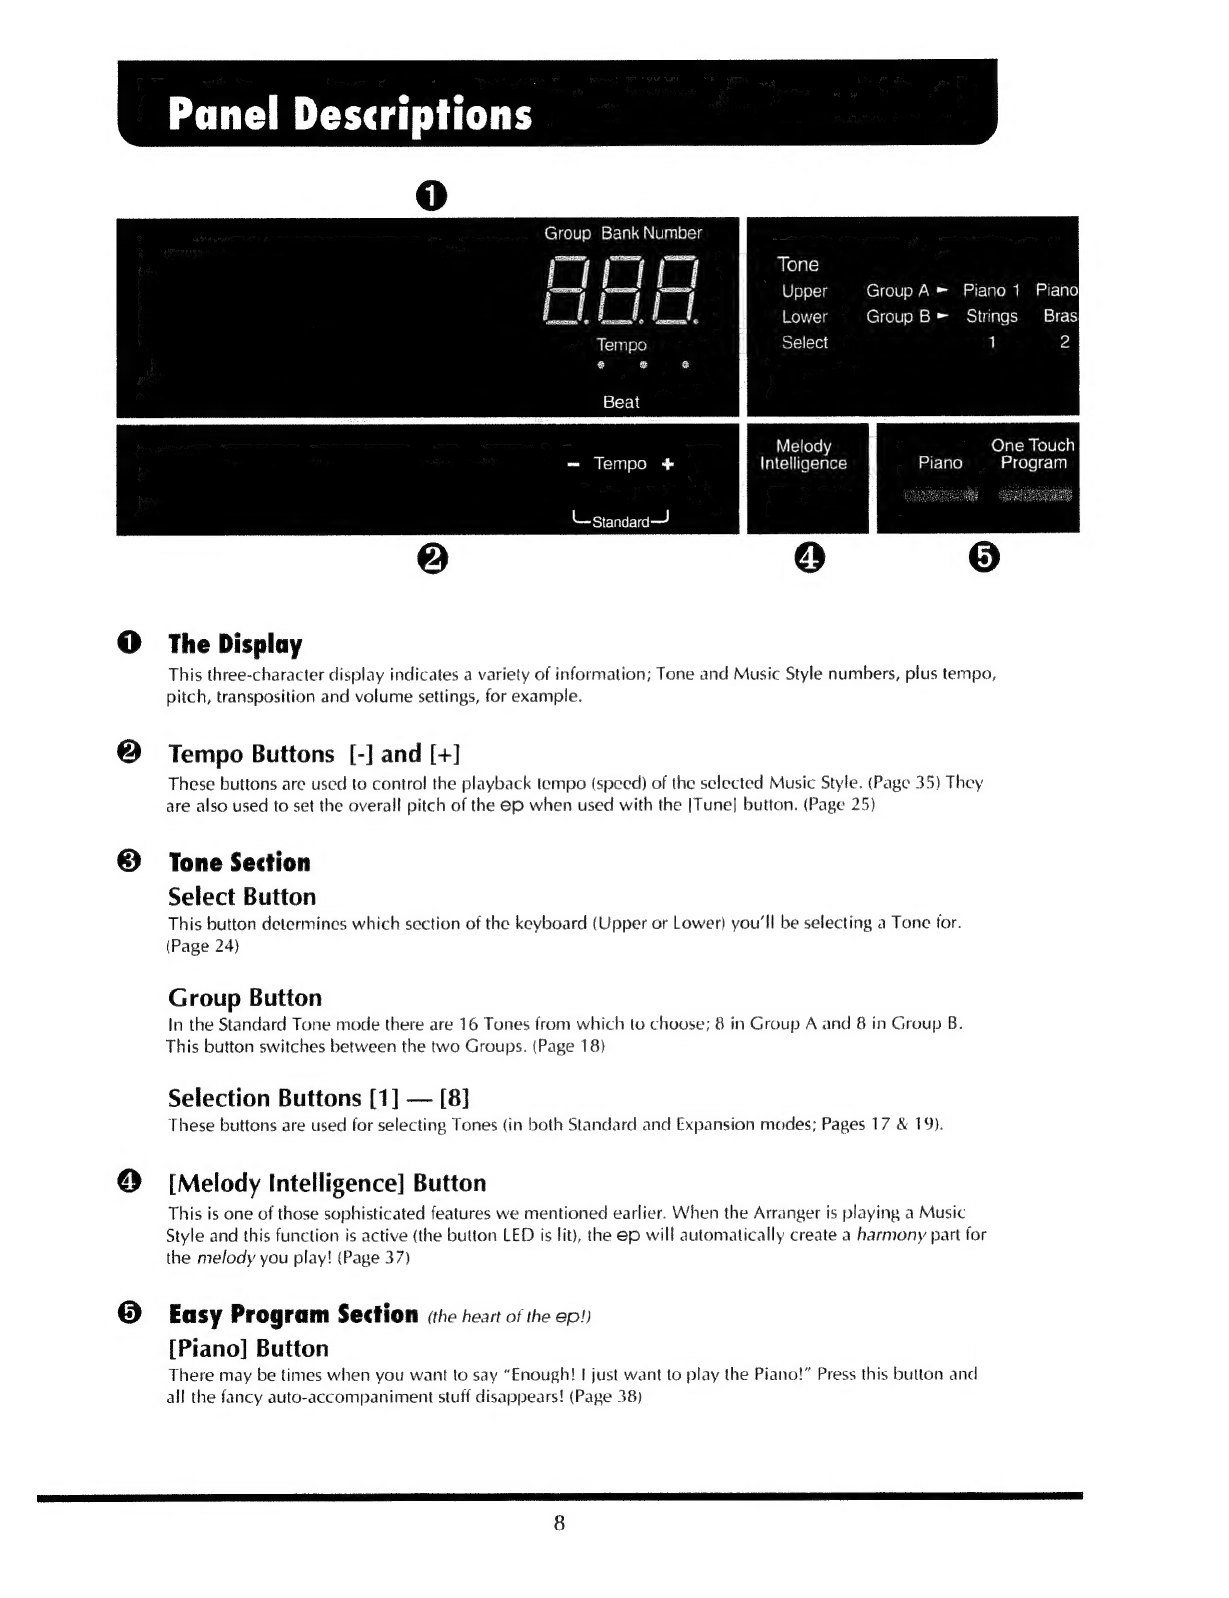
Roland ep-707 User manual

Roland
DIGITAL
INTELLIGENT
PIANO
ep:/0/
OWNER'S
MANUAL

For
the
U.K.
IMPORTANT:
THE
WIRES
IN
THIS
MAINS
LEAD
ARE
COLOURED
IN
ACCORDANCE
WITH
THE
FOLLOWING
CODE.
BLUE
BROWN
:
NEUTRAL
:
LIVE
As
the
colours
of
the
wires
in
the
mains
lead
of
this
apparatus
may
not
correspond
with
the
coloured
markings
identifying
the
terminals
in
your
plug,
proceed
as
follows:
The
wire
which
is
coloured
BLUE
must
be
connected
to
the
terminal
which
is
marked
with
the
letter
N
or
coloured
BLACK.
The
wire
which
is
coloured
BROWN
must
be
connected
to
the
terminal
which
is
marked
with
the
letter
L
or
coloured
RED.
For
Germany
Bescheinigung
des
Herstellers/Importeurs
Hiermit
wird
bescheinigt,
daß
der/die/das
Dem
Zentralamt
für
Zulassungen
im
Fernmeldewesen
wurde
Roland
Digital
Intelligent
Piano
ep-707
ve......»n
,..,..,..:.:eeraa.
...au..00%6©
(Gerät,
Typ,
Bezeichnung)
in
Übereinstimmung
mit
den
Bestimmungen
der
BMPT-
das
Inverkehrbringen
dieses
Gerätes
angezeigt
und
die
Berechtigung
zur
Überprüfung
der
Serie
auf
die
Einhaltung
der
Bestimmungen
eingeräumt.
Roland
Corporation
AmtsbiVig
243/1991
funk-entstört
ist.
Der
vorschriftsmäßige
Betrieb
mancher
Geräte
(z.
B.
Meßsender)
kann
allerdings
gewissen
Einschränkungen
unterliegen.
Beachten
Sie
deshalb
die
Hinweise
in
der
Bedienungsanleitung.
4-16
Dojimahama
1-Chome
Kita-ku
Osaka
530
Japan
%90000000000000000000000000
(Name
und
Anschrift
des
Herstellers/Importeurs)
For
the
USA
FEDERAL
COMMUNICATIONS
COMMISSION
RADIO
FREQUENCY
INTERFERENCE
STATEMENT
This
equipment
has
been
tested
and
found
to
comply
with
the
limits
for
a
Class
B
digital
device,
pursuant
to
Part
15
of
the
FCC
Rules.
These
limits
are
designed
to
provide
reasonable
protection
against
harmful
interference
in
a
residential
installation.
This
equipment
generates,
uses,
and
can
radiate
radio
frequency
energy
and,
if
not
installed
and
used
in
accordance
with
the
instructions,
may
cause
harmful
interference
to
radio
communications.
However,
there
is
no
guarantee
that
interference
will
not
occur
in
a
particular
installation.
If
this
equipment
does
cause
harmful
interference
to
radio
or
television
reception,
which
can
be
determined
by
turning
the
equipment
off
and
on,
the
user
is
encouraged
to
try
to
correct
the
interference
by
one
or
more
of
the
following
measures:
Reorient
or
relocate
the
receiving
antenna.
Increase
the
separation
between
the
equipment
and
receiver.
Connect
the
equipment
into
an
outlet
on
a
circuit
difterent
from
that
to
which
the
receiver
is
connected.
Consult
the
dealer
or
an
experienced
radio/TV
technician
for
help.
Unauthorized
changes
or
modification
to
this
system
can
void
the
users
authority
to
operate
this
equipment,
For
Canada
CLASS
B
NOTICE
This
digital
apparatus
does
not
exceed
the
Class
B
limits
for
radio
noise
emissions
set
out
in
the
Radio
Interference
L
Regulations
of
the
Canadian
Department
of
Communications.
CLASSE
B
AVIS
Cet
appareil
numérique
ne
dépasse
pas
les
limites
de
la
classe
B
au
niveau
des
émissions
de
bruits
radioélectriques
fixés
dans
le
Reglement
des
signaux
parasites
par
le
ministere
canadien
des
Communications.

Roland
€p+707
Digital
Intelligent
Piano
C
ongratulations!
You
are
now
the
owner
of
one
of
the
most
sophisticated
—
and
fun!
—
home
keyboard
instruments
currently
available.
If,
however,
you've
looked
at
the
front
panel
and
are
saying
to
yourself,
“Gee,
look
at
all
those
buttons...”
don’t
worry!
The
epe
707
is
indeed
a
sophisticated
in-
strument,
but
it’s
also
very
easy
to
use.
With
the
patience
to
read
through
this
manual
—
and
a
little
practice
—
you'll
be
ready
to
enjoy
years
of
home
enter-
tainment
that
nothing
else
can
match!
So
turn
off
that
TV,
turn
on
the
ep,
and
everything
will
be
OK!
Your
New
EP
Features
...
*
128
different
Tones
(instrument
and
special
effect
sounds).
*
64
different
Music
Styles
(authentic
rhythm
backing
and
instrument
selection)
which
allow
you
to
play
a
wide
variety
of
the
most
popular
kinds
of
music.
*
An
intelligent
Arranger
which
provides
amazing
automatic
accompaniment
—
even
if
you're
a
‘one-finger’
piano
player!
e
A
Recorder,
so
you
can
capture
those
rare
performances!
*
Easy
Programming,
for
those
who
want
to
play
NOW!
*
A
Piano
mode,
for
those
times
when
you'd
rather
do
all
the
playing
yourself.
*
A
Manual
Drums
mode,
which
allows
you
to
get
in
on
the
rhythm
act!
*
Digital
Reverb
and
Chorus
effects
to
enhance
everything
you
play.
Copyright
©
1993
ROLAND
CORPORATION
All
rights
reserved.
No
part
of
this
publication
may
be
reproduced
in
any
form
without
the
permission
of
ROLAND
CORPORATION.


Once
the
ep
has
been
secured
to
the
keyboard
stand
(if
you’re
using
one;
contact
your
retailer
for
details),
there
are
just
a
couple
of
other
things
left
to
do
(if
you
haven't
done
them
already).
Connect
the
AC
Adaptor
Find
the
AC
adaptor
and
connect
it
to
the
ep’s
DC
inlet
(on
the
back
panel):
*
Before
you
plug
the
other
end
into
a
wall
outlet,
be
sure
the
ep's
|Power]
button
is
in
the
“off”
position.
*
Use
only
the
AC
adaptor
supplied
with
the
instrument.
*
Loop
the
adaptor
cord
around
the
cord
hook;
this
will
help
prevent
accidental
disconnection.
DC
IN
9V
1200mA
MODEL
EP-707
sE
R
A
je)
Roland
Corporation
MADE
IN
JAPAN
B-
ra
AC
Adaptor
Attach
the
Music
Rest
There
should
be
a
music
rest
somewhere
in
the
box
your
ep
came
in.
If
you
wish
to
attach
the
music
rest
to
the
instrument,
simply
slide
the
pasts
of
the
music
rest
into
the
holes
on
the
back
panel:

For
those
of
you
who'd
rather
play
your
new
instrument
than
read
about
it
...
With
the
ep
properly
setup
(see
previous
page)
...
Press
the
[Power]
button
(on
the
left
side
of
the
front
panel).
Find
and
press
the
[One
Touch
Program]
button
(below
and
to
the
right
of
the
display).
Play
any
note
within
the
bottom
two
octaves
of
the
keyboard
and
amazing
things
will
happen!
The
Arranger
(auto-accompaniment)
will
kick
in
and
play
an
Intro
phrase
based
on
the
note
you
played.
After
the
Intro
is
finished,
the
rhythm
will
settle
in.
(This
Music
Style
(A-1
BIG
BAND)
is
selected
automatically
each
time
the
ep
is
turned
on.)
Adjust
the
volume
with
the
[Volume]
slider.
Play
a
different
note
on
the
keyboard
—
again
within
the
bottom
two
octaves
—
and
the
accompaniment
will
change
to
reflect
the
new
chord.
To
make
nice,
smooth
chord
changes,
try
to
play
each
new
note
just
before
—
but
not
exactly
on
—
the
first
beat
of
the
following
bar.
(Watch
the
Beat
indicator
in
the
display
for
help.)
This
is
entirely
a
matter
of
feel
and
will
take
some
practice.
Also,
different
Music
Styles
(with
different
rhythmic
feels)
may
require
a
different
timing.
Once
you
get
the
idea,
you
can
play
a
solo
part
over
top
of
the
accompaniment!
(Ah,
yes
....
the
miracle
of
modern
technology!)
Play
your
solo
anywhere
within
the
top
four
octaves
of
the
keyboard.
(A
piano
sound
has
already
been
selected
as
the
solo
instrument.)
When
you’re
ready
for
the
big
finale,
find
and
press
the
[Intro/Ending]
button
(below
and
to
the
left
of
the
display).
An
automatic
Ending
phrase
will
complete
your
dazzling
performance!
There
...
doesn't
that
feel
better?!
Now,
please
proceed
to
the
rest
of
this
manual.

Demo
Song
Playback
Now
that
you've
had
a
chance
to
play
the
ep,
sit
back
and
let
the
ep
play
for
you!
Stored
in
the
ep’s
memory
are
8
demonstration
songs
which
were
writlen
to
highlight
the
instrument’s
capabilities.
With
a
little
practice
(and
the
knowledge
gained
from
this
manual),
you'll
be
able
to
create
music
just
like
this!
1.
On
the
far
right
side
of
the
panel,
find
and
press
[Demo].
The
button
indicator
will
light
and
the
display
will
read:
Group
Bank
Number
«JETI
It
says
“dEn,”
but
it
means
“demo.”
LIL
11
Tempo
LJ
> a
2.
To
hear
all
8
demo
songs,
one
after
another,
press
[Start/Stop].
The
first
song
will
start
to
play
(adjust
the
volume
as
necessary)
and
the
words
“demo
song
1”
will
scroll
across
the
display.
3.
To
stop
playback
at
any
time,
press
[Start/Stop]
or
[Demo].
*
All
8
songs
will
play
continuously
until
you
stop
playback.
To
hear
a
specific
demo
song
...
1.
Be
sure
the
[Demo]
button
is
lit
and
that
no
song
is
currently
playing.
Press
the
Music
Style
button
([1]
—
[8])
that
corresponds
to
the
song
you
wish
to
hear:
Music
Style
Group
A»
BigBand
Ballad
Swing
Country
Dixieland
Dance
Funk
Gospel
Group
B
=
PopPiano
Standard
Contemp
OldBallad
BossaNova
Rhumba
March
Waltz
1
2
3
4
5
6
7
8
Song
1
Song
2
Song
3
Song
4
Song
5
Song
6
Sang
7
Song
8
Playback
will
begin
instantly
(and
will
stop
when
complete).
2.
Again,
press
[Start/Stop]
or
[Demo]
at
any
time
to
stop
playback.
Press
another
Music
Style
button
to
select
a
different
song
if
you
like.
3.
When
you
are
finished
listening
to
all
the
demo
songs
you
wish,
press
[Demo]
again
(so
the
button
indicator
goes
out).
*
During
demo
song
playback,
only
the
[Demo]
and
[Start/Stop]
buttons
and
the
[Volume]
slider
will
have
any
effect;
all
other
panel
controls
(including
the
keyboard
itself)
will
be
inactive.
*
MIDI
data
is
neither
transmitted
nor
received
during
the
playback
of
demo
songs.
*
For
information
about
the
demo
songs
and
their
composers,
refer
to
page
51
in
the
Reference
section.
5

Panel
Descriptions
Chord
Transpose
Tune
Y
Arranger
à
intelligence
Hold
-On/Off
oiume
Min
1
1
01!
0104
pr
t
414
Max
@
Master
Control
Section
[Power]
Button
This
one's
really
easy;
this
button
turns
the
ep
on
and
off!
[Tune]
Button
This
button
—
when
used
with
the
Tempo
[-]
and
[+]
buttons
—
is
used
to
set
the
overall
pitch
of
the
instrument.
You
can
use
this
function
to
tune
the
ep
to
another
instrument
or
recorded
music,
for
exam-
ple.
(Page
25)
[Transpose]
Button
This
button
is
used
to
transpose
the
pitch
of
the
instrument.
With
this
function,
you
can
play
the
ep
in
any
key
while
using
the
fingering
of
C
major!
(Page
26)
[Volume]
Slider
This
slider
controls
the
instrument's
overall
volume
level
(including
headphone
volume).
©
Arranger
Section
These
buttons
control
the
volume
of
the
Arranger
—
that
part
of
the
ep
which
creates
the
auto-accompa-
niment.
They
can
also
turn
the
Arranger
off
completely.
(Page
37)
®
Chord
Functions
[Intelligence]
Button
This
button
activates
the
ep’s
Intelligence
function
which
creates
full
chords
from
the
single
notes
you
play!
(Page
36)
[Hold]
Button
When
active,
this
function
will
automatically
sustain
(hold)
any
note
or
chord
you
play
until
you
play
the
next
one.
(Page
37)
O
[Sync]
Button
This
button
activates
one
of
the
ep’s
two
synchronization
modes
—
Start
or
Intelligence.
(Page
34)

Front
Panel
(Left)
Music
Style
Group
A»
BigBand
Ballad
Swing
Country
Dixieland
Dance
Funk
Gospel
Group
B
=
PopPiano
Standard
Contemp
OldBallad
BossaNova
Rhumba
March
Waltz
1
tart
Intelligence
o
e
2
3
4
5
n
8
Style
Variation
#
To
Variation
To
Original
#
Intro
/Ending
#
Start
/
Stop
Fill
In
®
O
Music
Style
Section
Group
Button
In
the
Standard
Style
mode
there
are
16
Styles
from
which
to
choose;
8
in
Group
A
and
8
in
Group
B.
This
buttons
switches
between
these
two
Groups.
(Page
32)
Selection
Buttons
[1]
—
[8]
These
buttons
are
used
for
selecting
the
Music
Styles
(in
both
the
Standard
and
Expansion
modes;
Pages
31
&
32),
and
the
demo
songs
(when
in
the
Demo
Song
mode).
(Page
5)
[Style
Variation]
Button
Within
each
Music
Style
there
is
an
Original
and
a
Variation
rhythm
pattern.
This
button
switches
between
these
two
patterns
(without
adding
a
fill-in).
(Page
33)
Fill
In
Section
These
two
buttons
([To
Variation]
and
[To
Original])
are
used
to
add
variety
to
any
Music
Style
and
to
create
rhythmic
‘fill-ins.”
(Page
33)
[Intro/Ending]
Button
Every
Music
Style
contains
an
Introduction
and
an
Ending
phrase
(from
1
—
8
measures
long).
When
lit,
this
button
triggers
the
Introduction
phrase
before
the
rhythm
settles
in.
When
a
Music
Style
is
already
playing,
you
can
trigger
the
Ending
phrase
by
pressing
this
button.
(Page
35)
[Start/Stop]
Button
This
one's
really
easy.
You
can
manually
start
and
stop
any
Music
Style
by
pressing
this
button.
(There
will
be
no
Intro
or
Ending,
however.)
(Page
32)
This
button
is
also
used
to
start
and
stop
playback
of
demo
songs
and
any
song
stored
in
the
Recorder.
(Page
5,
39
&
40)

Panel
Descriptions
Group
Bank
Number
7
|
|
Fi
Tone
1
me”
Upper
Group
A
=
Piano
1
Piano
i
|
d.
LI
Lower
Group
B=
Strings
Bras
Tempo
Select
1
2
e
Lj
Beat
Melody
One
Touch
Intelligence
Piano
Program
e o
©
©
The
Display
This
three-character
display
indicates
a
variety
of
information;
Tone
and
Music
Style
numbers,
plus
tempo,
pitch,
transposition
and
volume
settings,
for
example.
CG
Tempo
Buttons
[-]
and
[+]
These
buttons
are
used
to
control
the
playback
tempo
(speed)
of
the
selected
Music
Style.
(Page
35)
They
are
also
used
to
set
the
overall
pitch
of
the
ep
when
used
with
the
|Tune]
button.
(Page
25)
€
Tone
Section
Select
Button
This
button
determines
which
section
of
the
keyboard
(Upper
or
Lower)
you'll
be
selecting
a
Tone
for.
(Page
24)
Group
Button
in
the
Standard
Tone
mode
there
are
16
Tones
from
which
to
choose;
8
in
Group
A
and
8
in
Group
B.
This
button
switches
between
the
two
Groups.
(Page
18)
Selection
Buttons
[1]
—
[8]
These
buttons
are
used
for
selecting
Tones
(in
both
Standard
and
Expansion
modes;
Pages
17
&
19).
®
[Melody
Intelligence]
Button
This
is
one
of
those
sophisticated
features
we
mentioned
earlier.
When
the
Arranger
is
playing
a
Music
Style
and
this
function
is
active
(the
button
LED
is
lit),
the
ep
will
automatically
create
a
harmony
part
for
the
melody
you
play!
(Page
37)
©
Easy
Program
Section
(he
heart
of
the
ep!)
[Piano]
Button
There
may
be
times
when
you
want
to
say
“Enough!
I
just
want
to
play
the
Piano!”
Press
this
button
and
all
the
fancy
auto-accompaniment
stuff
disappears!
(Page
38)

Front
Panel
(Right)
Harpsi
E.Piano
Vibraphone
E.Organ
PipeOrgan
Choir
Chorus
Reverb
Sax
Flute
A.Guitar
E.Guitar
Accordion
Fantasia
3
4
5
6
7
8
Expansion
Effects
Arranger
Lower
M.Drums
Split
e
Recorder
>»
O
O
©
[One
Touch
Program]
Button
Pick
a
Music
Style,
any
Music
Style,
and
then
press
this
button
—
the
ep
instantly
makes
all
the
best
settings
for
your
performance.
Just
go
ahead
and
play!
(Pages
5
&
38)
Q
[Split]
Button
This
button
switches
between
the
Arranger,
Lower
Tone
and
Manual
Drums,
allowing
you
to
work
with
each
individually.
(Pages
22,
23
&
35)
You
can
also
use
this
button
to
set
different
split
points
on
the
keyboard
itself.
(Page
23)
@
Recorder
Section
[Rec]
Button
Set
everything
up
the
way
it
should
be,
press
the
[Rec]
button
and
away
you
go!
Everything
you
play
(and
do)
will
be
recorded
with
perfect
accuracy.
(Pages
39
&
40)
[Play]
Button
Press
this
button
to
playback
your
masterpiece!
(Pages
39
&
40)
©
[Expansion]
Button
By
pressing
this
button
you
can
access
an
additional
112
Tones
(for
a
total
of
128)
(page
19),
or
48
more
Music
Styles
(for
a
total
of
64).
(Page
32)
©
[Demo]
Button
You
can
listen
to
the
ep's
demo
songs
anytime
you
like;
press
this
button
and
then
a
Music
Style
button
(11]
—
[8)),
or
press
[Star/Stop].
(Page
5)
@
[Effects]
Button
This
button
turns
the
ep's
digital
effects
—
reverb
and
chorus
—
on
and
off.
(Chorus
and
reverb
enhance
your
music
to
really
make
it
sound
alive!)
(Page
22)

Rear
Panel
MODEL
EP-707
Roland
Corporation
MADE
IN
JAPAN
@
PEDAL
Jacks
The
supplied
pedal
(Roland
DP-2)
can
be
connected
to
either
of
these
jacks.
The
effect
obtained
will,
of
course,
depend
upon
the
jack
you
select:
DAMPER
Connecting
the
pedal
to
this
jack
will
allow
you
to
sustain
(hold)
the
notes
that
you
play;
much
like
using
the
damper
pedal
on
an
acoustic
piano.
SOFT
If
you
connect
the
pedal
to
this
jack,
you
can
make
the
notes
you
play
sound
a
little
softer;
similar
to
the
function
of
the
soft
(shift)
pedal
on
an
acoustic
piano.
O
MIDI
Connectors
OUT
The
MIDI
data
created
by
the
ep
can
be
sent
(or
transmitted)
to
other
MIDI
devices
via
this
connector.
IN
MIDI
data
transmitted
to
the
ep
from
external
MIDI
devices
is
received
through
this
connector.
*
[f
you
are
using
the
ep
on
its
own,
there
is
no
need
to
be
concerned
about
MIDI.
If,
however,
you
would
like
more
information
about
MIDI,
contact
your
Roland
dealer.
€
Audio
Connectors
INPUT
R/L(MONO)
If
you
have
another
keyboard
(ar
other
audio
source)
that
you'd
like
to
hear
through
the
ep’s
internal
speakers,
connect
it
to
these
input
jacks.
OUTPUT
R/L(MONO)
If
you'd
like
to
hear
your
ep
through
a
stereo,
PA,
or
guitar
ampli-
fier
(for
example),
connect
that
external
audio
system
to
these
output
jacks.
€
DCIN
Jack
Connect
the
supplied
AC
adaptor
to
this
jack.
(Page
3)
(Loop
the
AC
adaptor
cord
around
the
cord
hook;
this
will
help
prevent
the
adaptor
from
accidental
disconnection.)
10

Important
Notes
in
addition
to
the
information
on
the
rear
panel,
please
read
and
observe
the
following:
Power
Supply
*
Be
sure
to
use
only
the
AC
adaptor
supplied
with
the
unit.
Use
of
any
other
AC
adaptor
could
result
in
damage,
malfunction,
or
electric
shock.
*
Before
connecting
this
unit
to
other
devices,
turn
off
the
power
to
all
units;
this
will
help
prevent
damage
or
malfunction.
*
Do
not
use
this
unit
on
the
same
power
circuit
with
any
device
that
will
generate
line
noise;
an
electric
motor
or
variable
lighting
system
for
example.
The
power
requirement
for
this
unit
is
indicated
on
its
nameplate
(rear
panel).
Ensure
that
the
voltage
in
your
installation
meets
this
requirement.
Avoid
damaging
the
power
cord;
do
not
step
on
it,
place
heavy
objects
on
il,
etc.
When
disconnecting
the
AC
adaptor
from
the
power
outlet,
grasp
the
plug
itself;
never
pull
on
the
cord.
If
the
unit
is
to
remain
unused
for
an
extended
period
of
time,
unplug
the
power
cord.
Placement
*
Do
not
subject
the
unit
to
temperature
extremes
(eg.,
direct
sunlight
in
an
enclosed
vehicle).
Avoid
using
or
storing
the
unit
in
dusty
or
humid
areas,
or
areas
that
are
subject
to
high
levels
of
vibration.
e
Using
the
unit
near
power
amplifiers
(or
other
equipment
containing
large
power
transformers)
may
induce
hum.
*
This
device
may
interfere
with
radio
and
television
reception.
Do
not
use
this
device
in
the
vicinity
of
such
receivers,
*
Do
not
expose
this
unil
to
temperature
extremes
or
install
it
near
devices
that
radiate
heat.
Direct
sun-
light
in
an
enclosed
vehicle
can
deform
or
discolor
the
unit.
Maintenance
*
For
everyday
cleaning
wipe
the
unit
with
a
soft,
dry
cloth
or
one
that
has
been
slightly
dampened
with
water.
To
remove
stubborn
dirt,
use
a
mild,
non-abrasive
detergent.
Afterwards,
be
sure
to
wipe
the
unit
thoroughly
with
a
soft,
dry
cloth.
*
Never
use
benzene,
thinners,
alcohol
or
solvents
of
any
kind,
to
avoid
the
possibility
of
discoloration
and/or
deformation.
"4*
.
Additional
Precautions
*
Protect
the
unit
from
strong
impact.
*
Do
not
allow
objects
or
liquids
of
any
kind
to
penetrate
the
unit.
In
the
event
of
such
an
occurrence,
discontinue
use
immediately.
Contact
qualified
service
personnel
as
soon
as
possible.
*
Never
strike
or
apply
strong
pressure
to
the
display.
*
A
small
amount
of
heat
will
radiate
from
the
unit
during
normal
operation.
*
Before
using
the
unit
in
a
foreign
country,
consult
with
qualified
service
personnel.
*
Should
a
malfunction
occur,
or
if
you
suspect
there
is
a
problem,
discontinue
use
immediately.
Contact
qualified
service
personnel
as
soon
as
possible.
To
avoid
the
risk
of
electric
shock,
do
not
open
the
unit
or
its
AC
adaptor.
11

A
Note
About
This
Manual
...
The
ep
manual
was
designed
to
be
as
short
as
possible
as
we
realize
that
most
people
would
much
rather
play
their
new
instrument
than
read
about
it.
How-
ever,
if
is
very
important
that
you
read
at
least
two
sections
—
The
Basics
and
Beyond
the
Basics.
These
two
sections
were
written
in
a
(hopefully)
logical
manner,
taking
you
from
the
simplest
operations
to
the
more
complex
(which
really
aren’t
that
difficult).
To
that
end,
each
new
function
or
operation
which
is
introduced
assumes
that
you've
completed
the
steps
of
the
previous
operation.
This
approach
was
taken
because
all
the
instruments
functions
are
related,
and
they
build
upon
one
another.
Our
best
advice,
therefore,
is
to
work
your
way
through
these
two
main
sections
as
they
contain
the
information
you
really
need.

Table
Of
Contents
Adag]
33
Congratulations!
ep+707
Features
Setup
Connect
the
AC
adaptor
Attach
the
Music
Rest
Quick
Start!
4
Demo
Song
Playback
Panel
Descriptions
Front
Panel
(Left)
Front
Panel
(Right)
Rear
Panel
Important
Notes
11
A
Note
About
This
Manual
Ins
343165
Power
ON!
16.
Selecting
Tones
(Standard
Tone
Mode)
Selecting
More
Tones
(Expansion
Tone
Mode)
Group,
Bank,
Number
(GBN)
21
Manual
Drums
22
Digital
Effects
22
Split
Keyboard
Mode
23
New
Sounds
for
the
Split
Keyboard
Master
Tuning
25
Transpose
Function

Table
Of
Contents
BEYOND
fus
3445155
“What
is
the
Arranger,
anyway?”
“Well
then,
what
are
Music
Styles?”
Selecting
Music
Styles
31
Style
Variation
and
Fills
33
Sync
(Synchronization)
Intelligence
Start
(Sync
Start)
34
Intelligence
(Sync
Intelligence)
Intro/Ending
Function
35
Music
Style
Tempo
Manual
Drums
Chord
Intelligence
Chord
Hold
37
Melody
Intelligence
Arranger
Volume
37
Easy
Programming
38
One
Touch
Program
Piano
38
The
Recorder
A
Final
Note
Music
Styles
45
intelligent
Chords
Manual
Drums
List
Demo
Song
Information
Default
Settings
52
Toubleshooting
53
MIDI
Implementation
Chart
Specifications
55
Index
56
Information

Roland
EP
-
707
Digital
Intelligent
Piano

the
BASICS
Power
ON!
1.
Press
the
[Power]
button
and
the
ep
instantly
springs
to
life!
Go
ahead
and
play
a
few
notes.
(Use
the
[Volume]
slider
to
set
the
volume.)
You
can
also
connect
headphones
to
either
or
both
the
headphone
jacks
if
you
like:
WARNING:
Take
great
care
when
using
headphones.
Excessive
volume
levels
can
easily
damage
your
hearing!
The
sound
that
you
hear
(Piano
A-1)
is
automatically
selected
each
time
the
ep
is
turned
on.
The
display
will
look
like
this:
Group
Bank
Number
You
may
have
noticed
by
now
that
the
Piano
sound
is
assigned
to
the
entire
keyboard.
This
is
called
the
Piano
mode
because
the
ep
now
functions
just
like
an
acoustic
piano.
The
Piano
mode
is
also
automatically
selected
each
time
the
ep
is
turned
on.
*
You
can
also
select
the
Piano
mode
at
any
time
by
simply
pressing
the
[Piano]
button.
The
pedal
also
provides
familiar
‘piano’
functions.
Depending
on
which
jack
you
connected
the
pedal
to,
you
can
control
one
of
two
familiar
functions;
the
damper
effect,
which
allows
you
to
sustain
the
notes
you
play,
or
the
soft
effect,
which
makes
the
notes
you
play
sound
a
little
soiter.
16

the
BASICS
Selecting
Tones
(Standard
Tone
Mode)
1.
2.
3.
The
Piano
sound
that
you’ve
been
playing
is
only
one
of
16
Tones
available
in
the
Standard
Tone
mode.
To
try
out
some
of
the
others,
first
locate
the
Tone
Section
(on
the
right
side
of
the
panel):
Tone
Upper
Group
A»
Piano
1
Piano
2
Harpsi
E.Piano
Vibraphone
E.Organ
PipeOrgan
Choir
Lower
Group
B
=
Strings
Brass
Sax
Flute
A.Guitar
E.Guitar
Accordion
Fantasia
Select
1
2 3
4
5
6
7
8
Press
the
button
marked
[Piano
2]
(button
[2])
and
play
the
keyboard.
This
is
a
variation
of
the
first
Piano
sound.
The
display
will
read:
Group
Bank
Number
A-2
Tempo
>
e
L4
Now
press
the
button
marked
[Harpsi]
(button
[3])
and
play
the
keyboard.
The
display
will
read:
Group
Bank
Number
No
Piano
sound
here!
Instead,
a
fine
Harpsichord
sound
for
your
Baroque
experiments!
17

the
BASICS
5.
Proceed
through
the
other
Tones
in
Group
A.
When
you’ve
played
the
last
one
([Choir]),
find
and
press
the
Tone
Group
button
to
select
Group
B:
Tone
Upper
Group
A
=
Piano
1
Piano
2
Harpsi
Lower
Group
B=
Strings
Brass
Sax
Select
1
2
3
The
display
will
read:
Group
Bank
Number
L-O
o a
Now
select
the
Group
B
Tones
by
pressing
the
same
8
Tone
buttons
again.
But
wait!
There's
more!
...
18
Table of contents
Other Roland Musical Instrument manuals

Roland
Roland FP-E50 User manual

Roland
Roland fp-30 User manual

Roland
Roland XP-50 User manual

Roland
Roland RS-09 User manual

Roland
Roland HP-207 User manual

Roland
Roland 60S User manual

Roland
Roland FR-18 DIATONIC User manual

Roland
Roland RD-170 User manual

Roland
Roland RM-700 User manual

Roland
Roland EP-7 User manual

Roland
Roland RD-100 Operating and maintenance manual

Roland
Roland pt-2700 User manual

Roland
Roland Atelier AT-80SL User manual

Roland
Roland KR-5500 User manual

Roland
Roland MP-60 User manual

Roland
Roland G-70 Installation and operating instructions

Roland
Roland Aerophone Go User manual

Roland
Roland FP-50 User manual

Roland
Roland HP 1500 User manual

Roland
Roland V-ACCORDION FR-5 User manual