ROLF PRIMA User manual

Wheel Systems
Owner’s Manual

23
ROLF PRIMA OWNER’S MANUALROLF PRIMA OWNER’S MANUAL
Congratulations!
You have chosen wisely and we thank you for purchasing the world’s finest high perfor-
mance wheel system. We build all wheels by hand and we are proud to have built them
for you.
Because there are a variety of Rolf Prima wheels, this manual may contain information
that does not apply to your wheelset. Some illustrations may show details which vary
from your wheelset. If you have any questions after reading this manual, please consult
Please inspect and save all packaging materials that came with your wheels. If there is
any damage to the wheels or the packaging, it is important to identify it immediately.
The structural condition of your wheels and correct installation are crucial to your safety.
It is important that you read this manual thoroughly before riding to ensure that your
wheel system functions properly and safely. This manual explains the recommended care,
inspection, and maintenance of your Rolf Prima wheel system. If you have any question
about the details of installation or maintenance, have a qualified bicycle dealer perform
the installation or maintenance.
If you sell or loan your Rolf Prima wheel system, please provide the new rider with this
manual.
Installation and maintenance instructions are included in this manual. Even if your
wheelset was installed by a bike shop, you should read this manual thoroughly.
A detailed service manual is available at www.rolfprima.com
Please register your wheelset at www.rolfprima.com with the serial numbers of your
wheels. These are located on the card that came with your wheels and under the rim
strip by the valve hole for clincher wheels or found on the side of the rim.
Some maintenance and repair should only be performed by your Rolf Prima dealer. Any
such service will be indicated in this manual. If you have a question or issue your dealer
Rolf Prima
888.308.7700
www.rolfprima.com
Inspection – Before Every Ride
Before every ride be sure to inspect every item on this list to ensure your Rolf Prima
wheels are in top condition and are properly installed on your bicycle. If you find that
your wheel system requires service or further inspection, see www.rolfprima.com for our
Factory Service Program or contact your Rolf Prima dealer.
Check that the wheels run true
Check that the rims are clean
Dirty or greasy rims greatly reduce braking effectiveness and can present a significant
safety risk.
Check that the brake pads are clean and properly adjusted
Check that the tires are properly inflated
For aluminum clincher wheels, inflate tires to the inflation pressure indicated on the tire
sidewall or as indicated in the Tire Pressure section. Your rims can be damaged by riding
with insufficient tire pressure. Inspect the tires for damage or excessive wear. If you
have any questions about the condition of your tires, have them inspected by your local
bike shop.
For carbon tubular road wheels, inflate tires to a minimum of 110 psi (7.6 bar). Do not
exceed the maximum pressure indicated on the tire sidewall.
PLEASE NOTE: Rims can be damaged if ridden with insufficient tire pressure. Appropri-
ate pressure may be dependent on road conditions, rider weight and tire size. Impact
damage to rims is not covered under your Rolf Prima warranty. Many tubular tires tend to
lose significant amounts of pressure over a short period of time. It is very important that
tubular tires are checked for proper tire pressure before each ride.
Check that the quick release mechanisms are properly closed
Your wheels are equipped with quick release wheel retention mechanisms. The quick
release allows the wheel to be removed and installed without tools. For proper and safe
operation, read these instructions carefully.
WARNING!
Failure to have wheel quick release retention mechanisms properly adjusted and
closed may cause loss of control resulting in personal injury or death. If you have
any questions about the operation of this system, consult your dealer.

45
ROLF PRIMA OWNER’S MANUALROLF PRIMA OWNER’S MANUAL
Operation of Quick Release Mechanisms
IMPORTANT: IF YOU DO NOT UNDERSTAND ANY PORTION OF THESE INSTRUCTIONS,
HAVE YOUR ROLF PRIMA DEALER SHOW YOU PROPER INSTALLA-
TION OR CONTACT ROLF PRIMA DIRECTLY.
1. Check both wheels before every ride.
2. Move the quick release lever to the OPEN position and set the
wheel so it seats firmly in the frame or fork tips [figure 1].
3. With the lever about halfway between the OPEN and CLOSED
position [fig. 2], tighten the quick release adjusting nut on the
opposite end of the quick release axle until finger tight, ensuring that
the nut is threaded on a minimum of 5 turns.
4. Place the quick release lever in the palm of your hand and move the
lever fully into the CLOSED position. [figure 3 for front wheels, figure
4 for rear wheels]. At the halfway closed position you should feel
resistance to this motion.
5. If the quick release lever can be moved to the CLOSED position with little or no
resistance, clamping strength is insufficient. Return the lever to the OPEN position
and tighten the nut further. Close the lever, testing again for resistance. When the
quick release mechanism is properly tightened and clamped in the closed position, the
clamping force will be adequate to cause metal into metal engagement [embossing] of
the fork or frame tips. It should require effort to close the Quick Release, yet it should
not be difficult.
DO NOT TIGHTEN THE QUICK RELEASE MECHANISM BY USING THE QUICK
RELEASE LEVER LIKE A WING NUT [FIG 5]. OVER-TIGHTENING THE QUICK RELEASE
MECHANISM MAY CAUSE DAMAGE TO THE QUICK RELEASE ASSEMBLY.
6. Perform these two tests to ensure that the quick release
mechanisms are properly closed:
A.Lift the front of the bicycle and give the top of the tire
a sharp downward blow with a closed fist. The wheel
should not come out of the fork, be loose, or move
from side to side. Repeat this test to the rear wheel. If
uncertain, repeat the tightening process, as shown in
steps 2-6, above.
B. With the quick release lever properly adjusted and closed,
it will not be possible to rotate the quick release lever in a circular motion parallel to
the wheel as pictured in figure 5.
Inspection – Weekly
Check that there are no loose, damaged, or broken spokes
Check that there are no cracks in front or rear rims
As alloy rims near the end of their fatigue life, cracks may develop. If cracks are found, do not ride
the wheel. Take the wheel to your Rolf Prima dealer or contact Rolf Prima for service.
Carbon fiber rims may become damaged as a result of an accident, impact, or improper handling.
Damage to carbon fiber components may be contained internally, and the rims may appear
outwardly normal and undamaged at a glance. It is very important to thoroughly inspect all the parts
on your bicycle after an accident – but it is especially important that you thoroughly inspect your
carbon fiber rims for signs of damage. Look closely for cracks, deep scratches or gouges, delamina-
tion, loose fibers and other surface flaws. If you suspect the rim has been damaged, take your wheel
to your Rolf Prima dealer for further inspection.
Inspection – Monthly
Check that there is no excessive looseness in hub bearings in both wheels
Check both rims for wear
Bicycle rims will wear from the friction of rim braking and may eventually require replace-
ment. Inspect the rim sidewalls and braking surfaces for heavy grooving or cracks.
WARNING!
Inspect your wheels regularly. Make sure your Quick Release mechanisms are
closed properly before each ride. Worn or damaged components, or improperly
closed Quick Release mechanisms can cause an accident which may result in
serious injury or death.
CLOSED
OPEN
OPEN
CLOSED
FIGURE 1
FIGURE 2
FIGURE 3
FIGURE 4
FIGURE 5

67
ROLF PRIMA OWNER’S MANUALROLF PRIMA OWNER’S MANUAL
Wheel model Brake pad color
58rSc & all alloy modelS red
TdF4Sl, TdF6, TdF6Sl
red
eoS3, areS6, areS6 eS, areS4, areS4 eS yelloW
areS3, areS3 eS, TT diSc Blue
Wheels with carbon fiber rims will exhibit different braking characteristics than wheel with
aluminum rims. Please refer to our FAQ and carbon rim braking manual insert for more information.
Carbon rims do not dissipate the heat generated by braking as fast as aluminum rims. Managing rim
temperatures through proper brake application is important. If rims are allowed to overheat, damage
to the rim and/or tire can result. During long descents, it is very important that brakes are applied
with greater force, more frequently, and for the shortest possible time period. Just like in a car,
DO NOT DRAG YOUR BRAKES. The technique of frequent, hard braking and releasing, even if only
releasing for brief periods, significantly reduces rim temperatures.
Carbon rims can have a higher rate of brake pad wear, especially in wet conditions. Check your
brake pad thickness before each ride.
Carbon rims are different from aluminum rims in wet braking conditions. We recommend test riding
your carbon wheels in wet conditions.
Brakes and Tandem Wheels
Rolf Prima tandem wheels are compatible with industry standard tandem brakes. Both front and
rear alloy tandem wheels are compatible with rim or disc brakes. Carbon fiber tandem wheels
and Tandem Stealth are designed for disc brake only.
Follow the brake manufacturer’s instructions for installation and adjustment.
MTB, Road Disc, Cyclocross disc brakes
Rolf Prima mountain bike, cyclocross and road disc wheels are compatible with 6 bolt or Center
Lock disc brake rotors depending on the model. They are not rim brake compatible. Refer to
your bike and/or brake owner’s manual for proper installation and setup.
Cassette Compatibility
All road, cyclocross and tandem Rolf Prima wheels are Shimano/SRAM 11-speed compatible as are
most MTB wheels. To use a 10-speed cassette with 11-speed compatible wheels, use the 1.8mm Rolf
Prima supplied spacer behind the cassette in addition to any spacer included with your cassette. For
road 11-speed cassettes, do not use the Rolf Prima supplied spacer. For 11-speed MTB cassettes (not
XD) use the 11-speed spacer.
Rolf Prima Campagnolo wheels are 10/11-speed compatible. Contact your Rolf Prima dealer for
options to convert between Shimano and Campagnolo (road), or Shimano and SRAM XD (MTB).
Installation and Recommendations
There are many different drivetrain and tire systems. Before attempting any installation of compo-
nents onto this wheelset, make sure the parts are compatible. Tires, valves, gear clusters, brakes
and the frame and fork spacing must be correct. If you are unsure of the compatibility of any part,
consult your Rolf Prima dealer.
Brakes and Brake Pads
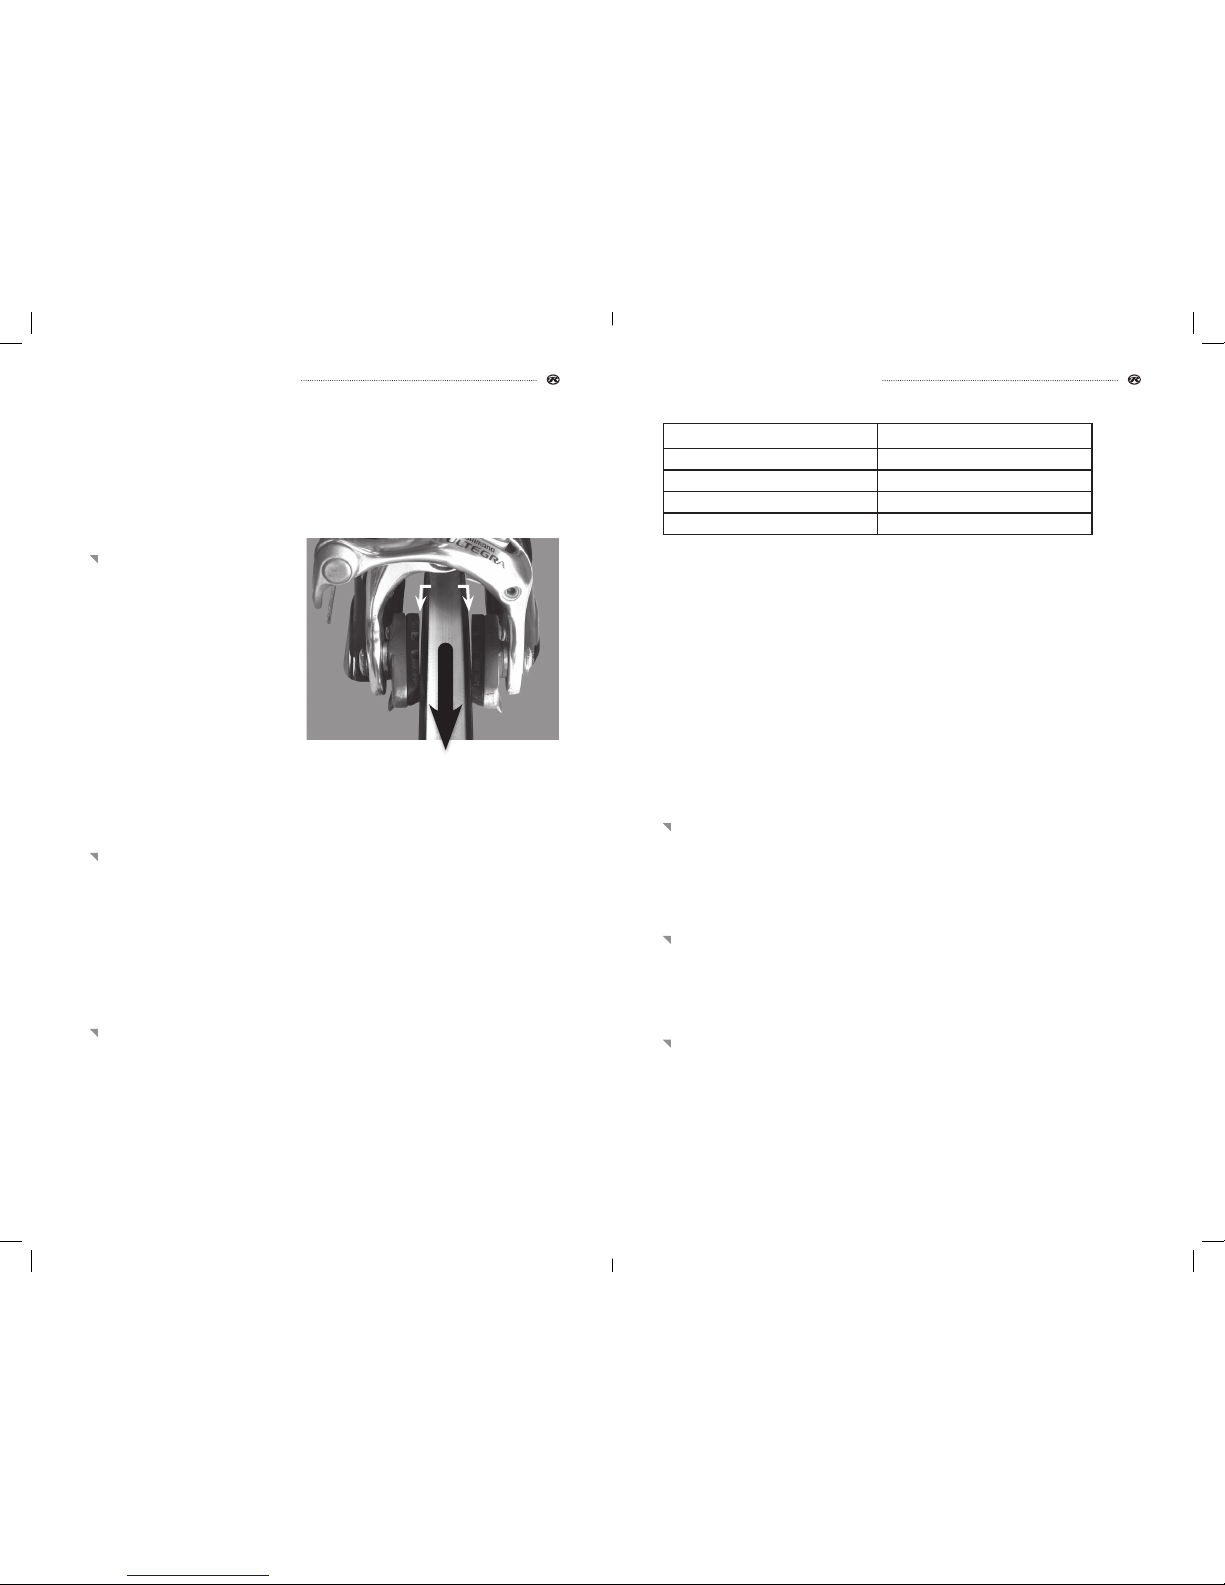
Proper brake pad adjustment
Rim brake pads should be adjusted so
that they sit 1mm to 2mm away from the
rim when the brakes are released. Toe-in
brake pads 1mm. When the forward most
tip of the pad first contacts the rim, there
should be 1mm space at the back of the
pad. Brakes should be properly centered
over the rim so that each pad is the same
distance from the rim when the brakes
are released.
Rim brake pads should be aligned properly with the braking surface of the rim and should contact
only the machined or designated brake surface of your rim. Ensure there is adequate clearance
between the top of the brake pad and the tire. Improper or misaligned pads can cause premature rim
wear or a sudden tire blowout.
Rims with aluminum braking surface: Brake pad selection and maintenance
While your Rolf Prima alloy wheels do not require special brake pads, for best braking perfor-
mance use Rolf Prima RED brake pads. Brake pads from many manufacturers are available in
different compounds. It is important that medium compound pads designed for aluminum rims
are used with your Rolf Prima wheels. Soft pads may cause brake stutter or be too “grabby”.
Hard compound pads are abrasive and may decrease the life of your wheels.
Inspect and clean your brake pads frequently. Road grit, small rocks and other items can
become embedded in brake pads and cause accelerated wear of the braking surface. If you hear
scratching noises when you brake that is a hint. Check and clean your pads.
Rims with carbon braking surface: Brake pad selection and maintenance
Rolf Prima Carbon wheels with carbon brakewalls feature a specially prepared braking surface,
but can still be susceptible to heat build-up issues and abrasion. These carbon wheels come
with Rolf Prima brake pads. We strongly recommend the use of the supplied Rolf Prima pads as
the use of other pads may void the warranty and decrease the braking function.
FWD
FIGURE 5.1
TOE-IN
GAP
1MM

89
ROLF PRIMA OWNER’S MANUALROLF PRIMA OWNER’S MANUAL
Tires
Important information about rim strips
Each Rolf Prima wheel (with clincher rims) comes with a rim strip or tape installed. Before installing tires,
make sure this is in place and completely covers all spoke holes in the tire bed. If the spoke holes are not
completely covered, a sudden loss of tire pressure or blowout could occur.
Tire selection, installation and tire pressure – clincher tires
> Clincher Tires with inner tubes:
This is the type of tire system most riders are familiar with. Follow normal clincher tire installation
procedures. If you are not familiar with tire installation, see your dealer. Do not use metal or narrow plastic
tire levers to install or remove tires. These levers can damage the rim. For best results use: Park Tool - TL-6,
TL-1.1, TL-4, TL-4.2 or Lezyne Power XL levers.
>Road
Rolf Prima clincher road wheels can be used with tire widths ranging from 22mm to 28mm. Follow
air pressure recommendations on the sidewall of the tire. Do not overinflate tires. Overinflating can
cause sudden blowout or damage to your wheels. For carbon clinchers in particular, under inflation
of tires may allow rims to make contact with the road surface resulting in damage to the rim. Do
not use tires that measure less than 22mm in width and do not use Latex inner tubes with carbon
clincher wheels.
>Cyclocross
Rolf Prima clincher cyclocross wheels can be used with tires from 22mm to 35mm. Follow air
pressure recommendations on the sidewall of the tire.
>Adventure
Rolf Prima clincher Hyalite wheels can be used with a wide variety of tires from 22mm to 2 ½”
however, recommended tire pressure varies with tire width. Follow air pressure recommendations on
the sidewall of the tire and the tire pressure chart below – whichever is lower for your tire width.
>Mountain Bike
For use with traditional mountain bike tube and tire follow normal tire mounting procedures. Inspect
rim tape before mounting tire to be sure that the nipple access holes are completely covered. Follow
air pressure recommendations on the sidewall of the tire.
> Tubeless Clincher Tires (without inner tubes):
> Road and Cyclocross
Rolf Prima clincher road and cyclocross wheels are shipped with a rim strip which is not tubeless compat-
ible. Most of these wheels can be set up tubeless, but require tubeless rim tape and a valve. Follow your tire
manufacturer’s recommendation for installation. Road wheels can be used with tire widths ranging from
22mm to 28mm and Cyclocross 22mm – 35mm. Follow air pressure recommendations on the sidewall of
the tire and do not overinflate tires. Overinflating can cause sudden blowout or damage to your wheels.
Our tubeless compatible road wheels can also be used with conventional clincher tires and inner tubes
however some combinations will be tight and require a tire lever so we recommend you carry tire levers with
you on your rides.
> Adventure
Rolf Prima clincher Hyalite wheels are tubeless ready and come with rim tape and tubeless valve
stems. These wheels can be used with a wide variety of tires from 22mm to 2 ½”. However, recom-
mended tire pressure varies with tire width. Follow air pressure recommendations on the sidewall of
the tire and the tire pressure chart below – whichever is lower.
Tire WidTh maximum preSSure
25mm-28mm
110
29mm-33mm
85
34mm-40mm
60
41mm-50mm (1.6-2.0”)
50
51mm-60mm (2.1-2.5”)
35
> Mountain Bike
Rolf Prima mountain bike wheels are tubeless ready and come with rim tape and tubeless valve stems.
They can also be used with standard tire/tube systems. Refer to your tire manufacturer’s recom-
mendation for tubeless tire application recommendations and mounting instructions. Do not inflate
tubeless mountain bike tires over 40psi.
Tire selection, installation and tire pressure: Tubular tires
Tubular tire installation requires specific experience or training. Correct tire installation is critical to your
safety. If you do not know how to install tubular tires, have them installed professionally by your dealer.
Have your dealer teach you correct tire installation. It is not difficult, but it is important that it is done
correctly. Below are important notes regarding safe installation.
> Carbon tubular rims:
Rolf Prima tubular road wheels can be used with tire widths ranging from 22mm to 28mm and cyclo-
cross tubular wheels can use 22mm – 35mm. Appropriate minimum tire pressure may be dependent
upon road conditions, rider weight and tire size. As a general recommendation we recommend a
minimum of 110psi for road wheels to protect your carbon rim from impact damage. Never exceed the
maximum tire pressure marked on the tire sidewall.
> Only use tire cement designed specifically for tubular tires and follow the tire cement maker’s instruc-
tions carefully. We do not recommend 3M Fast Tack.
>Thoroughly clean the tire mounting surface of the rim before adding cement. There should be no dirt,
oil or grease on the mounting surface. Dirty surfaces will not adhere properly. For alloy tubulars, lightly
sand the rim tire bed. Old cement can be safely removed from the rim using acetone, Goof Off or isopropyl
alcohol.
>We do not recommend using tape such as TUFO. While tapes can work well, some are overly adhesive
and can damage the rim upon removal.
>After curing, inflate tires and test the bond by attempting to pull the tire off the rim. For more detailed
instructions, see the tire or cement manufacturer’s website.

10 11
ROLF PRIMA OWNER’S MANUALROLF PRIMA OWNER’S MANUAL
>Do not use any tools to install or remove a tubular tire from a carbon rim as they may damage the rim.
Valve Extenders
Rolf Prima carbon wheels come with a valve extender matched to the rim height. Be sure to install
the valve extender before mounting the tire.
Installation procedure:
>Remove valve core from tube or tire valve using supplied valve core tool
>Securely install valve core in female threaded end of valve extender
>Install valve extender into tube or tire valve using supplied valve extender tool. Overtightening
can cause damage to the extender. If you are using sealant via the valve, install sealant before
reinserting the valve core
Maintenance
WARNING!
Repair and service of Rolf Prima wheels requires special tools and knowledge, and should
be undertaken only by a qualified service technician at a professional bicycle shop. Repairs,
service, or adjustments performed by an inexperienced person could lead to wheel failure
that may cause a crash resulting in injury.
Care and Cleaning
For general cleaning use soap and water. Do not use high pressure water to clean wheels. High
pressure water can damage the hub bearings.
To remove tubular tire glue use acetone, Goof Off or a similar product. Take care to avoid getting
solvent on the tire, tire/rim bondline or decals. Decals can be damaged by solvents. If this occurs,
replacement decals are available on www.rolfprima.com
Wheel Truing
Wheel truing involves special tools and knowledge and should be performed by a qualified profession-
al wheel builder. Should you suspect your wheels need truing, we recommend that you take them to
your Rolf Prima dealer for evaluation.
Before truing a wheel, it is important to apply oil between the rim and the nipple, and between the spoke and
the nipple. This can be accomplished by dripping oil into the hole where the spoke enters the rim and also
through the hole in the tire well.
Hub Bearing Inspection and Adjustment
Inspection
Over time bearings in your wheel hubs may become worn or may otherwise come out of adjustment.
With the wheel installed on the bicycle, grab the wheel near the brake calipers and gently rock side to
side. If you feel play (light clunking), the bearings may need to be adjusted or possibly replaced. See
www.rolfprima.com for hub adjustment instructions.
For further inspection remove the wheel from your bicycle and remove the Quick Release assembly.
With your forefinger and thumb holding the axle endcap on one side of the wheel, rotate the axle. It
should rotate smoothly. If the bearing turns roughly or noisily, it is time to replace the bearing.
Bearing replacement
Rolf Prima hub systems use a variety of bearings. To determine which bearing you require, refer to the bearing
chart at www.rolfprima.com under service and tech info. Care must be taken during removal and installation
of bearings to prevent damage to the hub shell and bearing. We recommend this procedure be performed by a
qualified service technician. Rolf Prima will not be responsible for damage to the hub or bearing as a result of
improper removal or installation.
Freehub body lubrication and overhaul
Occasionally it may be necessary to service the Freehub Body mechanism. This requires special
knowledge. Rolf Prima recommends this service be performed by a qualified service technician. For
more information, see the Rolf Prima Service Manual at www.rolfprima.com.
WARNING!
Incompatible or improperly installed components can damage your wheelset and/or cause
an accident which may result in injury or death. Make sure your brakes are adjusted and
functioning properly. Make sure your tires are installed and inflated properly. Test the braking
performance of your new wheels in a safe manner.

ROLF PRIMA OWNER’S MANUAL
CRASH REBUILD AND FACTORY SERVICE PROGRAM
If you have damaged your wheels or they require service beyond your capabilities, contact
your Rolf Prima dealer or call us. If you do not have a Rolf Prima dealer in your area, or you
have further questions, see www.rolfprima.com and select Factory Service. We provide every
customer direct access to service from our facility. Our goal is to turn around all repair work in
48 – 72 hours.
REGISTER YOUR WHEEL WARRANTY
www.rolfprima.com/warranty-registration/
NOTE: WHEN SENDING A WHEEL BACK FOR WARRANTY OR OTHER SERVICE WORK, PLEASE
REMOVE ALL ACCESSORY ITEMS SUCH AS TIRE, TUBE, COMPUTER MAGNET, QUICK
RELEASE AND CASSETTE. ROLF PRIMA WILL NOT BE RESPONSIBLE FOR LOST OR DAMAGED
PARTS.
TROUBLESHOOTING. SEE OUR ONLINE SERVICE MANUAL AT WWW.ROLFPRIMA.COM
ROLF PRIMA LIMITED WARRANTY
Rolf Prima [RP] warrants each Rolf Prima wheel to be free from defects in material and workmanship for a period of five years from the
date of original retail purchase. Decals and bearings are warranted for a period of two years from the original date of retail purchase.
The warranty is extended only to the original owner and is not transferable. Proof of purchase and wheel serial number(s) are required for
any warranty claim so be sure to keep your receipt.
RP will, at its sole discretion, repair or replace any wheel or wheel component that it determines to be defective with an equivalent
part. There is no other remedy, expressed or implied, under this warranty. RP cannot guarantee that all custom colors or decals will be
available for replacement, but we will do our best provide a comparable option.
This warranty does not cover normal wear and tear, nor does it apply to damage that is the result of abuse, neglect, improper assembly,
improper maintenance, alteration, damage resulting from or relating to use with unauthorized components, modifications or attachments,
damage caused by use of the wheels for purposes other than those for which it was designed, including use on unsuitable surfaces or at
unsafe speeds, misuse or riding like a complete and utter knucklehead. The costs of disassembly, reassembly or repair of any attached
components are not covered by this warranty and are the responsibility of the original owner. Under no circumstance are the costs of
shipping to or from Rolf Prima covered by this limited warranty. No employee, distributor, dealer or agent of RP is authorized to make any
warranty in addition to or different from the foregoing limited warranty.
Unless otherwise provided, the sole remedy under the above warranty, or any implied warranty, is limited to the replacement of defective
parts with those of equal or greater value at the sole discretion of Rolf Prima. In no event shall Rolf Prima be liable for any other
damages or liability including for direct, incidental, consequential damages, including, without limitation, damages for personal injury,
property damage, or economic losses, whether based on contract, warranty, negligence, strict tort, product liability, or any other theory.
THE FOREGOING LIMITED WARRANTY IS IN LIEU OF ALL OTHER WARRANTIES, EXPRESS OR IMPLIED, INCLUDING BUT NOT LIMITED
TO THE IMPLIED WARRANTIES OF MERCHANTABILITY AND FITNESS FOR A PARTICULAR PURPOSE.
LIMITATION OF LIABILITY
The sole remedy for breach of the limited warranty set forth herein is RP’s repair or replacement, as described herein. In no event shall RP
be liable for any other damages or liability, including special, incidental or consequential damages based upon breach of warranty, breach
of contract, negligence, strict tort, or any other legal theory, and including damages arising from or related to any physical injury to person
or property. Some states do not allow the exclusion of incidental or consequential damages, so the above exception may not apply to you.
This warranty, and statutory law, gives the consumer specific legal rights, and those rights may vary from place to place.
©2017 Rolf Prima
888.308.7700
www.rolfprima.com
pN 2170003 rev. 7/16
Table of contents