Rollei 56F User manual

CONTENT
Safety Instruction............36
Specification................37
Nomenclature...............38
Display Icons................40
Basic operation .............42
Auto-Focus Auxiliary AF Lamp ..42
Battery Installation...........43
Attach the Flash to the Camera . 44
Turn ON/OFF power ..........45
Charging Indicator ...........45
Extended Interface...........45
Flash light transmitter mode ..46
2.4G Wireless transmitter mode. 46
Automatic flash shooting (TTL) . 47
Manual flash mode (M) .......48
Multi flash mode (MULTI)......49
ZOOM setting ...............50
2.4G wireless transmitter .....51
Set wireless channel..........51
2.4G Master................52
2.4G Master TTL.............54
2.4G Master MULTI ..........55
2.4G Slave (TTL, M, MULTI) ....56
Light Sensing Mode..........57
High Speed Sync.............58
Other ......................59
Signal Tones,
Backlight display ............59
Special status interface .......59
Custom function settings .....60
Multi Lighting Applications ...61
Disposal....................62
Conformity .................62
Flash Unit 56F for Sony
35

36
ENGLISH
Thank you for purchasing this Rollei Flash Unit.
Please read this manual carefully before using the Flash Unit and use it correctly
according to the given instructions.
Safety Instruction
1. Never trigger the Flash Unit around flammable gas or liquid gas (such as gaso-
line and solvents)! There is the risk of explosion!
2. Neither shoot with the Flash Unit at drivers of cars, buses or trains, nor the
riders of motorcycles and bicycles. They may be temporarily blind of the bright
light which can cause traffic accidents.
3. Never trigger the Flash Unit directly in front of your eyes! Using the Flash Unit
directly at people or animal‘s eyes might damage the retinas and cause serious
visual disturbances, even blindness.
4. Only use the batteries listed in this manual!
5. Never place the batteries in high-temperature environment, such as under the
sun or in the fire.
6. Remove the drained battery from the Flash Unit, as the alkaline liquid can exude
from the battery which will damage the Flash Unit.
7. Keep the Flash Unit away from water (such as the rain).
8. Protect the Flash Unit from extremely hot or damp environment.
9. Do not put the Flash Unit in the glove box of the car dashboard. Do not put any
light-proof items before or on the reflection shield when the Flash Unit will be
triggered. Please take care that there is no dirt on the reflection as otherwise
the high energy that the Flash Unit emits, will burn the item or damage the
reflection shield.
10. Never open the Flash Unit by yourself! There will be the danger of electric shocks.
Non-professional personal cannot fix the components within the Flash Unit.

37
Specification
Technical Features
Guide Number 56 (ISO 100, 180mm)
Motorised Zoom 18 –180 mm; manual / automatic zoom
TTL Flash Mode TTL, M, 2.4 G Master, 2.4 G Slave, S1, S2, Multi
Wireless Trigger 2.4 G wireless flash, light pulse,
S1/S2 optical flash
WL Visual Flash Distance Indoor up to 30 meters
Outdoor up to 50 meters
WL Transmission Range 2.4 GHz Up to 50 meters
Swivel Reflector Tilt angle (up and down): -7° up to +90°
Rotation angle (left and right): 0° up to +180°
Slave Group and Unit 16 Slave communication channels (1 – 16)
3 Slave unit groups (A,B,C)
Color Temperature 5500 K
Flash Duration 1/200 seconds ~ 1/20,000 seconds
High Speed Synchronisation Up to 1/8,000 seconds
Flash Control 1/128 – 1/1 step length is 0.3 EV,
total 22 fine-tuning gear
Peripheral Interface Hot shoe, PC sync, USB
(for firmware updates only)
Recycle Time 3.0 seconds
Power 4x AA batteries or 4x AA Ni-MH batteries
(any batteries are not included)
Lighting Time 100 ~ 1500 times
Additional Function Sleep mode, overheating protection
Dimensions WxHxD: 75 x 200 x 60 mm
Weight 399 g (without any batteries)
Subject to technical changes. Sony is registered trademark, Sony products are trademarks or
registered trademarks of Sony.

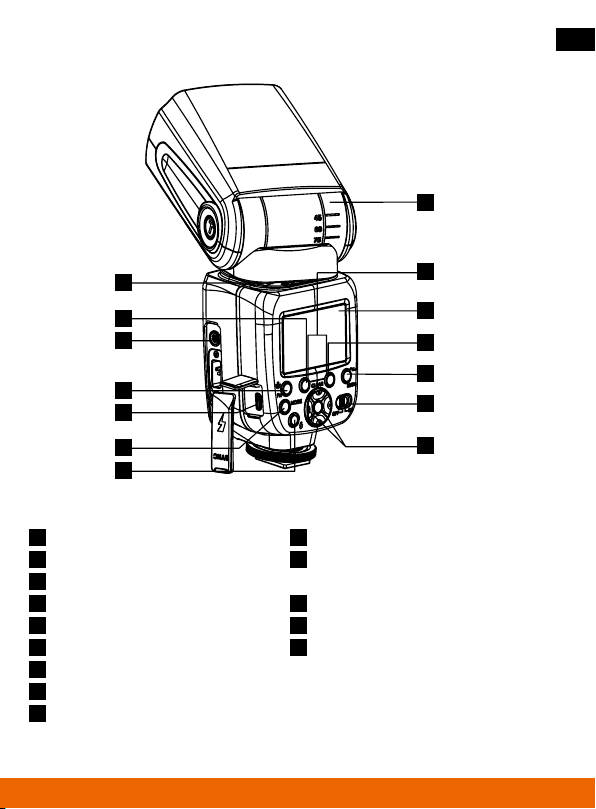
38 Nomenclature
1
2
3
4
5
6
7
8
9
10
Bounce card
Wide angle diffusor
Flash head / Flash sensors
Battery compartment
Optical transmitter wireless sensor
2.4G wireless transmitter sensor
Auto focus auxiliary lamp
Locking wheel
Pins
Hot shoe
10
9
4
8
5
1
2
3
ENGLISH
5
56
57
39
Nomenclature
Tilt angle scale
Rotation Angle
Wireless option button
Synchronous sockets
Backlight / custom function
USB port
Mode select button
Test button / indicator light
Clear button (both pressed
at the same time)
LCD
Rear Curtain / high-speed sync mode
select key
Zoom / Wireless Settings button
ON-OFF switch
Keypad
1
9
10
11
12
13
14
2
3
4
5
6
7
8
2
1
10
11
12
13
14
3
4
5
7
9
8
6

40 Display Icons
ENGLISH
Auto zoom
Manual zoom
Pulled out Bounce card
TTL/M/MULTI
Zoom 8–180mm
(14mm pull-out
diffuser screen-angle)
High-speed
sync
Buzzer
Aperture
Firing rate
FEB
Flash light mode
Flash light icon
Flash light
compensate
M mode
M mode
Multi mode
Number of flashes
Multi mode
Power

41
Receiver mode
SALVE icon
SALVE group
Display Icons
Wireless firing mode
Optical firing mode
2.4G Wireless flash mode
2.4G MASTER
2.4G SLAVE
Channel
Sony master
flash light
Group A/B/C
wireless model
Wireless radio
transmission
SALVE Power
Mode
MASTER on
MASTER off
Master flash light
exposure data
Group A/B/C
exposure data
Optical SLAVE S1
Optical Mode
Output Power

42
ENGLISH
Basic operation
Auto-Focus Auxiliary AF Lamp
When working under dark conditions, the Automatic AF which is positioned in the
middle of the flash light, may temporary project a red light to assist focusing. If this
lamp disturbs the subject that should be shooted you can switch to manual focus
(M) or to custom function (Fn – 08).
This flash unit can be rotated up to 90° and donwards up to 7°. Furthermore a
horizontal rotating from ”left to right“ and ”right to left“ by 180° is possible.
Rotating the flash to the ceiling or wall can make the images look more natural.
90°
7°
180°
180°

43
Basic operation
Battery Installation
1. Slide the battery compartment cover down in the
direction of the small arrow.
2. Insert 4x AA alkaline batteries following the
polarity markings stamped into the metal contacts
on the inside of the door.
3. Close the battery compartment cover.
2
3
1
44
ENGLISH
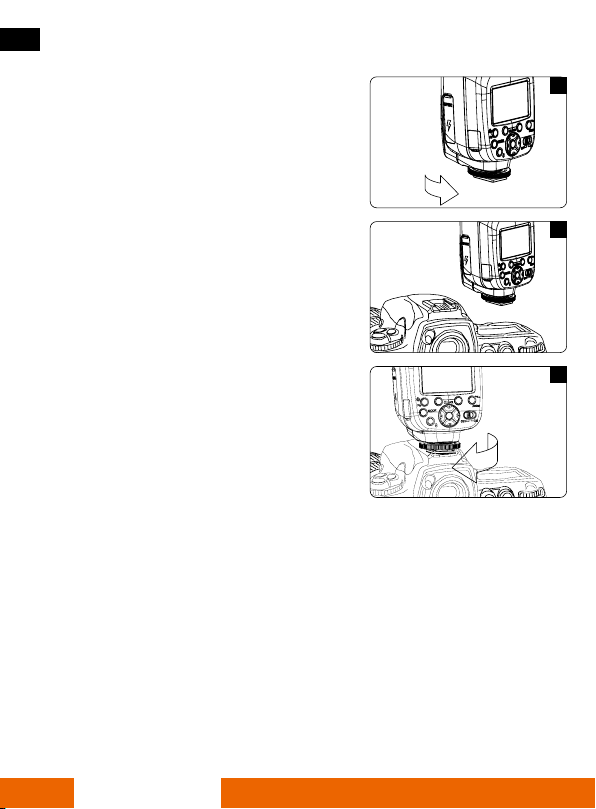
Basic operation
Attach the Flash to the Camera
1. Loose the locking wheel at the bottom of
flash.
2. Slide the flash all the way into the camera’s
hot shoe mount.
3. To secure the flash turn the locking wheel
until it’s tight.
Note:
• Make sure that the flash and camera are
turned off.
• Do not forcibly pull out the flash from the
camera.
1
2
3
Other manuals for 56F
1
Table of contents
Other Rollei Camera Flash manuals


