manuals.online logo
Brands
  1. Home
  2. •
  3. Brands
  4. •
  5. Romet
  6. •
  7. Medical Equipment
  8. •
  9. Romet R355 User manual

Romet R355 User manual

Other Romet Medical Equipment manuals

Romet R200 User manual

Romet

Romet R200 User manual

Romet R210 User manual

Romet

Romet R210 User manual

Romet R310 User manual

Romet

Romet R310 User manual

Romet R700 User manual

Romet

Romet R700 User manual

Popular Medical Equipment manuals by other brands

TekTone Tek-CARE160 Installation and operation manual

TekTone

TekTone Tek-CARE160 Installation and operation manual

NeuroMetrix Quell 2.0 user manual

NeuroMetrix

NeuroMetrix Quell 2.0 user manual

AMT XLR8 Quick reference guide

AMT

AMT XLR8 Quick reference guide

EDAN SONOTRAX Pro user manual

EDAN

EDAN SONOTRAX Pro user manual

Restorative Therapies RT300 Service guide

Restorative Therapies

Restorative Therapies RT300 Service guide

Gendex Expert DC installation manual

Gendex

Gendex Expert DC installation manual

Dexcowin ADX4000W user manual

Dexcowin

Dexcowin ADX4000W user manual

Libelium MySignals user manual

Libelium

Libelium MySignals user manual

Acelity V.A.C.ULTA 4 user manual

Acelity

Acelity V.A.C.ULTA 4 user manual

Caputron ActivaDose II tDCS quick start guide

Caputron

Caputron ActivaDose II tDCS quick start guide

Plinth 2000 93CDT Service manual

Plinth 2000

Plinth 2000 93CDT Service manual

GE SENOGRAPHE 800T Operator's manual

GE

GE SENOGRAPHE 800T Operator's manual

GE Definium 5000 Operator's manual

GE

GE Definium 5000 Operator's manual

Kanmed GE-1380 user manual

Kanmed

Kanmed GE-1380 user manual

Huntleigh FD1 Instructions for use

Huntleigh

Huntleigh FD1 Instructions for use

Stryker SPR Plus Operation manual

Stryker

Stryker SPR Plus Operation manual

Tobii Dynavox I-Series user manual

Tobii Dynavox

Tobii Dynavox I-Series user manual

S-Capepod Evac Cocoon Step-by-step guide

S-Capepod

S-Capepod Evac Cocoon Step-by-step guide

manuals.online logo
manuals.online logoBrands
  • About & Mission
  • Contact us
  • Privacy Policy
  • Terms and Conditions

Copyright 2025 Manuals.Online. All Rights Reserved.

Volume Wheel:(on the right)
Note: unit is shipped with the volume
OFF.The wheel must first be turned
up to activate volume; then used for
easy adjustment while speaking to
increase or decrease your speaking
volume for emphasis.
Practice: Place the Romet® R355
Electronic Larynx to your neck and
practice finding your “sweet spot” to
achieve your best vocal tone.
NOTE: This spot can be many places
on either your neck or the side of your
mouth; each person is different
depending upon your skin texture and
the amount of radiation you have
received. Look into a mirror and
repeat simple sentences to achieve
vocal clarity. If possible, record your
voice and play it back to hear how
you sound. Practice regularly!
Adjust
Pitch
Push On
Push Off
Adjust
Volume
Fine Tuning
It is easy to control your speech
with only one hand.
NO TOOLS REQUIRED.
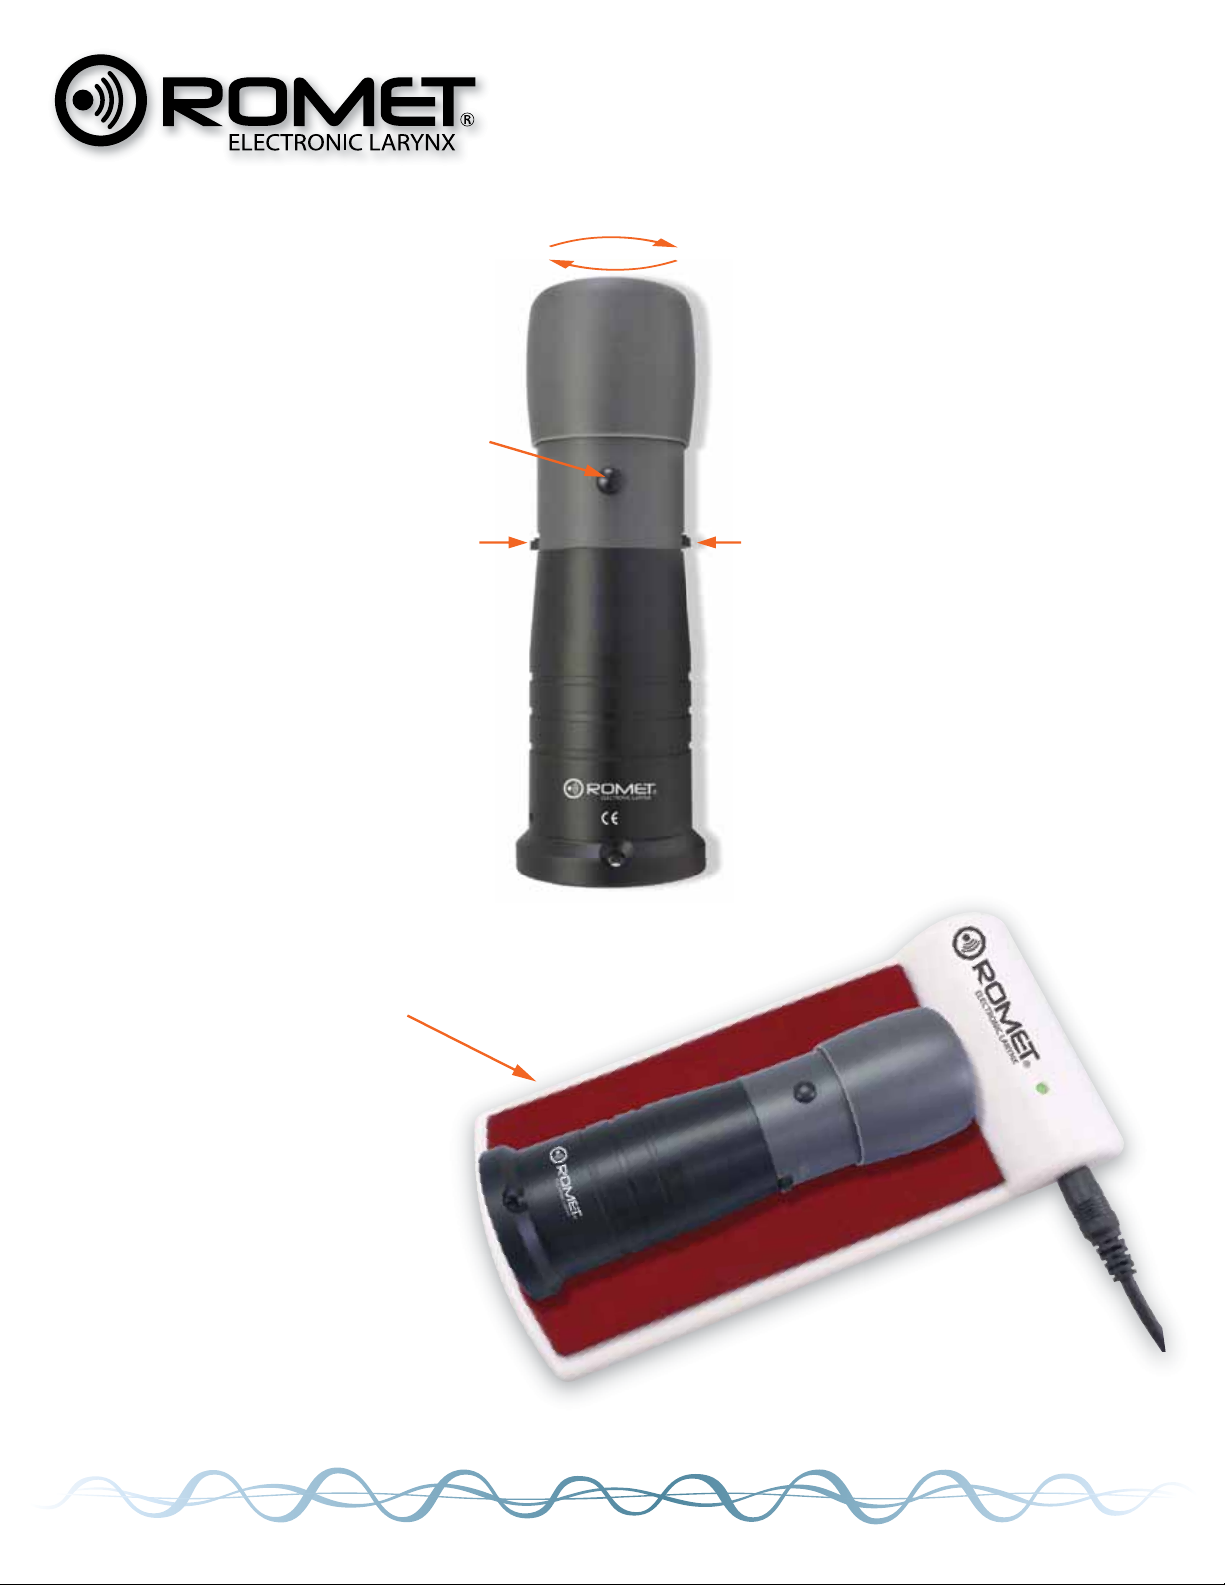
Adjustable top head: Twist for
fine-tuning of the sound, if needed.
WARNING - over adjusting of the
head will result in diminished tone
quality; be careful.
On/Off Button: To speak, push
the button and release when you are
finished.
Pitch Wheel: (on the left) Turn the
wheel for easy adjustment to a
higher or lower pitch. No need to
further adjust after you have
achieved your desired pitch level.
Charging your unit couldn’t be
easier: Simply plug in your charg-
ing pad and place the R355 unit
centered on the pad (as shown).
While charging is in progress, the
light will flash red. When charging is
complete, the light will turn green. If
the light does not turn on when you
place the unit on the pad, it still has
a sufficient charge. The unit should
be fully charged be fully charged
within approximately 3 hours.
SPEAKING
CHARGING
OPERATING INSTRUCTIONS
MODEL R355
FOR MORE INFORMATION, CONTACT:
14410 Saratoga Pass
San Antonio, TX 78254 USA
888.826.2703 Fax 210.858.9608
inf[email protected] www.romet.us
The oral adapter and tubes provided with your Romet® Elec-
tronic Larynx will enable you to begin speaking while your neck is
healing post surgery.
Firmly place the rubber cap adapter on the top of your Electronic
Larynx (as shown above). Insert a tube into the small hole on the
top of the adapter. Push the tube firmly into the hole. The tube
must be secure in the adapter hole while you are speaking. Place
the end of the tube into the corner of your mouth, pointing the tip
toward the top of your mouth.
Activate the on/off button on your Electronic Larynx. Practice
your speech with simple vowels or short sounds. Try a few
simple sentences.
If possible, speak slowly into a tape recorder and replay
your speech.
The clear tubes provided are fitted with tips to prevvent any
food particles from lodging in the tube while being used.
You can easily remove this tip or shorten the tube with scissors.
After you have finished speaking, rinse the tubes with cool, clear
water. Be sure to clean the top of your Electronic Larynx to remove
any saliva residue or food particles.
ORAL ADAPTER
INSTRUCTIONS