Ronix 8604 User manual
CORDLESS SPRAY GUN
8604
BRUSHLESS

USER MANUAL 3
TECHNICAL SPECIFICATIONS
Model 8604
Voltage 20V
Battery Capacity 2000mAh
Paint Reservoir Volume 1200ml
Max. Viscosity 50-60din/sec
Max. Flow 600ml/min
Speed 32000RPM
Continuous Working Time 18-20 min
Battery Charging Time 60mins
LED Voltage 16-20V
LED Power 4W
Flux 150-200LM
CCT 7200-8000K
Weight 1.1kg
Supplied in Ronix Color Box
Includes clean needle, shoulder strap,
viscositycup,2battery,charger,
nozles (1/1.8/2.5mm), Spanner
CORDLESS SPRAY GUN
4
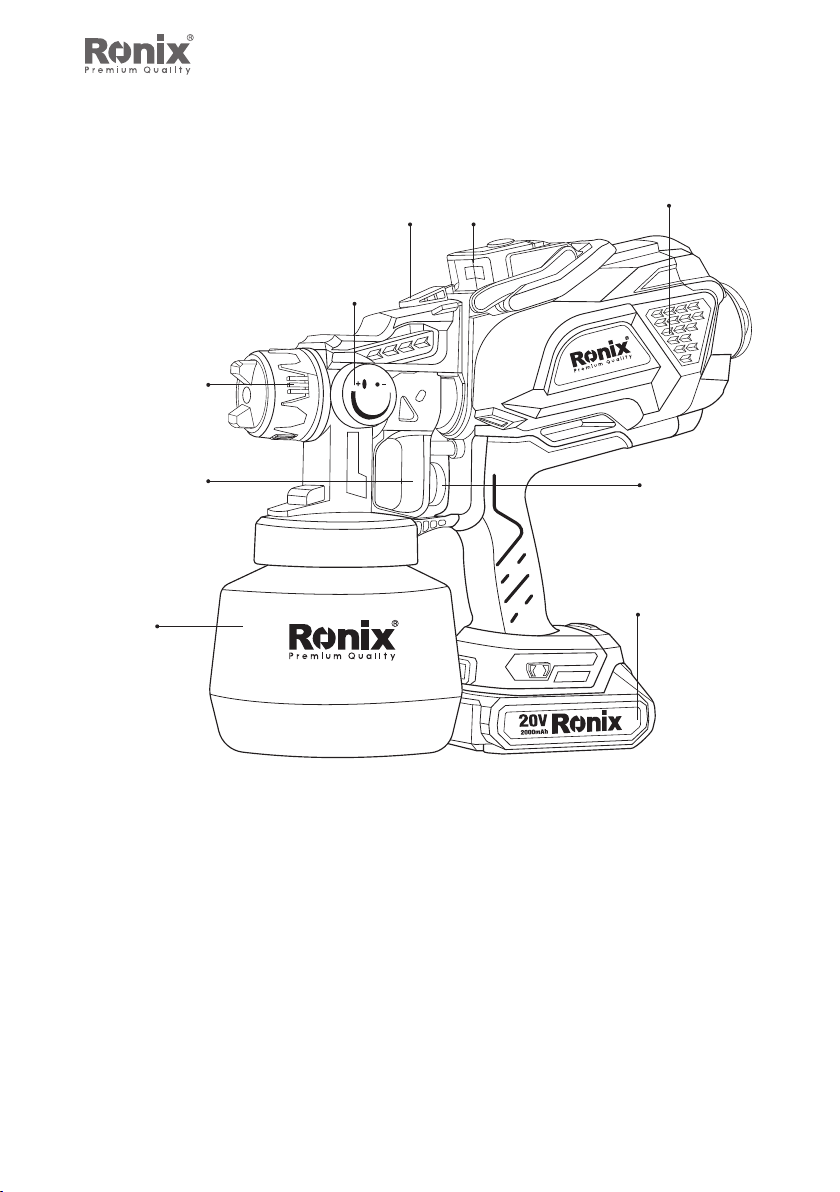
PART LIST
BRUSHLESS
LED lightLock Button
adjustable
knob
Air Cap
Trigger Dimmer
Battery
Tank
IMPORTANT SAFETY INFORMATION
.READ AND FOLLOW ALL INSTRUCTIONS
Like other power tools, the PORTABLE SPRAY GUN is safe
when properly used but can be dangerous if misused. It is the
responsibility of the user to read and understand all instructions,
and safety precautions before operating the unit and also to use
the unit properly.
Failure to do so may result in personal injury or loss of life and
product damage.
Do not try to repair (or disassemble) the unit yourself. Repairs
Motor

USER MANUAL 5
should be performed by Ronix Service Center.
When using parts that do not comply with the specifications and
safety devices of the manufacturer, the user assumes all risks and
liabilities.
WARNING!
- Do not spray flammable or combustible materials near an open
flame, pilot lights or sources of ignition such as hot objects,
cigarettes, motors, electrical equipment and electrical appliances.
- Keep area clean and free of paint or solvent containers, rags,
and other flammable material
- Avoid creating sparks from connecting and disconnecting power
cords.
- For use with only water-based with a minimum flash point of
73 °f(22c). (Flash point is the temperature at which a fluid can
produce enough vapor to ignite)
- Always place the sprayer upright (do not place the sprayer upside
down or on its side) to prevent liquid from entering internal wiring
and causing electric shock.
- Keep spray area well ventilated. Keep a good supply of fresh air
moving through the area.
- When you stop spraying, always unplug the cord to prevent
unintended operation.
- Clean the spray gun thoroughly after each use.
- To prevent electrical shock, never immerse the sprayer into
water or other liquids.
HOW TO USE
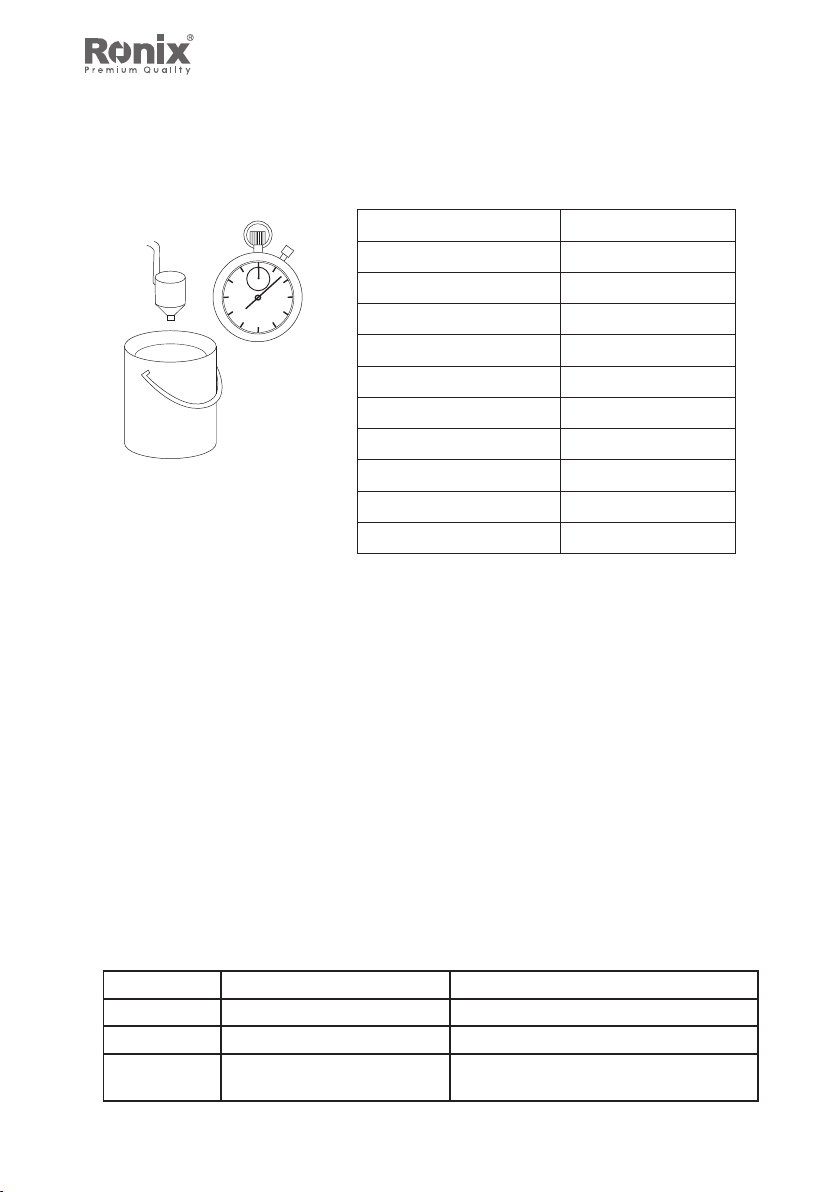
.THINNING PAINTS
In order for your sprayer to operate properly it is important to make
sure the paint is suitable to be sprayed.
- Hold the viscosity cup in your hand and block the bottom of the
viscosity cup with one finger.
CORDLESS SPRAY GUN
6
- Fill the viscosity cup with the diluted paint.
- Release your finger to let the paint leak and time it.
- Please refer to the thinning chart and picture.
Material Run out Time (Sec)
1) Oil enamel 25-60
2) Oil based primer 30-60
3) Oil stain No thinning required
4) Clear sealer No thinning required
5) Polyurethane No thinning required
6) Varnish 20-60
7) Lacquer sanding sealer 25-35
8) Lacqure 25-35
9) Automotive finishes 20-40
10) Latex 45-90
.CHOOSING THE PROPER NOZZLE
-The PORTABLE SPRAY GUN
can be equipped with1.0mm/1.8mm/2.5mm nozzle.
The spray nozzle sets are changeable with the M4 wrench,
simply turn the tip counterclockwise with the M4 wrench to
loosen.
- Place the desired nozzle tip on the gun head and then tighten
with M4 wrench.
- Fix the nozzle with air cap and big nut to complete the replacement.
Please refer to the nozzle size and recommended paint in the
table below.
Nozzle size Recommend material Project type
1.0mm Sealers and varnish Furniture and woodworking projects
1.8mm Stains and polyurethane Furniture and woodworking projects
2.5mm Latex paint, chalk type
paint, milk type paint
Furniture and cabinets
USER MANUAL 7
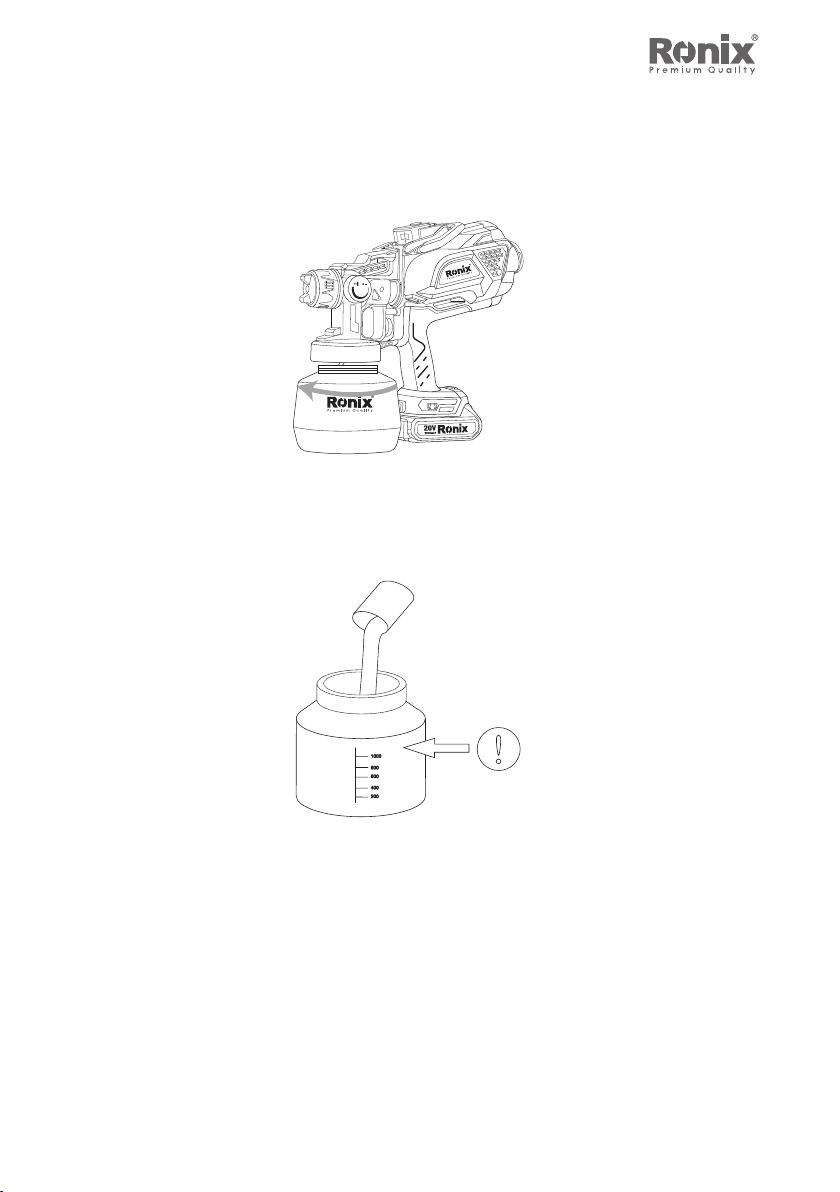
ASSEMBLY
- Make sure the container is empty and dry.
BRUSHLESS
- Pour thinned paint into the tank, do not exceed the MAX. scale
mark, rotate to tighten the tank.
Be sure the suction tube is inserted tightly.
a) If you are going to be spraying in a downward direction, the
angled end of the suction tube should be pointing
toward the front of the gun.
b) If you are going to be spraying in an upward direction, the
angled end of the suction tube should be pointing
toward the rear of the gun.
CORDLESS SPRAY GUN
8
BRUSHLESS
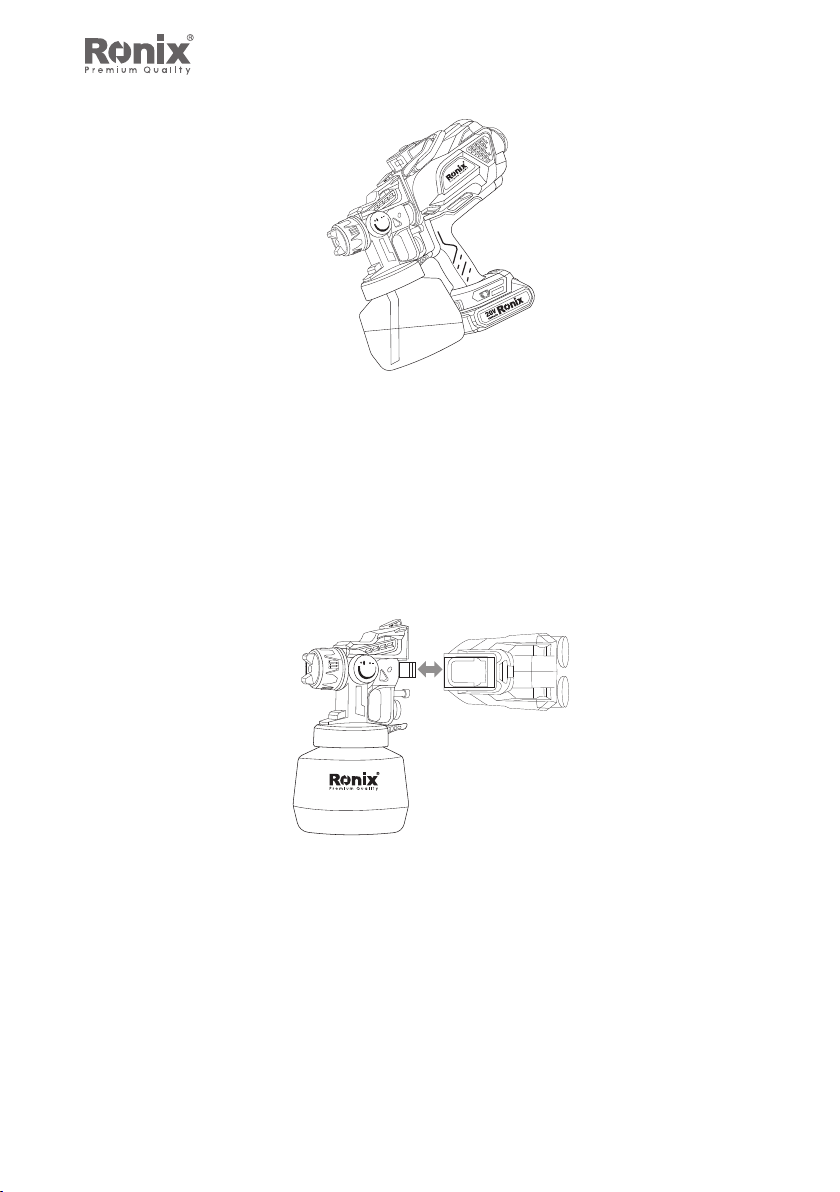
.CONNECT GUN BODY WITH MOTOR
a) Hold the gun with your hand to align the slot on the gun with the
slot on the motor and insert it .
b) Hold the motor handle with your hand, rotate the right hand
clockwise 90°.
c) When the gun and host are parallel, it is locked
.REMOVE THE MOTOR
a. Hold the gun with your hand and press the latch in the direction
of the arrow.
b) At the same time hold the motor handle with your hand and
rotate it counterclockwise 90°.
c) Pull out to remove the motor from the gun.

USER MANUAL 9
.REMOVE THE BATTERY PACK
a. Hold the spray gun with your hand and press and hold the button
on the battery (as shown in the figure).
b. Pull out the battery
BRUSHLESS
.HOW TO USE LED LIGHTS
a) Adjust the position of the LED light (as shown in the figure).
b) Click the LED switch to turn on the LED light.
BRUSHLESS
LED light
switch
Multi-angle
adjustable
c) When not in use, it can be detached and used as a work light.
BRUSHLESS
Use as
work light

CORDLESS SPRAY GUN
10
.HOOK AND CARRYING
a) Shoulder strap can be hung on the hook and used on the shoulder
BRUSHLESS
Hook place
.ACCESSORY BOX
a) First put the needle into the middle hole and fix it
b) Put the nozzle in the outer center
c)Put the wrench in the gap in the middle
Place the
Venting Core
Place the Nazzle
Place the Wrench
Place the
Venting Core
Place the Nazzle
.SPRAY INSTRUCTIONS
- Spray width adjustment
Patent spray width adjustment helps you control the spray width
according to the spraying environment, reduce waste and save material.
a) The counterclockwise rotation shortens the width.
b) The clockwise rotation increased width.
c) By adjusting the air cap and the width knob at the same time, you will
be able to spray a beautiful circular pattern.

USER MANUAL 11
BRUSHLESS
- Adjust the spray patterns
The spray pattern shape is adjusted by turning the ears of the air cap to
either the vertical, horizontal, or diagonal positions. The positions of the air
cap and the corresponding spray pattern shapes are illustrated below.
Test each pattern and use whichever pattern is suitable for your
application
BRUSHLESS BRUSHLESS
.SPRAY PROPERLY
5.1. Keep distance.
The best distance for spraying is 8 to 12 inches from the surface you’re
spraying. Too far away may result in over spray (and wasted liquid), and
too close may cause liquid build-up (runs).
- The spray result depends heavily on the smoothness and cleanliness
of the surface to be sprayed. Therefore, the surface should be carefully
prepared and kept free of dust.
- Cover all surfaces not to be sprayed.
Table of contents
Other Ronix Paint Sprayer manuals


Popular Paint Sprayer manuals by other brands


zogics
zogics Z-DAS instruction manual

KISANKRAFT
KISANKRAFT KK-KBS-165 Operation manual

Matrix
Matrix SG 650 Translation of the original instructions

Anest Iwata
Anest Iwata SGA-3 Installation, use & maintenance instruction manual

paasche
paasche VV Instructions and parts list

Carlisle
Carlisle DeVilbiss JGA-510 Service manual


