ROPES RARK EQUIPMENT LockD Clips User manual

LockD Clips User Manual V03.03 | September 2022 | English
Instructions Manual
CE 0408 EN17109:2020/D
LockD Clips Communicating Safety System
Subject to Technical Changes

User Manual
2 ENGLISH
Table of Contents
List of figures ...................................................................................................................... 4
1. Use of the LockD Clips system ..................................................................................... 5
1.1. Intended use .............................................................................................................. 5
1.2. In Horizontal Elements with Life Safety Lines ............................................................ 5
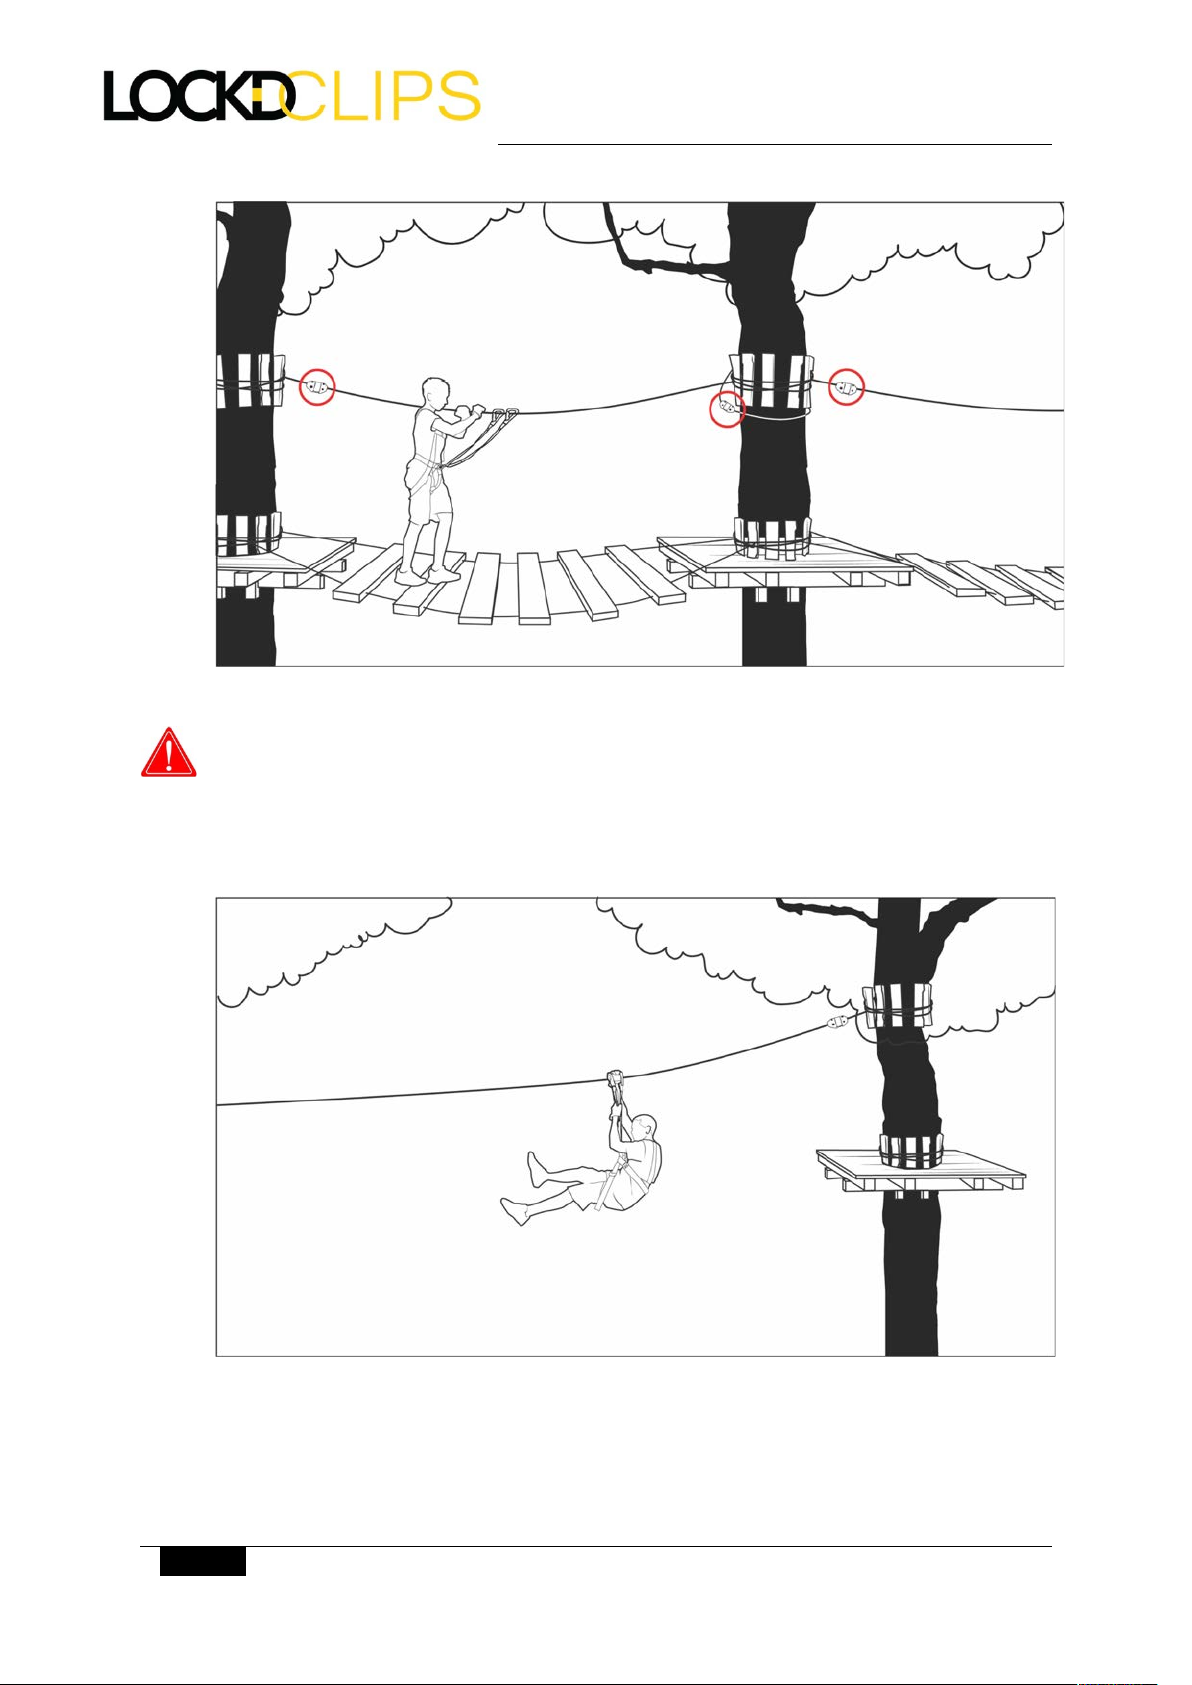
1.3. In Combination with Trolleys in Zip Lines .................................................................. 6
1.4. In Vertical Ascents/Descents with Fall Arrest Devices ............................................... 7
2. Equipment Names & Designations .............................................................................. 8
2.1. Carabiner Head .......................................................................................................... 8
2.2. LockD Clips System .................................................................................................. 10
2.3. Communication control Banana .............................................................................. 11
2.4. Identification ........................................................................................................... 12
2.4.1. Identification label ........................................................................................... 12
2.4.2. Markings on the Carabiner Body ..................................................................... 13
3. Accessories ............................................................................................................... 13
3.1. Tweezle Variants ...................................................................................................... 13
3.1.1. Standard Tweezle ............................................................................................ 13
3.1.2. Tweezle O ........................................................................................................ 14
3.1.3. Rescue Tweezle ................................................................................................ 14
3.2. Exchangeable Modules ............................................................................................ 15
3.2.1. Stainless Steel Abrasion Guard ........................................................................ 15
4. Connection between LockD Clips and Safety Harness ................................................ 15
4.1. Connection to Lockd Clips with stiched swivel ........................................................ 15
4.1.1. Connection with Miallon Rapide ..................................................................... 15
4.1.2. Connection with textile lanyard sling .............................................................. 16
4.2. Connection to Lockd Clips without stiched swivel ................................................... 16
4.2.1. Connection with Maillon Rapide ..................................................................... 16
4.2.2. Connection with textile lanyard sling .............................................................. 17
5. Before Using LockD Clips ........................................................................................... 17
5.1. Visual inspection of LockD Clips ............................................................................... 17
5.2. Functional test ......................................................................................................... 18
5.3. Control of the system .............................................................................................. 18
6. Operation of the LockD Clips system ......................................................................... 18
6.1. Initial and Regular Preparations .............................................................................. 18
6.2. Using LockD Clips as Personal Safety System .......................................................... 18
6.3. Open a LockD Clips Carabiner Head ........................................................................ 19
6.4. Locking the Carabiner Heads by means of a Tweezle .............................................. 19
7. Misuse and bugs ....................................................................................................... 20
7.1. Excessive Twisting of the LockD Clips Lanyard Arms During Use ............................ 20

V03.03 | September 2022 | English
ENGLISH 3
7.2. Carabiner Gate Cannot be Opened ......................................................................... 21
7.3. Carabiner Gate Moves but does not Self-Close ....................................................... 21
7.4. Replacing the Spring ................................................................................................ 21
7.4.1. Components of the Gate Spring ...................................................................... 21
7.4.2. Preparing to Install the Gate Spring ................................................................. 22
7.4.3. Mounting the Gate Spring ............................................................................... 22
7.5. Checking and Replacing the Abrasion Guard ........................................................... 23
7.5.1. Examining the Abrasion Guard ........................................................................ 23
7.5.2. Removal and Replacement of an Abrasion Guard ........................................... 24
7.6. Alpha Error: Both Carabiners can be Opened at the Same Time ............................. 25
7.7. Beta Error: Neither Carabiner Gate can be Opened ................................................ 25
7.8. Replacing a User’s LockD Clips on a Ropes Course Due to Beta Error ..................... 26
8. Cleaning and Storage ................................................................................................. 28
8.1. Storing LockD Clips After Use .................................................................................. 28
8.2. Cleaning ................................................................................................................... 28
8.2.1. Cleaning of Textile Parts .................................................................................. 28
8.2.2. Removing Foreign Matters .............................................................................. 28
8.2.3. Cleaning with Moisture .................................................................................... 29
8.2.4. Lubrication and Oiling ...................................................................................... 29
8.3. Storage ..................................................................................................................... 29
8.4. Use after prolonged storage .................................................................................... 30
9. Repair ...................................................................................................................... 31
10. Other safety regulations ............................................................................................ 32
11. Supplemental Issues .................................................................................................. 33
11.1. Conforming Standards ............................................................................................. 33
11.2. Sales and Translations ............................................................................................. 33
11.3. Regular Checks ......................................................................................................... 33
11.4. Life of Product ......................................................................................................... 33
12. Annual Monitoring by Qualified Individuals .............................................................. 34
12.1. Inspection Criteria ................................................................................................... 34
12.2. Inspection Procedures ............................................................................................. 34
12.3. Inspection Report Templet ...................................................................................... 34
13. Your partner and direct contact for all kinds of questions .......................................... 36

User Manual
4 ENGLISH
List of figures
Figure 1: LockD Clips for securing horizontal elements in the rope course ................... 6
Figure 2: LockD Clips when using zip lines ..................................................................... 6
Figure 3: LockD Clips to secure vertical ascents and descents ...................................... 7
Figure 4: Carabiner Head ............................................................................................... 8
Figure 5: Total system .................................................................................................. 10
Figure 6: Communication control Banana ................................................................... 11
Figure 7: Identification label and serial number .......................................................... 12
Figure 8: Tweezle ......................................................................................................... 13
Figure 9: Tweezle O ..................................................................................................... 14
Figure 10: Rescue Tweezle ........................................................................................... 14
Figure 11: Stainless steel abrasion guard ..................................................................... 15
Figure 12: Connection with harness using Maillon Rapide in stiched in swivel ........... 16
Figure 13: Connection with harness using swivel and textile sling (girth hitch) ......... 16
Figure 14: Connection to harness with Maillon Rapide ............................................... 17
Figure 15: Connection to harness with maillon rapide and lanyard ............................ 17
Figure 16: Opening the unlocked hook by pressing on the carabiner gate, the second
carabiner remains locked ............................................................................................ 19
Figure 17: Tweezeling an unlocked carabiner head ..................................................... 20
Figure 18: Lafe Safety Ropes of a Ropes Course with Tweezles Installed .................... 20
Figure 19: Components of the gate spring .................................................................. 21
Figure 20: Positioning of the two springs one behind the other ................................. 22
Figure 21: Fastening and gluing the screw ................................................................... 22
Figure 22:: Slightly worn abrasion guard - does not require replacement .................. 23
Figure 23: Worn abrasion guard - needs replacement ................................................ 23
Figure 24: Mount the carabiner hook on the disassembly adapter ............................. 24
Figure 25: Alpha error .................................................................................................. 25
Figure 26: Beta error .................................................................................................... 26
Figure 27: User with both carabiners locked (Beta error) ........................................... 26
Figure 28: Replacement LockD Clips system to be installed with non-functioning system
still connected .............................................................................................................. 27
Figure 29: Non-functioning unit is detached from the user after the new unit is
attached to the user and life safety line ...................................................................... 27
Figure 30: Use of the Carabiner Removing Tool with safety gloves ............................ 28
Figure 31: Storage after use. ........................................................................................ 30

V03.03 | September 2022 | English
ENGLISH 5
1.
Use of the LockD Clips system
1.1.
Intended use
The LockD Clips safety system is used with a connecting lanyard in accordance with EN
362 (Kat Q), a safety harness in accordance with EN 361, or a climbing harness in
accordance with EN 12277, exclusively to protect individuals instructed in their use,
against falls that can cause injury on a ropes course.
It is always used in conjunction with suitable attachment connection: a horizontal or
slightly inclined textile sling or lanyard, or an appropriately rated metal connector. This
textile or metal connector must be chosen by a qualified professional, rated for life
safety and meet all jurisdictional standards.
Danger of severe injury or death can be caused if the
attachment connection does not meet life safety
standards.
Life safety components of a ropes course such as wire rope, attachment rings, or textile
ropes must be equipped with a "Tweezle", a mechanical identification point.
The Tweezle is a type of “key” that enables the carabiners on LockD Clips to lock and
unlock in order to perform their safety function and enable a user to move through the
elements of a ropescourse without being able to disconnect from the life safety line.
Unauthorized use of LockD Clips can lead to severe injury
or death. It is the builder’s/operator’s responsibility
to properly and appropriately provide LockD Clips to
their participants at their own risk.
LockD Clips are intended to be used in the for the following manner:
1.2.
In Horizontal Elements with Life Safety Lines
Horizontal elements or elements with only a slight incline in a rope course must use a
Tweezle at the entry point. The user can use the unlocked carabiner of the LockD Clips
to tweezle in order to hook onto the life safety line and allowing the second carabiner
to unlock and detach from the previous life safety line, and continue progressing
through the ropes course.

User Manual
6 ENGLISH
Figure 1: LockD Clips for securing horizontal elements in the rope course
LockD Clips may only be used on life safety lines that
have been designed by a qualified professional and
inspected according to jurisdictional standards.
1.3.
In Combination with Trolleys in Zip Lines
Figure 2: LockD Clips when using zip lines
As 1.2 with an additional pulley.

V03.03 | September 2022 | English
ENGLISH 7
1.4.
In Vertical Ascents/Descents with Fall Arrest Devices
Figure 3: LockD Clips to secure vertical ascents and descents
A fall arrest device requires a Tweezle O or equivalent as an attachment point for the LockD
Clips carabiner. The user tweezles themselves onto the attached Tweezle O with the
unlocked carabiner of the LockD Clips, allowing the other carabiner to be unlocked and
able to detach from their previous life safety line, then ascend or descend using the fall
arrest device.
LockD Clips may only be used on life safety lines that
have been designed by a qualified professional and
inspected according to jurisdictional standards.

User Manual
8 ENGLISH
2.
Equipment Names & Designations
2.1.
Carabiner Head
Figure 4: Carabiner Head

V03.03 | September 2022 | English
ENGLISH 9
No.
Label
1200
Carabiner body, forged from high-strength aluminum alloy
1200A
Abbreviated logo
1200B
Batch Number | Date of manufacture, where the first two digits
represent the year, the third and fourth digits represent the week of
production
1111L
Left-hand securing bolts for textile connectors
1111R
Right-hand securing bolts for textile connectors
2121L
Left attachment of the plug-in unit
2121R
Right attachment of the plug-in unit
1130
Connection pin for carabiner gate
4010L
Left locking pin for abrasion guard or other module attachment.
4010R
Right locking pin for abrasion guard or other module attachment.
1300
Carabiner gate, forged from high-strength aluminum alloy
2010
Locking pin of the communication system (not visible)
1400
Threaded top
3000
Textile with communication system
3000CL
Left textile tab for fastening to screwing
3000CR
Right textile tab for fastening to screwing
3000EL
Sewing of the left textile tab for fastening to the screw
3000ER
Sewing of the left textile tab for fastening to the screw
4100
Abrasion guard (and attachment location of other modules)

User Manual
10 ENGLISH
2.2.
LockD Clips System
Figure 5: Total system
No.
Label
1000A
Carabiner hook on the long arm
1000B
Carabiner hook on short arm
3000A
A Textile lanyard with communication system (cowtail), long arm
3000B
Textile lanyard with communication system (cowtail), short arm
3000D
Stiched loop for connection to the user's safety harness with
Maillon or swivel
3000F
Protective cover for “Banana” (locking and adjustment mechanism
of the communication system)
3200
Swivel (stainless steel)
8100
Tweezle

V03.03 | September 2022 | English
ENGLISH 11
2.3.
Communication control Banana
Figure 6: Communication control Banana
Nr.
Label
2241
Bowden cover in long arm
2242
Bowden cover in short arm
2300
Banana, consisting of 2 identical, screwed-together plastic parts
3000A
Textile connection long arm
3000B
Textile connection short arm
3000D
Hanging loop for connection with climbing harness
3000F
Protective cover for banana with Velcro
3000G
Textile guide for the Bowden cable
3200
Swivel (stainless steel)
3900
Identification label (details below)
In the center of the banana there are two neodymium ring magnets.
The center of the banana is magnetic, keep pacemakers at
least 8cm away.

User Manual
12 ENGLISH
2.4.
Identification
2.4.1.
Identification label
A label with all the relevant information about each LockD Clips unit can be found in
the Banana’s protective wrap. Open the Velcro fastener to view.
Figure 7: Identification label and serial number
No.
Label
1
Product name and logo
2
Model designation
3
Maximum number of people for simultaneous use and
minimum braking load
4
Certifying body
5
Relevant standard
6
System of serial number
7
Reference to Operations Manual
8
QR Code - this is to the manufacturer's website
9
Serial number
10
Year of production of the batch
11
Week in the year of production of the batch
12
Continuous number of the batch
13
Country of Origin
14
Name and logo of the manufacturer
15
Website of the manufacturer

V03.03 | September 2022 | English
ENGLISH 13
2.4.2.
Markings on the Carabiner Body
The short product name "LockD" and the batch number are shown on the carabiner
body. The batch number corresponds to the first 4 digits of the serial number (as
shown on the identification label).
3.
Accessories
3.1.
Tweezle Variants
3.1.1.
Standard Tweezle
Figure 8: Tweezle
Tweezle is a type of “key” that installs on horizontal life safety lines of 9 to 13mm
diameter. The Tweezle consists of 2 plastic halves, they are attached to the life safety
line by screwing the two halves together.
LockD Clips can be used and function as designed once a Tweezle has been mounted
on a life safety line.
Tweezle are available in several different colors.
Please mind the operating manual of the Tweezle.
A Tweezle must only be installed on suitably rated and
approved life safety line.
Please note that this product has its own instruction
manual.

User Manual
14 ENGLISH
3.1.2.
Tweezle O
Figure 9: Tweezle O
The Tweezle O replaces a standard Tweezle to permanently attache to a mechanical
or non-mechanical device by means of a life saving rated screw link. The attachment
point must be approved for life safety in a ropes course.
Please mind the operating manual of the Tweezle O.
3.1.3.
Rescue Tweezle
Figure 10: Rescue Tweezle
The Rescue Tweezle is used by trained park staff for assisting users when a user
requires their LockD Clips to be disconnected from the life safety line, for example
when performing rescues, or conducting evacuations. The Rescue Tweezle allows staff
to remove a user of LockD Clips from a life safety line any time needed. The Rescue
Tweezle must only be used by qualified personnel having had appropriate training. If
used incorrectly, the LockD Clips user may have both clips unlocked when at height!
Keep all Tweezles away from unqualified, untrained individuals.

V03.03 | September 2022 | English
ENGLISH 15
A Rescue Tweezle and any Tweezle not permanently mounted
on a life safety line can allow a LockD Clips user to be
unsecured on a ropes course.
3.2.
Exchangeable Modules
1
Different modules can be mounted on the carabiner head of the LockD Clips for
different intended uses. The modules can also be different on each head, for example
an abrasion guard can be mounted on one head and a roller can be mounted on the
other head.
3.2.1.
Stainless Steel Abrasion Guard
Figure 11: Stainless steel abrasion guard
The stainless-steel abrasion guard (1.5mm thickness) protects the aluminum carabiner
body from wear and damage. The plate can be changed using commonly available tools
following specific instructions, see section 7.5.
4.
Connection between LockD Clips and Safety Harness
The LockD Clips system is to be used with an EN 361 approved safety harness or an EN
12277 approved climbing harness. The connection between LockD Clips and the
climbing harness can be done by several means.
4.1.
Connection to Lockd Clips with integrated swivel
4.1.1.
Connection with Miallon Rapide
The LockD Clips with stiched swivel can be connected to the harness with an EN 362
(Kat Q) connector (typically Maillon Rapide). Make sure, that the connector can not be
opened by the climber.
1
When available

User Manual
16 ENGLISH
4.1.2.
Connection with textile lanyard sling
If necessary, the connection between the harness and LockD Clips can be extended
with a rated textile sling. To minimize risk of strangulation, open slings longer than 50
cm must not be used as a connection material but be longitudinally sewn to form a
single lanyard.
Use only approved and rated connection devices (CE
stamped) that meet the required minimum breaking load.
Figure 12: Connection with harness using Maillon Rapide in
integrated swivel
Figure 13: Connection with harness using swivel and textile
sling (girth hitch)
4.2.
Connection to Lockd Clips without integrated swivel
4.2.1.
Connection with Maillon Rapide
The LockD Clips can be connected to the harness with an EN 362 (Kat Q) connector
(typically Maillon Rapide). Make sure, that the connector can not be opened by the
climber.

V03.03 | September 2022 | English
ENGLISH 17
Figure 14: Connection to harness with Maillon Rapide
Figure 15: Connection to harness with maillon rapide and
lanyard
4.2.2.
Connection with textile lanyard sling
If necessary, the connection between the harness and LockD Clips can be extended
with a rated textile sling. To minimize risk of strangulation, open slings longer than 50
cm must not be used as a connection material but be longitudinally sewn to form a
single lanyard.
5.
Before Using LockD Clips
Carry out visual and functional tests before each use.
LockD Clips may not be used if any malfunctioning, deterioration, wear, defect or
vandalism is observed.
Defects must be brought to the attention of the manufacturer immediately to be
examined and repaired by the manufacturer or an authorized representative.
5.1.
Visual inspection of LockD Clips
• Check that all parts are present and asses their condition: Carabiner heads, Bowden,
locking housing units, cowtails, etc.
• Check metal parts for possible deformation, cracks, corrosion, wear.
• Check the wear of the abrasion guard.

User Manual
18 ENGLISH
• Check that all screws, nuts and bolts, etc. are in place and tight, gate and gate springs
are functioning properly.
• Textile parts are free from cuts, abrasion, fraying, or any other damage, and sewn
seams and connection & sewn points are intact.
• LockD Clips are securely attached to the harness or safety belt.
5.2.
Functional test
• Check to make sure LockD Clips locking mechanism functions properly allowing only
one carabiner gate to open at a time.
• Carabiner gate self-closes when let go after opening.
• Insert unlocked carabiner heat onto a Tweezle to observe it locking. Repeat with other
side to determine proper locking and unlocking of each.
• Make sure both carabiner heads are not unlocked at the same time
5.3.
Control of the system
• Check to make sure LockD Clips locking mechanism functions properly allowing only
one carabiner gate to open at a time.
• Determine that LockD Clips are securely attached to the harness or safety belt.
• Place the unlocked carabiner head on a life safety line, then,
• Tweezle to make sure the carabiner locks and the other carabiner head unlocks.
6.
Operation of the LockD Clips system
6.1.
Initial and Regular Preparations
• Read the instruction manual.
• If possible, obtain firsthand instruction by a manufacturer or a manufacturer’s
representative.
• Ask the manufacturer or manufacturer’s representative to allow you to personally
practice using LockD Clips as an end user would.
• Familiarize users by providing an oral and visual briefing, then allow them to personally
perform the task of tweelzing to lock and unlock the LockD Clips.
• Test before each use that the locking/unlocking mechanism functions properly.
• Do not allow LockD Clips to be used if you find have misgivings, have any questions, or
believe the units are malfunctioning.
6.2.
Using LockD Clips as Personal Safety System
The initial tweezling of a LockD Clips carabiner is of critical importance, thus a Tweezle
Barrier with signage should be installed to facilitate and encourage the user to tweezle
prior to entering the first ropes course element. Once the user tweezles onto the
Tweezle Barrier, the user has engaged the LockD Clips system and is secured by its
locking/unlocking functionality throughout the course, until the user is provided an
“exit” Tweezle.

V03.03 | September 2022 | English
ENGLISH 19
Ensure a Tweezle Barrier with signage is installed to
facilitate and encourage the user to tweezle prior to
entering the first ropes course element.
6.3.
Open a LockD Clips Carabiner Head
Note that only one carabiner of the LockD Clips system can be opened at a time.
Figure 16: Opening the unlocked hook by pressing on the carabiner gate, the second carabiner remains locked
You can check which carabiner gate can be opened by:
• Pressing the gate of one of the two carabiner heads to determine whether it can press
to be opened, if unable to be opened, then
• Press the gate of the other carabiner head to open and remove from the corresponding
life safety line or specialty Tweezle.
• The unlocked carabiner head can then be tweezled on a corresponding life safety line
or specialty Tweezle.
6.4.
Locking the Carabiner Heads by means of a Tweezle
• Place the open carabiner head on the life safety line adjacent to an installed Tweezle
and allow the gate to close,
• Align the locking housing unit at the base of the carabiner head with the center of the
installed Tweezle,
• Push the locking housing unit of the unlocked carabiner head forcefully up into the
center pin of the Tweezle to:
o Activate the internal cable situated within the Bowden shield,
o The locked carabiner head will remain on the current life safety line until
o the connected unlocked carabiner head is tweezled and locked on another life
safety rope.

User Manual
20 ENGLISH
Figure 17: Tweezeling an unlocked carabiner head
The use of the LockD Clips system requires the installation of Tweezles at all designated
life safety clipping points, allowing the user to advance from one element to the next.
Figure 18: Lafe Safety Ropes of a Ropes Course with Tweezles Installed
7.
Misuse and Troubleshooting
7.1.
Excessive Twisting of the LockD Clips Lanyard Arms During Use
If inexperienced users tweezle without thought, lanyard arms can twist several times
until free travel of the Bowden cable is blocked, making subsequent tweezling difficult
or impossible.
Instruct users to straighten the lanyard arms by
regularly un-twisting them after tweezling.
Table of contents
Popular Safety Equipment manuals by other brands

Safety Rail Source
Safety Rail Source Kee Dome Information sheet

Scott Safety
Scott Safety CONNECT QUEUE manual

Mustang Survival
Mustang Survival SENTINEL MSD624 03 owner's manual

Sagola
Sagola 4240 instruction manual

South-Tek Systems
South-Tek Systems N2 Blast FPS-900-RS O & M Manual

Protekt
Protekt P-30N instruction manual

Climbing Technology
Climbing Technology ROLLNLOCK instruction manual

Safety Xpress
Safety Xpress FDBOL800PAD PRODUCT INFORMATION & INSTALLATION GUIDE

Ecco
Ecco ED3706 Installation and operation instructions

Omron
Omron F3SG-PG Series instruction sheet

Bornack
Bornack IRC System user manual

Honeywell
Honeywell Miller Falcon Edge User instruction manual