Instruction Sheet
Safety Multi-Light Beam
Model
F3SG-PGSeries
Declaration of Conformity
©
OMRON Corporation 2020-2022 All Rights Reserved.
Original instructions
Thank you for purchasing the F3SG-PG Series Safety Multi-Light Beam
(hereinafter referred to as the "F3SG-PG"). Be sure to have F3SG-PG be handled
by a "Responsible Person" who is well aware of and familiar with the machine to be
installed. The term "Responsible Person" used in this document means the person
qualified, authorized and responsible to secure "safety" in each process of the
design, installation, operation, maintenance services and disposition of the
machine. It is assumed that F3SG-PG will be used properly according to the
installation environment, performance and function of the machine.
Responsible Person should conduct risk assessment on the machine and
determine the suitability of this product before installation. Read this document and
reference manuals for F3SG-PG thoroughly to understand and make good use of
the descriptions before installing and operating the product. Keep this document at
the place where the operator can refer to whenever necessary.
This device is electro-sensitive protective equipment for the purpose of protecting
the human body.
Precautions for Correct Use
EN
Installation
2865475-2C
Indications and Meanings for Safe Use
The precautions listed in this document indicated by alert symbols and statements must
be followed for the safe use of the F3SG-PG. Failure to follow all precautions and alerts
may result in an unsafe use or operation.Thoroughly read this document before using
the F3SG-PG. The following word and symbols are used in this document.
Safety Precautions
Make sure Responsible Person tests the operation of the F3SG-PG and
F39-SGIT-IL3 after installation to verify that the F3SG-PG and F39-SGIT-IL3
operate as intended. Make sure to stop the machine until the test is complete.
Unintended installation, wiring or function settings may cause a person to go
undetected, resulting in serious injury.
Install a protective structure so that the hazardous part of a machine can only be
reached by passing through the sensor's detection zone. If access to the
hazardous part by reaching over the detection zone of a vertically mounted
F3SG-PG cannot be excluded, the height of the detection zone and the safety
distance shall be determined in consideration of such a risk. Install the sensors
so that part of the person is always present in the detection zone when working
in a machine's hazardous zones. If a person is able to step into the hazardous
zone of a machine and remain behind the F3SG-PG's detection zone, configure
the system with Restart Interlock function. Failure to do so may result in serious
injury due to unexpected startup.
Install the reset switch in a location that provides a clear view of the entire
hazardous zone and where it cannot be activated from within the hazardous zone.
Install the pre-reset switch always in the hazardous zone and where it cannot be
activated from outside the hazardous zone.
The F3SG-PG cannot protect a person from an object flying from the hazardous
zone. Install protective cover(s) or fence(s).
When muting error occurs with workpiece blocking the F3SG-PG, there are two
methods to forcibly remove the workpiece.
1) Manual operation (with additional safety measure); or
2) Override function (Override at Normal Operation / Override upon Startup)
Only one of the methods, either 1) or 2) must be used.
If they are used at the same time, the Override may be activated at an
unexpected timing.
The Muting and Override functions disable the safety functions of the device.
Especially setting the Muting Time Limit parameter to infinite may cause the
safety functions to be disabled for a long time. Install the F3SG-PG, muting
sensor and physical barrier and configure time settings for Muting and Override
so that an operator should not enter hazardous zone when the Muting and
Override are active.
Install muting sensors so that they can distinguish between the object that is
being allowed to pass through the detection zone and a person. If the Muting
function is activated by the detection of a person, the machine may not stop
operating, resulting in serious injury.
Muting lamps that indicate the state of the Muting and Override functions must be
installed where they are clearly visible to workers from all the operating positions.
Use two independent input devices for muting inputs. Failure to do so may
cause the MUTING state due to a single muting sensor's failure.
Install the switch to activate the Override function in a location that provides a
clear view of the entire hazardous zone and where it cannot be activated from
within the hazardous zone. Make sure that nobody is in the hazardous zone
before activating the Override function.
Make sure to connect an override cancel switch to the RESET line when using
the Override function. Otherwise, the OVERRIDE state may not be released by
the override cancel switch, resulting in serious injury.
Install the F3SG-PG so that it is not affected by reflective surfaces.
Failure to do so may hinder detection, resulting in serious injury.
When using more than one set of F3SG-PG's in adjacent areas, the emitter of
one F3SG-PG may interfere with the receiver of the other, causing the safety
functions to stop working properly. Install, configure and maintain them so that
mutual interference does not occur.
To change the response time, calculate the safety distance based on the
setting. Otherwise, the machine may not stop before a person reaches the
hazardous part, resulting in serious injury.
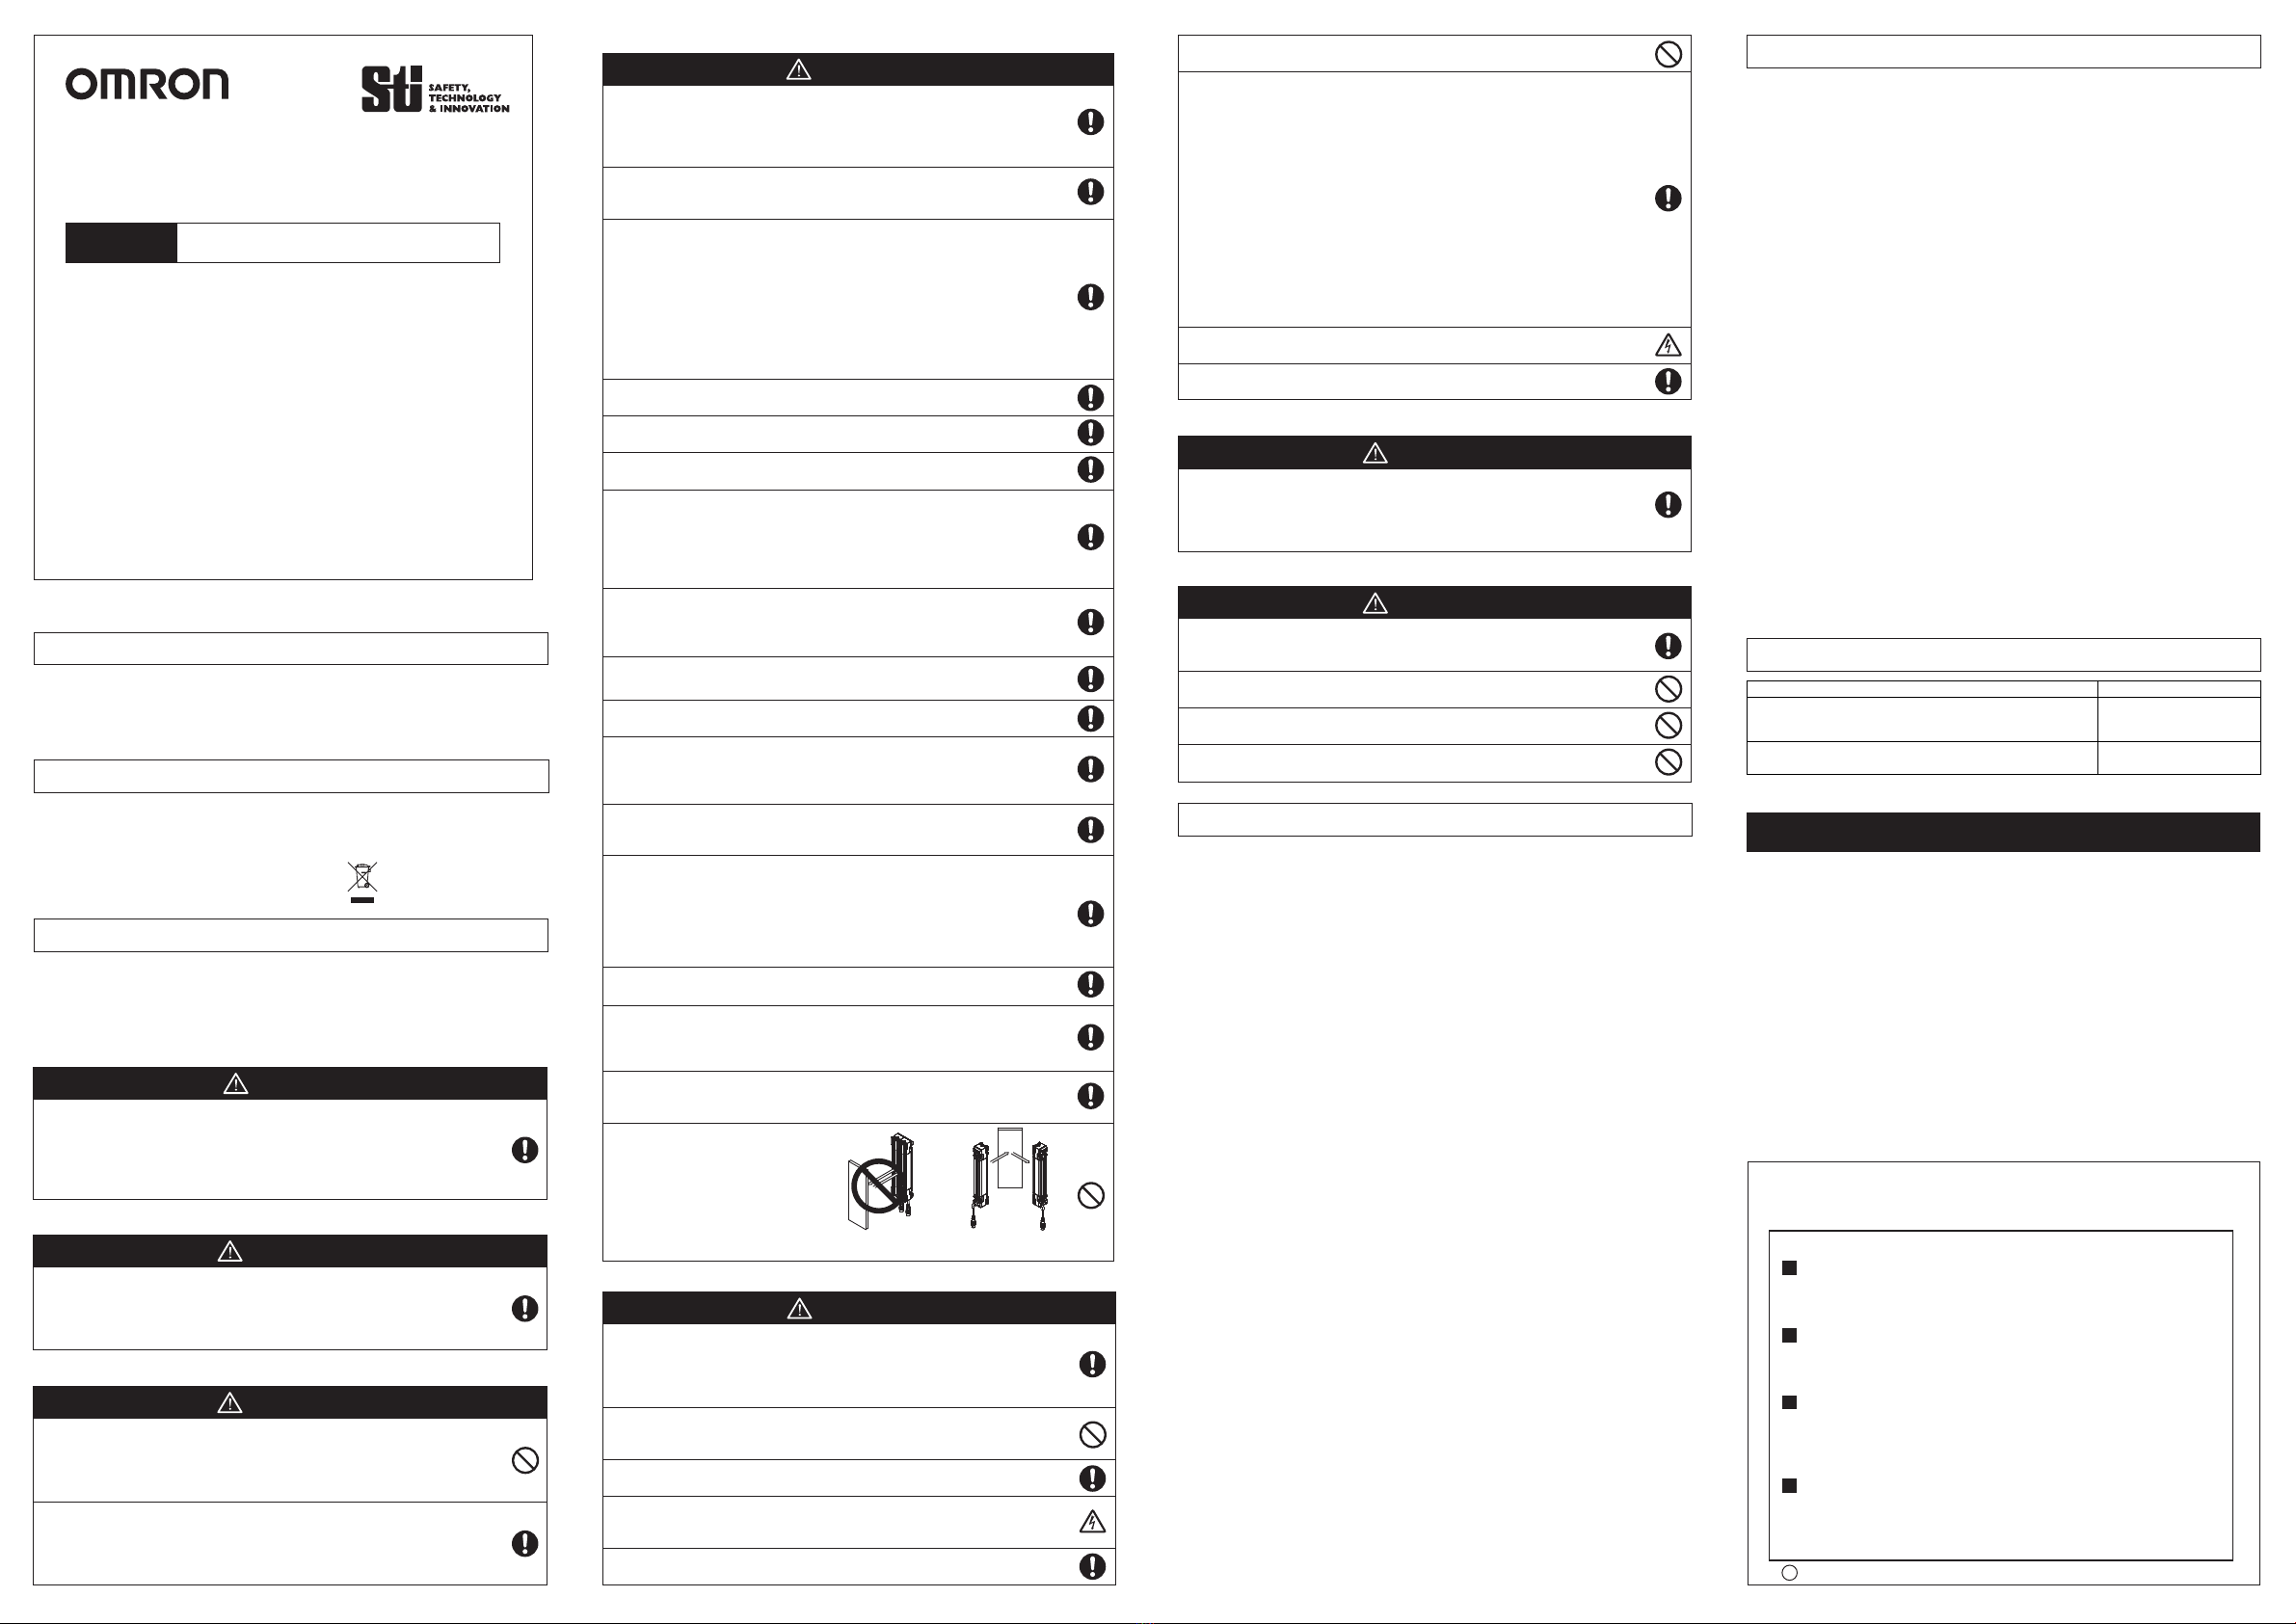
Do not use the F3SG-PG with
mirrors in a retro-reflective
configuration.
Doing so may hinder detection.
It is possible to use mirrors to alter
the detection zone to a 90-degree
angle.
Make sure to install the F3SG-PG at the safety distance from the hazardous part
of the machine. Otherwise, the machine may not stop before a person reaches
the hazardous part, resulting in serious injury.
Position with
detection zone bent at 90°
Mirror
Mirror
Position with
retro-reflection
WARNING
Precautions for Safe Use
Make sure to observe the following precautions that are necessary for ensuring safe use
of the product.
Storage conditions and installation environment
• Do not install, use, or store the product in the following types of environments:
- Areas exposed to intense interference light, such as direct sunlight
- Areas with high humidity where condensation is likely to occur
- Areas where corrosive gases are present
- Areas exposed to vibration or shock levels higher than in the specification provisions
- Areas where the pollution degree is harsher than 3, such as outdoor environment
- Areas where the product may get wet with liquid that can solve adhesive
• Do not drop the product.
Wiring and installation
• The rated life of the LEDs used for this product is 6 years.
• Loads must satisfy both of the following conditions:
- Not short-circuited
- Not used with a current that is higher than the rating
• Make sure that the mounting brackets, fixing screws and connectors are properly
secured with the torque recommended in the User's Manual or the Quick Installation
Manual.
• Bending radii of cables must be equal to or higher than specified minimum values.
• When replacing the cables with those other than the dedicated cables, use cable
connectors that provide a protection grade of IP54 or higher, for the cables.
• To extend a cable length with a cable other than the dedicated cable, use a cable with
the same or superior specifications.
• Be sure to route the input/output lines for the F3SG-PG separate from high-potential
power lines or through an exclusive conduit.
• Make sure that foreign material such as water, oil, or dust does not enter the
F3SG-PG, F39-SGIT-IL3 or the connector while the end cap and root cables of the
F3SG-PG or the cover of the DIP Switch on the F39-SGIT-IL3 is removed.
• The F39-SGIT-IL3 is dedicated to the F3SG-SR/PG series. Do not use it for the
equipment other than F3SG-SR/PG.
• In environments where foreign material such as spatter adheres to the F3SG-PG,
attach a cover to protect the F3SG-PG from the spatter.
Oil resistance
• Some cutting oils may affect the product. Before using cutting oils, make sure that the
oils should not cause deterioration or degradation of the product.
• Do not use the product with degraded protective structure such as swelling and crack
in housing and/or sealing components. Otherwise cutting oil or other substance may
enter the product, resulting in a risk of corruption or burning.
• Use the F39-JGC-Root-Straight Cables, F39-JGR3K-Root-Plug Cables for
Extended or F39-JGR3K--Conversion Cables in environment where the product
may be exposed to oil. Using the other cables in such an environment may cause
cutting oils or other substances to enter the cables, resulting in a risk of damaging or
burning the product.
• Do not connect the Conversion Cable for the following purposes. Failure to do so may
result in failure.
1. Connecting with the F39-SGIT-IL3, F39-GCNY2 or F39-GCNY3
2. Connecting between the F3SG-SR ,F3SG-PG
Disposal
• Dispose of the product in accordance with the relevant rules and regulations of the
country or area where the product is used.
Observe the precautions described below to prevent operation failure, malfunctions, or
undesirable effects on product performance.
Storage conditions and installation environment
•
Do not install, use, or store the product in the following types of environments:
- Areas with a temperature or humidity out of the specified range
- Areas submerged in water or subject to rain water
•
This is a class A product (for industrial environments). In residential areas it may cause
radio interference, in which case the Responsible Person may be required to take
adequate measures to reduce interference.
Wiring and installation
•
Properly perform the wiring after confirming the signal names of all the terminals.
•
Do not operate the control system until 3 s or more after turning ON the power of the
F3SG-PG.
•
When using a commercially available switching regulator power supply, make sure to
ground the PE terminal (protective earth terminal).
•
Install the emitter and receiver, emitter/receiver, and passive mirror to the same vertical
direction.
•
Use brackets of specified quantities and locations according to the dimensions. If the
brackets described above are not used, ratings and performance cannot be met.
•
Do not install the F3SG-PG close to a device that generates high-frequency noise.
Otherwise, take sufficient blocking measures.
•
Sharing the power supply with other devices may cause the F3SG-PG to be affected by
noise or voltage drop. It is recommended that the F3SG-PG use a power supply dedicated
for safety components, not shared with other devices.
•
Do not change the scan code during normal operation. The F3SG-PG transitions to
lockout.
•
Do not apply load to the connectors.
Cleaning
•
Do not use thinner, benzene, or acetone for cleaning. They affect the product's resin parts
and paint on the housing.
•
Use a soft cloth which is dry or wetted with clean water for cleaning. Do not use solvents.
Object detection
•
The F3SG-PG cannot detect transparent and/or translucent objects.
Settings
•
Do not operate the DIP Switch on the F39-SGIT-IL3 during normal operation of the
F3SG-PG. Otherwise, the F3SG-PG enters the LOCKOUT state.
•
Do not operate the DIP Switch and Push Switch on the F39-SGIT-IL3 with tools that may
damage the product.
•
Be sure that the F3SG-PG is in the SETTING state when making a change to the setting.
Settings
Make sure the Responsible Person tests the operation of the F3SG-PG
after setting with the DIP Switch on the F39-SGIT-IL3, Teach-in, SD
Manager 3 or End Cap to verify that the F3SG-PG operates as intended.
Make sure to stop the machine until the test is complete. Unintended
settings may cause a person to go undetected, resulting in serious injury.
WARNING
Other
Perform daily and 6-month inspections for all F3SG-PG as described in the
User's Manual or the Quick Installation Manual. Otherwise, the system may fail
to work properly, resulting in serious injury.
Do not try to disassemble, repair, or modify the product.
Doing so may cause the safety functions to stop working properly.
Do not use the product in environments where flammable or explosive gases
are present. Doing so may result in explosion.
Do not use the F3SG-PG in environments where strong electromagnetic field may
be produced. Doing so may cause the safety functions to stop working properly.
WARNING
Users
The F3SG-PG must be installed, configured, and incorporated into a
machine control system by a sufficiently trained and qualified person.
An unqualified person may not be able to perform these operations
properly, which may cause a person to go undetected, resulting in
serious injury.
WARNING
Do not use the output signal of the auxiliary output or IO-Link output for safety
applications. Failure to do so may result in serious injury when the F3SG-PG fails.
Double or reinforced insulation from hazardous voltage must be applied to all
input and output lines. Failure to do so may result in electric shock.
Extension of the cable must be within a specified length.
If it isn't, safety functions may not work properly, resulting in danger.
For the F3SG-PG to comply with IEC 61496-1 and UL 508, the DC power
supply unit must satisfy all of the following conditions:
•
The DC power supply operates within the rated power voltage (24 VDC ± 20%).
•
The DC power supply has tolerance against the total rated current of devices if it is
connected to multiple devices.
•
The DC power supply complies with EMC directives (industrial environment).
•
Double or reinforced insulation is applied between the primary and secondary circuits.
•
The DC power supply has an automatic recovery type of overcurrent protection
characteristics.
•
Output holding time is 20 ms or longer.
•
The DC power supply satisfies output characteristic requirements for class 2 circuit or
limited voltage current circuit defined by UL 508.
•
The DC power supply complies with laws and regulations, regarding EMC and
electrical equipment safety, of the country or region where the F3SG-PG is used.
(For example, in EU, the power supply must comply with the EMC Directive and the
Low Voltage Directive.)
Wiring
When using the PNP output, connect the load between the output and 0 V line.
When using the NPN output, connect the load between the output and +24 VDC
line. Connecting the load between the output and a different power supply line
from the above line will result in a dangerous condition because the operation
mode of safety outputs are reversed to "Dark-ON".
WARNING
Machines
Do not use this sensor for machines that cannot be stopped quickly
by electrical control. For example, do not use it for a pressing
machine that uses full-rotation clutch. Otherwise, the machine may
not stop before a person reaches the hazardous part, resulting in
serious injury.
To use the F3SG-PG in PSDI mode (initiation of cyclic operation by a
presence sensing device), you must configure an appropriate circuit
between the F3SG-PG and the machine. For details about PSDI,
refer to OSHA 1910.217, IEC 61496-1, and other relevant standards
and regulations.
WARNING
Alert Statements
Make sure that the machine can be controlled correctly and as
intended. Also make sure that the machine can be stopped
immediately at any time of the operation cycle without danger to
machine operators when the machine behavior does not meet
safety-related requirements. Otherwise, continued use of the
machine may result in serious injury or death.
DANGER
When using the PNP output, do not ground +24 VDC line. When using the NPN
output, do not ground 0 V line. Otherwise, a ground fault may turn the safety
outputs ON, resulting in a failure of stopping the machine.
Configure the system by using the optimal number of safety outputs that satisfy
the requirements of the necessary safety category.
Do not connect each line of the F3SG-PG to a DC power supply of higher than
24 VDC+20%. Also, do not connect it to an AC power supply. Failure to do so
may result in electric shock.
Make sure to perform wiring while the power supply is OFF.
Suitability for Use
Omron Companies shall not be responsible for conformity with any standards,
codes or regulations which apply to the combination of the Product in the
Buyer’s application or use of the Product. At Buyer’s request, Omron will
provide applicable third party certification documents identifying ratings and
limitations of use which apply to the Product. This information by itself is not
sufficient for a complete determination of the suitability of the Product in
combination with the end product, machine, system, or other application or
use. Buyer shall be solely responsible for determining appropriateness of the
particular Product with respect to Buyer’s application, product or system.
Buyer shall take application responsibility in all cases.
NEVER USE THE PRODUCT FOR AN APPLICATION INVOLVING SERIOUS
RISK TO LIFE OR PROPERTY OR IN LARGE QUANTITIES WITHOUT
ENSURING THAT THE SYSTEM AS A WHOLE HAS BEEN DESIGNED TO
ADDRESS THE RISKS, AND THAT THE OMRON PRODUCT(S) IS PROPERLY
RATED AND INSTALLED FOR THE INTENDED USE WITHIN THE OVERALL
EQUIPMENT OR SYSTEM.
OMRON Corporation (Manufacturer)
Contact: www.ia.omron.com
Regionale Hoofdkantoren
Shiokoji Horikawa, Shimogyo-ku, Kyoto, 600-8530 JAPAN
OMRON EUROPE B.V. (Importer in EU)
Wegalaan 67-69, 2132 JD Hoofddorp
The Netherlands
Tel: (31)2356-81-300/Fax: (31)2356-81-388
OMRON ELECTRONICS LLC
2895 Greenspoint Parkway, Suite 200
Hoffman Estates, IL 60169 U.S.A.
Tel: (1) 847-843-7900/Fax: (1) 847-843-7787
OMRON ASIA PACIFIC PTE. LTD.
No. 438A Alexandra Road # 05-05/08 (Lobby 2),
Alexandra Technopark,
Singapore 119967
Tel: (65) 6835-3011/Fax: (65) 6835-2711
OMRON (CHINA) CO., LTD.
Room 2211, Bank of China Tower,
200 Yin Cheng Zhong Road,
PuDong New Area, Shanghai, 200120, China
Tel: (86) 21-5037-2222/Fax: (86) 21-5037-2200
Apr, 2021
u
F
Reference Manuals
Document Title
Safety Light Curtain F3SG-SRSeries
Safety Multi-Light Beam F3SG-PGSeries
User’s Manual
Cat. No.
Z405-E1
5605730-1
Safety Multi-Light Beam F3SG-PGSeries
Quick Installation Manual
In the interest of product improvement, specifications are subject to change without notice.
Instructions in the EU languages and a signed EU Declaration of Conformity are available
on our website at www.industrial.omron.eu/safety.
OMRON declares that the F3SG-PG is in conformity with the requirements of following
EU Directives and UK Legislations:
EU: Machinery Directive 2006/42/EC, EMC Directive 2014/30/EU, RoHS Directive
2011/65/EU,
UK: 2008 No 1597 Machinery (Safety) , 2016 No 1091 EMC, 2012 No 3032 RoHS
•
The F3SG-PG is designed and manufactured according to the following standards.
EN61496-1 (Type 4 and Type 2 ESPE), EN 61496-2 (Type 4 and Type 2 AOPD),
EN61508-1 through -4 (SIL 3 for Type 4 and SIL 1 for Type 2),
EN ISO 13849-1:2015 (PL e, Category 4 for Type 4 and PL c, Category 2 for Type 2)
• Dispose in accordance with applicable regulations.
Safety Standards


