Roscoe Medical DINOSAUR Series User manual

ROSCOE DINOSAUR
COMPRESSOR NEBULIZER
Manual
MODEL: NEB-DINO
DINO-TRU
DINO-TRUWB
DINO-TRUWB-PB
Read this manual before operating the nebulizer.
Save these instructions for future reference.

2
TABLE OF CONTENTS
Page
1. Introduction ............................................2
2. Illustration of Parts.......................................3
3. Important Safety Precautions And Warnings................4 – 7
4. Getting Started .....................................8 – 10
5. Operating the Compressor Nebulizer ...................11 – 12
6. Cleaning..........................................12 – 13
7. Maintenance ..........................................14
8. Specications .........................................15
9. Limited Warranty .......................................16
10. Service and Repair......................................16
INTRODUCTION
Thank you for purchasing the Roscoe Medical Dinosaur Nebulizer Compressor.
It is a compact medical device designed to efciently deliver physician
prescribed medication to the bronchial lung passages and is intended for home
health care use. With proper care, it will provide you with many years of reliable
treatment.
This product is developed for the successful treatment of asthma, allergies and
other respiratory disorders. It creates a stream of air that travels through a clear
tube to the nebulizer. When air enters the nebulizer, it will convert the prescribed
medication into an aerosol mist for easy inhalation.
Your nebulizer compressor should be used under the supervision of a licensed
physician and/or a respiratory therapist. We encourage you to thoroughly read
this manual to learn about the features of this product. Any use of this
product other than its intended use should always be avoided.
All Rights Reserved
42_NEB-DINO_03 ©2018

3
ILLUSTRATION OF PARTS
NEBULIZER COMPRESSOR UNIT
1. Compressor
2. Cap/Air Filter
3. Air Outlet
4. Power Switch
NEBULIZER ASSEMBLY AND ACCESSORIES ILLUSTRATION
1. Tubing
2. Nebulizer Cup
3. Nebulizer Insert
4. Nebulizer Cap
5. Mouthpiece
6. Child Mask
3
2
1
4
Figure 1
Figure 2
56
4
3
2
1
Figura 4
Tapa del nebulizador
Mascarilla (opcional)

4
SAFETY SYMBOLS USED IN THIS MANUAL
DANGER Indicates a potentially hazardous situation which,
if not avoided, could result in death or serious injury.
WARNING
Indicates a potentially hazardous situation which,
if not avoided, could result in serious injury and equipment
damage.
CAUTION
Indicates a potentially hazardous situation which,
if not avoided, could result in minor or moderate injury to the
user or patient or damage to the device or other property.
IMPORTANT SAFETY PRECAUTIONS
AND WARNINGS
It is important that you read all warnings in user’s manual before
use. Use the product only for its intended use as described in the
manual. Improper use can result in serious or fatal illness /
injury, improper treatment or property damage. DO NOT attempt to
operate this product without reading all instructions carefully. Save
this manual for future reference.
WARNING
(USA only)
U.S. Federal Law restricts these devices to sale by, or on
the order of, a physician or licensed practitioner. This device
should only be used under the continued supervision of a
physician or licensed practitioner.
DANGER THIS MEDICAL DEVICE IS NOT INTENDED TO BE USED AS
A LIFE SUSTAINING OR LIFE SUPPORTING DEVICE.
This device has been thoroughly tested and inspected to assure proper perfor-
mance and operation.
Specications put forth in this manual were in effect at the time of
publication. However, to ensure continual improvement measures, changes
to these specications may be made at any time without obligation on the
part of manufacturer.
Upon receiving your nebulizer/compressor, inspect the packaging for signs of
damage in transit. Inspect the unit thoroughly. If damage is noted, external or
internal, DO NOT use, and report to your Homecare Dealer immediately.
When using electrical products, especially when children are present, basic
safety precautions should always be followed. Read all instructions before using.

5
WARNING
To reduce the risk of serious or fatal injury from electrocution, re, burns and
to reduce the risk of damage or malfunction of the unit:
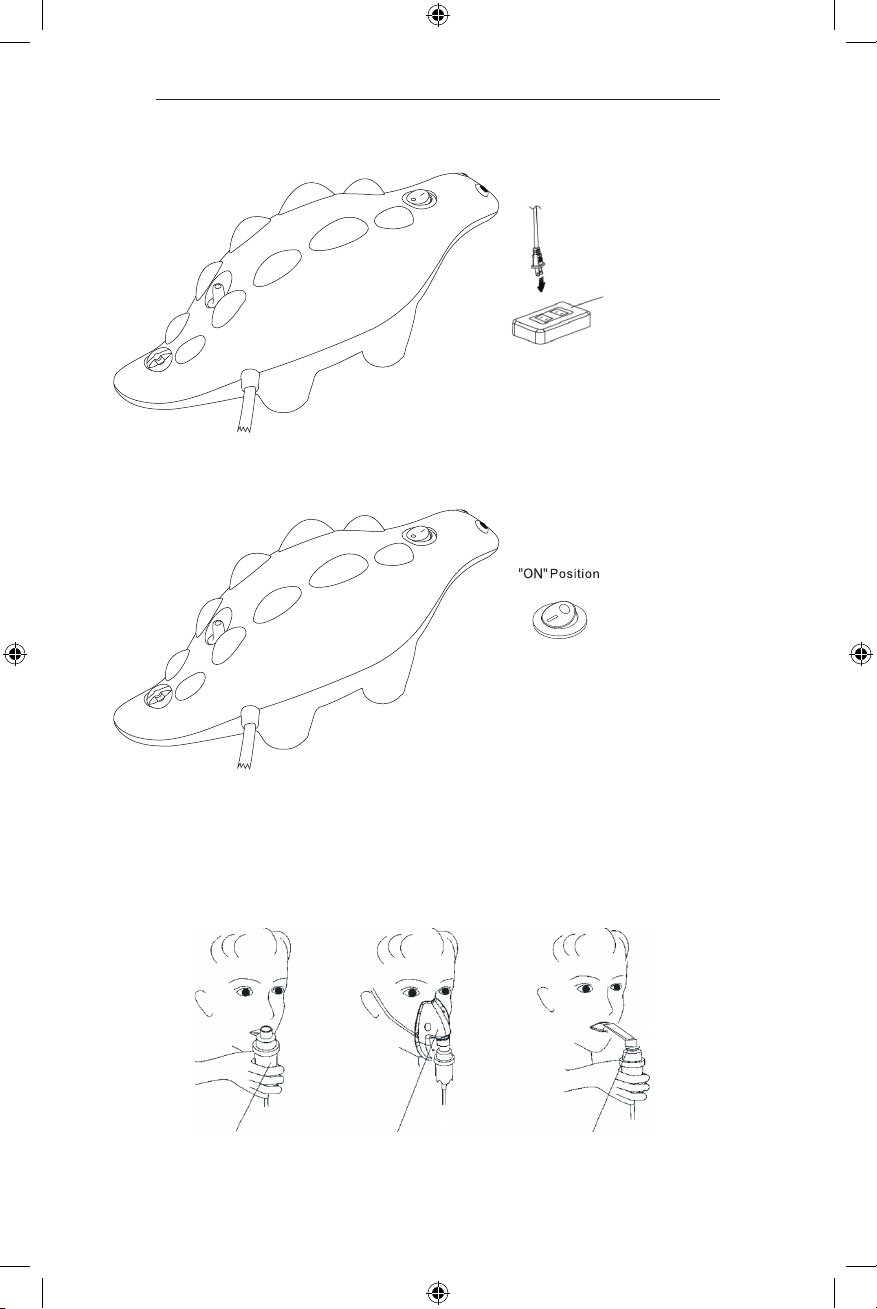
• Before use, check the serial number label on the bottom of the
compressor to ensure that the voltage and current indicated on the unit
correspond with the voltage and current available. DO NOT overload wall
outlets or use with power strips or extension cords.
• DO NOT use this product with a DC to AC converter, or with any AC
voltage and/or frequency other than specied
• Before use, check tubing and accessories for proper assembly. All parts
should be rmly in place. Use of improperly assembled tubing and
accessories could diminish or prevent adequate delivery or medication
and the effectiveness of the treatment.
• Tubing and accessories are for single patient use only. DO NOT share
your tubing and accessories with other patients.
• NEVER use tubing with a clogged nozzle. If the nozzle is clogged, the
aerosol mist will be reduced, altered, or stopped, which will diminish or
eliminate the effectiveness of the treatment. If clogging occurs, replace
with the same model.
DISCONTINUE OPERATION IMMEDIATELY IF ANY OF THE MOTOR
HOUSING PARTS BECOME DETACHED OR BROKEN, EXPOSING THE
MOTOR OR ANY OTHER ELECTRICAL COMPONENTS.
• DO NOT open or disassemble the compressor. Refer all servicing to a
Compass Health Brands authorized dealer.
• ALWAYS unplug immediately after each use and keep unplugged when
not in use. DO NOT run this product unattended.
• NEVER operate this product if it has a damaged cord or plug, is not
working properly or any abnormalities occur, has been dropped in any
way or into water, or has been exposed to any liquids inside the case.
Return to a Compass Health Brands authorized dealer for repair or
replacement.
• DO NOT use the nebulizer while operating a vehicle or while bathing.
• Keep all electrical cords away from heated surfaces. DO NOT operate or
store unit under direct sunlight, high temperature or humidity.
• The compressor motor has a thermal protector, which will shut off the
unit before it becomes overheated. When the thermal protector shuts the
unit off, please:
o Switch off the unit and unplug the unit from the electrical outlet.
o Wait 40 min. for motor to cool down before starting another treatment.
o Make sure the air openings are not obstructed and air lter is clean.
• DO NOT operate where oxygen is being administered in a closed
environment such as an oxygen tent.

6
WARNING (cont.)
• To avoid EMI/RFI:
a. DO NOT turn on or use hand-held personal electronic
communication devices such as cellular phones, walkie-talkies and
CB radios while the compressor is turned on.
b. DO NOT operate the compressor close to any nearby transmitters
(radio, television, microwave, etc.).
c. Be aware that adding accessories or components or modifying the
compressor may make it more susceptible to EMI/RFI.
• NEVER block air openings of the main unit or place it where the air
openings may be obstructed.
• NEVER drop or insert any object into any openings.
• DO NOT wrap cord around the appliance.
• NEVER allow the power supply cord to be pulled, jerked, strained,
twisted, or severely bent, especially at the plug connections. Damage
will occur at the high ex point of entry into the appliance, causing it to
rupture and short. Handle the cord carefully for longer life.
• Close supervision is necessary when this product is used by or near
children and physically or mentally impaired persons. NEVER use when
sleeping or drowsy.
• This product contains small parts that may present a choking hazard to
small children. The tubing also presents a strangulation hazard. Keep the
unit out of reach of small children.
WARNING: ALWAYS USE CLOSE ADULT SUPERVISION WHEN
ADMINISTERING TREATMENT TO A CHILD. DO NOT LEAVE CHILD
UNATTENDED DURING TREATMENT.
• Children under the age of 3 or any patient who is unable to use a
mouthpiece properly under supervision should use a mask.
• DO NOT place or store the product where it can fall or be knocked into a
bathtub, sink, water, or other liquid. DO NOT immerse or drop into water
or other liquid.
• DO NOT reach for a product that has fallen into water or other liquid.
Unplug immediately.
• ALWAYS disconnect the unit from the electrical outlet before cleaning.
• To reduce the risk of increased bacterial growth, infection, illness or
injury from contamination, thoroughly clean and dry all parts of tubing
and accessories and thoroughly dry any moisture or condensation in the
tubing at the end of every treatment, following the instructions on page
12.
• NEVER spray liquids onto the compressor housing. Fluid could
cause damage to the electrical compressor parts and could lead to a
malfunction. If uids enter the unit, return the product to an authorized
medical equipment service center for examination and repair.

7
WARNING (cont.)
• Disposable nebulizers are NOT dishwasher safe.
• Use a clean, damp cloth to wipe the exterior of the compressor housing.
• Cleaning the nebulizer after each treatment is not enough. The tubing
and accessories MUST also be regularly sterilized and disinfected
between treatments to prevent serious or fatal illness caused by
contamination.
GETTING STARTED
1. Check to ensure the following components of the nebulizer are enclosed:
• Compressor unit
• Tubing and accessories (see page 3for illustration of parts)
2. It is recommended to keep extra tubing, accessories and air lters
on hand at all times in case original parts become lost, damaged,
or soiled.
CAUTION
If you did not receive the components listed in this manual, please contact
the dealer where you purchased your nebulizer.
SETTING UP THE NEBULIZER COMPRESSOR AND NEBULIZER ACCESSORIES
CAUTION
Tubing and accessories are NOT sterile from package.
Prior to initial operation, the nebulizer should be thoroughly cleaned.
1. Wash hands with soap and warm water and dry completely with
a clean towel.
2. Place the compressor on a clean, dust-free, stable and at surface. Check
the lter monthly or every 10 – 12 treatments and replace if dirty, clogged,
or wet to ensure proper operation.
3. Make sure tubing and accessories have been cleaned and/or disinfected
before rst use and after last daily treatment. Refer to the Cleaning and
Disinfecting Tubing and Accessories section on page 12.
4. Remove the nebulizer cap by twisting counter-clockwise until it stops and
lift up (Figure 3-1). Be sure that the cone is put inside the bottom section
5. Fill nebulizer cup using eyedropper or syringe with prescribed medication.
Do not ll more than 5 ml per treatment (Figure 3-2).
6. Close the nebulizer cap and turn clockwise until it is tightened (Figure 3-3).

8
7. If using the mask (optional), press it directly into the nebulizer cap. (Figure 4)
8. If using the mouthpiece, attach it rmly into the nebulizer cap. The cap is
designed to t tightly (Figure 5).
Figure 3-1 Figure 3-2 Figure 3-3
Nebulizer Cap
Prescribed
Medication
Figure 4
Mask (optional)
Figure 5

9
9. Attach one end of the tubing rmly onto to the air outlet on the back of the
compressor unit. It is important that the tubing be pushed all the way onto the
air outlet. The tubing is designed to t tightly (Figure 6-1).
10. Firmly press the other end of the tubing onto the bottom of the nebulizer cup
(Figure 6-2).
11. Plug the power cord into an appropriate electrical outlet. (DO NOT use with
power strips or extension cords). Make sure at this stage, the power switch is
at “OFF” status.
12. Press power switch to “ON” status to begin your prescribed treatment.
(DO NOT run unattended). When treating children, adult supervision required.
13. When treatment is nished, shut off the unit and unplug it from the electrical
outlet.
WARNING!
• The exterior surfaces of the unit and the air outlet connector may become slightly
warm to the touch during use. Warm air can also be felt exiting the vents on the
sides of the case of the unit. This is normal.
• Never operate if this unit has a damaged cord or plug, has been dropped
in any way, immersed into water or if it does not work properly. Return it to a
service center for repair.
• If any abnormality occurs, discontinue use immediately until the unit has been
examined and repaired.
• Always unplug the product immediately after use.
• Never allow the power supply cord to be pulled, jerked, strained, twisted or
severely bent, especially at the plug connections. Damage will occur at the high
ex point of entry into the appliance, causing it to rupture and short. Handle the
cord carefully for longer life.
• Never block the air openings of the main unit or place it where the air openings
may be obstructed.
• Safety overload: DO NOT exceed 20 minutes of continuous operation.
Figure 6-1 Figure 6-2
Nebulizer
Air Outlet

10
OPERATING THE COMPRESSOR NEBULIZER
1. Take the power cord and plug into an electrical outlet. (Figure 7)
2. Locate the power switch on the top of the unit. Switch it to the “ON” position
as shown below (Fig. 8). Power switch will light up when on.
3. Check for moisture leakage near the nebulizer connections.
4. There are (3) ways to administer medication with this nebulizer. Consult with
your healthcare provider which option is right for you.
(A) Hold the air intake near the nose (Figure 9-1).
(B) If using a mask (optional), put the mask on the face (Figure 9-2).
(C) If using a mouthpiece, hold it in or near the mouth (Figure 9-3).
Nebulizer Unit Mask (optional) Mouthpiece
Figure 9-1 Figure 9-2 Figure 9-3
Figure 7
Figure 8
120V

11
5. Taking deep breaths in, inhale the liquid medication vapor.
6. When liquid medication is depleted, turn the power switch to “OFF” (Fig. 10).
CAUTION
The compressor is designed for intermittent use only.
For optimal performance, operate the unit for 20 minutes on,
then leave off for 40 minutes.
7. Unplug the power cord from the electrical outlet.
8. Detach the tubing and accessories from the compressor unit.
9. Clean nebulizer components before next treatment.
CLEANING
CLEANING THE NEBULIZER COMPONENTS AND ACCESSORIES:
1. Disconnect the tubing from the compressor and from the bottom of
the nebulizer cup.
2. If there is any moisture (condensation) in the tubing, let the compressor run
with the tubing only for 2 – 3 minutes. The warm air from the compressor
will dry out the tubing. Alternatively you can dry the tubing by removing it
from the compressor and hanging it up with the “ends down” to allow the
moisture or condensation to drain out and evaporate. Dampen a cloth with
warm water to wipe the exterior of the tubing.
3. Disassemble tubing end of the accessories.
4. Wash all parts with warm water and liquid dish soap. It is not necessary to
wash the tubing.
5. Rinse thoroughly with warm water and shake out water.
6. Air dry or hand dry nebulizer parts with a clean, lint free cloth. Reassemble
nebulizer when parts are dry and store. Make sure all components are
completely dry before storing.
Figure 10

12
7. You can also wash the reusable nebulizer (optional accessory) in the top
shelf of a dishwasher. Masks and disposable nebulizers cannot be washed
safely in a dishwasher. It is not necessary to wash the tubing. Place the
parts in a dishwasher basket and place the basket on the top rack of the
dishwasher. Remove and dry parts when the cycle is complete.
8. With proper care, all components of a disposable nebulizer kit should be
replaced every 2-4 weeks, and all components of a reusable nebulizer kit
should be replaced every 6 months.
CAUTION
Disposable nebulizers are NOT dishwasher safe!
CLEANING NEBULIZER COMPONENT:
1. Clean the nebulizer components and accessories as described in the
cleaning section. Every other treatment day, soak the parts except tubing
in a solution of one (1) part distilled white vinegar and three (3) parts hot tap
water for one (1) hour. You can substitute commercially available respiratory
equipment disinfectant for distilled white vinegar by following manufacturer’s
instructions for mixing.
2. Rinse all parts thoroughly with warm tap water and dry with a clean, lint-free
cloth. Discard vinegar solution when disinfecting is complete.
WARNING
Only one patient may use one set of tubing and accessories.
DO NOT share components with other patients.
CLEANING THE COMPRESSOR
1. Wipe daily with a damp cloth.
2. Do not use any powdered cleaners or soap pads, which may damage
the nish.

13
MAINTENANCE
NOTE
The following accessories and replacement parts are recommended
Accessories Part No.
Kit: Mouthpiece, Disposable Nebulizer Cup, Neb T,
6" Reservoir Tubing & 7' Tubing
NEB-ROSKT
Kit: Adult Mask, Disposable Nebulizer Cup & 7' Tubing NEB-ADLTM
Kit: Pediatric Mask, Disposable Nebulizer Cup & 7' Tubing NEB-PEDM
Kit: Mouthpiece, TruNeb Reusable Nebulizer Cup & 7' Tubing 50016
Air Filters (6) CIF-1128PK6
Nylon Carry Bag BAG-DINO
AIR FILTER:
• The air lter on the side panel of the compressor unit is bright white when
new. With use, it will turn gray, which means it is time to replace it. It must
be replaced immediately if it gets wet or becomes clogged.
• To replace the air lter, ensure the compressor is turned off.
FILTER CHANGE
1. DO NOT wash or clean the lter. ONLY use lters supplied by your
distributor and DO NOT operate without a lter.
2. Check the lter every 15 days. Change the lter when it is visibly dirty OR
every 30 days, whichever comes rst.
3. Changing procedure (Fig. 12):
a. Remove the lter cover by twisting counter-clockwise and pulling out.
b. Replace the used lter with a new one.
c. Replace the lter cover.
Figure 12
Air Filter Cover
Air Filter

14
CAUTION
DO NOT attempt to wash and reuse the air lter. DO NOT use substitute
lter material. Compressor damage may result.
NEBULIZER SPECIFICATIONS
Power AC 120V, 60Hz
Maximum Wattage 180VA
Power Consumption 1.5A
Medication Capacity 5ml
Particle Size (micron) 0.5μm ~ 5μm
MMAD 4μm
Sound Level Less than 60 dB at 1 meter
Average Nebulization Rate ≥0.2ml/min
Compressor Pressure Range 17.4 to 29 PSI (0.12 to 0.20 MPA)
Operating Pressure Range 8 to 13 PSI (0.05 to 0.07 MPA)
Liter Flow Range 4.0 ~ 8.0 LPM
Operating Temperature Range 10˚C to 40˚C (50˚F to 104˚F)
Operating Humidity Range 10 to 90% RH
Dry Storage Temperature Range -25˚C to 60˚C (-13˚F to 140˚F)
Dry Storage Humidity Range 10 to 95 % RH
Dimension (L x W x H) 4” x 11.4” x 5.2”
Weight 2.85 lbs (1.3 kg)
Standard Accessories Nebulizer, Air Tube, Mouthpiece, Child Mask,
Air Filters (5pcs)
Optional Accessories Adult mask, Reusable Nebulizer, Carry Bag
Warranty 5-year limited warranty

15
LIMITED WARRANTY
Compass Health Brands offers a limited ve (5) year warranty on the compressor
unit and six (6) months on accessories. We warrant that the compressor unit and
its parts will be free from defects in workmanship and materials for a period of
ve (5) years from the date of original purchase and thirty (30) days on tubing
and accessories. This warranty does not extend to failures resulting from
accident, misuse, abuse, alteration, use of unauthorized service, parts or
cleaning solutions, or failure to comply with the User’s Manual.
If the warranted equipment should fail during the warranty period, Compass
Health Brands, at our option, will repair or replace parts at issue, provided the
claim is bona de. It shall be the responsibility of the purchaser to pack and
return the equipment in a manner to avoid shipping damage. The shipment must
be prepaid to us. This warranty covers the cost of labor incurred in the removal
or replacement of the warranted component parts at us only.
SERVICE AND REPAIR
If you should have any questions about this nebulizer, please contact an
authorized Compass Health Brands dealer. Do not open or disassemble
the compressor unit at any time. This will void the warranty. If the unit is
malfunctioning, discontinue use immediately and return to the original provider
for
repair or replacement. Please dispose of this nebulizer in accordance with
local, municipal, state, and federal law of electronic devices.

ROSCOE DINOSAURIO
COMPRESOR NEBULIZADOR
Manual
MODELO: NEB-DINO
DINO-TRU
DINO-TRUWB
DINO-TRUWB-PB
Lea este manual antes de usar el nebulizador.
Guarde estas instrucciones para una referencia futura.

17
ÍNDICE
Página
1. Introducción...........................................18
2. Ilustración de piezas ....................................19
3. Precauciones y advertencias importantes de seguridad.....20 – 23
4. Cómo empezar ....................................24 – 26
5. Funcionamiento del nebulizador con compresor ..........27 – 28
6. Limpieza..........................................28 – 29
7. Mantenimiento .....................................29 – 30
8. Especicaciones .......................................31
9. Garantía limitada .......................................32
10. Servicio y reparación ....................................32
INTRODUCCIÓN
Gracias por adquirir el compresor nebulizador Roscoe Medical Dinosaur. Es un
dispositivo médico compacto diseñado para suministrar de manera eciente
medicamentos prescritos por un médico a los conductos broncopulmonares
y para cuidar su salud en la casa. Con el cuidado y uso apropiados, este
dispositivo le brindará muchos años de tratamiento conable.
Este producto se desarrolló para el tratamiento exitoso del asma, las alergias y otros
trastornos respiratorios. Crea una corriente de aire que viaja a través de un tubo
transparente al nebulizador. Cuando el aire ingresa en el nebulizador, convierte el
medicamento prescrito en una niebla de aerosol para facilitar su inhalación.
Su nebulizador con compresor debe ser utilizado bajo la supervisión de un médico
autorizado o terapeuta respiratorio. Le recomendamos que lea atentamente esta
guía para conocer las características de este producto. Evite el uso del producto
para cualquier otro propósito distinto del que está destinado a realizar.
Todos los derechos reservados
42_NEB-DINO_03 ©2018

18
ILUSTRACIÓN DE PIEZAS
UNIDAD DEL COMPRESOR DEL NEBULIZADOR
1. Compresor
2. Filtro de aire/ tapa del ltro de aire
3. Salida de aire
4. Interruptor de encendido
ILUSTRACIÓN DEL ENSAMBLAJE Y LOS ACCESORIOS DEL NEBULIZADOR
1. Tubos
2. Copa del nebulizador
3. Adaptador del nebulizador
4. Tapa del nebulizador
5. Boquilla
6. Máscara de niño
Figura 2
56
4
3
2
1
Figura 4
Tapa del nebulizador
Mascarilla (opcional)
3
2
1
4
Figure 1

19
SÍMBOLOS DE SEGURIDAD UTILIZADOS EN ESTE MANUAL
PELIGRO Indica una situación potencialmente peligrosa que,
Si no se evita, podría causar la muerte o lesiones graves.
ADVERTENCIA Indica una situación potencialmente peligrosa que, Si no se
evita, podría causar lesiones graves y daños al equipo.
PRECAUCIÓN
Indica una situación potencialmente peligrosa que,
Si no se evita, podría ocasionar lesiones leves o moderadas
al usuario o al paciente o daños al dispositivo u otra
propiedad.
ADVERTENCIA (solo para los EE. UU.):
EE. UU. La legislación federal de los Estados Unidos solo autoriza la venta
de estos dispositivos a través de un médico autorizado o bajo prescripción
médica. El dispositivo solo debe usarse bajo la constante supervisión de un
médico o facultativo matriculado.
Estos dispositivos se han probado e inspeccionado exhaustivamente para ase- gurar
un rendimiento y funcionamiento adecuados.
Las especicaciones que se incluyen en este manual estaban vigentes al mo- mento
de la publicación. Sin embargo, para garantizar las medidas de mejora continua,
se pueden realizar cambios en estas especicaciones en cualquier momento, sin
obligación por parte del fabricante.
PRECAUCIONES Y ADVERTENCIAS IMPORTANTES
DE SEGURIDAD
Es importante que lea todas las advertencias y el Manual del
usuario antes de usarlo. Use el producto solo para el fin previsto
según lo descrito en el Manual del usuario.
Su uso inadecuado puede dar lugar a una enfermedad o lesión
mortal, un tratamiento inadecuado o daños materiales.
NO intente operar este producto sin leer todas las instrucciones
cuidadosamente. Guarde este manual para futuras referencias.
SÍMBOLOS DE SEGURIDAD UTILIZADOS EN ESTE MANUAL
ADVERTENCIA
(solo para los EE. UU)
Indica una situación potencialmente peligrosa que, de no
evitarse, podría traer como resultado la muerte o lesiones
graves.
PELIGRO
INDICA UNA SITUACIÓN POTENCIALMENTE PELIGROSA
QUE, DE NO EVITARSE, PODRÍA CAUSAR LESIONES
GRAVES Y DAÑOS AL EQUIPO.

20
ADVERTENCIA
Para reducir el riesgo de lesiones graves o mortales por electrocución, incendio,
quemaduras, así como el riesgo de daños o mal funcionamiento de la unidad:
• Antes de usar, verique la etiqueta del número de serie en la parte inferior
del compresor para asegurarse de que el voltaje y la corriente indicados
en la unidad corresponden con el voltaje y a la corriente que están
disponibles. NO sobrecargue los tomacorrientes ni use la unidad con
supresores de picos o cables de extensión.
• NO use este producto con un convertidor de CC a CA ni con un voltaje o
una frecuencia de CA distintos a los especicados.
• Antes de usar, revise los tubos y los accesorios para realizar un ensamblaje
correcto. Todas las piezas deben estar jas en su lugar. El uso de tubos
y accesorios ensamblados incorrectamente podría disminuir o impedir el
suministro adecuado de medicamentos, y la ecacia del tratamiento.
• Los tubos y los accesorios solamente deben utilizarse para un solo
paciente. NO comparta sus tubos ni los accesorios con otros pacientes.
• NUNCA use los tubos con una boquilla obstruida. Si la boquilla está
obstruida, el vapor del aerosol se reducirá, se alterará o se detendrá, lo
que disminuirá o eliminará la ecacia del tratamiento. Si se produce una
obstrucción, reemplace la boquilla por una del mismo modelo.
SUSPENDA EL USO INMEDIATAMENTE SI ALGUNA DE LAS PIEZAS
DE LA CARCASA DEL MOTOR SE DESPRENDE O SE ROMPE, Y
EXPONE EL MOTOR U OTROS COMPONENTES ELÉCTRICOS.
• NO abra ni desarme el compresor. Encargue todo tipo de mantenimiento a
un distribuidor autorizado de Compass Health Brands.
• SIEMPRE desenchufe el producto inmediatamente después de cada
uso y manténgalo desenchufado cuando no esté en uso. NO utilice este
producto sin supervisión.
• NUNCA utilice este producto si tiene un cable o enchufe dañado; si
no funciona correctamente o se observa algún tipo de anomalía; si se
ha caído de algún modo o se lo ha sumergido en agua; o si ha estado
expuesto a algún líquido dentro de la caja. Devuélvalo al distribuidor
autorizado de Compass Health Brands para su reparación o reemplazo.
• NO use el nebulizador mientras conduce un vehículo o mientras se baña.
• Mantenga todos los cables eléctricos alejados de las supercies calientes.
NO utilice ni guarde la unidad bajo la luz directa del sol, expuesta a altas
temperaturas o humedad.
• El motor del compresor tiene un protector térmico que apagará la unidad
antes de que se sobrecaliente. Cuando el protector térmico apague la
unidad, haga lo siguiente:
o Apague la unidad y desenchúfela del tomacorriente.
o Antes de iniciar otro tratamiento, espere 40 min. hasta que el motor se
enfríe.
o Asegúrese de que las aberturas de aire no estén obstruidas y de que el
ltro de aire esté limpio.
This manual suits for next models
4
Table of contents
Languages:
Other Roscoe Medical Respiratory Product manuals
Popular Respiratory Product manuals by other brands

Sunset Healthcare
Sunset Healthcare NEB200 instructions

Xupermask
Xupermask XUPERFAB user manual

Respironics
Respironics Profile Lite 1002375 manual

SAFEYEAR
SAFEYEAR GM8000 quick start guide

Weinmann
Weinmann JOYCE Full Face vented Description of the equipment and instructions for use

Dr.Frei
Dr.Frei TURBO LEX user manual